Account Options

How to Use Google My Maps to Plan a Trip (Ultimate Guide)

Note: Some of the links in this post may be affiliate links. This means if you click on the link and purchase the item, I will receive a commission at no additional cost to you. More details are here .

I love a good map. I’ve got maps hanging on my walls. I go to the bookstore to read maps. Whenever I navigate my way home using only a map, I feel like I must have some innate bushcraft skills. And if you’ve read my posts about traveling in Maine , you’re probably sick of me talking about the DeLorme Atlas by now.
But while reading paper maps will always inspire a sense of get-up-and-go adventure for me, I’m not totally opposed to using tech for planning my trips and navigating on the ground.
And one of my favorite techy solutions? A secret little trip planner called Google My Maps, buried inside of everyone’s favorite map tool.
Google My Maps lets you create shareable custom maps with multiple layers, plus location pins with icons and notes. It’s a great way to brainstorm travel plans or create a trip itinerary from a desktop. And since the map can be viewed in the Google Maps app, you can use it to navigate on the go.
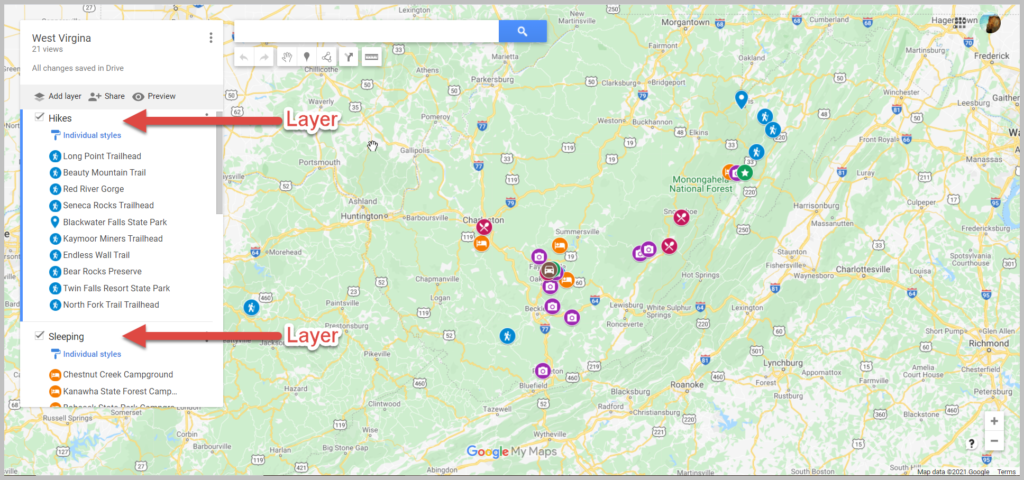
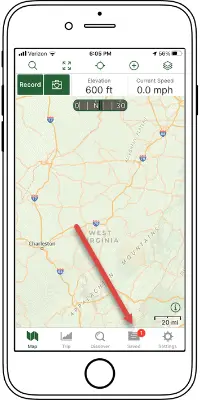
To give you an example of what this post will show you how to do, here’s one of the custom Google Maps I’ve created for a trip.
Keep reading for an overview of how to use Google My Maps to plan a trip, plus a video tutorial of how to set it up—all updated in 2023. I’ll also share answers to commonly asked questions and some lesser known tips to help you get the most out of this tool.
A quick note: Creating a custom map in Google My Maps is distinct from Google Lists of saved places. Check out our Google My Maps vs Lists comparison to see all the differences and our full guide to using Google Maps Lists .
8 Top Google My Maps Features
(AKA Why It’s Awesome)
Google My Maps allows you to see your trip itinerary.
This is so helpful, especially if you’re a visual person or enjoy using maps. But even if you’re not, it’s still really useful to see where everything is in relation to each other as you plan your trip, vacation, or holiday because it helps you be realistic about your plans.
It connects with other Google apps.
Setting aside my (ahem, very rational) fear that they may take over the world soon, I love all things Google. My Maps stores a copy of the map in whatever Google Drive account you’re using. (Am I the only one who has six of these?) So if you like to create Google Docs or folders to store trip planning information, documents, photos, or itineraries, it’s nice to have your map easily accessible in the same folder.
You get additional location information since it’s part of Google Maps.
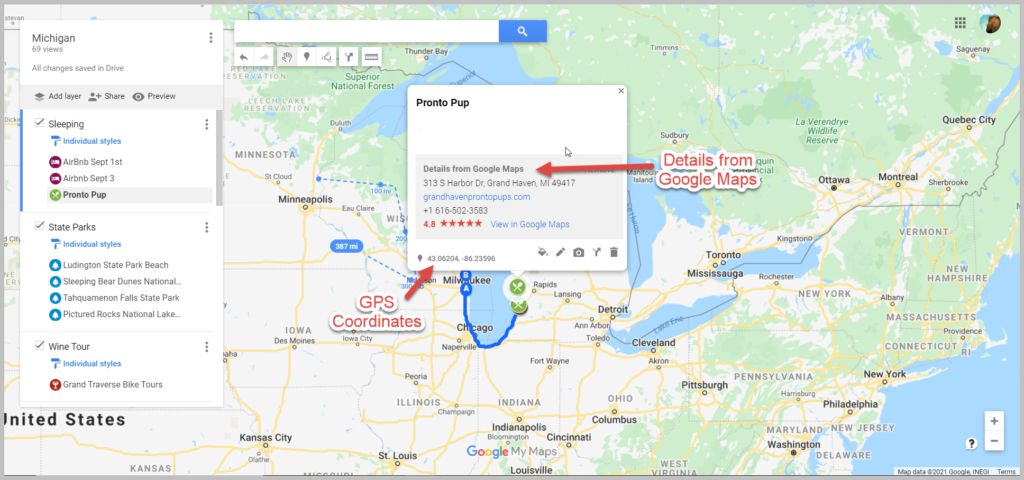
If a location is on Google, you can see their website, phone number, address, reviews, and website when you add it to your custom map. (Note that you can’t see this information when clicking on your saved pin from the Google Maps app, but you can from desktop.)
You can add your own extra notes and photos.
Customize your map even more by adding notes, photos, or videos. Use the notes during planning to add website, hours, or tips. If I hear about the location from a particular website, I usually add that link and what was noted in the article about the location (e.g., it’s a great sunset spot, which dish on the menu is recommended) so I can reference it later.
You can view your route by creating a layer with directions.
When I traveled to Burlington, Vermont, I wanted to see the length of the bike trail on the map, so I used the directions feature to show the whole route. (Check out the Burlington travel guide for an example of the travel map I created that includes the bike path route.) And while I haven’t done this yet, you could also use Google My Maps to plan a road trip itinerary for a longer adventure.
Caveat: As I’ll discuss later, you can’t use directions layers to get turn-by-turn directions (but I mention an alternative below). For this reason, I only use these layers to visualize my route.
It’s highly customizable.
Don’t mind me while I swoon over the color coding and organization options over here. Use custom icons, layers, and colors so it’s easy to see what things are at a glance. For example, you can give different locations individual styles: a coffee cup icon for cafes, a bed icon for hotels, and a swimming icon for beaches. You can also use layers in many different ways, such as one layer for each day of your trip or one layer for each category (like dining, lodging, and things to do).
In-depth planning on your computer. Easy, on-the-go access from your phone.
While you can’t edit the maps from the Google Maps app on iPhone or Android, you (and anyone you’ve shared them with) can view them. You can click on icons and see your notes, as well as navigate to those locations.
Note that there used to be a dedicated My Maps app on Android, but this has been deprecated.
It’s easy to share it with a friend or with the world.
If you’re planning a trip with other people, it’s easy to share the map with others . And if it’s something you want to make available to everyone (like I do on my travel guide posts), just change the privacy setting and share the link or embed it on a website.
3 Ways to Use Google My Maps
Brainstorm and store ideas for future “maybe” trips.
I often come across a really interesting hotel, restaurant, or fun thing to do in destinations I want to travel to in the future, and I want to make sure I don’t forget about them. I have so many bookmarks in so many places (Pinterest, Facebook, Instagram), but Google My Maps is the place I’ve started storing ideas for future trips.
Plan your trip itinerary.
Want to use Google Maps for route planning? When you’re ready to plan an upcoming trip, plot it out visually by using Google My Maps to create your itinerary. If you like structured itineraries, you can easily create a detailed day-to-day plan.
Or, you can use a looser itinerary structure like we usually do by adding all the places you might like to go.
For example, on a day trip to NYC, we added tons of places to eat on the map (thank you, Tiktok). As we were walking around doing other activities and started to get hungry, we were able to easily see which saved restaurants were closest to us.
Navigate on the go.
Whether you’re using your map loosely for ideas or for a structured itinerary, you can pull it up on your phone anytime and get directions to your next location.
Not sure what you want to do today, or want to see what the closest restaurant from your list is for dinner? Pop into your custom map to jog your memory from the notes you made or to get directions to your next location.
Recommended: Need an organized backpack to take on the road? Check out my favorite luggage for camping, road trips, and flying: the Cotopaxi Nazca 24L and Allpa 35L !
How to Use Google My Maps to Plan a Trip
How to create a new custom map.
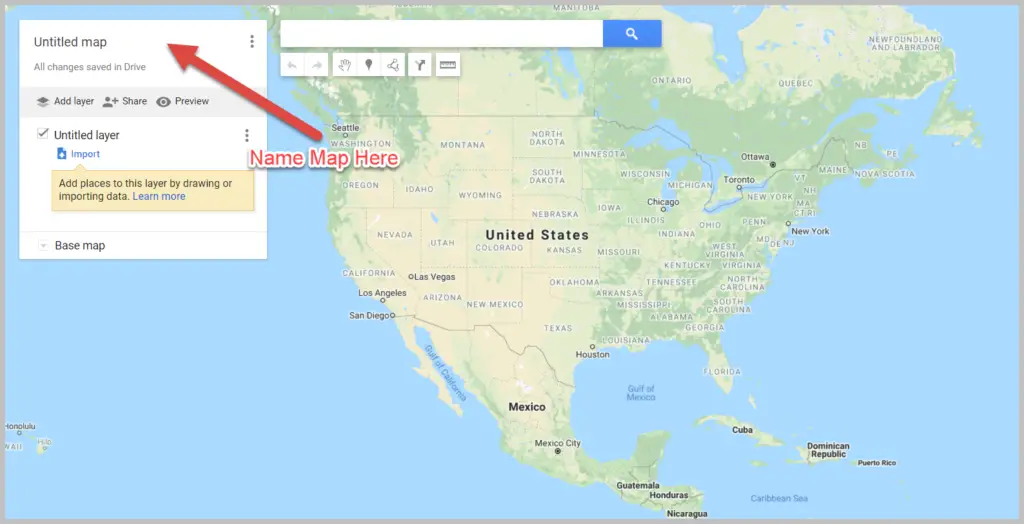
Go to Google My Maps from your desktop browser . Check the Google icon in the top right corner to make sure you’re using the Google account you want to. Click “Create A New Map” and a window will open with a blank map. To give your map a name and description , click the map name (“Untitled Map”).

You can also change the color and style of the base map if desired. At the bottom of the layer panel on the left, click the arrow next to “Base Map.” You’ll get a window with nine options, including terrain, light political (a very light version of the standard Google Maps), satellite, and some different colored versions. Note that changing the base map style on desktop won’t change anything when viewing on mobile in Google Maps.
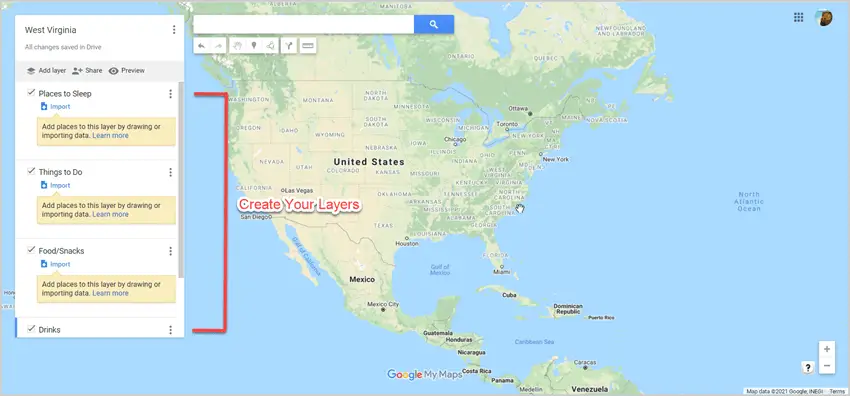
How to Add and Edit Layers
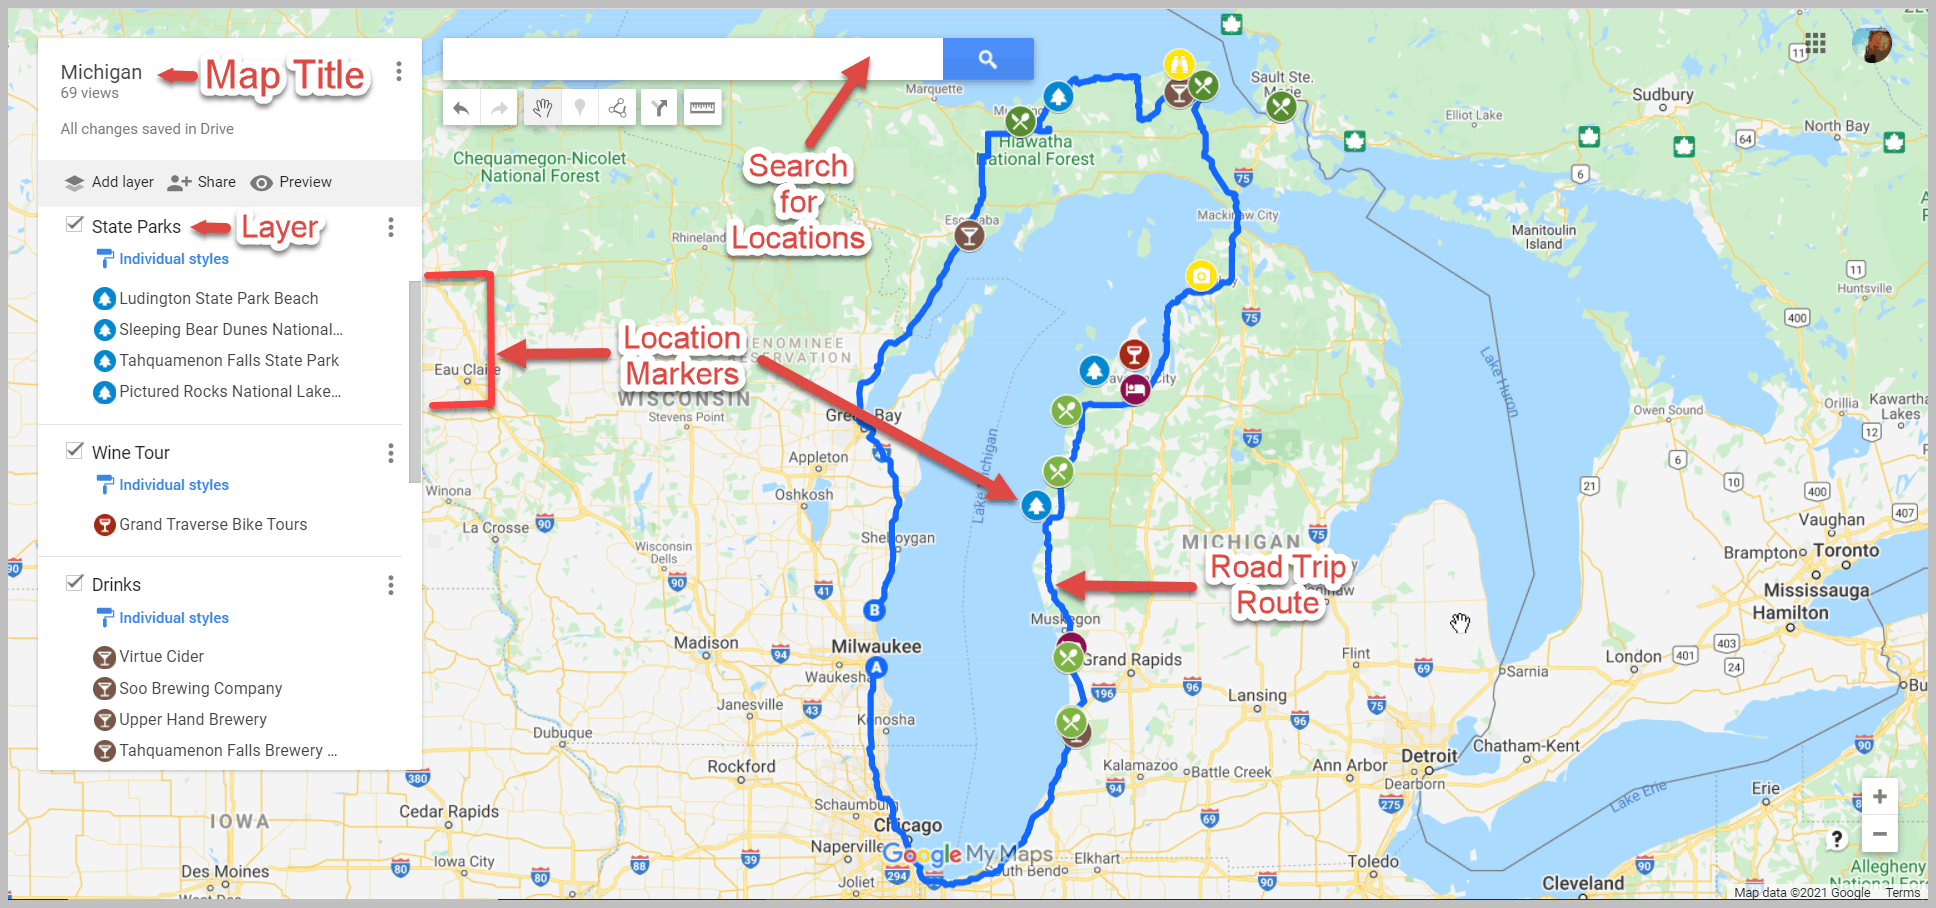
When you create a new map, the first layer will already be created, so you’ll probably want to rename it. To give your first layer a title , click directly on the title name like you did with the map name, or click the 3 dots next to “Untitled Layer” and then click “Rename Layer.” Clicking these 3 dots next to a layer title is also how you can delete a layer if you add one accidentally or change your mind. In this example, I’m changing my first layer to “dining” and will add all restaurants to this layer.
You can use layers any way you want to, or simply stick to one layer if you don’t need multiple. To add new layers , simply click “Add Layer” in the gray section below the map title and description.
To move a pin between layers , click the pin on the layer and hold down the mouse, and then drag it to the desired layer.

How to Add Location Pins
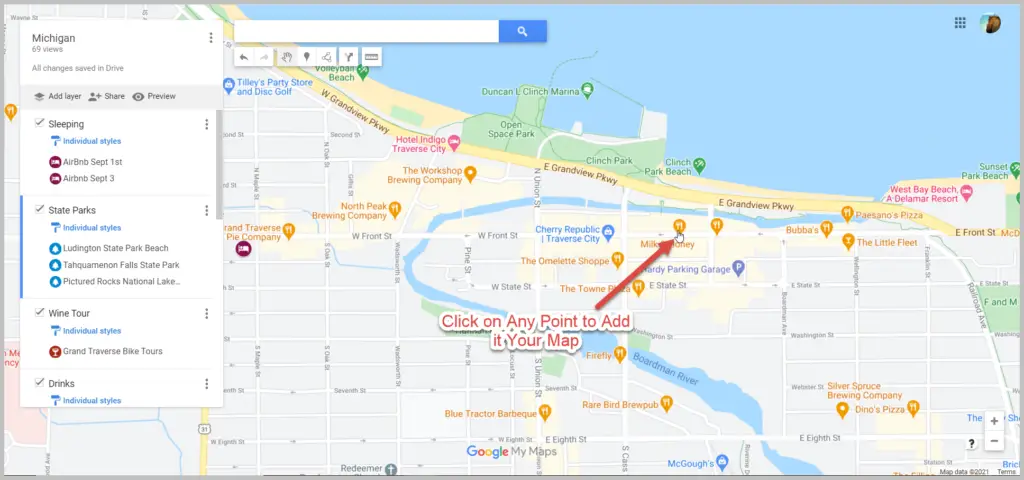
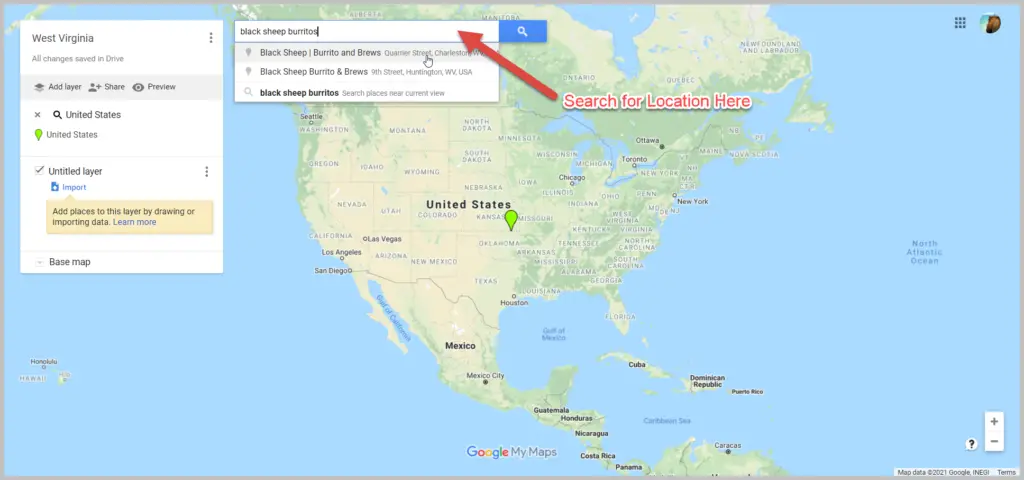
There are various ways to add location pins to a layer. First, make sure the correct layer is chosen by clicking anywhere in the white area on the layer. You’ll see which layer is selected by looking for the blue bar on the left of the layer.
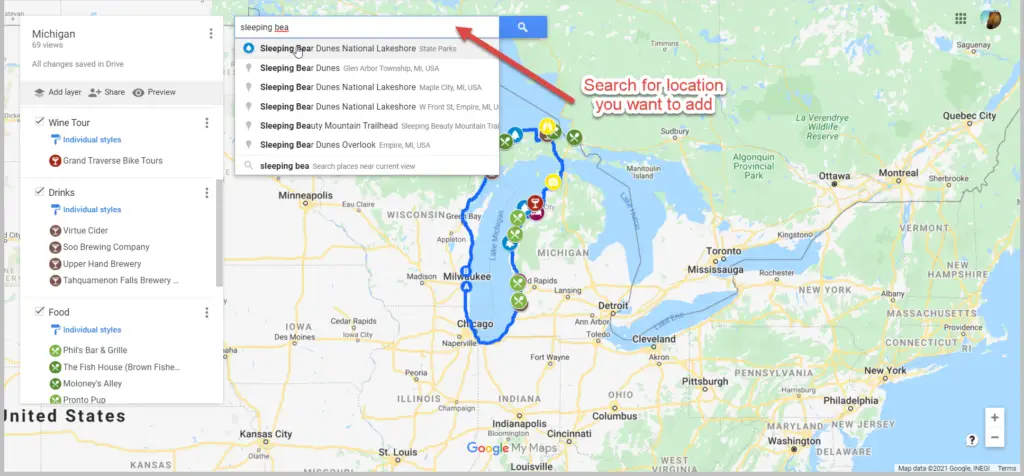
- In the map search bar, type either a place name or an address. Click “Add to Map” to add a pin for this location . This is how I add most pins.
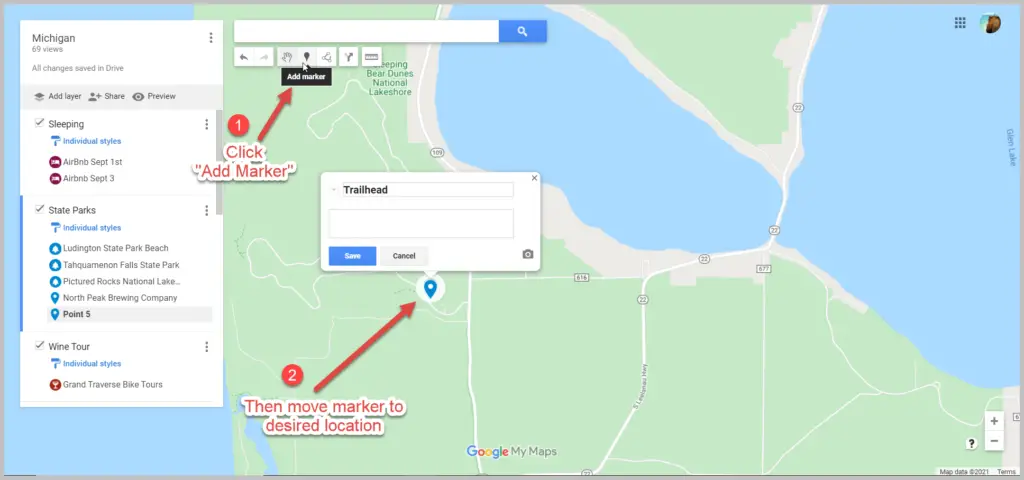
- If you don’t need an exact location or don’t have an address , you can click the pin marker button below the map search bar (“Add Marker”). It will turn your mouse into a T and you can click anywhere on the map to add a blank pin. You’ll immediately be prompted to add the pin title and description.
- If you’re dealing with very remote locations (or you just like geeky map stuff), you can also use latitude and longitude coordinates in the search bar.
To delete a pin , simply click on it and click the trash icon.

A few tips and best practices for adding pins:
- If the place you’re searching for does not have a listing on Google, you’ll have to use an address. One thing to note is that sometimes Google Maps listings aren’t correct or don’t take you to the right place, so you may want to double check the location if you’re not using a street address to add the pin (especially if it’s a small business without a website).
- I have also found that hiking trail heads are frequently on Google Maps, but they’re not always correct in terms of navigating there by car. I usually add them to my map to get a basic idea of where they are while planning, but I use a paper map or atlas to find them while traveling.
How to Customize Location Pins
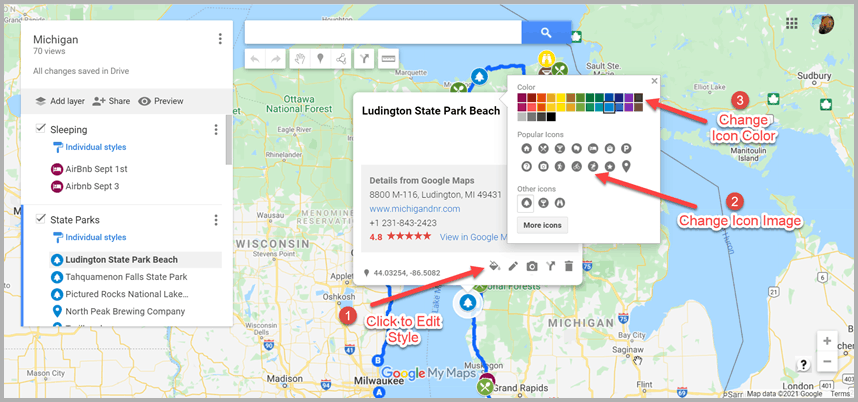
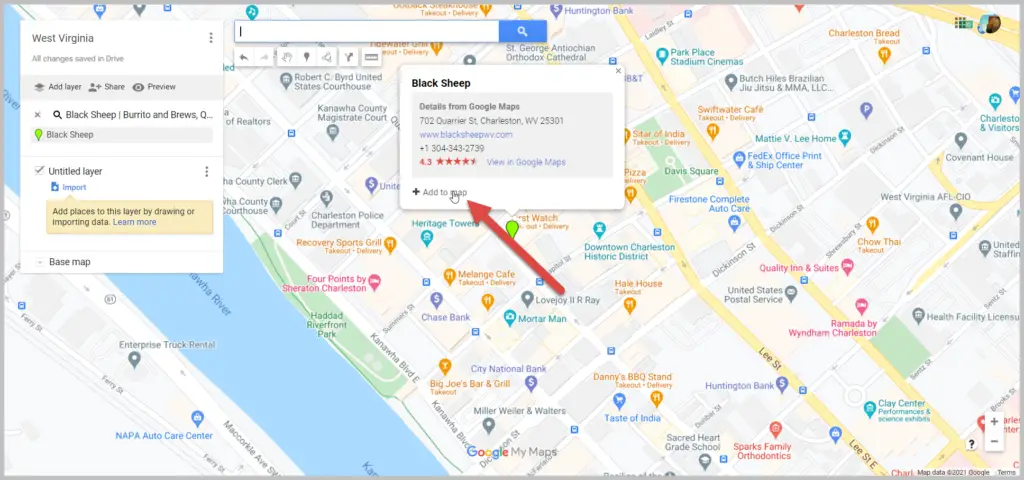
To change the title and add notes to your listing, click on the pin on the map, and then click the pencil icon (“Edit”).
To change the color and icon of the pin , click the paint bucket icon (from the pin itself or directly in the layer). Click “More Icons” to view all the icon options. You can color code by type of activity, by layer, or any way that makes sense to you.
To add photos or videos to a pin , click on the pin on the map, and then click the camera icon (“Add Image or Video”). This is another way to make your map interactive, especially after you’ve visited a location and want to share it with others.

How to Add A Directions Layer
I find that directions layers are helpful for showing the route of a walking tour, bike path, or road trip you want to take, but I don’t find them useful for directions while traveling since I can simply use the maps app to navigate.
I use directions layers whenever I want to show an entire route on a map , rather than a specific location. Think of this as the 2024 version of mapping out a trip with AAA paper maps and a highlighter (if you’re old enough to remember).
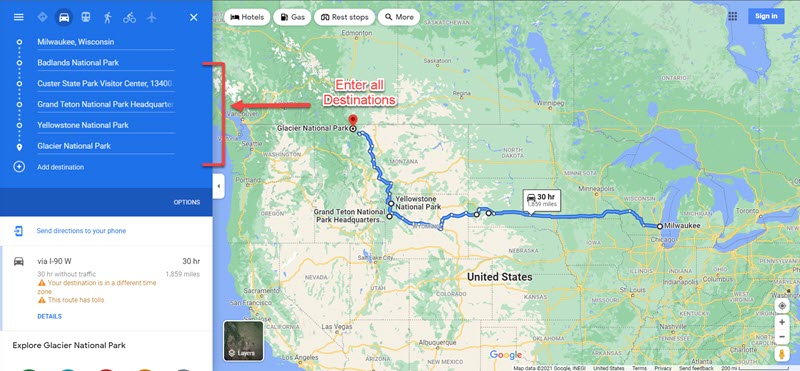
Click the arrow icon underneath the search bar, which will create a new directions layer. On the legend, click “Driving” if you want to change this to walking or biking directions. Add a location name or address to Points A and B in the legend. If you find that the pins are not exactly where they should be, you can drag the points on the map.
Continue adding points by clicking “Add Destination” on the map. You can either type the information into the legend or hover your mouse to a spot on the map and double click it. (This is especially useful if you’re tracing a route on something like a bike path or hiking trail that won’t have an address.)
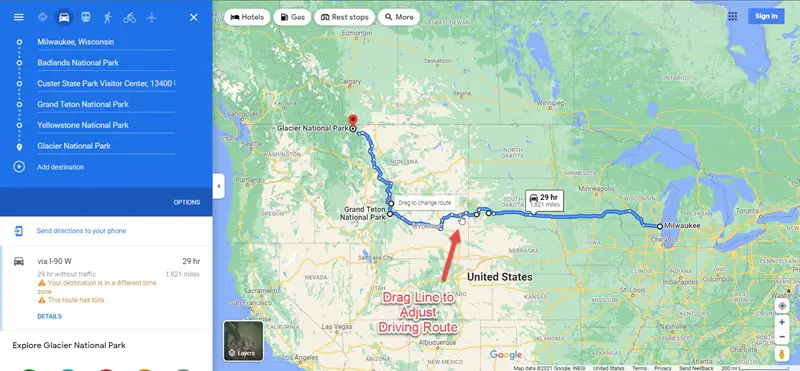
Rearrange the order by dragging the items around in the legend. Just like altering directions on Google Maps navigation, you can click on part of the route and drag it to a different road if you want to change part of the route after it is complete.
If you need to access the directions so you can see the distance of your route or the time it will take, click the three dots on the layer and click “Step-by-Step Directions.” Note that you can’t actually use this to get turn-by-turn directions in Google Maps.

How to Share A Google My Map
There are several options for sharing your Google Maps trip plan.
Open up your map, then click the share button in the gray bar above your layers. To allow others to view your map (which includes embedding on your website), click “change” under the section “Who has access.” For embedding, you will need to make this setting public.
Otherwise, if you want to allow others to edit your map, add their email address in the “invite people” section.

How to View Your Custom Map in Google Maps (iPhone or Android)
Open Google Maps and go to the Saved icon at the bottom. Scroll to the bottom of this screen and click “Maps.” Choose the My Map you want to view. The layers with your custom icons will now be visible on your Google Map. You can click on any pin to view your details (such as description or photos), as well as to navigate there.
To close a map, click on a pin and then click “View Map Legend.” There, you can click the Close icon.
From the Map Legend, you can also toggle layers on and off, and then backing out to the main map (don’t click Close—just the back arrow or back button).
How to Navigate with a Custom My Map (iPhone or Android)
To navigate to one of your pins, open your map, find the pin for where you want to go, click it, and then click “directions.” When you do this, you won’t see your custom map anymore but will be looking at the regular navigation of Google Maps.
You can’t use a My Maps “directions layer” for navigation. If you’re looking for that functionality, I recommend just creating a route in Google Maps and sending it to your phone (or sharing with others). See here for more details.
How to Import Locations from Google Sheets, CSV, or Excel
Importing locations to a My Maps layer can be helpful in a few scenarios:
- You have a significant amount of locations to add to your layer
- Your data is already in the form of a spreadsheet
- You want additional fields included besides the default Name and Description
- You want to create groupings of pins (for example, a list of 50 restaurants could have a column for “Cuisine,” which will give you the option to group and style the pins by cuisine)
The process is simple, and you can import a variety of file types, including CSV, Excel (XLSX), or directly from Google Sheets. There are also special file formats that import map data from other programs, but this section is focused on spreadsheet-type files that you create and format.
Create a spreadsheet with the desired column headers. At a minimum, you need place names and either addresses or latitude-longitude information .
If you want to group your pins by some type of categorization, you should include that as a column. Other columns you could include: website, phone number, description, or notes. While Google Sheets allows you to include photos in a cell, Google My Maps will not import photos in this way (it will include the column as a field, but will be blank).
Once your spreadsheet file is ready, click “Import” on a blank layer (if your map already has layers, you will need to add a new layer to see this option). If uploading a CSV or XLSX, do this from the Upload tab. If using a Google Sheet, click the Google Drive tab and choose your file.
Choose which column has location data (address or latitude-longitude) and click “Continue.” Choose the location name column next and click “Finish.”
To change the icons individually, click “Uniform Style” next to the paintbrush on your layer. Under “Group Places By,” choose “Individual Styles.”
To change styles by a category column (such as Cuisine), click the link next to the paintbrush and choose to group places by the desired column. You can then give each category its own color or icon.
You can manually add new pins to this layer, and they will include all the fields you imported from the spreadsheet columns.
You can also add more items to your spreadsheet, and import this new data. Click the three dots on your layer. Under “Reimport and Merge,” click “Add More Items” and choose your file. It will add the new rows to your layer.
How to Import a Route from Google Maps Timeline History (KML) or GPS Data From a Fitness App (GPX)
Google My Maps can import routes and locations you’ve already traveled to via special file types that are very easy to download from certain apps. This could be useful if you want to share a walking, biking, or driving route that you’ve taken without having to recreate it on a directions layer.
Note that this only works as well as the GPS satellites were able to track your location while you were traveling.
If there are a lot of clouds, dense forest, buildings, or anything else blocking the GPS signal, your tracked route will be much less precise. I’ve noticed that Google Maps sometimes has my route showing somewhere I couldn’t have walked or driven.
If you have your location history turned on in Google Maps, you can download a KML file from a trip, which will include the route traveled and location pins for any stops. Sometimes it misses a location name or adds a pin in the wrong place, but overall it’s pretty good.
Go to your Google Maps Timeline and locate the day you want to export. Click on it, and you should now see your route highlighted along with any stops you made. Now click the gear icon on the bottom of your map, and click “Export this day to KML.” Go to your My Map and on a new layer, click “Import.” Choose the KML file you just downloaded. You can now edit each portion as needed—changing the color and thickness of the route line, changing the location icons, as well as adjusting the route where desired.
If you have other apps that track your location, such as fitness apps, you may be able to download a GPX file that shows the route you took. The instructions for doing this will vary from app to app, but I was able to easily find it in Samsung Health by looking at the detail of a particular workout/walk and clicking the three dots to download a GPX. The import process to Google My Maps is the same as above.
With both methods, you can make adjustments to points/stops along the way or even add more pins. With the Google Maps KML file, you can also adjust your route by moving the small white dots.
Google My Maps Tutorial
Here’s a walk through video to show you how to use Google Maps to plan a trip, along with several of my own Google My Maps itinerary examples. Coming soon: a 2024 update!
Google My Maps Examples
Here are a few more examples of My Maps I’ve created for sharing recommendations, trip ideas, and actual vacation planning.

Google My Maps FAQs and Tips
As great as Google My Maps is for planning a trip, there are some limitations to using it. Lots of questions have also come up about more specific uses and ways to use its features. Thanks to all the readers who have asked or shared tips in the comments as I’m always looking to make this a more robust guide. I’ve organized the questions and tips here since it makes it easier than scrolling through the comments.
How many layers can you add to a map?
Google My Maps limits you to 10 layers. If you are planning a longer road trip and want to create a layer for each day, this limitation may prove frustrating.
Here are a couple of workaround ideas: You can create 2 maps, and have the entire master route as 1 layer on each (showing the very basic route for all 12 days—say from city to city) as a reference. Then build individual layers for each day. As a second option, you could add multiple days to 1 layer and change the titles to start with the day they correspond to (so it would be “1 – Name of Place” instead of just “Name of Place.”) However, this option may not be ideal since you can’t see the titles until you click when you’re on the phone.
How many location pins can you add to each layer?
You can add up to 2,000 pins per layer, and the entire map cannot exceed 10,000 lines, shapes, or places total. I haven’t tested the limits, and it’s possible adding this amount of items could slow things down. My guess is that most travelers wouldn’t need anything so large, but it is possible according to Google .
Are custom Google My Maps available offline?
No, but keep reading for a workaround and alternative.
One of the biggest complaints about Google My Maps is that you can’t download your custom map and pins to use offline, unlike the rest of Google Maps.
However, I have been able to use it in areas with spotty reception. I pulled the map up when I did have reception, and I left it running in the background. It would stay loaded in the app and I was able to pull it up to look at it later when I was out of reception. I’m not sure I would rely on this as a surefire workaround, but it can work in a pinch.
Another alternative, especially if you’ll be traveling in another country where you’ll be completely offline, is to use Google Maps Lists, which can be edited from desktop or your phone but don’t offer the option for separate layers, unique icons, or adding photos.
Is there an app for Google My Maps?
There is no separate Google My Maps app, but you can view your maps within Google Maps. Just make sure you’re signed into the same account, and all your maps will sync.
(There used to be a dedicated My Maps app on Android, but this was deprecated in 2021.)
Can you create or edit maps from your phone?
No, the maps cannot be edited from the Google Maps app. Google My Maps can only be created or edited from the desktop version of the site. This is another huge advantage Google Lists has over Google My Maps because Lists allow you to add new places or entire lists from any device—iPhone, Android, tablet, laptop, or desktop.
Is there a bridge height filter?
No. For RVers and others who need to plan ahead for height limitations, there is no bridge height filter available in Google Maps. Since I haven’t had to use this feature myself, I am not confident in an alternative to recommend. However, from a bit of digging around, there are some apps and GPS units for truckers that may be a good place to start looking if you have an oversize vehicle.
What is the difference between Google Maps Lists and Google My Maps?
They both allow you to create custom maps with pins, but there are some key differences, such as offline access, layer capabilities, customizable pins, and creating/editing within the app. Check out the details on how Google My Maps compares to Lists (including a features comparison table).
How many stops can you add on a directions layer?
You can only add 10 stops per directions layer. This is also the maximum number of stops you can add for navigation in Google Maps. As some readers have pointed out, this can be limiting when you want to use this feature for a long road trip.
Can you use the directions layers on your phone for navigation purposes?
No, you cannot create a directions layer and then access those turn-by-turn directions for navigation in the Google Maps app.
So…are directions layers totally useless? What’s the point of having a Driving Directions layer in My Maps?
Personally, I still like to use these layers, but only to show a route for my very visual brain, rather than to actually create custom directions.
Can you send a custom created route (layer) to someone else so that the other person will take that specific driving route on google maps?
No, you can’t do this from My Maps, but there’s a workaround I can suggest.
Forget My Maps, and use Google Maps from desktop or mobile to plot a route. You can add up to 10 stops, and then you will be able to share your custom directions.
From desktop, there’s an extra step in first sending the directions to your phone. If you’ve created the directions in the mobile app or once you have them pulled up there, you can share them with anyone by clicking the 3 dots next to your list of locations (sharing must be done before clicking “Start”—if you’re already in the navigation, you need to back out of it to share). When you share, it will list all the steps as well as send a link for the other person to open the directions in Google Maps directly.
An important caveat to sharing custom routes: Google Maps will reroute the directions as it normally does according to current traffic at the time of driving, so this method cannot be relied upon if you’ve mapped a specific route for bridge clearances. As a workaround, you can add “stops” on the desired interstate (zoom in and add this literally on the road itself so navigation doesn’t try to take you off an exit), which will force Google Maps to take the driver that way. This is what I do when driving south from Connecticut to PA because Google Maps always wants me to take its beloved George Washington Bridge and I always don’t want to. I add a stop to force my route across the Tappan Zee Bridge. However, I’m not sure I would rely on this workaround as a sole method for RVs or truckers.
Can you see how much time the directions will take?
Yes, on desktop you can view the details if you want to know the distance or how long a route will take. To view distance and time for a directions layer, click the 3 dots on the laye, then click Step-by-Step Directions.
Of course, this doesn’t really help when you want to get this information on your phone or use the directions for navigation. As mentioned elsewhere, the “directions” layer functions best as a way to visualize a route. If you need turn-by-turn directions, see the steps mentioned above to save and send directions in Google Maps.
This post was originally published on July 27, 2017 and has been updated in May 2023.

Travel Photographer | FAA Certified Drone Pilot
Naomi is the coffee-loving, crazy-about-Latin-America writer and photographer behind everything here. She's guided by curiosity and a belief that every place has a story to tell–whether it’s through the intricate details of nature, history that has shaped a culture, or the people who call a place home. Learn More
How to use Google My Maps to plan your trip
How to set up, share and use Google’s customized map view

- Quick steps
Tools and requirements
- How to use Google My Maps
Whether you’re planning a holiday or a day trip, having the ability to plan your trip with more granularity is a real boon, so it’s worth learning how to use Google My Maps to help you get organized.
Google Maps is undoubtedly one of the best wayfinding software available, but there are some features Google likes to split off into separate services.
One such example is the ability to customize your maps, which is currently housed under Google My Maps , allowing you to plan custom routes, set multiple markers, and add details like notes, colored labels, and more.
For example, the map above shows a map of some of the most popular destinations in Paris, with added detail in the form of summaries and different layers for different types of locations.
Below, we’ve included instructions on how to do a basic set-up, as well as some optional steps to really make your map sing.
Steps for how to use Google My Maps
- Head to Google My Maps and log in to your Google account
- Create and name a new map
- Input or import your destinations
- Customize tags, labels, and imagery
- Google account
- Desktop browser
Step by step guide for how to use Google My Maps
1. head to google my maps and create a map.

First, open Google My Maps and sign in to your Google account. In the top left hand corner of the screen, you’ll see a button titled “Create a new pin". Click this , then name your map by clicking the map title field in the index on the left side of the screen.
2. Add pins for your destinations

Next, you'll want to add pins for the destinations on your map. You can do this either by using the search bar as you would on the standard Google Maps, or by pressing the pin logo, which will change your mouse into a crosshair and allow you to manually place your destination.
3. Label and describe the destinations

A box will appear, in which you can type your own label for the location (or use whatever comes up in the text box search, if you used that method), add a short description or any notes, and even add media to the location.
This media can either be uploaded from your device, from a URL, from your Google Drive, from Google Image search results, or from YouTube.
4. (Optional) Add lines or directions

If you're traveling by foot, car or by bike, you can press the three circles connected by dots below the search bar (pictured above) to draw lines or directions between your destinations . You can choose to type the destinations directly into the index on the left side of the page or simply click on existing pins to connect them .
5. (Optional) Customize your map

There are lots of ways to make your map bright, colorful, and detailed.
By clicking the paint can icon on a pin or in the index bar next to the pin's name in the index, you can change the pin color or icon.
By clicking the dropdown menu titled 'Base map' at the bottom of the index, you can change the topography of your map.
You can also separate your pins out into layers by clicking 'add layer', allowing you to check or uncheck the visibility of given layers and separate destinations by any filter you might need; what day of the trip you'll be visiting, what kind of location they are, etc.
6. (Optional) Share and/or publish your map

When your map is ready, you can either share it with your families or travel buddies, or you can publish it online for your blog, social media, or project.
Clicking share will bring up a window with the sharing options, allowing you to toggle your map's visibility, searchability, and if your details are attached to the map, as well as its share link and an option to share on drive.
To see what it will look like to non-collaborators, click the preview button.
Get daily insight, inspiration and deals in your inbox
Get the hottest deals available in your inbox plus news, reviews, opinion, analysis and more from the TechRadar team.

Josephine Watson ( @JosieWatson ) is TechRadar's Managing Editor - Lifestyle. Josephine has previously written on a variety of topics, from pop culture to gaming and even the energy industry, joining TechRadar to support general site management. She is a smart home nerd, as well as an advocate for internet safety and education, and has also made a point of using her position to fight for progression in the treatment of diversity and inclusion, mental health, and neurodiversity in corporate settings. Generally, you'll find her watching Disney movies, playing on her Switch, or showing people pictures of her cats, Mr. Smith and Heady.
Confused about Google's Find My Device? Here are 7 things you need to know
This new app brings Netflix and Prime Video in 4K with Dolby Atmos to Apple's Vision Pro
Quordle today – hints and answers for Wednesday, April 10 (game #807)
Most Popular
By Krishi Chowdhary April 04, 2024
By Tom Wardley April 03, 2024
By Cesar Cadenas April 01, 2024
By Amelia Schwanke April 01, 2024
By Emma Street March 31, 2024
By Jennifer Allen March 31, 2024
By Joshua Chard March 30, 2024
By Emma Street March 27, 2024
By Charlotte Henry March 25, 2024
By Jennifer Allen March 24, 2024
By Amelia Schwanke March 23, 2024
- 2 Ninja Woodfire Pro Connect XL BBQ Grill and Smoker review
- 3 IKEA's affordable new smart LED wall panel is an impressively versatile mood light
- 4 Programmers got PSP games running on the PlayStation Portal, then “responsibly reported” the exploit so it could be patched
- 5 Quordle today – hints and answers for Monday, April 8 (game #805)
- 2 Google has a new way to try and stop cookie theft leading to possible cyberattacks
- 3 From online racing to real-life car technology: why MOZA is all-in on the race for driving innovations
- 4 Sonic vs rotating toothbrushes: Which is better?
- 5 Don’t dive into GenAI waters without first learning to swim
- PRO Courses Guides New Tech Help Pro Expert Videos About wikiHow Pro Upgrade Sign In
- EDIT Edit this Article
- EXPLORE Tech Help Pro About Us Random Article Quizzes Request a New Article Community Dashboard This Or That Game Popular Categories Arts and Entertainment Artwork Books Movies Computers and Electronics Computers Phone Skills Technology Hacks Health Men's Health Mental Health Women's Health Relationships Dating Love Relationship Issues Hobbies and Crafts Crafts Drawing Games Education & Communication Communication Skills Personal Development Studying Personal Care and Style Fashion Hair Care Personal Hygiene Youth Personal Care School Stuff Dating All Categories Arts and Entertainment Finance and Business Home and Garden Relationship Quizzes Cars & Other Vehicles Food and Entertaining Personal Care and Style Sports and Fitness Computers and Electronics Health Pets and Animals Travel Education & Communication Hobbies and Crafts Philosophy and Religion Work World Family Life Holidays and Traditions Relationships Youth
- Browse Articles
- Learn Something New
- Quizzes Hot
- This Or That Game New
- Train Your Brain
- Explore More
- Support wikiHow
- About wikiHow
- Log in / Sign up
How to Make a Travel Itinerary with Google Maps
Last Updated: March 14, 2022 Fact Checked
This article was reviewed by Stan Kats and by wikiHow staff writer, Nihal Shetty . Stan Kats is a Professional Technologist and the COO and Chief Technologist for The STG IT Consulting Group in West Hollywood, California. Stan provides comprehensive technology solutions to businesses through managed IT services, and for individuals through his consumer service business, Stan's Tech Garage. Stan holds a BA in International Relations from The University of Southern California. He began his career working in the Fortune 500 IT world. Stan founded his companies to offer an enterprise-level of expertise for small businesses and individuals. There are 8 references cited in this article, which can be found at the bottom of the page. This article has been fact-checked, ensuring the accuracy of any cited facts and confirming the authority of its sources. This article has been viewed 84,068 times.
If you’re planning a trip, you might be wondering how to figure out where to go and in what order. Luckily, Google has a free tool that you can use in order to get a better sense of your travel plans. We’ll walk you through how to make a travel itinerary with Google Maps through its My Maps feature. In a few easy steps, you can master an excellent organizational tool that’ll help you plan the best trip possible.
Setting Up Your Map

- Unfortunately, as of October 2021, Google no longer supports the “My Maps” app on phones. If you’re on mobile, you’ll have to use your phone’s web browser to access the site while on the go. [2] X Research source
- If you don’t already have a Google account, setting one up is a quick process. A Google account gives you a number of benefits, including a new gmail address. Check out this link to start the set-up process: https://accounts.google.com/signup/v2/webcreateaccount?flowName=GlifWebSignIn&flowEntry=SignUp

- For instance, your might name your map something like “California Summer Trip 2022,” and you could enter a description like, “Places to see and eat during two-week California road trip.”

- For example, for a California road trip, you might enter “Golden Gate Bridge” into the search box. My Maps will automatically direct you to its location.

- For instance, if you’ve searched for “Golden Gate Bridge,” there will be a white box that offers some information on the location, and even a rating from other users. Click on the “Add to map” button to send it to your saved locations.

- For example, you might fill in the description to the “Golden Gate Bridge” box with something like, “Spend at least 1 hour here—must-see location.”

- You might consider changing the colors of your pins to match how important each location is to your trip. For example, must-see locations could be red pins, your housing spots could be green pins, and optional places to visit could remain as blue pins.
Creating an Itinerary and Planning Routes

- For example, you might have a layer titled “Places to see,” one titled “Places to eat,” and one titled “Places to sleep.” You can then put sightseeing destinations, restaurants, and hotels you want to stay at in their respective layers.

- You can add more than one location to a single route. For example, if you wanted to plot a route from Big Sur to the Golden Gate Bridge, and then to Palo Alto, you can add all three locations to your route layer and create a multi-stop path. [11] X Research source
- By clicking on the three dots next to the layer with your travel route, then selecting “Step-by-step directions,” My Maps will create a set of directions for your travel. Handy!

- For example, by using My Maps, you might notice that seeing the Golden Gate Bridge, walking around San Francisco, and eating at a restaurant in Berkeley are close enough to all be doable in one day, while visiting Big Sur might be better saved for another afternoon. My Maps can help you plan out the most efficient trip possible, so you can enjoy your travels even more.

- When sharing your map, you can also choose the option that allows others to edit the map as well. With this option selected, your friends can pick places that they’re interested in as well, so you can have them all on the same document. [13] X Research source

- Although My Maps can’t be viewed offline, you can download an offline map of any areas you’re interested in on your phone. Using the Google Maps app, type in a location into the search bar, tap the name of the location, then navigate to the option “Download offline map.” [15] X Research source
Expert Q&A
You might also like.

- ↑ https://support.google.com/mymaps/answer/3024925?visit_id=637744367666134651-2428484219&p=lite_addplaces&rd=1
- ↑ https://9to5google.com/2021/07/20/google-my-maps-android-shutdown/
- ↑ https://support.google.com/mymaps/answer/3024454?hl=en&ref_topic=3024924
- ↑ https://support.google.com/mymaps/answer/3024925?visit_id=637744500327517491-717751493&p=lite_addplaces&rd=1
- ↑ https://support.google.com/mymaps/answer/3024925?hl=en&co=GENIE.Platform%3DDesktop
- ↑ https://support.google.com/mymaps/answer/3502610?hl=en&ref_topic=3024924
- ↑ https://support.google.com/mymaps/answer/3109452?hl=en
- ↑ https://support.google.com/maps/answer/6291838?hl=en&co=GENIE.Platform%3DiOS
About This Article

- Send fan mail to authors
Did this article help you?

Featured Articles

Trending Articles

Watch Articles

- Terms of Use
- Privacy Policy
- Do Not Sell or Share My Info
- Not Selling Info
Don’t miss out! Sign up for
wikiHow’s newsletter
How to use Google Maps as a trip planner and make a full itinerary
- You can use Google Maps as a trip planner through the "Places" and "My Maps" features.
- Both the Google Maps website and app let you save locations to lists, which you can then get immediate directions to.
- When getting directions, you can look up reviews and add multiple stops to your route.
Google Maps has become an essential part of any road trip. After all, it's a GPS, business directory, and reviews platform all-in-one.
But if you spend some time with it, you can integrate Google Maps even more seamlessly into your next vacation. Google Maps has a variety of features you can use to plan your trip and save any interesting spots you find on the way.
Here's how to make Google Maps your trip planner, using the Places feature, My Maps, and more.
How to use Google Maps as a trip planner
Use the 'places' feature to save points of interest.
Let's say you're traveling, and happen to stumble upon the cutest coffee shop you've ever seen. You want to visit, but don't have time right now — what's the best way to remember it?
Google Maps' Places feature can help you out. Both the Google Maps website and app let you save any location on the map to a list, which you can then easily find later.
1. Open Google Maps and click, tap, or search for the location that you want to save.
2. Find the Save icon , which has the icon of a bookmark. You'll find it right under the location's name, but you might need to swipe to find it in the mobile app.
3. Pick where you want to save the location to. You've got three lists to start with — Favorites , Starred places , and Want to go — but you can make a new one by tapping New list .
4. Once you've saved the location, you can find it again by opening the list. In the mobile app, tap Saved at the bottom of the screen; on the website, click the three stacked lines in the top-left and then Your places .
Tap on a location in your list to have the map jump straight to it.
Look at Google Reviews to find the best shops
Nearly every point of interest on Google Maps has a section for user reviews. Similar to sites like Yelp, these reviews can be a great way to see which stops are must-sees and which you can pass.
To check out reviews:
1. Open Google Maps and find the location that you're interested in.
2. At the top of its information page should be a star rating and a number, showing how many people have left reviews.
3. Scroll down until you hit the Reviews section, and you'll find reviews from other users who've visited the location. They'll include a star rating, a date, and occasionally a picture.
If you're interested in leaving a review of your own, check out our article on how to write Google reviews .
Make a custom My Maps page to share your road trip plan
Only available on a computer as of this month , Google's My Maps program lets you make a custom map or plot out a route with as many waypoints as you like, and then save and share it with others.
1. Head to the My Maps homepage and click Create a New Map .
2. You'll be given a world map. In the menu in the top-left, click the Untitled map name to give your map a name.
3. Use the search bar at the top of the page to find any location, then click Add to map to save it. You can add as many points of interest as you like.
4. You can also save multiple separate lists of locations to the same map; just click Add layer in the top-left menu.
5. To save directions between multiple locations, click the Add directions icon that looks like a curved arrow. It'll add a new layer that you can use to plot a path.
6. When you're done, click Share or Preview in the top-left window.
Add multiple stops to one trip
Driving from one city to another is simple. But if you want to make stops along the way — lunch, the beach, a mall — things get complicated.
Luckily, you don't need to start a new Google Maps route for every stop. You can create one navigation route that includes every stop from the start, giving you a clear way to see how long it'll all take.
1. Open the Google Maps app and start navigating to another location.
2. On the screen that lets you pick your starting and ending location, tap the three dot icon .
3. Select Add stop .
4. A third waypoint — labeled "B" — will appear. Tap it to choose your second destination, or drag it to reorder the waypoints.
On a computer
1. On the Google Maps app website, find a location and start getting directions to it.
2. Underneath the menu that lets you pick your starting and ending location, click Add destination .
3. A new field will appear. Enter your third waypoint.
4. Once you pick a new waypoint, you'll be able to click Add destination again and pick another one, as well as reorder them.
You can add up to nine destinations on both the website and mobile app.
On February 28, Axel Springer, Business Insider's parent company, joined 31 other media groups and filed a $2.3 billion suit against Google in Dutch court, alleging losses suffered due to the company's advertising practices.
- Main content
How to Plan a Road Trip with Google Maps: A Step-by-Step Tutorial
This post may include affiliate links. As an Amazon Associate, I (The Winding Road Tripper) earn from qualifying purchases. Read more .
This post was originally published on August 8, 2021, and updated on February 16, 2023.
Ready to start planning your road trip using the power of Google Maps?
Then you’ve come to the right place.
Google has two amazing tools to help you plan your road trip: Google Maps and Google My Maps.
Google Maps is a great tool for plotting out your route, while Google My Maps is an amazing tool for road trip planning and organization.
In this post, I’ll teach you how and when to use each of these powerful free tools.
Let’s start by looking at Google Maps since it’s the simpler of the two.
But if you are looking for how to use Google My Maps, then click here .
How to Use Google Maps to Plot Your Road Trip Route
Google Maps is a great tool if you want to plot out your road trip route.
We use it as a starting point for all of our road trip planning to get a sense of how long our trip will be or what we can accomplish in the time we have.
Step 1: Open Google Maps
Start by opening up Google Maps on your desktop or phone.
When trip planning, we like to use our desktop computers to make use of the bigger screen.

Step 2: Plot Your Road Trip Route
To start plotting your road trip route, click on directions.

Then enter your starting point and your first destination.

Continue to add stops to your road trip by clicking on the (+) to add destinations.

Stop when you have all your road trip stops added to your map. Google Maps allows you to add up to 10 points to your map. If you want to add more, then Google My Maps is the tool for you.
Step 3: Reorder Road Trips Stops
If you want to play around with your route and reorder your stops, Google Maps makes it easy to do so.
On the left, where your stops are listed, you can drag and drop the stops to reorder them.

Step 4: Move the Driving Route
Google Maps will choose the fastest route between your road trip stops. But sometimes, there may be a scenic route you want to take.
You can easily move your driving route as desired by dragging and dropping your route.
Step 5: Send the Driving Route to Your Phone
Once you plan your road trip, you can send the directions to your phone for easy access during your trip. Directions can be sent via text message or email.
Note: You will have to have a Google Account to send directions to your phone.

Google Maps is a great starting point for planning a road trip.
But if you want to harness the power of Google and use it to plan your road trip and as a resource throughout your trip, Google My Maps is the choice for you.
Google My Maps: The Best Road Trip Planning Tool
Planning a road trip can be a daunting task. It’s hard to know where to start, and all the research can feel overwhelming. But that is where the ultimate road trip planning tool, Google My Maps, comes to the rescue.
Google My Maps is a very similar tool to traditional Google Maps, but it’s much more powerful and customizable.
In this section, we’ll start with detailed information on the features of Google My Maps. And then, we’ll get into exactly how we use Google My Maps to plan each one of our road trips.
Using this tool will help you seamlessly organize and plan your road trip.
Once we tried it, we never looked back.
Let’s start by giving you a little introduction to Google My Maps.
What is Google My Maps?
Google My Maps utilizes all of the data in Google Maps to allow you to create your very own custom map for your road trip. It’s a way for you to create a map containing the places important to you .
Once you create your map, you can access all of the personalized information you’ve added, so you never miss a beat while on the road.
Why is Google My Maps the Ultimate Road Trip Planning Tool?
Google My Maps is our favorite tool for planning a road trip. Here is why:
- It Helps You Visualize Your Trip Plotting all of your points of interest on a map helps see how your road trip may take shape. At the start of road trip planning, we typically have no idea what route we may take until we see all of the things we want to do on a map. And this is where Google My Maps can help.
- It Helps Organize Your Research When planning a road trip, you are likely gathering information from many sources, including websites, tourist bureaus, and recommendations from friends and family. Google My Maps can help you organize all of your research so you can more easily plan your road trip itinerary.
- It Consolidates Your Entire Itinerary Using Google My Maps allows you to have all of your road trip information in one place. There will be no need for a separate spreadsheet with your day-to-day itinerary or to bring your travel books with you.
What Are the Limitations of Google My Maps?
- Google My Maps Can Not Be Used Offline You will need access to wifi or cellular data to use your map on your road trip. But don’t let that stop you from using it to plan your road trip. There are ways to download your map to other apps for offline use, which I’ll take you through in the tutorial.
- You Can Only Add 2,000 Locations to Your Map Likely, you will not need over 2,000 locations when planning your road trip. And if you do, you can make separate maps, possibly divided by days or weeks, to get around this limitation.
- You Can Only Add 10 Layers to Your Map Layers are ways to categorize your location points. When using Google My Maps, you can only have ten layers per map.
- Planned Routes Can Not Be Accessed for Driving Directions on Google Maps When planning your trip, you may add a direction layer on your map to display the route you plan to take. Unfortunately, you can not use those directions to give you turn-by-turn navigation on your road trip. You’ll have to use Google Maps or click on a destination point on your custom Google My Map to bring up directions. I go through this in detail here .
How to Use Google My Maps to Plan a Road Trip
Now that you know why Google My Maps is the best road trip planning tool, let’s dive into the nuts and bolts of Google My Maps.
We’ll start with an in-depth overview and then show you exactly how we use Google My Maps to plan our road trips. Use the screenshots I’ve provided to help guide you through all of the steps.
Overview of Google My Maps
If you want to know how we use Google My Maps to plan our road trips, then feel free to skip down to the step-by-step guide for planning a road trip here .
But if you want to learn the ins and out of Google My Maps, this is where to start.
You can start from the beginning or jump to the section you want to learn more about by clicking on the links below.
Here is what we will cover to familiarize you with how Google My Maps works so you can start road trip planning like a boss.
Google My Maps Layout
- Markers/Locations
Google My Maps allows you to add locations and driving directions to your map while allowing you to organize them as you wish.
To get started, let’s get familiar with the layout of Google My Maps.
I suggest creating your first Google My Map and playing around with the functions of the map to help you get familiar with them.
Note: You must either create a Google Account or sign in to your Google account to start using Google My Maps .
Location Markers
Location markers are points that you add to a map. They can be things like restaurants, hotels, sights-to-see, bathroom stops, etc.
Find things to do along your route with our Favorite Tools to Find Things to Do Along Your Road Trip Route .
Each point you add to a map will include any information that Google already has for that point.
These include things like:
- GPS coordinates
- Website address
- Phone Number
Three Ways to Add Markers to Your Google My Map
You can add markers to your road trip map in three ways:
- Using the search function
- Selecting a Point already on Google Maps to add to your own map
- Add a point manually
Let’s look at how to do all three.
Search Function
You can find a marker by typing in the name, address, or GPS coordinates into the search bar.
Adding a Marker That is Already on Google Maps
Google Maps already has many markers in its database. When you zoom into an area, many points of interest will start to show up. If any of these markers look appealing to you, you can add them to your own map by clicking on them.
Adding a Marker Manually
You may need to add markers manually when you can not find them via the search function and don’t have the location’s GPS coordinates.
For example, sometimes, I struggle to find the exact location of a trailhead via the search bar. In these cases, I find the location of the trailhead via a different resource and plot it on the map myself.
Color Code and Change the Icons of Your Markers
To keep your map organized, you’ll want to customize and color-code your icons to help you group locations together.
Luckily, Google lets you fully customize your markers.
Map layers are a great way to organize your maps.
But before we dive into adding layers, let’s talk about map layers.
What are Map Layers?
A map layer is a set of markers that are layered on top of an existing map. You can see your different layers on the left-hand side of your map.
When you add a marker to a map, Google My Maps will add it to a layer. You can then use these layers to organize your map.
The added marker will appear on the selected layer. If you want to move a marker to a different layer, click and drag that marker to the desired layer.
For example, I made a map of Wisconsin Campgrounds to help me find campgrounds nearby during our road trips.
I have chosen to use separate layers for different types of campgrounds; National Forests, State Parks, and County Parks.
The benefit of using separate layers versus adding all of the campgrounds to a single layer is that I can check and uncheck specific layers depending on what information I want to see on my map.
If I don’t want to see the State Parks on my map, I can uncheck “Wisconsin State Parks,” and they will not be plotted on my map until I recheck the box.
How to Add Layers
Within Google My Maps, you can have up to 10 layers on a single map.
To add layers, click on “add layer” on the left-hand side of your map just below the map title and description.

Google My Maps then adds an “untitled layer” to your map.
To change the title, click on “Untitled layer,” and it will give you the option to rename the layer.
The current layer selected will have a solid vertical blue bar on the left side of the layer panel. Any new markers created will be added to the selected layer.

You can use Google My Maps to plot your driving route. Unfortunately, you can’t use these routes for navigation in Google Maps. This is one of the downfalls of Google My Maps.
But that is not to say that adding driving directions to your Google road trip map isn’t helpful. Adding driving directions helps you visualize your route so you can better understand where you are going while on your road trip. It also will help you figure out how long you can drive in one day .
Here’s how to add and use Directions on your Google Map:
Start by clicking on the direction icon located below the search bar.

You will then continue to add stops along your route to get a visual of your driving route.

Google Maps will default to the quickest route when creating your driving route. The quickest driving route will likely be the main highways and not always the most scenic. Therefore, there may be times you want to deviate from the quickest route and take a more scenic route.
Fortunately, you can adjust your route by dragging it to where you want it to go.
Start by clicking on the route, and a small circle will appear.

Then drag this route to where you want the route to go.
How to Plan a Road Trip with Google My Maps – A Step-by-Step Tutorial
Now that we know the ins and outs of Google My Maps let’s learn how to use it to create your very own customized road trip map.
- Create a New Google Map
- Add Layers for Different Types of Locations
- Add Locations to Your Map
- Plan Your Road Trip Route
Step 1: Create a New Google Map
You will need to sign in to your Google Account or create a new account to create your own Google My Map.
Once you’re logged into Google, follow this link to bring you to Google Maps .
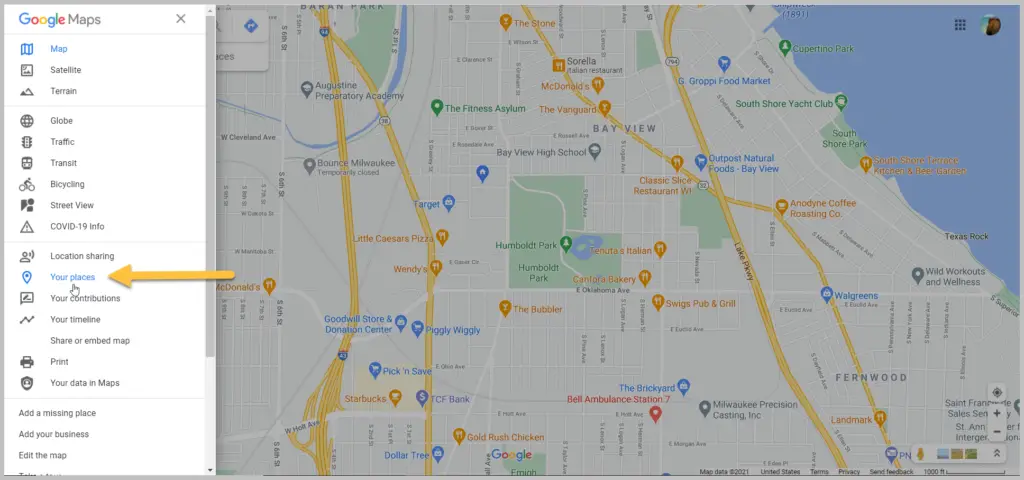
Click on the hamburger ( 𝄘 ) in the top left-hand corner of Google Maps.
Click on “Your Places”.
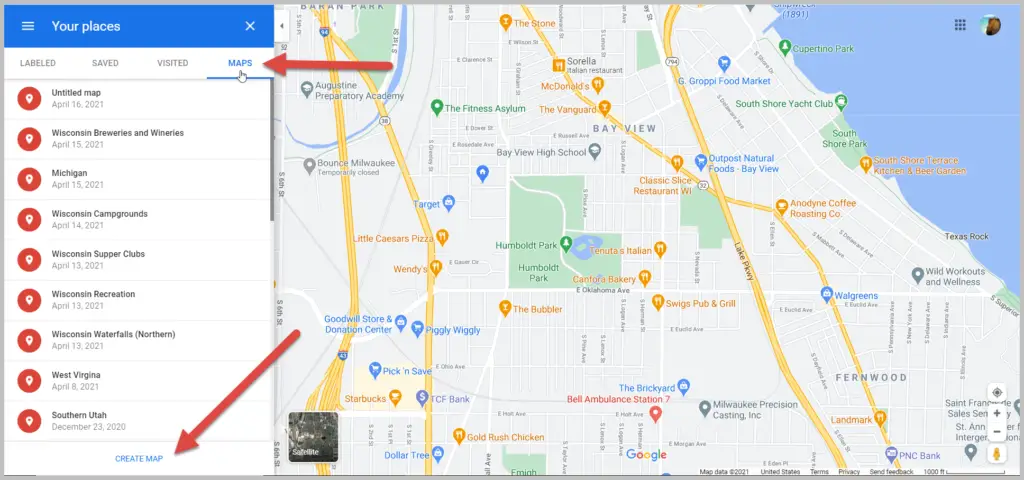
This brings up any saved information you’ve stored in Google maps, like your favorites
Now it’s time to bring up your very first map.
Click on Maps on the top left →, then click “create map” on the bottom left.
You now have your blank map!
Give your map a title, and get ready to create your first custom road trip map.
Step 2: Create Layers for Different Types of Markers
I like to start trip planning by creating different layers for the types of markers I plan to add to my map.
The layers I typically use are: – Places to Sleep – Places to Eat – Places to Drink – Things to Do
You can always add layers while you plan. But I find it easier to stay organized if I start with some layers on my map before adding locations.
Step 3. Add Markers to Your Map
This is the best part of planning your road trip with Google My Maps.
Whether you are in your brainstorming stage of travel prep or you already know where you want to go, this step is where your trip starts to come together.
To start, you’ll research your destinations to find markers to add to your map.
I like to use the following resources for trip research:
- Google: Search for things to do, places to eat, places to stay, etc., in the areas you plan to visit or pass through
- Visitor Centers: Find tourism information online or request info from your destinations’ tourism bureaus to be mailed to you
- Travel books: We like to get ours from the library
- Facebook groups: Join a Facebook Group for the area you are traveling to. They are filled with tons of suggestions on the best things to do in the area.
When you find a location you want to make note of, add it to your map.
Do this by entering it into the search bar.
The great thing about Google Maps is that it pulls up all of the information on a location that Google has. If available, you can find the exact address, reviews, and website address.
If the location looks good, you can then add it as a marker to your map by clicking “add to map”.
Once added to your map, you can customize your marker by changing your icon’s color and/or shape by clicking on the paint bucket icon labeled “style”.
I like picking a specific color and icon for each marker category. For example, my “restaurants” may all be blue with a fork and spoon icon, while my “sights to see” will be yellow with a binocular icon.

One of my favorite features of Google My Maps is that I can add my own info to the marker. Typically, this info comes from the research I’ve done on the location. If I found a blog post recommending a specific restaurant, I’ll add that to the marker, so I have that info at my fingertips when we are on the road.
Add any info you want to your marker and click save.

Your marker will now be added to your map.
You can see your marker in two places: one on the map and the other in the layer it was added to in the layers menu on the left-hand side of the screen.
Continue to add locations until your map starts to take shape.
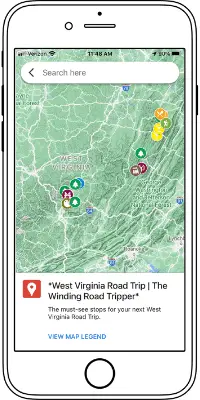
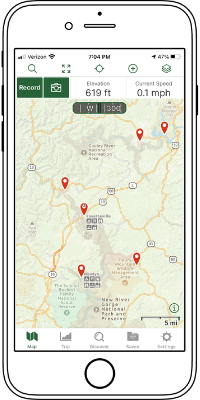
Here is an example of a map we made for a West Virginia Road Trip .

Step 4: Determine Your Route / Itinerary
Now that you have location markers on your map, you can determine your route and day-to-day itinerary.
Take a look at where all your location markers are situated and start planning your route.
Start by creating a directions layer on your map.
Once you have your directions layer, rename it, and begin plotting your route.
First, you will need to enter your starting point. This can be done by either entering an address manually or clicking on a marker on your map.
Continue to add stops until your route is complete.
Here is an example of what our Lake Michigan Circle Tour Road Trip looked like.

Google Maps will default to the quickest route from two points. If you want to go a different route than the one suggested, you can drag the route to force it to go a different way than it was originally displayed.
You now have your own customizable Google Map for your road trip.
We use these maps for both planning our trip and for reference during our trip.
Now let’s look at how to use your awesome map during your trip.
How to View Your Google My Map on Your Phone
Now that you have your map customized, you’ll likely want to be able to view it on your phone.
You will first need to download the Google Maps app from your phone’s app store.
Once you have the Google Map app, here is how you access your map:
- Click on “Saved” on the lower toolbar on your phone
- Click on “Maps” on the lower right
- Select your customized map
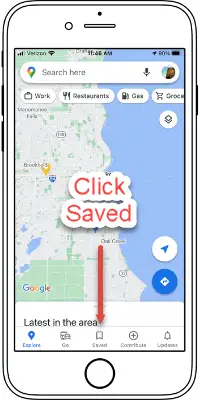
Now you can view your location markers and all the customized information you added to your map.
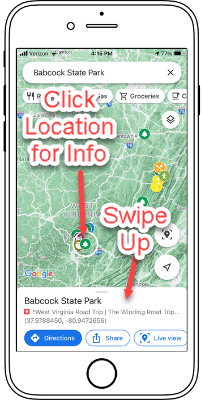
Click on your marker to bring up basic information. For the more detailed information you added, swipe up.
How to Use Your Google Map to Get Directions During Your Road Trip
Unfortunately, you can’t use the turn-by-turn directions you may have added to your map for actual driving instructions for your trip.
But not all is lost; you can still get directions to the next stop by using your customized map and Google Maps.
To do this, click on the location you want directions to and click on directions.
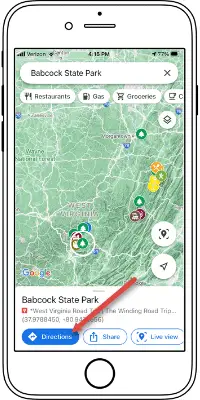
This will launch your Google Map app and allow you to get turn-by-turn directions to your next stop.
How to Export Your Map for Offline Access
Google My Maps works great when you have cell phone service on your trip. Unfortunately, you will not always have service, and you can’t download your Google My Map for offline use like you can in Google Maps.
Thankfully, there are ways to export your map for use offline.
To do this, we use Gaia GPS .
Let’s walk you through downloading your Google My Map for importing into Gaia GPS, an offline mapping app.
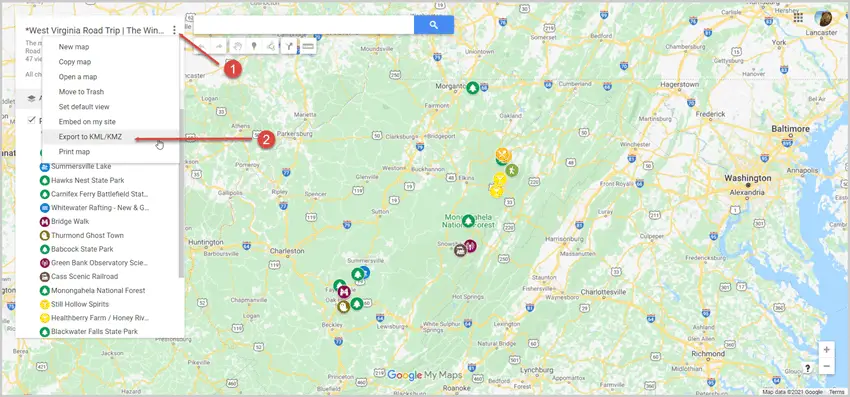
On your computer, click on the ( ⋮ ) in the top left corner by the map’s name. Then click on Export to KML/KMZ.
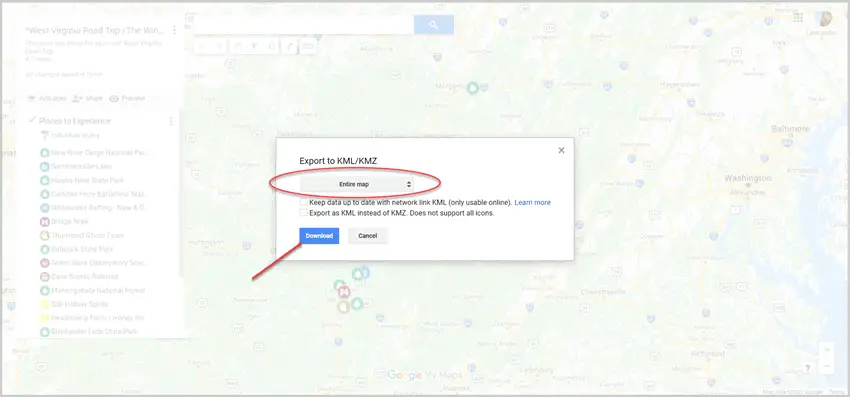
A pop-up will appear. Keep the default of “entire map” and click “download”.
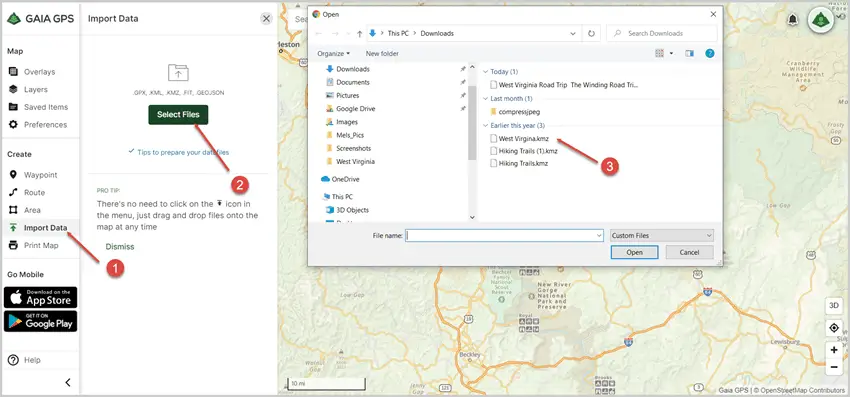
Now you can import this map into Gaia GPS.
Start by creating a Gaia GPS account .
Once logged in, click “Import Data” and select the .KMZ file you downloaded from Google My Maps.
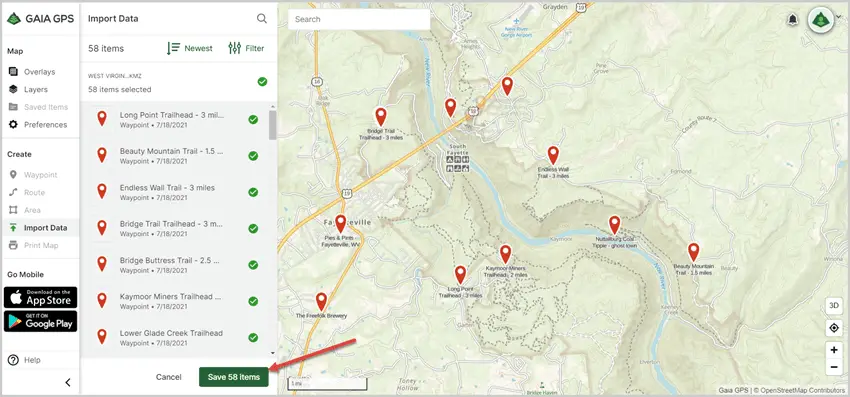
Your locations will now populate in your Gaia GPS map. Make sure to click “save” .
You can now access your map locations offline on your phone via Gaia GPS.
To do this, download the Gaia GPS App on your phone and log in.
Once logged in, you will see a notification that you have a saved location available.
Click on the Saved folder
You can now see all your locations on your Google My Map. Including the details, you added.
More Road Trip Tips: Road Trip Hacks for a Stress-free Trip Road Trip Activities for a Long Car Ride Road Trip Meal and Snack Ideas Money-Saving Tips for Your Next Road Trip How to Budget for a Road Trip
How To Plan A Trip With Google Maps: 7 Easy Steps
This page may contain affiliate links which earn us a commission at no extra cost to you to support the site. Thank you!
Wondering how to plan a trip with Google Maps? Below, we’ll show you how we plan all our trips on Google Maps – get ready for every Google Maps hack you’ll ever need!
There is a lot that goes into planning the perfect trip. What are you going to do? Where will you stay? How are you going to plan your days? How long do you even need to see everything? It’s overwhelming!
I love travel planning. As you can see on this website, I kind of made my career out of it. Because I want to make the most out of my trips (and write the best possible guides about the destinations I visit), I take travel planning pretty seriously.
There is so much research that goes into it, and I couldn’t do it without my favourite travel planning tool: Google Maps. In this guide, I’m sharing how I use Google Maps as a trip planner, along with some handy hacks to help you on your next adventure. Let’s take a look!
Add Directions
Embed your map on your site, 3. it is easy to plan your driving miles/time.

7 Steps to Plan a Trip With Google Maps
Here is how to use Google Maps trip planner:
1. Create a Map
To create a map on Google, you do need a Google account. Once signed up/logged in, go to this page .
Click on “ Saved” >> “My Maps “, which will take you to your maps. If you have created any maps in the past, you will also find them here. As you can see in the screenshots below, I’ve already created quite a few!
Alternatively, you can go to this page , where you see and access your maps in an instant.

To create a new map, click on “ Create Map ”. This will open a new tab with an empty map.

By clicking on “ Untitled Map ”, you can give your map a name and a description. And ta-da! You’re ready for some travel planning on Google Maps. Time to create the perfect itinerary .

2. Add Locations
Now it’s time to start brainstorming. What do you want to do and see on your trip? There are so many ways to find the best places to visit.
For starters, you can find things to do by reading travel guides, blog posts , and itineraries from other travel bloggers. It’s also a good idea to go through Instagram hashtags and location tags. And, of course, good old printed travel guides (by Lonely Planet and Rough Guides, for example) are always a good shout too.
You don’t have to worry about how to plan out your days in detail. For now, you simply want to get an idea of what you want to do on your trip.
Whenever you find something that seems interesting, you can add these to your map by typing the location into the search bar. This can be the name of the location or the address, or you can use the coordinates. Usually, you’ll see a drop-down menu with suggestions as you type.

By pressing enter or selecting one of the options, Google Maps will take you to the location. Here, you can add these locations to your maps. Simply click on “ Add to map ”. Afterwards, you’ll see it appear on the Untitled Layer .

Alternatively, you can use the “ Add Market ” tool (shown in the screenshot below) to add a marker on the map. You can use this when a location isn’t on the map but you don’t have the coordinates, for example.

Before adding all your locations, make sure to read step 3. We explain how to customize your pins on Google Maps, making it much easier to plan your daily itineraries later on.

Planning a road trip on Google Maps? Start by adding the places you want to see/visit. Later on (see step 5), you can add directions to help you find the fastest routes. You can create on Google Maps for the overall road trip, and make another map for daily itineraries of your road trip.
3. Customise Your Categories (Icons and Colours)
The customisation options are another reason why planning trips on Google Maps is one of the best travel planning tools out there. By using colours, icons, pictures and notes, your map will be even easier to navigate.
These options let you break down your locations into categories, such as things to do, photography spots, restaurants, cafes, hotels, shops, etc.
You can change the colour of your pin and add an icon under the “ Style ” option – it looks like a paint bucket. There are hundreds of different icons to choose from.
At this stage, it’s best to stick to changing the icons for now. I normally change the colours to divide the days on my itineraries. Obviously, you can completely style this the way you want.

You can also change the colour and icon of your pins in the side menu.

When clicking on the “ Edit ” icon, you can change the title and add a description for your location. This can be handy to help yourself remember any specifics about this place, such as good photography spots, opening times and whether you need to book a ticket in advance or not.

You can add an image or video to your pins, too. And lastly, you can delete the pin by clicking on the trash icon.

4. Create Layers
Now you’ve added all the things you want to do and given them some icons, it’s time to take a look at the layers. You can add a layer by clicking the “Add layer” option in the sidebar. This automatically creates a brand new untitled layer on your map.

You can rename and delete the layers by clicking on the three dots next to the name of the layer.

You can make layers invisible by unchecking the box next to the name of your layer.

To move points of interest from one layer to another, you can simply drag them over with your mouse.
Layers are an easy way to categorize and organise the locations on your map. There are multiple ways to do this, and you can choose a way that works best for your trip. For example, you can create one layer for restaurant options in Tokyo, one for sightseeing in Tokyo, one for hotels in Tokyo , etc.
When I’m planning a big trip, I like to use layers to break down my individual days or cities. This way, I can quickly see what I’m doing every day while I’m travelling. To make it even clearer, I change the colours of all my pins to match the different layers.
5. Plan Your Itinerary (with Directions)
After following these steps, we should have a good overview of all the things we want to do and see during our trip. This will make it much easier to break down the trip into days.
For the Tokyo itinerary I’ve been planning as part of this Google Maps tutorial, I’m going to spread it out over two days.
I created two layers to match my time in Tokyo in Google Maps.

Because I can see where all my hotspots are located, I can see which activities and sights I want to pair together. This way, I can efficiently plan what I want to see each day. You can even make squares to group things together with the “ Line Drawing ” tool.
For example, it makes sense to group these pins together per day – this will save me a ton of time travelling from one place to the other.

Always check whether these things actually work together, though. Sometimes, a ton of restaurants are located near each other, but there’s no point in planning to visit four restaurants on the same day.
Sometimes, there are museums that take way too long to visit alongside other sights or you can combine certain parts of the city in one day.
Take a look at your itinerary and plan it accordingly. As mentioned before, I like to use the colour tool to add the same colour per day to make it even easier to spot. My Google Map itinerary turned out like this:

If you’re planning a road trip on Google Maps or want directions for walking from one point to another, you can use the direction tools. Click on one of the locations and select “ Directions to here ”.

This will create a new layer on your map. From here, you can add different locations to create a route. You can select points of interest on your map to easily add them to your route. Click on “ Add Destination ” to add more stops.
You can also change whether you want directions by car, bike, or on foot by clicking on the car icon. This opens up a small window with a car, bike and pedestrian. Changing the mode of transport will automatically change the directions to find the best route for you.
This tool allows you to create road trip itineraries or city walks with just a few clicks. I find this especially handy to plan a road trip with Google Maps, as it allows me to estimate the driving time and the amount of money I’ll have to spend on petrol.

By clicking on the three dots next to the name of this direction layer, you can click on “ Step-by-step directions ”. This will give you detailed directions, distances, and an estimation of how long it’ll take for you to get there. Super handy!

6. Book Your Hotels
Now you know exactly what your daily plans are for our trip, it makes it much easier to pick the perfect location for your accommodation . Since you know what parts of the city you’ll be visiting, you can pick a spot that’s near these locations. This will save you so much time (and money), as you won’t have to travel too far to go to start your daily itinerary.
I usually book hotels on Booking.com . The website’s map feature makes it perfect for choosing the location. Because I have my itinerary ready on Google Maps, I know exactly what area of the city I prefer to stay in.
Once you’ve booked your accommodation, you can add the location to your map too.
7. Share Your Trip & Access it on Your Phone
Once you’ve finished your map, you can share it with your travel buddies and download it onto your phone. Here is how to do it.
Access Your Map on Your Phone
To view the map on your phone (with an internet connection), simply download the Google Maps app. Log into your account and click on the “ Saved ” button at the bottom.
Then scroll down and click on “ Maps ”. This will take you to all the maps you created. Click on the map you want to access, and all your saved spots will appear.

Share Your Map
To share your map with your travel company or friends, click on the “ Share ” button. Make sure to enable link sharing , which will allow you to copy the shareable link. You can share this link with friends, who can then access your map and download it themselves.

If you’ve read any of my itineraries or travel guides , you have probably noticed some Google Maps. As I always use these maps for my own trips, I try to include them in my articles for you to use. If you want to embed your map onto your site, click on the three dots >> “Embed on site” .

This will give you a code that you can include on any site for an interactive map to appear.
Why Use Google Maps for Trip Planning?
Google Maps is one the best travel tools because it’s so easy to use for both planning your trip and using it during your trip. We use it for planning city trip itineraries and road trip routes, plus it allows us to save our favourite locations and hotspots.
Whenever we come across a location on social media that we’d like to check out, we add it to a bigger map so we can organise it into smaller itineraries when we’re ready to visit.
Here are some of the main reasons to use Google Maps:
1. It Allows You to Access Your Maps Anywhere
You can access Google Maps anywhere you want. After creating a map on your desktop, you can open it on your phone or tablet. Plus, you can download it so you can access it without being connected to the internet. This is especially handy when you’re abroad and internet access isn’t a given.
2. It Makes it Easy to Find the Best Hotel Location
Using Google Maps to plan my city breaks gives me insight on the perfect location for my accommodation. Because I have a visual representation of all the things I plan to do during my holiday, I know exactly what the best hotel spot is. I compare the map from Booking.com and my own map, and ta-da!
When planning road trip routes on Google Maps, you can easily estimate the time it takes to drive from one place to the next. You can use this to properly budget your trip in terms of petrol cost, too. And when on the road, you can use the directions from your own map while driving.
Conclusion: Using Google Maps Trip Planner
That concludes my tutorial on how to plan a trip with Google Maps. I hope this has shown you all the amazing features this tool offers and how easy it is to use when planning a road trip or city break.
Ever since I started using it, I’ve never looked back. It has saved me so much time and always takes away a ton of travel planning stress. I hope it can do the same for you!
Nele (Nay-la) graduated from Manchester Metropolitan University with an English and Creative Writing Degree and has lived in the UK for nearly 10 years. She has had an interest in Japan and its culture for as long as she can remember. Since her first trip in 2018 surpassed all expectations, she has continued to return to Japan to explore more of all it has got to offer. You can read her full story here .
View all posts
10 thoughts on “How To Plan A Trip With Google Maps: 7 Easy Steps”
WOW!! I had no idea this resource existed. Your detailed steps and screenshots make it easy for me to take the plunge and start using this tool. Thank you.
Thank you so much for the lovely comment, Anne! So glad the post was able to teach you a few things – it’s such a great tool to use for planning trips!
Hi, Thank you for sharing this interesting feature. I was looking for a hard copy of a plan for my travel in Malaysia.
Great guide, exactly what I was looking for, Great work, Thank you!
- Pingback: Blogs To Read This September - Bournemouth Girl
This was very helpful. Thank you 🙂
Amazing tutorial! I am so glad you came up in Google search just as I was looking for this kind of resource. And best of all its free and a tool that I am so used to. How did I not know this before about G Maps?!
So glad to hear the tutorial was helpful! It’s been such a useful tool in my travels, hopefully you can use it on your next trip too!
Very detailed explanation and very well explained too. Thanks for making this blog…
Great post! I recently planned a trip to a nearby city using Google Maps, and it was incredibly helpful in navigating unfamiliar roads and finding the best routes. I especially appreciated the feature that allowed me to save my route and share it with friends. Will definitely be using this method for future trips!
Leave a Comment Cancel reply
This site uses Akismet to reduce spam. Learn how your comment data is processed .
Must-Read Articles

50+ Best Things To Do In Japan

Is The Japan Rail Pass Worth it?

The Perfect Three Week Japan Itinerary

Japan Travel Tips Group

The Japan Travel Newsletter
Sign up to get inspired! Receive insider tips, special discounts and more to plan your perfect Japan trip.
You have successfully joined our subscriber list.
japan travel Blog
Tokyo Kyoto Osaka Hiroshima Hakone Kobe Nikko Nara Kyushu All Japan Content
Plan Your Trip
Best Things To Do Japan Rail Pass 2 Week Itinerary 3 Week Itinerary Accommodation Japanese Phrases
About The Navigatio Work With Us
Husband and wife duo with a passion for travel and documenting the journey along the way!

How to Plan a Trip Using Google My Maps
For every trip or vacation Taylor and I take, we do a lot of research on the locations we plan to visit and what to do. Some would argue it’s better to go with the flow than having something planned, however, we think otherwise when you’re on a limited time crunch due to other obligations. We use a tool called Google My Maps to plan our trips and vacations which helps us spend less time planning and more time enjoying them!
Prior to leveraging Google My Maps, we used to write down where we wanted to go and what we wanted to do for our trips/vacations in a notebook. This process was time-consuming and often led to additional work because we had to “re-google” everything we previously wrote down.
Today, we are thankful to use Google My Maps and hope to inspire you to leverage this great tool that helps us plan our trips and vacations.
Disclosure: This is post contains affiliate links, which means we may receive a small commission if you click a link and purchase something that we have recommended. While clicking these links won’t cost you any extra money, they will help us keep this site up and running! Thank you for your support!
Why We Use Google My Maps
We found a happy medium between going with the flow and planning out things to do and places to see while vacationing.
We document what we want to do add them to our custom map. Once added to Google Maps we gauge how far each location is from one another to help us get an idea of how much time we want to spend at a specific location as well as how long it will take to get to the next location or point of interest.
Here’s a sample of Our Bucket List Map which covers everything we want to see (highlighted blue) as well as every place we been so far together (highlighted green). If you want access to Our Bucket List Map and make a copy of your own, click here . We’ve been all over the West Coast , Hawaii , Thailand , Bali Indonesia, the Phillippines , Switzerland , Spain , Portugal , and more.

10 Reasons Why We Use Google Maps For Planning a Vacation/Trip
1. Ease of Use
Google Maps is incredibly easy to use once you have it set up and ready to go. It links directly into your Google Maps app on your phone as well as the Google Earth app.
2. Device Agnostic (Works on Any Device)
Google Maps works on a laptop, tablet, and a mobile device. We love to use it on a laptop when planning a trip and while we’re traveling. When traveling we pull up all of the locations on our iPhones.
3. Share the Maps with Others
Google Maps lets you share your custom map with others. This is incredibly useful if your traveling with friends or family members who also have interests and want to add their unique spin to the trip. It’s a perfect collaboration tool!
4. Leverage Google’s Saved Information
Most locations on the maps already come prepopulated with Google’s data and information. For example, if you’re adding a restaurant or a museum to the map, Google will automatically populate the details of the location. Below is an example of this information automatically populated for a winery on the Big Island of Hawaii .

5. Reference For Later And Create Memories That Last!
Taylor and I take a stroll down memory lane looking at the map and seeing all of the places we’ve been together. That’s why we switch the markers to the color green instead of blue showcasing what places we were able to visit when traveling. Our intent is to reference this for later use. For example, if folks ask questions about a location or itinerary, we can share our experiences but also showcase exactly where a particular location is.
6. Look Up The Directions to a Location!
Once a location is added to the map, you can look up the directions on any device from your current location. This is great when your actually on your vacation and need to figure out where to go!
We recently bought a Sprinter Van from Michigan. So for our road trip, we added the dealership on Our Bucket List Map and we can easily just tap the icon on our iPhone and look up the directions.

7. It’s Highly Customizable
Google Maps is highly customizable and will fit the need for most itineraries. You can customize the marker’s icons, colors, your own notes, and your own photos.
If you notice in the pictures above, you can see the different icons, like trailheads (the hiker), waterfalls, cities, Insta-worthy locations (camera), fork and knife (restaurants), and so much more. You can also customize the color with 30 different colors to chose from.
8. Filter Icons Based on Categories
Google Maps has a “layer” option, which allows you to categorize your markers into buckets. For example, let’s say you put all of your waterfalls in one layer and name it “Waterfalls”. If you have 30+ markers ranging from different categories like restaurants, hikes, and others and you want to declutter the map you would only select the “Waterfalls” layer. This will filter out all other markers making only the waterfall markers visible.
9. Google Maps Optimizes Your Vacation
With Google Maps you can strategically decide where you want to go and when. Looking at all your desired points of interest on a map lets you bundle days together ensuring you’re not going out of your way. Taylor and I use the map to visualize where the bulk of our markers (points of interest) are and strategically visit the ones that are close together.
10. My Maps Helps You Decide Where to Stay
This is similar to the ability to optimize your vacation. When you can visualize everything on the map, you can find a hotel or Airbnb that’s within a close distance to your points of interest.

Recommended Use of Google Maps
- Bucket List! – Taylor and I use Google Maps for our Bucket List, whenever we see something or someplace we want to go we immediately save it to our map!
- Vacation Specific – You can simply create a map for your specific vacation and itinerary, so your map is not cluttered with a ton of markers.
- Reference – I leverage several Google Maps for references in future, whether it be surf spots, camping spots, free parking and more, there’s a map for any idea.
Easy Step by Step Guide on How To Use Google Maps
Now that you know why we love Google Maps, let’s walk through our step by step guide on how to use Google My Maps to plan a trip.
1. Create Your Map
The first thing you need to do is create a Gmail account if you do not have one. Once you have a Gmail account created, head to Google My Maps on your laptop (this will not work on a phone, you can only set it up on a laptop/desktop).
- Click the red button that says “CREATE A NEW MAP”

- Edit the title of the map and add a description, click save.

2. Create Your Map Layers (Category Filters)
Google Maps allows you to create layers in your map. Layers are filters for the markers on your map that you can display or hide when viewing your map.
A good example of using layers for a vacation is the following:
- Where to Eat
- Things to Do
- Where to Stay
If I was planning a vacation this is how I would plan it and for the purpose of this tutorial/guide, I will plan a trip to Paris.
To create a layer, simply double click the text “Untitled layer” and change its name.
Click “Add layer” to create new layers. LIMITATION: You can only have 10 layers in a map.
When you click “Add layer”, a new layer is added to the layer panel. To change the name, click on the three dots to the right of the name “Untitled Layer” and click “Rename this layer”.

3. Add Points Of Interest To Your Map
Once you set your layers up, you’re ready to add markers (points of interest) to your map. You can categorize the markers by tagging them to specific layers, changing their icons, colors and more.
First, let’s get into how to add points of interest to your map . You can do this in one of three ways.
- Scroll around the map to find a landmark and click on the landmark’s icon
Search for a location in the search bar
- Click the pin icon to drop a pin on a specific location on the map (use this if the point of interest isn’t already on google)
Scroll around the map to find a landmark
In the example below, I zoomed in on France and found Paris, from there I zoomed in even further to find the Eiffel Tower and I simply clicked the default google landmark icon. Once you clicked the landmark, Google automatically will automatically populate it with relevant information in a popup.

To add it to the map simply click the “Add to map” button on the popup. Make sure you select the layer that you want the point of interest to fall under!
The second method to add points of interest to your map is through the search bar. In the example below, I searched for a point of interest and started typing the Grand Canyon. Notice the search bar automatically populates with a drop drown of locations to select from.

You can simply select from the drop-down or hit enter on your keyboard to display the point of interest on the map. Again once the popup displays you can click “Add to map” to save it to your map.
Click the pin icon to create your own point of interest
If your point of interest isn’t on Google already, you can create your own. A good example of this is a perfect spot to watch a sunset, or the start of a hiking trail, etc.

After you click the pin to add a marker, you then click anywhere on the map where you want to add a marker. Here’s an example of me marking a surf spot in my home town on the map. Notice there isnt a google icon for the surf spot like other points of interest like hotels, restaurants, and stores on the map.

To delete a marker , simply click on the marker from the layers panel or from the map and click the delete (key for you MAC users) or escape key (for those on Windows).
4. Add Directions Between Points of Interests
Once you marked down your points of interest, you can visually display the directions between two points. You can leverage the google maps app for this when you’re ready to visit the point of interest, which is what we prefer, but jotting down the directions on the map can come in handy to give you a general idea of where to go and how to get somewhere.
To add directions between two markers or from any location to a marker, simply click on the marker and from the popup select the direction icon that looks like an arrow.

You can also change the transportation mode by clicking the driving icon on the layer on the left side of the map. It can be changed from driving to walking or biking.

5. Modify Your Point Of Interest Markers
Once you’ve added some point of interest markers to your map, it’s time to customize the markers to make it more user-friendly.
When you click on a marker and the popup is displayed, click on the paint bucket icon. This gives you two options to customize the marker, the ability to change the color and the ability to change the icon of the marker.
To change the color or the icon of the marker, click on the paint bucket. Here you chose a color from the color options displayed. If you don’t see one relevant on the shortlist, simply select “More icons” to view more.

In the screenshot below, I changed the color of the marker from blue to green and changed the icon of the marker to a surfing icon.

If you recall, Taylor and I use Google Maps for managing our bucket list and for planning trips.
For our bucket list, we mark everything we want to do in blue and then when we visit a point of interest, we change the color to green. This helps us visualize everywhere we’ve been since we’ve been together, it’s pretty neat!
For our regular trip planning maps, we use different colors and icons to help us plan and see different points of interests.
Below is an example of the map we are using to plan our trip to Europe. This only shows our points of interests for Amsterdam, but you can see here that we color-coordinated the markers. The markers are color coordinated by the following key:
- Blue = things to do
- Orange = where to eat
- Purple = where we are staying.
Modify Name & Description of Marker
Now that you know how to change a marker’s icon and color, you can further modify the marker by changing its name and description . To do this, simply click on the desired marker so the popup displays. Next, select the pencil icon to modify the name and description. You can add any text you want, even URLs to your favorite blog post for more information!

6. Share Your Google Maps With Others
One of my favorite features of Google My Maps is sharing the maps with others. You can share your maps with friends and family very easily and collaborate on a map with whoever you want. Taylor and I share all of our maps so we can plan our trip together at our own convenience.
To add others to a map, simply click the “Share” button under the name of the map on the left panel. From there you can define access, meaning decide if you want to make the map publicly available or keep it private.
There are three different options:
- Public on the web
- Anyone with the link
- Only specific people

If you choose to add specific people to your map and keep it private then simply select “Off – Specific people” and click “Save”, then invite others by entering their email.

Once you share your maps with other people, especially those going on a vacation or adventure with you it’s time to load the map onto your phone! To do this you will need the Google Maps mobile app.
7. Use Your Google My Maps on Google Maps Mobile App
The power of Google My Maps resides in the Google Maps mobile app. It is great to plan a trip or vacation from your computer but it’s even better to utilize it in real-time while you’re on the go. Below are ten steps to use your google my maps on your Google Maps Mobile App.
- Download Google Maps from your app store
- Log in with the same account you used to create your maps
- Select the three horizontal lines in the top left
- Select “Your Places”
- Scroll the tabs to the right until you see “Maps”, select “Maps”
- Here you should see your created maps visible in a list. Select the map you want to use
- All of your markers from the created map will display
- Select view legend to filter your map on specific categories, like “Where to eat”.
- Select a marker to get directions to its location view more information about the marker and more.
- Scroll up on a selected marker to view more information.

Notice in step 8, you can share your map with others through the app in addition to the desktop, this makes life more convenient when you’re on the move.
8. Save A Publicly Available Map
If you come across a blog that has a map embedded on a blog post, you can make a copy of it to save as your own. To do so, simply follow these steps:
- Sometimes you can find maps embedded on a blog that you can make a copy of. For example, we have an extensive post on The Ultimate Guide of Oahu Hawaii with a map of every spot we visited while we lived there for 5 months.

Popular Questions Related to Google Maps and My Maps
Can you plan a route in google maps can google maps plan a route with multiple stops.
Yes, you can plan a route in Google Maps, however, it’s not as intuitive as other map applications and websites. To do so, simply load the app, set directions to your first location, then select the three dots in the top right-hand corner to add an additional stop. We cover how to do this in Google My Maps above, in step 4, “Add directions to your map”.
How do you plot multiple locations on Google Maps?
To plot multiple locations on Google Maps, I advise using Google My Maps and following the steps indicated above, plotting your markers on a custom My Maps in Google, on a desktop/laptop device first. Once you plot your markers on your custom map, you can load your custom map on a mobile device.
Does Google Maps have a trip planner?
Google used to have Google Trips but discontinued the service in August of 2019. However, you can use Google My Maps to plan your trip and this post provides a step by step guide on how to do that! Scroll back up to see how to use Google My Maps to plan your trip.

Plan a Trip Using Google My Maps – Summary
Overall, Taylor and I use Google My Maps for every trip we go on, no matter how big or small. We also use Google My Maps to keep track of our bucket list, which helps us share stories with others, keep memories, and helps us write blog posts when we visit a location and write about specific places.
Also, we love the ability to share the maps with friends and families as well as our readers! We offer our readers a copy of the “ Our Bucket List “ map which contains points of interests all over the world, it’s a great opportunity to see where we’ve been and where we’re planning on going. If you want access to the Our Bucket List map, click here !
If you have any questions about Google My Maps, please drop a comment below and I hope this step by step guide inspires you to plan your next trip!
One Comment

This one service of using the Google My Maps to travellers is worth so much Kevin and Taylor.Life is a journey and what a blessing that your mission have become Journey is my life.Keep going .who knows some day we may bump into each other in iceland or usa.
Leave a Comment Cancel
Your email address will not be published. Required fields are marked *
Email Address *
Save my name, email, and website in this browser for the next time I comment.
Share your trips and real-time location from Google Maps
Mar 22, 2017
[[read-time]] min read

“Where are you now?” and “What's your ETA?” Whether you’re heading to a party or meeting up for dinner, you probably hear questions like this pretty often from family and friends. Soon Google Maps users worldwide will be able to answer those questions in just a few taps, without ever leaving the app. On both Android and iOS, you’ll be able to share your real-time location with anyone. And the people you share with will be able to see your location on Android, iPhone, mobile web, and even desktop. Here's how it works in a real-world scenario:

Whenever you want to let someone know where you are, just open the side menu or tap the blue dot that represents where you are. Tap “Share location” and then select who to share with and how long to share—and you're done! You can share your real-time location with your Google contacts, or even share with friends and family by sending a link on your favorite messenger apps. When you’re sharing your location, the people you’ve chosen to share with will see you on their map. And you’ll see an icon above the compass on your own map reminding you that you’re actively sharing your location. You can change your mind and stop sharing at any time—it’s entirely up to you.
Next time you’re on your way or running late, you can share your real-time location and trip progress from navigation as well. During your next trip, tap the “More” button on the bottom on the navigation screen, and then tap “Share trip.” When you share your trip with people, they’ll see your expected arrival time and can follow your journey as you head toward your destination. Sharing automatically ends when you arrive.
Location sharing on Google Maps is rolling out soon worldwide, and you’ll be able to quickly let your friends and family know where you are and when you’ll get where you’re going. The answer to “where are you?” is only a tap away.
Related stories

6 ways to travel smarter this summer using Google tools

3 Maps updates to make summer travel a breeze

Street View comes to Kazakhstan

How satellites, algorithms and AI can help map and trace methane sources

How machine learning keeps contributed content helpful

A new way to discover places with generative AI in Maps
Let’s stay in touch. Get the latest news from Google in your inbox.
Google Maps
- Google Travel
How to get ready for a road trip using Google’s travel site and Maps
Due to the pandemic, travel has been slow this past year, and you might be a little rusty when it comes to picking up and traveling somewhere to visit friends and family or just planning a getaway. Whatever the case, Google has a few helpful tools in Google Maps and Google’s travel site to help you get started on making those plans and staying safe along the way.
Table of contents
Getting started with google’s travel website, using google map’s road trip feature, planning a trip around covid-19 restrictions.
Google’s travel website is meant to be a companion site that can help you plan all of the details of your trip. You can use it to book flights, make an itinerary, and even explore interesting places to visit at your destination. If you have a Gmail account , there’s a good chance that any flight reservation you make will automatically appear the next time you use Google’s travel site, making it that much easier to plan the trip’s details. If not, Google Travel may suggest locations based on your search history and interests. While that may be a little creepy, it can also be pretty helpful.
If no destination has been chosen yet, Google will suggest locations in the “Explore” tab. You can filter these locations based on flight and hotel cost, giving you a pretty good idea of where a nice place to go would be. After choosing a destination, Google gives you a few options as far as what you’d want to know. There’s a “Discover” section that will break down various points of interest. In bigger cities, you may find the number of things to do or see endless. Fortunately, you can filter out locations and activities based on your personal interest.
If there are a few places that pique your curiosity, or you already know you want to go there, Google allows you to save them to the trip and pin them to the trip’s detail page. This serves as a sort of to-do list when you get where you’re going.

If you don’t plan on flying and want to avoid certain COVID-19 hotspots, Google Maps is probably the way to go. Just this year, Google added a feature to the Maps website that allows you to add stops along the route when planning the trip. Previously this was possible on mobile, but it didn’t lend itself well to planning out a road trip to be shared with friends and family. Adding stops along the way with Google Maps on mobile was best for impromptu stops.
Once you’ve defined a starting point and destination, you can add stops along the way. You can add anything from a city to rest stops and gas stations. You can do this by either manually entering a stop you already know you would like to pause at, or by choosing one of the criteria towards the top of the screen. Google Maps lets you narrow down your search by these criteria:
When selecting from one of these criteria, Google will also suggest a few filters. For instance, choosing hotels will bring up a “Guest rating” filter, as well as an “Amenities” filter, so you make sure that you’re getting free wifi. Of course, if none of these fit the bill, you can always just search for what you want. The nice thing is that these suggestions can add a little flare to the trip by suggesting something you would have never thought about, making the road trip that much more exciting.
Once you find a point of interest, hit add stop , and Google Maps will automatically insert it in the right spot on the planned route. Unfortunately, there doesn’t seem to be a way to define how much time you plan on spending at that stop, so the trip time might have to be calculated manually. Besides that, Google Maps has become a handy road trip planner with enough tools to get you where you’re going and let you have some fun along the way.
The major caveat to traveling right now is the looming risk of COVID-19. Fortunately, the travel website by Google and Maps both supply some great tools for managing risk and assessing where you plan to go.
On the travel website, you can find up-to-date COVID-19 information for your destination pretty easily. You can access this information by searching for and clicking on the destination . Under the main card that lists the date of your trip, area name, and weather, there will be a COVID information section. This section has useful information like the CDC’s travel advisory website, COVID-19 stats for that specific area, and the number of local cases.
Clicking on the “Travel advisory” button brings you to the CDC’s COVID-19 map. This map is a risk assessment of most destinations in the world, color-coded depending on how risky it is to travel there. The second button will search Google for COVID-19 information on the location you’re traveling to, detailing data like news, statistics, and testing locations. The “Local cases” button will show even more detailed information about active cases, vaccines administered, and deaths in the area. All of this is fantastic information to have when traveling and comes in handy when planning your trip.
FTC: We use income earning auto affiliate links. More.

Check out 9to5Google on YouTube for more news:
Andrew Romero's favorite gear
Google Pixel 7 Pro
Explore and navigate your world
Discover new experiences across the world or around the corner.

Explore your world
With the redesigned Explore tab, find places to eat and things to do around you or when you travel
Just for you
See recommendations for new and trending places based on your interests

Create lists
Easily create lists of places you want to go, and add notes to the places you’ve saved. You can keep these lists private, share them with close friends, or share them publicly. You can also browse through lists created by publishers, Local Guides or Google
Make your plans happen by connecting with the places you’re interested in
Follow your favorites.
Stay on top of offers, updates and more when you follow your favorite businesses

Make a reservation, book an appointment, or get tickets with just a few taps
Get answers fast
Message a business right on Google Maps to find out information
Navigate the world around you
Real time traffic updates.
Find the best route when driving, with real-time updates on traffic jams, accidents, road closures and speed traps. You can also keep fellow drivers in the know by reporting incidents yourself
Hands-free help with the Google Assistant
Your Google Assistant is now integrated into Google Maps so you can message, call, listen to music and get hands-free help while driving. Say “Hey Google” to get started

Real-time updates for public transportation
Get up-to-the-minute updates on busses and trains, like departure times and how crowded the bus is. You can also see where on the map your bus is so you know if you need to walk a little faster to the bus stop
Explore new places confidently
With Live View in Google Maps, see the way you need to go with arrows and directions placed right on top of your world. There’s less second guessing and missing turns
Control your data with confidence
Industry-leading data protection.
Every day you’re Safer with Google. We use the most advanced technology like differential privacy to protect your data and build helpful features - like seeing how busy a place is so you can avoid the crowd.
Easy-to-use privacy controls
You’re in control. With Your data in Maps , you can easily view and manage your Location History and other account settings. Location History is off by default. When you turn on Location History, it can help you with real-time traffic predictions for your commute or reminisce about places you’ve been.
Search with Incognito mode
When you want additional privacy, use Incognito mode in Google Maps. When it’s turned on, you can navigate, search for places, and find business information from your device - all without searches or directions being saved in account.
See how people are using Google Maps to explore what’s around them, put their communities on the map, and help others
Why we map the world.
Map making is an ancient human endeavor, and one that those of us working on Google Maps are honored to continue to pursue
Mountain View, California
More stories
Melbourne, Australia
Mums who map
A group of Local Guides, Mums who Map, dedicated their time to help parents find kid-friendly places in Melbourne, Australia.
Nuku’alofa, Tonga
Mapping Tonga
Tania Wolfgramm and Wikuki Kingi set out to bring Tonga to Street View for all the world to see.
Devon Island, Canada
Together with the Mars Institute and NASA, Google Maps documented the research that goes on Devon Island, the most Mars-like place on Earth.
Norcia, Italy
Mapping Italy’s Recovery
One Local Guide records the aftermath of Italy’s earthquakes to show the world that they still need help recovering.
Kerala, India
Kerala Flood Rescue
Bobby Kurian used Google Maps to tag her parents’ location to help rescue them in the Kerala floods.
Supporting Women’s Rights
With the help of Local Guides and Google Maps, Princess Ilonze got hospitals and police stations on the map to help save lives.
Kids in India
The India Literacy Project teamed up with Google to help students explore the world through photos uploaded by Local Guide.
Bozeman, Montana
Connecting to Bozeman
One Local Guide was inspired to celebrate and show off her hometown in a unique way.
Sao Paulo, Brazil
Mapping Blood Donation Sites
Local Guide Adriano Anjos in Brazil mapped Sao Paulo’s blood donation centers on Google Maps.
London, England
Wheelchair Accessible Routes
Wheelchair-accessible routes on Google Maps has made getting around easier for Meridtyh, Omari, Adam, and Lucy.
Kolkata, India
Plus Codes creates geographical coordinates that provide an address to those who previously had none.
Grand Canyon National Park
Vets Kayak The Grand Canyon
Five blind veterans kayaked through the Grand Canyon and documented their journey on Street View.
Google Maps Blog
Read articles, interviews, and more to learn what’s new on Google Maps

Want the best prices for your trip? Google can help.

Take off to your next destination with Google Maps

Hip-hop dancers show Paris in a new light on Street View
There's more we can help you with.
Check out some related products below
Street View
Explore world landmarks, discover natural wonders, and step inside places with Street View on Google Maps
Google Earth
Explore worldwide satellite imagery, 3D buildings, and terrain for hundreds of cities with Google Earth
Local Guides
Become a Local Guide to help people everywhere find the places worth seeing and things worth doing
Google My Business
Stand out to people searching on Google, and connect with customers with a free business profile
Get Google Maps

5 Google Maps Tips You Need To Know When Planning Your Next Trip
W hether a brief weekend escape or an extensive expedition across continents, planning a trip can be a daunting task. The challenge of selecting the ideal destinations, navigating through unfamiliar territories, and ensuring that you experience all the essential sights without overlooking anything, can quickly become overwhelming for any traveler. This is where online maps come into play, and one prominent tool that almost everyone has used at some point is Google Maps.
Google Maps goes beyond basic directions . It offers a suite of features designed to make trip planning not just easier, but also more enjoyable. You can map out itineraries, discover new attractions, get insights into local restaurants and services, and even find electric vehicle charging stations . The platform's real-time updates, user reviews, and detailed information on points of interest can help you make informed decisions while exploring new destinations. Moreover, its customization features allow you to create personalized maps that cater specifically to your travel plans, which are also shareable. Here are five essential Google Maps tips that every traveler should know. These tips will not only help you streamline your trip-planning process but also ensure that your travels are as smooth and enjoyable as possible.
Read more: 12 Smart Gadgets You Didn't Know Existed
Utilizing Offline Maps
When you're heading out on a trip, one thing you definitely don't want to worry about is losing access to your maps when your signal drops. That's where offline maps come in handy. Google Maps allows you to download maps for offline use, ensuring you never get lost even when you're off the grid.
Downloading maps for offline use is a straightforward process. Follow these steps:
- Open the Google Maps app on your smartphone or tablet.
- Tap on your profile icon in the top-right corner.
- Choose Offline maps.
- Tap Select your own map in the following window.
- Drag the map window to your desired area.
- Select Download.
Depending on the size of the area you're downloading and your internet connection speed, this process may take a few moments.
Once the download is complete, you'll be able to access the map even without an internet connection. Offline maps are not only convenient, but they can also save you time and frustration. Imagine hiking in a remote area and losing your cell signal — having the offline map ensures you can still navigate your way back to your starting point without any hassle. This is also one of the many secret Google Maps features that can come in handy.
Customizing Your Route With Multiple Stops
We all have days packed with errands or sightseeing, where we just wish we could plan the routes efficiently. Google Maps allows you to do that by customizing your route with multiple stops. It's a nifty feature that can save you time and make your trips more organized.
Follow these steps:
- Open Google Maps on your device and enter your final destination.
- Click on the three buttons next to your starting point and select Add stop.
- You can add multiple stops by repeating this step.
- Rearrange stops by dragging the three lines next to each destination.
Now, Google Maps will calculate the most efficient route for you, taking into account all your stops along the way. This is perfect for those days when you have several places to visit or errands to run, but you want to make sure you're not zigzagging all over town. It can also save you time and fuel. Plus, it's a great way to ensure you don't forget any important stops along the way.
When customizing your route with multiple stops on Google Maps, keep in mind to arrange your stops in a logical order to minimize backtracking and optimize efficiency. Additionally, consider traffic conditions and estimated travel times between each stop to plan your schedule accordingly. Lastly, ensure that all stops are accurately inputted to avoid any confusion or missed destinations along the way.
Taking Advantage Of Live Traffic Updates
This feature provides real-time information about traffic conditions, allowing you to avoid packed routes and save valuable time.
As you navigate with Google Maps, the app constantly monitors traffic conditions along your route. If there is heavy traffic, accidents, or road closures ahead, Google Maps will highlight the problematic area on the map using yellow or red markers.
To enable live traffic updates, open the Google Maps app and enter your destination. Once your route is set, Google Maps will display real-time traffic information along the way, including any incidents or slowdowns. You can then choose to follow the suggested route or explore alternative options based on the traffic conditions.
When using live traffic updates on Google Maps, keep in mind to regularly check for updates throughout your journey to stay informed about changing road conditions. You can also report problems on the road yourself on Google Maps . Lastly, be flexible with your travel plans and prepared to follow alternative routes suggested by Google Maps to avoid congestion and minimize travel time.
By taking advantage of live traffic updates, you can make informed decisions about your route and avoid getting stuck in gridlock. Whether you're commuting to work or heading out on a road trip, this feature can help you reach your destination more efficiently.
Exploring Nearby Attractions And Restaurants
When you're in a new area, or even just exploring your own neighborhood, Google Maps can be a great tool for discovering nearby attractions and restaurants.
To start exploring:
- Open Google Maps and zoom in on the area of your interest. You should see several options below the search bar, including Restaurants, Gas, Coffee, Shopping, ATMs, and more.
- Click on the option you want to explore. For instance, if you are looking for places to eat nearby, select Restaurants to see a list of dining options in the area. Each restaurant will be marked with its location on the map, along with details such as the establishment's name, its rating, and sometimes photos or reviews.
- Refine your search further by applying filters for rating and distance.
- After selecting a restaurant that catches your interest, click on it to view more detailed information, including its address, hours of operation, contact details, and directions on how to get there.
Google Maps also allows you to call the restaurant directly from the app if you wish to make a reservation or inquire about menu items.
You can explore all these categories by swiping right on the options pane below the search bar. To view the full list, click on the More button (three dots) at the very end.
Create A Custom Map To Share With Friends And Family
You can also easily create a custom map and share it with whoever you want on Google Maps. It's a great way to collaborate on travel plans, recommend must-visit places, or simply share your favorite local hangouts.
- Open Google Maps on your computer and sign into your Google account.
- Click on the menu icon and choose Saved > Maps > Open My Maps.
- Start a new map by clicking the Create A New Map button.
- Give your map a title and a description that encapsulates the essence of your adventure or theme. This could be anything from "Family Road Trip to Yellowstone" to "Best Coffee Shops in New York City."
- Populate your map with markers. Click on the marker icon, then click on the location on the map you wish to mark. For each marker, you can add a detailed description, upload photos, and even include links for more information.
- Additionally, Google My Maps allows you to draw paths and shapes, perfect for outlining routes or highlighting areas of interest.
- Once your map is ready, click on the Share button. Here, you'll be prompted to set the map's privacy settings. You can choose to make it public, share it with specific people, or keep it private with a link.
- Finally, invite your friends via email or simply send them the link.
Read the original article on SlashGear .

- Software Reviews
- Affiliate disclosure
- Terms of use
- Privacy policy
Google Maps Keeps Changing My Route [How To Avoid Rerouting]
published on April 11, 2024
Share this article
Improve this guide
Read our disclosure page to find out how can you help MSPoweruser sustain the editorial team Read more

When Google Maps keeps changing my route, I’m usually not eager to discover the fastest route or avoid tolls . All I want to do is stick to my original plan.
Unfortunately, Google Maps doesn’t let you turn off automatic rerouting. But luckily, I found three handy workarounds:
1. Turn Off Background Data Usage For Google Maps
To do that on an Android phone , follow the steps below:
- Navigate to your device’s Settings .
- Select Apps , then find and tap on Google Maps .

You can achieve the same on iPhone :
- Go to your device’s Settings .
- Select Cellular , and locate the Google Maps app.
- Turn off the green switch next to the app to restrict mobile data usage.
2. Use Offline Maps.
To make that happen, you need to download the specific map area or region for offline use before starting your journey:
- Open Google Maps and tap on your profile picture or initials in the top right corner.

- Once downloaded, you can access the offline map by selecting Offline maps from the main menu during navigation.
You can use the downloaded map as you’d normally would – pick a destination, route, stops, etc.
3. Add Stops Along Your Route
Adding stops along your route can provide Google Maps with additional waypoints, helping to stabilize the suggested route and reduce unnecessary changes.
Here’s how to do that:

- Enter the location of your desired stop , such as a gas station, restaurant, or attraction. Do that for all the key places you want to follow to your destination.
Google Maps will adjust the route to include the added stops, potentially reducing the frequency of route changes.
By following the steps outlined in this guide, you can prevent Google Maps from changing your route, or at the very least minimize reroutes.
More about the topics: google maps

Technical Writer
Ana is an experienced technical writer and she likes solving problems and fixing errors.

Was this page helpful?
Let us know if you managed to solve your tech problem reading this article.
We’re happy to hear that!
You can subscribe to our newsletter to stay up to date with the latest news and best deals!
Do you have a suggestion?
We know how frustrating could be to look for an universal solution.
If you have an error which is not present in the article, or if you know a better solution , please help us to improve this guide.
- Skip to main content
- Keyboard shortcuts for audio player
Solar eclipse 2024: Follow the path of totality
Solar eclipse, watch live: total solar eclipse.
The NPR Network
A total solar eclipse is crossing from the Pacific coast of Mexico through the United States on Monday.
According to NASA , totality will start around 11:07 a.m. PDT/1:07 EDT in Mexico and leave Maine at around 1:30 pm PDT/3:30 pm EDT. Precisely when you'll be able to see the eclipse — and what kind of eclipse you'll be able to see — will depend on your location and time zone. More on that here .

Here's what time the eclipse will be visible in your region
This will be the last chance to catch a total solar eclipse in the continental U.S. for about 20 years, so here's what you need to know to safely enjoy!
Livestreams from along the path of totality
View from Vermont
Vermont Public will livestream views of the eclipse from the Fairbanks Museum and Planetarium in St. Johnsbury, Vermont. Tune in starting at 3 p.m. ET.
View from New Hampshire
NHPBS will livestream the solar eclipse from Lancaster, N.H. starting at 12 p.m. ET.
View from Maine
Maine Public will livestream from Mars Hill, Maine, starting at 2:30 p.m.
More resources to enjoy the eclipse
- Sharing the eclipse with tiny humans? Check out these kid-friendly total solar eclipse learning guides from Vermont Public's But Why, and this great explainer from KERA Kids on the difference between a solar and a lunar eclipse.
- Plan to wander into the wild for the best view? Here are some tips from outdoor experts.
- Tips from Bill Nye on the best ways to enjoy the eclipse.
- Feeling whimsical? Here are three ways to sprinkle a little magic into your eclipse experience .
NPR will be sharing highlights here from across the NPR Network throughout the day Monday if you're unable to get out and see it in real time.
Already planning to see the next solar eclipse in 2026? What travelers need to know.
Umbraphiles feeling the post-eclipse blues should start checking the expiration date on their passports.
The next total solar eclipse is set to happen on Aug. 12, 2026, over Greenland, Iceland, Spain, Russia and a small part of Portugal, according to NASA .
In North America, only a partial eclipse will be visible, so if April’s event made you an eclipse chaser and you want to see totality, you’ll need to head overseas.
Here’s what you’ll need to know before packing your bags:
Do you need a passport or visa for the best destination?
The path of totality for the 2026 eclipse mostly goes through places Americans can travel visa-free with their passport, so long as they’re planning to stay for less than 90 days.
Spain, Portugal, Iceland and Greenland all allow visa-free tourist travel for U.S. passport holders.
Spain, Portugal and Iceland are also members of the Schengen Area, which allows for visa-free travel in much of Europe, meaning if you decide to make a multi-country trip out of your eclipse adventure, you won’t need to clear customs if you’re coming from much of the rest of Europe, either.
One major change for travelers to Europe from the U.S., however, is that electronic preauthorization will become a requirement beginning in mid-2025. The European Travel Information and Authorization System (ETIAS) requirement will apply to all four open countries in the path of totality.
Depending on the state of the Ukraine war, travel to Russia may or may not be an option for most Americans by 2026, so it’s unclear what the paperwork requirements will be by then.
Is it better to see it from the beach?
Beaches can be a great place to see the eclipse because there are few natural obstacles blocking observers’ views of the sky. The 2026 path of totality passes over beaches on Spain’s northern and southeastern coasts, as well as over islands in the Mediterranean Sea including Mallorca, Menorca and Ibiza. The eclipse will also pass over coastal areas in Greenland and Iceland, according to the National Solar Observatory .
Cruising Altitude: What it was like to see the eclipse from a plane
Will there be eclipse cruises or flights?
Almost certainly, although most operators have not announced specific plans yet.
Cruise lines will also offer more viewing opportunities. Princess Cruises “has created a bespoke itinerary aboard Sky Princess to position the ship near Spain on that date,” according to a spokesperson for the line. The cruise will open for bookings on Princess’s website on May 23.
Cunard Line has sailings on its Queen Mary 2 , Queen Victoria and Queen Anne vessels that will put passengers in prime spots to watch .
'The ship can move': Why you should watch next solar eclipses from a cruise ship
Holland America Line is also planning multiple sailings around the event, though details are still to be announced. “Guests have reacted positively to our 2024 eclipse cruises and with the next full eclipse in 2026 we plan to have three sailings in Europe that will align with the path of the eclipse,” Paul Grigsby, the line's vice president of Deployment & Itinerary Planning, previously told USA TODAY in an email.
When and where the solar eclipse will be crossing the U.S.

A total solar eclipse will grace the skies over North America on Monday, one of the most hotly anticipated sky-watching events in recent years.
Weather permitting , millions of people in Mexico, 15 U.S. states and eastern Canada will have the chance to see the moon slip between Earth and sun, temporarily blocking the sun’s light .
The total solar eclipse will be visible along a “path of totality” that measures more than 100 miles wide and extends across the continent. Along that path, the moon will fully obscure the sun, causing afternoon skies to darken for a few minutes.
Follow live updates on the solar eclipse
In all other parts of the continental U.S., a partial solar eclipse will be visible, with the moon appearing to take a bite out of the sun. Exactly how big a bite depends on the location.
The first spot in North America that will experience totality on Monday is on Mexico’s Pacific coast at around 11:07 a.m. PT, according to NASA .
After moving northeast across Mexico, the eclipse’s path travels through Texas, Oklahoma, Arkansas, Missouri, Illinois, Kentucky, Indiana, Ohio, Pennsylvania, New York, Vermont, New Hampshire and Maine. Slivers of Michigan and Tennessee will also be able to witness totality if conditions are clear.
In Canada, the eclipse will be visible in parts of southern Ontario, Quebec, New Brunswick, Prince Edward Island and Cape Breton, at the eastern end of Nova Scotia.
The timing of the eclipse and the duration of totality varies by location. Most places will experience around 2 minutes of darkness, but the longest periods of totality are typically in the center of the eclipse’s path.
This year, the longest stretch of totality will last 4 minutes and 28 seconds in an area northwest of Torreón, Mexico.

Below is a list of timings for some U.S. cities along the path of totality, according to NASA .
- Dallas: Partial eclipse begins at 12:23 p.m. CT and totality at 1:40 p.m. CT.
- Idabel, Oklahoma: Partial eclipse begins at 12:28 p.m. CT and totality at 1:45 p.m. CT.
- Little Rock, Arkansas: Partial eclipse begins at 12:33 p.m. CT and totality at 1:51 p.m. CT.
- Poplar Bluff, Missouri: Partial eclipse begins at 12:39 p.m. CT and totality at 1:56 p.m. CT.
- Paducah, Kentucky: Partial eclipse begins at 12:42 p.m. CT and totality at 2:00 p.m. CT.
- Carbondale, Illinois: Partial eclipse begins at 12:42 p.m. CT and totality at 1:59 p.m. CT.
- Evansville, Indiana: Partial eclipse begins at 12:45 p.m. CT and totality at 2:02 p.m. CT.
- Cleveland: Partial eclipse begins at 1:59 p.m. ET and totality at 3:13 p.m.
- Erie, Pennsylvania: Partial eclipse begins at 2:02 p.m. ET and totality at 3:16 p.m. ET.
- Buffalo, New York: Partial eclipse begins at 2:04 p.m. ET and totality at 3:18 p.m.
- Burlington, Vermont: Partial eclipse begins at 2:14 p.m. ET and totality at 3:26 p.m. ET.
- Lancaster, New Hampshire: Partial eclipse begins at 2:16 p.m. ET and totality at 3:27 p.m.
- Caribou, Maine: Partial eclipse begins at 2:22 p.m. ET and totality at 3:32 p.m. ET.
Other resources can also help you figure out when the various phases of the eclipse will be visible where you live, including NationalEclipse.com and TimeandDate.com .
If you plan to watch the celestial event, remember that it’s never safe to look directly at the sun, including through binoculars, telescopes or camera lenses. Special eclipse glasses are required to safely view solar eclipses and prevent permanent eye damage.
Denise Chow is a reporter for NBC News Science focused on general science and climate change.
- Help Center
- Google Maps
- Privacy Policy
- Terms of Service
- Submit feedback
Plan your commute or trip
Find traffic & transit info.
You can use Google Maps to quickly find all of your frequent trips in one tap. You’ll get information about your ETA, the traffic reports and the accidents along the way.
Tip : To show the map, tap anywhere on the map or drag the tabs back down.
Change the way you commute
- Search for your destination in the search bar at the top.
- At the bottom, tap on “Directions.”
- At the top, select your transportation mode.
- Select your preferred route.
You can pin your trip and find it back in the Go tab next time you need it.
Set a reminder to leave for your trip
Plan for your next trip using your iPhone or iPad to make sure you arrive on time.
- At the top, type a destination.
- Choose your transportation mode.
- When to leave : Tap Depart.
- When to arrive : Tap Arrive .
- Set a time.
Change the mode of transportation for part of your trip
Tip: Only available on mobile and in some locations.
You can combine different modes of transportation, like driving, ride-sharing, or bicycling with transit on the same trip.
Once you’ve selected your route and can view the directions, you may be able to change how you travel for part of your trip. The rest of the route, like transit departure times and total journey time, will be updated when you change the mode of transportation.
Was this helpful?
Need more help, try these next steps:.
Watch CBS News
Solar eclipse maps show 2024 totality path, peak times and how much of the eclipse people could see across the U.S.
By Aliza Chasan
Updated on: April 9, 2024 / 5:00 AM EDT / CBS News
A total solar eclipse crossed North America Monday with parts of 15 U.S. states within the path of totality. Maps show where and when astronomy fans could see the big event as skies darkened in the middle of the day Monday, April 8.
The total eclipse first appeared along Mexico's Pacific Coast at around 11:07 a.m. PDT, then traveled across a swath of the U.S., from Texas to Maine, and into Canada.
About 31.6 million people live in the path of totality , the area where the moon fully blocked out the sun , according to NASA. The path ranged between 108 and 122 miles wide. An additional 150 million people live within 200 miles of the path of totality.
Solar eclipse path of totality map for 2024

The total solar eclipse started over the Pacific Ocean, and the first location in continental North America that experienced totality was Mexico's Pacific Coast, around 11:07 a.m. PDT, according to NASA. From there, the path continued into Texas, crossing more than a dozen states before the eclipse enters Canada in southern Ontario. The eclipse exited continental North America at around 5:16 p.m. NDT from Newfoundland, Canada.
The path of totality included portions of the following states:
- Pennsylvania
- New Hampshire
Small parts of Tennessee and Michigan also experienced the total solar eclipse.
Several major cities across the U.S. were included in the eclipse's path of totality, while many others saw a partial eclipse. These were some of the best major cities for eclipse viewing — though the weather was a factor :
- San Antonio, Texas (partially under the path)
- Austin, Texas
- Waco, Texas
- Dallas, Texas
- Little Rock, Arkansas
- Indianapolis, Indiana
- Dayton, Ohio
- Cleveland, Ohio
- Buffalo, New York
- Rochester, New York
- Syracuse, New York
- Burlington, Vermont
Map of when the solar eclipse reached totality across its path
The eclipse began in the U.S. as a partial eclipse beginning at 12:06 p.m. CDT near Eagle Pass, Texas, before progressing to totality by about 1:27 p.m. CDT and then moving along its path to the northeast over the following few hours.

NASA shared times for several cities in the path of totality across the U.S. People could have also checked their ZIP code on NASA's map to see when the eclipse was to reach them if they were on, or near, the path of totality — or if they saw a partial eclipse instead.
How much of the eclipse did people see if they live outside the totality path?
While the April 8 eclipse covered a wide swath of the U.S., outside the path of totality observers may have spotted a partial eclipse, where the moon covers some, but not all, of the sun, according to NASA. The closer they were to the path of totality, the larger the portion of the sun that was hidden.
NASA allowed viewers to input a ZIP code and see how much of the sun was to be covered in their locations.
Could there be cloud cover be during the solar eclipse?
Some areas along the path of totality had a higher likelihood of cloud cover that could interfere with viewing the eclipse. Here is a map showing the historical trends in cloud cover this time of year.
You could have checked the latest forecast for your location with our partners at The Weather Channel .

Where did the solar eclipse reach totality for the longest?
Eclipse viewers near Torreón, Mexico, got to experience totality for the longest. Totality there lasted 4 minutes, 28 seconds, according to NASA.
Most places along the centerline of the path of totality saw a totality duration of between 3.5 and 4 minutes, according to NASA. Some places in the U.S. came close to the maximum; Kerrville, Texas, had a totality duration of 4 minutes, 24 seconds.
What is the path of totality for the 2044 solar eclipse?
The next total solar eclipse that will be visible from the contiguous U.S. will be on Aug. 23, 2044.
Astronomy fans in the U.S. will have far fewer opportunities to see the 2044 eclipse they had on April 8. NASA has not yet made maps available for the 2044 eclipse but, according to The Planetary Society , the path of totality will only touch three states.
The 2024 eclipse will start in Greenland, pass over Canada and end as the sun sets in Montana, North Dakota and South Dakota, according to the Planetary Society.

Aliza Chasan is a digital producer at 60 Minutes and CBSNews.com. She has previously written for outlets including PIX11 News, The New York Daily News, Inside Edition and DNAinfo. Aliza covers trending news, often focusing on crime and politics.
More from CBS News

Couple gets engaged on flight to see total solar eclipse

Severe weather, flooding, suspected tornadoes hit Southeast

"Sunday Morning" archives: Impressionism at 150

Iowa governor signs bill that allows for arrest of some migrants
IMAGES
VIDEO
COMMENTS
Trip Planner - Google My Maps. Sign in. Open full screen to view more. This map was created by a user. Learn how to create your own. Trip Planner.
Check the Google icon in the top right corner to make sure you're using the Google account you want to. Click "Create A New Map" and a window will open with a blank map. To give your map a name and description, click the map name ("Untitled Map"). You can also change the color and style of the base map if desired.
Continue planning on-the-go . When you're on-the-go or visiting a new place, we'll do more to highlight things to do, restaurants and more with Google Maps.
1. Head to Google My Maps and create a map. First, open Google My Maps and sign in to your Google account. In the top left hand corner of the screen, you'll see a button titled "Create a new ...
Create a new map through the home screen. At the top left of the "My Maps" home screen, you'll see a red box with the text "+Create a New Map.". Click on it to be redirected to a map screen. [3] 3. Give your map a descriptive name. To keep yourself organized, give your map a name to remind you what it contains.
1. Head to the My Maps homepage and click Create a New Map. Any map you create will appear on this page. Google; William Antonelli/Insider. 2. You'll be given a world map. In the menu in the top ...
To begin, open the Google My Maps app on your device and find the map that you want to share. On IOS devices, tap the "share" button and select the friends you want to share the map with. They will receive a link to access the map. On Android devices, tap the menu button and select "share trip.".
Step 1: Create a New Google Map. You will need to sign in to your Google Account or create a new account to create your own Google My Map. Once you're logged into Google, follow this link to bring you to Google Maps. Click on the hamburger ( 𝄘 ) in the top left-hand corner of Google Maps. Click on "Your Places".
7 Steps to Plan a Trip With Google Maps. Here is how to use Google Maps trip planner: 1. Create a Map. To create a map on Google, you do need a Google account. Once signed up/logged in, go to this page. Click on " Saved" >> "My Maps ", which will take you to your maps. If you have created any maps in the past, you will also find them here.
Select "Your Places". Scroll the tabs to the right until you see "Maps", select "Maps". Here you should see your created maps visible in a list. Select the map you want to use. All of your markers from the created map will display. Select view legend to filter your map on specific categories, like "Where to eat".
About this app. Navigate your world faster and easier with Google Maps. Over 220 countries and territories mapped and hundreds of millions of businesses and places on the map. Get real-time GPS navigation, traffic, and transit info, and explore local neighborhoods by knowing where to eat, drink and go - no matter what part of the world you're in.
Now, you can use Google Maps to see all of your flight and hotel reservations in one place-a lifesaver when you're checking in at the airport or en route to the next hotel in your destination. Simply tap on the three gray lines at the top left corner of your screen, and then on "Your Places". Then, hit the "Reservations" tab where ...
Next time you're on your way or running late, you can share your real-time location and trip progress from navigation as well. During your next trip, tap the "More" button on the bottom on the navigation screen, and then tap "Share trip.". When you share your trip with people, they'll see your expected arrival time and can follow ...
Using Google Map's road trip feature. If you don't plan on flying and want to avoid certain COVID-19 hotspots, Google Maps is probably the way to go. Just this year, Google added a feature to ...
Find local businesses, view maps and get driving directions in Google Maps.
Find the best route when driving, with real-time updates on traffic jams, accidents, road closures and speed traps. You can also keep fellow drivers in the know by reporting incidents yourself. Hands-free help with the Google Assistant. Your Google Assistant is now integrated into Google Maps so you can message, call, listen to music and get ...
Downloading maps for offline use is a straightforward process. Follow these steps: Open the Google Maps app on your smartphone or tablet. Tap on your profile icon in the top-right corner. Choose ...
Navigate to your device's Settings. Select Apps, then find and tap on Google Maps. In the Usage section, select Mobile Data, and turn off the Allow background data usage option. You can achieve the same on iPhone: Go to your device's Settings. Select Cellular, and locate the Google Maps app. Turn off the green switch next to the app to ...
Today's total solar eclipse is the first widespread one in the Lower 48 states since 2017 and the last one until 2044. W e're here to help track the weather with a series of maps below, including ...
1 day ago. According to NASA, totality will start around 11:07 a.m. PDT/1:07 EDT in Mexico and leave Maine at around 1:30 pm PDT/3:30 pm EDT. Precisely when you'll be able to see the eclipse ...
The next total solar eclipse is set to happen on Aug. 12, 2026 over Greenland, Iceland, Spain, Russia and a small part of Portugal, according to NASA . In North America, only a partial eclipse ...
Timothy D. Easley / AP file. Below is a list of timings for some U.S. cities along the path of totality, according to NASA. Dallas: Partial eclipse begins at 12:23 p.m. CT and totality at 1:40 p.m ...
Plan for your next trip using your iPhone or iPad to make sure you arrive on time. On your iPhone or iPad, open the Google Maps app . At the top, type a destination. In the bottom left, tap Directions . It'll show a car, bus, bike, a person waving, or a person walking. Choose your transportation mode. On the top right, tap More Set a reminder ...
A total solar eclipse crossed North America Monday with parts of 15 U.S. states within the path of totality. Maps show where and when astronomy fans could see the big event as skies darkened in ...