- New Drivers - 1st License
- Defensive Driving
- CDL Practice Tests
- Air Brakes Courses—CDL & RV
- Log Books - US & Canada
- CDL Pre-Trip
- Learner's Permit
- Motorcycles
- Newly Licensed Driver
- Driving Test SHORTS
- Smarter Car Care
- SHORT Driving Tips
- Winter Driving
- Crash Analysis
- Air Brake Valves
- United States
- CDL Beginner
- CDL Turning
- CDL Pre Trip Inspection
- CDL Coupling
- Driving Instructors
- Pass CDL Air Brakes - Free
- Can't Log In
- Live Q & A
- Expert Witness
- The Founder
- 100K Campaign
- Smart Driver Success Stories
- Funny Driving Memes
Cannot find your purchased courses? Click here to Login!
- Commercial Drivers
- Pre Trip Inspection
For the purposes of the CDL pre-trip inspection, tires are a major component. Learn how to inspect these.
How to Inspect Tires to Pass Your CDL Pre-trip Inspection TEST | CDL Road Test Smart
https://youtu.be/RkHIt3bxdxc
- CDL Air Brake Valves
- CDL Employment
- CDL Paperwork

Introduction
Talking about tires on commercial vehicles, not just trucks, but this applies to buses as well.
In a pre-trip inspection we whack the tires (ie hit the tires with a hammer).
Now there is some discrepancy on this point.
My firm belief is is that the only thing that whacking a tire is going to tell you, is whether this inside dual is flat or not.
Because it's being held up by the tires on the outside.

Some driving instructors and some other people— truck drivers and what not—believe that they can tell the difference of a few pounds of pressure in these tires.
I'm not on board with that at all.
These tires hold a hundred pounds of pressure; that's what the recommended inflation pressure is.
There is some belief in the industry that if they're 10 percent less— so ninety pounds of air, they're under-inflated.
Today we're gonna talk about tires on commercial vehicles and give you some information so that you can stay employed for one thing, and keep your job, keep rolling up and down the road.
We'll be right back with that.
GUARANTEED TO PASS FIRST TIME
Cart and Checkout
Retreads on the rear of Commercial Vehicles
Talking about tires on big trucks.
On the rear of vehicles, these four tires the tandems, & the tires on the rear of the trailer - back there can be retreads.
So what they do is they take the old casing when when the tread wears off, and they take it to a Kal Tire, or one of the other big tire manufacturers‚ Michelin, Goodyear, all those places and they put a new tread on top of the casing.
So this is important for drivers to know because if your're driving around and you get a flat tire you don't want to run around until the casing is wrecked.

Because that casing alone is worth about $175.
So it's important to know not to wreck the casing.
Tires Sizes
Now the other thing you need to know about tires on the back of the truck: these are 22.5s - a lot of tires are 24s - those are the two most common sizes so obviously the 24 is bigger.
And why this is important is because:
A) there is a little bit of fuel mileage benefit because the tire doesn't roll as much on a bigger tire.
B) also when you dropped trailers—semi-trailers—off the back of a big truck, it drops the trailer at a different height so it's important when you're hooking up to get out and check the trailer height.
Because if the semi-trailer is too high, you're gonna drop the kingpin over the front of the fifth wheel.
And let me tell you from personal experience it's a bit of a pain in the butt to get that out of there.

And I'll make another video to explain to you—if you do drop the kingpin over the front of the fifth wheel—how to get that out of there.
So tires on the back of trucks and semi-trailers are retreads.
A lot of people in the industry they're called Gators.
If you get a hunk of retread that comes off and flies on the road, it's called a gator because it takes a bite of your vehicle if you run over it.
It's becoming less and less common that the retreads are flying off these tires.
I mean it still happens once in awhile but the adhesive— the vulcanizing process—that they use to adhere the retread to the casing is getting better and better.
The chemical technology and improvements are getting much better.
So these retreads come apart on a lot less frequent basis.
This is the front steer tire on a truck.
Front steer tires have to be brand new.
They cannot be retreads as they can on the back of the truck and on the semi-trailer - they have to be brand new.

Inspecting a Tire for a Road Test
Now you need to know for the purposes of a road test that tread depth on the front is 3mm (1/8 inch) minimum to pass the road test or to pass and MVI (Motor Vehicle Inspection) that the tread depths.
On the rear tires it can be 1/16 inch or 1.6mm.
The other criteria that a tire has to have to pass a road test - it cannot have any cuts are gashes in the tire that are longer than 2.5cm or one inch, and there cannot be cuts or abrasions in the tire that expose the chord inside the tires.
If any of those criteria exist, the tire won't pass, will not pass a MVI.
You will not pass a road test, and if you show up with tires with those conditions for road test, you won't be able to take the road test.

Unsafe Tires
On the top of this tire—this is a front tire—on this truck you begin to see that this tire is beginning—there's a dip here in the tread.
This tread is worn deeper than this tread.
And this side - so this tire has uneven wear - you can see that it's worn more on this side of the tire than it is on this side of the tire.
This front tire on this truck is not safe and needs to be replaced.
Tires on the front of commercial vehicles have to be brand new.
Don't Work the Day for Free:: Weigh Scale Checklist

• DID YOU KNOW? :: Bus & truck drivers are the only public sector that has its own police force (DOT, CVSE, MTO, etc.);
• SMART :: There's a lot of paperwork you must produce for authorities at the weigh scale;
• SELF-CONFIDENCE :: Bring all paperwork in one hit & impress the diesel bears!
Because in most cases, it's you that gets the fine... NOT the company!
Tire Wear Bars

What you do need to know is inside the tread are wear bars.
And you can see the wear bars here.
If the tire tread is down to wear bars on the steer tires on the front, the tire needs to be replaced.
Now as I said, steer tires on the front of the trucks—commercial vehicles, buses those types of things—have to be new tires.
A new steer tire on the front of a commercial vehicle is $600 to a $1000, depending on the type of tire.
This tire is not a very expensive tire, thus it's abnormally worn on the front and will soon need to be replaced.
So you either spend a little bit more and get a better quality tire and it'll last longer.
Now the reason, because a front steer tire is $600—$1,000 - the reason they put recaps on the rears and on the trailers is because a recap will cost you about $375—$400.
There's considerable saving in getting recaps for the rear of semi trucks and the trailers.
They're also allowed on the rear of buses, but not on the steer axles.

They have to be brand new.
That's a little bit of information about tires on commercial vehicles.
In conclusion, tires on commercial vehicles - on the front they're brand new tires.
They have wear bars on them.
You can tell that the tires worn because it'll be down to wear bars on the steer tires.
On the rear of the truck or bus or semi-trailer, they can be recaps.
A recap is about $375; a brand-new steer tire is $600—$1,000 depending on the quality of the tire.
Recaps are about $375—$450 - considerable savings on recaps.
The vulcanizing process to put the tread on the old casing is getting much better, so it's unlikely that you're gonna see Gators on the road - pieces a retread.
They take a bite out of your vehicle & they're called Gators.

Hitting a tire with a hammer, in my professional opinion, only tells you the inside of the tire is flat.
The only way that you're gonna be able to tell if that tire is full pressure—hundred pounds per square inch—is if you put a tire gauge on the tire and have it pumped up.
NOTE : If a tire is low pressure and you see this on trailers a lot.
They get dragged around and they got low tire pressure - you'll see a wave in the chords because the chords let go inside the tire and it's an indicator that the tire needs to be replaced because it's no longer safe and no longer will pass a MVI (Motor Vehicle Inspection).
If you get pulled into a scale they're probably gonna put you out of service because the tire isn't up to standard.
For the purposes of a road test:
(1.6 mm or 1/16") one point six millimeters on the rear tires; (3mm or 1/8") three millimeters on the front; any gouges longer than (2.5cm or 1") 2.5 centimeters.
And any cuts or abrasions in the top of the tires that expose the chords.

5 Things To Know Before Taking Your CDL Pre Trip Test

CDL Pre Trip Inspection Test Class A

5 Tips to Memorize the CDL Pre Trip Inspection

How To Remember Pre Trip Inspection CDL

CDL Pre Trip Inspection | The Work Pre-Trip

How to Fill Out the CDL Pre-trip Inspection Form

How to Read the CDL Motor Vehicle Inspection Decal

Tips for Avoiding Tire Violations | Roadcheck 2016

CDL Pre-Trip Inspection Absolutes
© Smart Drive Test Inc. 2024.
Contact Us: [email protected]
Get Your DOT Inspection Checklist

- OTR Flatbed Company
- OTR Van Company
- Regional/Dedicated Van Company
- OTR Heavy Haul Company
- OTR Flatbed Lease
- OTR Van Lease
- Regional/Dedicated Van Lease
- OTR Heavy Haul Lease
- Owner-Operator
- Career Path
- Available Positions
- Hiring Areas
- Job Matcher
- Learning Center

« View All Posts
Tire Pre-Trip Inspections — How to Inspect a Tire to Pass Your Roadside Inspection
May 10th, 2023

Michael Carlson
Michael Carlson is a safety manager with ATS. He assists drivers, as well as the operations team, adhere to safety protocols. Before coming to ATS, he had years of hands-on safety experience. He worked for the railroad for a while before starting a career driving, where he hauled hazmat freight for eight years. Michael loves working for safety at ATS because he believes in the program. ATS has a great safety team and it takes each and every person to make the roads and the company safer.
As you know, you play a vital role in transporting goods and products across long distances. But with great responsibility comes great caution. One of the most crucial parts of your job is ensuring the safety of yourself and other road users. And that's where tire inspections come in.
The tires on your truck are under a lot of stress and wear due to the heavy weight they carry. This can cause them to deteriorate over time, leading to unsafe driving conditions and potential accidents. That's why it's so important to inspect your tires regularly to make sure they’re in good condition and roadworthy.
By checking your tires for punctures, cuts, uneven wear, and low tire pressure, you can identify potential issues early on and address them before they turn into bigger problems. This helps to prevent accidents and ensures that you and your fellow drivers stay safe while you’re on the job.
As a former truck driver myself, I know how important pre-trip inspections are and how important it is to pay careful attention to each tire during your inspection.
You may not know (or remember) how to thoroughly inspect your tires. In fact, tire violations are among the most common violations cited in roadside inspections. In this article, I’ll help refresh your memory and teach you about the parts of a tire and how you can inspect them for wear and tear.
When you’re done reading, you’ll feel well-equipped to inspect your tires and prevent any tire-related incidents.
The Different Parts of a Tire
During your pre-trip inspection, taking a quick glance at the tires or just kicking them isn't enough. You shouldn’t just look at the top part of the tire. You need to get in there and inspect all parts of the tire.
On the steer tires and drive tires, you’ll need to check:
- Lug nuts
- Inner side wall
- Tread depth
- Tire pressure
- Outside side wall
Since the tires are the only point of contact between your truck and the road, it's vital to thoroughly inspect each tire.
Here’s a rundown of what you should be looking for:
Look at the inside of the rim for any signs of damage on the rim. Check for hub oil. If you see hub oil, that could be a sign of a bad inner wheel seal.
You should also ensure there’s no spacing between the rims when you’re inspecting duals.
Lug Nuts
I know it seems time-consuming, but you need to check every lug nut on each and every tire. They shouldn’t be loose.
If you notice rust streaks coming from the lug nut, that could be an indicator that the lug nuts are loose. Moisture can get in behind the lug nuts when loose and will create those streaks as the wheel spins. Placing a hand on every lug is a great way to make sure you inspect every one.

Check your hubs to ensure the cap is in place. Look at the hub oil level. There’s a sight glass you should be able to see through. If you can’t see through this because it’s dirty, pop the cap off and look inside to check the fluid level.
On your drive tires, you can’t check the hub oil because it’s a sealed unit. You’ll only be able to check the hub oil levels on the steer tires.
Inner Side Wall
When you check the inner sidewall of the tire, look for any cuts or bulges in the tire. If you can see a cut that exposes the tire cord, the tire needs to be replaced. Getting caught with an exposed tire cord will result in an out-of-service (OOS) violation.
Tread Depth
Tread depth requirements vary depending on whether you’re looking at your drive tires or your steer tires.
When you check the tread depth on the steer tires, ensure you have at least 4/32 inches to avoid a violation. If you’re down as low as 2/32 inches, you can get an OOS violation. If you have a bad spot where you’re down to 2/32 inches, take your tread depth sensor adjacent to that area and check it there too.
On your drive tires, the tread can be as low as 2/32 inches. If you’re as low as 1/32 inches, you can get an OOS violation. Make sure you check adjacent treads to ensure you have the proper tread depth all over the tire.
Be sure you’re not checking the tread depth on the top of a wear bar or a stone thrower tread. These areas will naturally give you a little bit less tread.
Tire Pressure
Again, it’s not enough just to kick the tire or lightly press on it — especially when it comes to checking tire pressure. It’s very hard to know what the pound per square inch (PSI) is by simply kicking it or hitting it with a hammer.
You need to actually put a gauge on your tires to ensure they have the proper pressure. You can get an OOS violation for anything under 50 percent of its maximum pressure.
Your tires will have different PSI requirements depending on what type of tire it is/its size.
Outside Side Wall
When you move to the outside sidewall, look for any cuts, bulges or any other sort of damage. There could be a plug that will result in an OOS violation.
Tire-Related Violations
Tire issues come with serious consequences. First and foremost, blowing a tire on the road can be extremely dangerous. A blowout can cause the driver to lose control and swerve — potentially hitting other drivers or tipping over entirely. The blown tire can also hit another vehicle on the road.
These accidents can be preventable if you inspect your tires daily.
You can also be given tire-related violations at roadside inspections that can have a significant impact on your time, wallet and safety record. You may receive violations for inadequate air pressure or tread depth, improper mounting, tire imbalance and worn tires.
Depending on the severity of the violation, you can be placed out of service. You won’t be able to drive again until the tire is fixed or replaced.
Not only is that time-consuming and costly, but your safety record can take a hit. Violations come with Compliance, Safety and Accountability (CSA) points that carry over to your trucking company. A driver can get too many points and be taken out of hiring guidelines. This will lead to their termination.
Too many violations on your record will also have an impact on which trucking companies will hire you in the future.

The Importance of Pre-Trip Inspections
The next time you hit the road, remember to give your tires a quick once-over and make sure they're up to par. Your safety, and the safety of others, depends on it!
As you’re doing those pre- and post-trip inspections, it really pays to take that 15 to 20 minutes to complete a thorough inspection. It’ll help you be a lot safer on the road and help avoid costly violations and repairs.
Need a pre-trip inspection refresher? Check out this list of everything you should check during a pre-trip inspection and a post-trip inspection .
Wondering what officers are looking for when they inspect you? Check out these tips from a commercial vehicle inspector.
CDL Pre-Trip Inspection Checklist
Studying this Class-A CDL pre-trip inspection checklist is an important part of truck driver training. Before getting your Class-A CDL and finding an entry level truck driving job , most states will require students to pass a DOT (department of transportation) pre-trip inspection test and a general knowledge test .
Each company’s pre-trip inspection varies slightly. Most likely you will have to do the coupling system, light check and in-cab inspections plus one of the remaining three sections.
Pre Trip Inspection Checklist
Download free and print it! Printable Pre Trip Inspection Checklist (PDF)
There are many sections to learn but the test is not as difficult as it may seem. Studying our simplified Class-A pre-trip inspection checklist and taking classes at your local CDL training school will get you prepared.
Engine Compartment
Driver door fuel area, coupling area, light check, in-cab inspection and brake tests, belt driven alternator, belt driven water pump, brake chamber, brake lining, caste nuts and cotter pins, coolant reservoir, gear box and hoses, gear driven air compressor, gear driven power steering pump.
- General Hoses
Leaf Springs
Power steering fluid reservoir, shock absorber, slack adjuster and push rod, spring hanger, steering column, what to check for:.
When checking the engine compartment, you will always want to make sure the following components are properly mounted and secured. You should also make sure they are not cracked, bent or broken. The items you will need to check for include:
- Make sure all of the wires are connected. The belt should not be cracked or frayed and the free play on the belt should be between ½ to ¾ of an inch.
- The free play on the belt should be between ½ to ¾ of an inch. Also check all the hoses running to and from the water pump to make sure nothing is leaking.
- The brake chamber should not be leaking air.
- The brake drum should be properly mounted and secure.
- The brake hose is rubber, so it is important to make sure it is not leaking air.
- Check for oil or debris on the lining. There should be at least ¼ of an inch of friction material.
- Make sure all three caste nuts and cotter pins are present.
- The reservoir should not leaking and must be filled to the manufacturer’s specifications.
- Make sure the drag link is properly mounted and secure, and not cracked, bent or broken.
- The gear box and hoses should have no abrasions, bulges or cuts, and should not be leaking.
- Although the air compressor is hard to see, you must make sure it is properly mounted and does not leak.
- The steering pump is located in the same place as the air compressor and is also gear driven. Ensure the steering pump is not leaking.
General Hoses (Passenger and Driver’s Side)
- The hoses should be secure at both ends. There should be no abrasions, bulges or cuts. Fluids run through these hoses, so it is important to make sure they are not leaking.
- The hub seal (or axle seal) should not be leaking and should be filled to the manufacturer’s specifications.
- Make sure none of the leaf springs have shifted.
- Check for leaks under the truck.
- There should be no lug nuts missing. Look for rust trails, powder residue and cracks around the bolt holes.
- The oil level should be filled to the manufacturer’s specifications.
- Make sure the pitman arm is properly mounted and secure. It should be not cracked, bent or broken.
- Make sure this reservoir is not leaking and filled to the manufacturer’s specifications.
- The rim cannot have any unauthorized welds.
- Make sure the shock absorber is not leaking. If it is leaking, the leak will be at the point where the top and bottom portion of the shock meet.
- With the brakes released and pulled by hand, the push rod should never move more than one inch.
- The spring hanger should be properly mounted and secure.
- Make sure the steering column is properly mounted and secure. It should not be cracked, bent or broken.
- Look for abrasions, bulges or cuts on the tread or sidewalls. Tread depth should have a depth no less than 4/32 of an inch. Tires must be properly filled to the manufacturer’s specifications. This can be checked with an air gauge.
- Make sure the tie rod is properly mounted and secure, not cracked, bent or broken.
- Make sure all are accounted for.
Back to top of Engine Compartment
Catwalk and Steps
Door and hinges, drive shaft, exhaust system, frame and cross members, spring mount.
Again it is important to make sure these items are properly mounted and secure. Look for cracks, bends, and breaks.
- The actual airbag is rubber, so it is important to check for abrasions, bulges, cuts and leaks, in addition to any missing mounting bolts.
- The axle seal should not be leaking and should be filled to the manufacturer’s specifications.
- Make sure to mention the brake chamber is not leaking air.
- Make sure the brake drum is secured properly. Also look for cracks, bends and breaks.
- Check the brake hose at both ends to make sure it is not leaking air.
- There should be no oil or debris on the brake lining. There should be at least ¼ of an inch of friction material.
- The cat walk and steps should be clear of any loose objects.
- Physically demonstrate that the doors open, close and latch properly. Door seals should not be worn, torn or rotten.
- The drive shaft should not be twisted and the u-joints should be free of any debris.
- The tread and sidewalls should have no abrasions, bulges or cuts. The tread depth should be no less than 2/32 of an inch. Tires should be properly filled to the manufacturer’s specifications. This can be checked with an air gauge.
- The exhaust system should show no signs of leaks.
- There should be no unauthorized holes or welds. Bundle up the cross members to ensure none are missing.
- Fuel should not be leaking from the tank and the cap should always be on tight.
- Rust trails could indicate loose bolts, while powder residue and racks around the bolts could mean the bolts have been over-tightened.
- Mirrors should be clean for best visibility.
- Make sure the mud flap is secured properly. Also look for cracks, bends and breaks.
- Make sure to mention there should be never be any unauthorized welds.
- The shock absorber should be secure at both ends and not leaking. If it does leak, it will leak in the middle.
- With the brakes released and pulled by hand, the push rod should not move more than one inch.
- If you are equipped with duals, check to see there is proper spacing between the tires and there is nothing stuck.
- The spring arm should be secure at both ends.
- The spring mount should be secure at both ends.
- Make sure the torque arm is secured properly. Also look for cracks, bends and breaks.
- Make sure to check and mention that no U-bolts are missing.
Back to top of Driver Door Fuel Area
Electric Line
Locking jaws, mounting bolts, release arm, sliding fifth wheel locking pin.
- Air lines should be secure at both ends with no abrasions, bulges or cuts. They should not be leaking, dragging or tangled.
- Make sure the apron is properly mounted and secure. Look for cracks, bends and breaks.
- Make sure there is enough space between the tractor mudflap and the trailer landing gear so that they don’t hit each other when making a turn.
- The electric line should be secure at both ends. There should be no abrasions, bulges, cuts or exposed wires.
- The gap is not an actual item, however there should be no space between the apron and the skid plate.
- The seals should be in good condition with no cracks, signs of rotting, or leaking air.
- Make sure the king pin is properly mounted and secure. Look for cracks, bends and breaks.
- You must physically check that the locking jaws is fully locked around the king pin.
- No mounting bolts should be missing.
- Make sure the platform is properly mounted and secure. Look for cracks, bends and breaks.
- The release arm should be in the fully locked position.
- The skid plate needs to be properly lubed.
- The pin must be in the fully locked position.
Back to top of Coupling Area
Header Board
Landing gear, rear door and hinges.
- Shock Absorbers
Tandem Frame and Release
Trailer tire.
- Again make sure the airbag has no abrasions, bulges, cuts or leakings. The airbag should not be missing any mounting bolts.
- The brake chamber should be properly mounted so that is does not leak air.
- The brake hose should be secure at both ends with no abrasions, bulges, cuts or leaks.
- Check for oil or debris on the brake lining. There should be at least ¼ of an inch of friction material.
- There cannot be any missing cross members.
- The header board cannot have any holes or missing rivets.
- The landing gear must be fully raised and the cradle handle secure.
- Rust trails indicate loose bolts. Powder residue and cracks around the bolt holes could be an indication of over-tightened bolts.
- The rims cannot have any unauthorized welds.
- The rear door should open, close and latch properly. Door seals should not be worn, torn or dry rotten.
- The shock absorber should be checked at both ends for leaks.
- When the brakes are released and pulled by hand, the push rod should not move more than one inch.
- Release handle and locking pins should be in the fully locked position.
There should be no abrasions, bulges or cuts to the tread or sidewalls. Tread depth should be no less than 2/32 of an inch. The tire should be properly filled to manufacturer’s specifications and checked with an air gauge.
- Front of the truck
- Both sides of the truck
- Rear of the truck
- Both sides of the trailer
- Rear of the trailer
Back to top of Trailer
The five functions are:
- Left turn signal
- Right turn signal
- Four way flashers
- High/low beams
- Brake lights
Back to top of Light Check
- Airbrake Test
Air Pressure Gauges
Emergency equipment, heater and defroster, lighting indicators, oil pressure gauge, parking brake, service brake check, water temperature gauge, windshield and mirrors, windshield wipers and washers.
The last section is In-Cab Inspection and Brake Tests. For the In-Cab Inspection you will once again want to make sure all of the following components are properly mounted and secure. As well as the following:
Air Brake Test
There are three stages to an air brake test:
- Applied Pressure Test – When doing the Applied Pressure Test, you will want to build the air pressure to governor cut out. Put the truck in the lowest gear, turn the engine off and immediately turn it back on. Push in the tractor and trailer valves which will then release the parking brakes. Push and hold the brake pedal, allowing the gauges to stabilize. When the gauges have stabilized, announce the Primary and Secondary PSI. Listen for air leaks while doing this.
- Warning Light and Buzzer – Pump down on the brake pedal until the warning light and buzzer comes on. This is typically at or before 60 PSI.
- Tractor/Trailer Protection Valve Pop Out – Pump down on the brake pedal until the tractor and trailer protection valves pop out, this will be between 20 and 40 PSI.
- The air pressure gauges should build to governor cut out.
- Your truck should have a fire extinguisher, three red reflective triangles and spare electrical fuses.
- Demonstrate both the heater and defroster are working properly.
Horns (Air Horn and City Horn)
- Blow both horns to make sure they are working.
- Check the left turn, right turn, four way flashers and high beams; also point these out on the dashboard.
- Make sure transmission is in neutral and then fully depress the clutch. Turn the key on, check the ABS light, announce when it comes on and off, and start the engine.
- The seat belt should not be ripped or frayed and should adjust and latch properly.
- The engine oil pressure gauge should rise to normal operating range.
- Trailer Parking Brakes – Set the trailer brake, release the tractor brake, then tug lightly on the trailer.
- Tractor Parking Brakes – Set the tractor brake, release the trailer brake and tug lightly on the trailer.
- Release both the tractor and trailer brakes. Drive at idle speed. Apply the service brake to make sure you come to a complete stop and that it doesn’t pull to the left or right when applying the brakes.
- The voltmeter should be charging between 13 and 14 volts.
- The water temperature gauge should also rise to normal operating range.
- The windshield and mirrors must be clean, with no obstructions and in proper adjustment.
- Demonstrate the wipers and washers are working properly by spraying the windshield.
Back to top of In-Cab Inspection and Brake Tests
During a CDL pre-trip inspection, truckers inspect many aspects of their commercial vehicle, including the overall safety of the vehicle; major hoses, fluid levels, and vehicle belts; the clutch or gear shift; and emergency equipment. The driver demonstrates their knowledge by walking around the vehicle, checking various safety components and explaining why each part should be checked for safety.
Reference and practice tests:
- Printable Pre Trip Inspection Checklist (PDF)
- CDL General Knowledge Practice Test
- Pre Trip Inspection Practice Test
- CDL HAZMAT Endorsement Practice Test
Edited for 2024 on 12/5/23

- Register / Login
- Trucker's Forum
- Paid CDL Training
- Truck Driving Jobs
- CDL Practice Tests
- High Road Training
Pre-Trip Inspection Study Guide

Our Pre-Trip Inspection Study Guide has everything you need to prepare for the Class A CDL Pre-Trip Inspection Exam . Our study guide will cover the pre-trip inspection terminology as well as a thorough list of all of the parts you will be inspecting on the vehicle. For each part you will be inspecting there will also be a list of items you will be checking for. Our study guide is broken down into the following sections:
- What You Need to Know About Pre-Trip Inspection
Pre-Trip Inspection Practice Questions
- Pre-Trip Inspection Checklist
Pre-Trip Inspection Videos
Pre-trip inspection printable resources, what you need to know about the pre-trip inspection.
The Pre-Trip Inspection is a thorough inspection of the vehicle and all of its major systems. Inspecting the vehicle before driving each day is a Federal requirement and normally takes about 15 minutes. It must be logged in your logbook as "on duty not driving."
You will have to do thorough safety inspections of the coupling system, the vehicle lights, engine compartment, tires and brakes, the chassis, the fuel tanks, and an in-cab inspection.
The following information is a brief summary of Daniel's Complete Pre-Trip Inspection taken from our oustanding free PDF download:
Engine Compartment

You will be checking the engine compartment for any sort of leaks. You will also be checking to see if all components are properly mounted and secured. None of the mounts must be cracked, bent, or broken.
You will be checking all hoses to make sure they aren't leaking, frayed, or sliced and the fluid levels including the oil level, the coolant, and the power steering fluid.
You must check the components like the water pump, the power steering pump, and the alternator to make sure nothing is leaking, the belts are not frayed, and that everything is properly mounted and secured.
From inside the engine compartment you will also find the steering system, the front suspension system, and the front brake system. All components of these systems must be properly mounted and secured without anything being cracked, bent, or broken. Finally you will be checking the tires, rims, and axle seals to make sure the tires are properly inflated, the rim isn't bent or cracked, and the axle seals are not leaking.
Fuel Tank And Battery Area

You will be standing along the side of the tractor doing a series of checks on the mirrors, fuel tanks, batteries, exhaust system, and more. You will check to make sure nothing is bent, cracked, broken, or leaking.
Check the mirrors, door hinges, door handle to make sure nothing is cracked, bent, or broken. Check to make sure there is no fuel leaking and that the fuel cap is secured and the gasket is not missing.
Check the exhaust system to make sure nothing is cracked, bent, or broken. Check the driveshaft, cat walk, and steps to make sure nothing is cracked, bent, or broken.
Check the frame and crossmembers for structural integrity. Check the air lines going to the trailer to make sure they're properly connected and that there are no abrasions, bulges, or cuts. Make sure the gaskets are present.
Check the suspension system and brakes on the drive axles, making sure nothing is cracked, bent, or broken. Make sure the brake linings are the proper thickness and that the air bags and properly inflated. Inspect the brake chambers, slack adjusters, and pushrods are properly mounted and secure. Not Cracked, Bent, or Broken. With the brakes released and pulled by hand, the Push Rod should not move more than 1 inch.
Check the rims, tires, and axle seals of the drive tires for proper inflation, no leaks around the seal, and the lugs are all present and secured.
Coupling System

You will be standing where the tractor and trailer are connected and you'll start by checking the electrical line and air lines to make sure they're properly mounted and secure at both ends. No abrasions, bulges or cuts. Not leaking air. Make sure the electrical line has no wires exposed. Check the gladhands to make sure the seals are in good condition, no cracks or signs of dry rotting. Not leaking air.
Check the skid plate of the fifth wheel and the apron of the trailer to make sure there is no debris and nothing is cracked, bent, or broken. Make sure the fifth wheel is properly greased. Also make sure there is no gap in between the fifth wheel and the trailer apron once the tractor and trailer are coupled. Make sure the kingpin of the trailer is properly mounted and not cracked, bent, or broken and that the locking jaws of the fifth wheel are properly secured when the tractor and trailer are coupled.
Check the mounting bolts where the fifth wheel attaches to the tractor frame. Make sure there are no missing bolts and that everything is secured properly. Check the locking pin if you having a sliding fifth wheel to make sure it's properly locked into place.
Make sure that there is the proper clearance space between the tractor mudflap and the trailer landing gear so that they don’t hit each other when making a turn.

You will start inspecting the trailer at the head board, which is the front wall of the trailer. Make sure there are no holes or missing rivets. Check the landing gear to make sure it is properly mounted and secure. Not cracked, bent, or broken. Make sure the fully raised and the handle is secure in the cradle when the tractor and trailer are coupled.
Check the frame and crossmembers under the trailer to make sure they're not cracked, bent, or broken. Check the tandem frame and release pins to make sure the frame is in good condition and the release handle and locking pins are in the fully locked position.
You will check the entire suspension and brake system for the trailer tandems the same way you did for the drive axles of the tractor. You will also make sure the mudflaps are properly secured. For dual tires check to see that there is proper space between the tires and there is nothing stuck between the tires.
Check the rear door and hinges to make sure they are properly mounted and nothing is cracked, bent, or broken. Make sure the door seals are not worn, torn, or dry rotted.
Light Check

You will be checking all of the lights and reflectors on both the tractor and the trailer. Check the reflectors and reflective tape to make sure they are properly mounted and secure, not cracked, bent, or broken, and clean and illuminated. Check that you have the proper color of amber to the front and sides, and red to the rear.
Start by turning on your marker lights and headlights. Now walk around the entire truck and trailer and point out the lights. Give the function of the light and the location. You should then ask your examiner to help you check your five functions.
While you're sitting in the drivers seat, the examiner will stand to the front of the truck, then behind the trailer. He will then check your Turn Signals, Four Way Flashers and Brake Lights. You must do each function at every location.
The five locations that you must check your lights:
- Front of the Truck
- Both sides of the Truck
- Rear of the Truck
- Both sides of the Trailer
- Rear of the Trailer
The Five Functions you are checking for:
- Left Turn Signal
- Right Turn Signal
- Four Way Flashers
- High Beams/Low Beams
- Brake Lights
In-Cab Inspection

The in-cab inspection and air brake check will cover the various gauges and systems inside the cab along with several tests to make sure you air brake system is working properly.
You will start by checking the following:
- Seat Belt- Properly Mounted and Secure. Not ripped or frayed Adjusts and latches properly.
- Fire Extinguisher- Properly Mounted and Secure. Fully charged
- Three Red Reflective Triangles- My three red reflective triangles are GIVE LOCATION
- Spare Electrical Fuses- My spare electrical fuses are GIVE LOCATION
- Volmeter, Oil Pressure Gauge, Water Temperature Gauge, and Air Pressure Gauge all show proper operation
- City horn and air horn functioning properly
- The windshield and mirrors are clean, no cracks or breaks, no obstructions. The mirrors are in proper adjustment.
- Windshield Wipers and Washers - Demonstrate that the washers work by spraying the windshield. The Wipers are: Properly Mounted and Secure and operate smoothly. The blades aren't cracked or dry rotten.
- Heater and Defroster - Demonstrate that both the Heater and Defroster are working properly.
- Lighting Indicators - Left Turn, Right Turn, Four Way Flashers, and High Beams.
Trailer Parking Brakes - Set the Trailer Brake, release the tractor brake, and then tug lightly on the trailer.
Tractor Parking Brakes- Then set the Tractor Brake, release the trailer brake, and then tug lightly on the tractor.
Service Brake Check - Release both Tractor and Trailer Brakes. Now drive at idle speed. Apply the Service Brake to make sure you come to a complete stop, and that it doesn't pull to the left or right when applying the brakes.
Air Brake Test

The air brake test will consist of a leakdown test to make sure your air brakes aren't leaking air and losing pressure. It will also test the warning lights and buzzer to make sure the driver gets the proper warning if the air pressure drops too low.
There are three stages to an Air Brake Test
#1: Applied Pressure Test
#2: Warning Light and Buzzer
#3 Tractor/Trailer Protection Valve Pop Out
Applied Pressure Test: Build the air pressure to governor cut out. Put the truck in the lowest gear. Then turn off the engine Immediately turn the engine back on. Push in both the tractor and trailer valves. (This will release the parking brakes.) Push and hold the Brake pedal fully. Allow the gauges to stabilize. Announce the gauges have stabilized and the Primary and Secondary PSI. With the Brakes fully pressed, you should not lose more than 4 PSI in one minute. Announce that you are listening for air leaks during that minute.
Warning Light and Buzzer Test: Pump down on the Brake pedal until the warning light and buzzer comes on, at or before 60 PSI.
Tractor/Trailer Protection Valve Pop Out Test: Pump down on the brake pedal until both the tractor and trailer protection valves pop out. They should both pop out between 40 and 20 PSI.
We have a ton of Pre-Trip Inspection Practice Questions along with the answers and a complete scoring system in our Free Online CDL Practice Tests :
The Engine Compartment Section will include questions about checking the oil level and coolant levels, inspecting belt-driven engine components (like the water pump, alternator, and air compressor), and the safety devices required in the cab. There will also be questions regarding the windshield wipers and free play in the steering wheel.
The Lights And Brakes Section will include questions about dashboard indicator lights, inspecting the parking brakes, and doing a leakdown test on the air brakes. It will also include questions about the low air pressure warning signal and testing your air horn and city horn.
The Suspension And Steering Section will include questions about the tractor protection valve, inspecting the steering box, and inspecting many suspension system parts. It will also include questions about welds being present on tire rims and the minimum tread depth required on steering axle tires.
The Tires And Coupling Devices Section will include questions about shiny trails or rusty threads on lug nuts, inspecting the battery box and cover, and inspecting electrical lines. It will also contain questions about inspecting the coupling devices and the fifth wheel skid plate.
The Emergency Equipment And Fifth Wheel Section will include questions about additional emergeny equipment required by school buses, inspecting the gap between the kingpin apron and the fifth wheel skid plate, and the landing gear securement. It will also contain questions about inspecting driver mirrors and the trailer frame.
Pre-Trip Inspection Checklist - Class A
Our pre-trip inspection checklist covers every part of the truck from front to back, both inside and outside of the truck. It covers the air brakes, suspension parts, steering components, wheels and rims, fuel tanks, batteries, lights, and more. It also covers the air brake tug test and checks for everything under the hood including alternator, water pump, fuel pump, fluids, and more.
This is a super handy checklist to study anytime you have a few minutes to spare:
Pre-Trip Inspection Checklist - Free Word Document Download (Editable Version)
Pre-Trip Inspection Checklist - Free PDF Download (Print Version)
Pre-Trip Inspection Video By Apex CDL Institute
Jeff from Apex Institute does an in-depth explanation of the entire pre-trip inspection process. This video is loaded with tips that go beyond the CDL test to help drivers really understand how to identify problems.
Pretrip Inspection Self-Test By CDL College
The Pretrip Inspection Self-Test By CDL College is really unique. It's a silent video which will show you the part you're inspecting and then gives you a few seconds to figure out what you should be checking for before giving you the answer. Definitely check this one out. Great for practicing before the CDL exam.
Pre-Trip Inspection Video By Averitt Express
This is a complete back to front pre-trip inspection of a truck and trailer by Averitt mainentance associate Kevin Breeding. This thorough pre-trip inspection covers all inportant points of inside the cab, lights, engine, the tractor itself and the trailer.
We have included two print versions of the pre-trip inspection process from Daniel. The first is the entire pre-trip inspection and the second is an abbreviated checklist for the inspection.
- PDF: Daniel's Pre-trip Inspection (Print Version)
- PDF: Daniel's Pre-trip Inspection Checklist (Print Version)

Why Join Trucking Truth?

- The High Road Training Program
- The High Road Article Series
- The Friendliest Trucker's Forum Ever!
- Email Updates When New Articles Are Posted
Apply For Paid CDL Training Through TruckingTruth
Did you know you can fill out one quick form here on TruckingTruth and apply to several companies at once for paid CDL training? Seriously! The application only takes one minute. You will speak with recruiters today. There is no obligation whatsoever. Learn more and apply here:
- Privacy Policy

Join 100,000+ Drivers
- Sponsorship
- Thinking of Becoming a Truck Driver?
- Getting a CDL License
- Trucking Driving Jobs Guide
- Trucking Company Guide
- Trucker Life
- Paid CDL Training
- CDL Schools
- Professional Driving Skills + Knowledge
- Owner Operator
- Latest Articles
- Truck Driver Skills
The Pre-Trip Inspection: A Practical Guide For the Truck Driver
Updated February 24th, 2022

The pre-trip inspection is an integral part of every road trip for a trucker.
It’s probably the most disliked and most often overlooked part of the job of the professional truck driver in the trucking industry.
This inspection is meant to be a thorough check of the truck, trailer and load.
The check is to ensure that everything is in correct working order, prior to the truck and driver, departing on a trip.
Any damage or issues found during the pre-trip inspection which needs attention, must be addressed before departure.
CDL Test Pre-Trip Inspection
If you just came through the process of getting your CDL, you can breathe a sigh of relief.
You don’t have to check all 500 or so items that you had to memorize for the test every single day.
Out on the road, a thorough pre trip shouldn’t take more than 10 to 15 minutes.
DVIRs – Daily Vehicle Inspection Report
According to federal law ( FMCSR Section 396.11 ), every day, a driver must submit a Daily Vehicle Inspection Report (DVIR) for each power unit he operates. Multiple trailers can go in one report.
DVIRs are either paper or electronic.
Not every trucking company (ahem) enforces this policy, so some truck drivers can go months or years without submitting a DVIR.
Minimum DOT Pre-Trip Inspection Requirements
- Service brakes including trailer brake connections
- Parking brake
- Steering mechanism
- Lighting devices and reflectors
- Windshield wipers
- Rear vision mirrors
- Coupling devices
- Wheels and rims
- Emergency equipment
Your trucking company’s DVIR might be more thorough.
This is a thorough Q&A on DVIRs which you can refer to.

Inspecting a New Truck
When you are assigned a new truck (either daily or just once), there are a few additional things you need to check for on the pre-trip inspection.
Truck Compliance
- Cab card and book – This is a book containing the registration, inspection, permits, cab cards, IFTA paperwork, and any other important papers for the truck. Make sure it is in the truck and all the paperwork is up to date.
- Inspection sticker – This is outside the truck. Find it and make sure the truck is not overdue.
- IFTA stickers – These are the fuel tax compliance stickers. They are on both sides of the truck. Make sure the current year is displayed.
- Elog device – Most trucks are required to have a working elog device.
- Required permits – These are in the cab card book. The most common permits are Heavy Motor Vehicle Trip Permit (Oregon) and the Weight Distance Tax Permit (New Mexico).
- New York HUT sticker – This is usually on the front of your truck. It’s a type of permit.
- License plate – Make sure the license plates on the front and back of the truck match.
- FMCSA Safety Regulations and Hazardous Materials book – These will be given to you by your company. They must stay in your truck within arms reach from the driver’s seat.
- Paper logbook – If your e-log stops working, you must log your hours in a paper logbook, which must be kept in your truck.
- Medical card – You must keep your current medical card in your truck. Always have your CDL on you as well.
- Orange triangles – You must have 3 triangles for when you break down.
- Fire extinguisher – Must be charged and secured to the truck. No rolling around on the floor.
- Extra fuses – If your truck doesn’t use circuit breakers, you must have spare fuses.
- Load bars and/or straps
- Extra oil, coolant, and windshield washer fluid
- Line antifreeze and diesel anti-gel
- Chains and bungees
- Gladhand seals
- Hammer, wrench, wire cutters, cable cutters, knife with glass-breaker
The Class A Pre-Trip Inspection Process
Unless I have to bobtail to pick up my trailer, I inspect my truck and trailer together.
The best way to memorize a thorough pre trip is to do it the same way each time.
Your process will look different from mine, but as long as you are consistent, you will be less likely to miss anything.
I do the inspection first thing each morning as well as every time I swap trailers.
Paperwork and Trailer
- Check the paperwork. It should be the first thing checked when you get to your truck.
- Match the trailer number to your paperwork. If your trailer has a seal, make sure it matches too.
- Unsealed trailer. If your trailer does not have a seal, open it and confirm the product matches the bills. If you are picking up an empty trailer, open it and make sure it’s actually empty.
- Confirm your destination. Ensure the destination is the same as on your trip sheet or load assignment. If there is a discrepancy, call your dispatcher.

I personally like to start with checking under the hood of the rig. Not everyone does, but I do.
Under the Hood of the Truck
I walk around the front of the truck, making sure all the lights work. Then I open the hood.

- Fluid levels – Check all fluids: coolant, oil, power steering fluid, and windshield washer fluid. Make sure caps are tight for the rad, oil filler, power steering fluid and the dip-stick is seated properly.
- Alternator, water pump, power steering pump –Make sure these are in good working order, and the belts are not worn or have too much slack.
- Observe at the engine block. Check for leaks, fluid running down the side of the engine. Check for wear, cracking or fraying. Inspect fan belts for proper tension and signs of wear.
- Hoses – Check all hoses for leaks, cracks, and tears.
- Wiring – Check wiring for wear.
- Steering linkage – Check linkage for worn or missing parts.
- Tires – Tires should be properly inflated and have decent tread. If there are flat spots on the tire, it needs to be replaced.
- Hub seal – Make sure it’s not leaking and wiped with oil if transparent.
- Brakes – Brake chambers should not be out of round and should be free of grease. Shoes should not be worn down too much.
- Slack adjusters – Pull slack adjuster. If it travels more than an inch, it needs to be adjusted.
- Suspension – Shocks should be in good condition, and not covered in grease or oil.
Back of the Truck
Next, I check the back of my truck because it’s easier to check this before hooking to a trailer.
- Tires – Tires should be properly inflated and have decent tread. If the tires have flat spots, the tire needs to be replaced.
- Suspension – Shocks and airbags should be in good condition, and not covered in grease or oil.
- Drive shaft – Driveshaft should be undamaged and free of grease. Make sure there is no debris in the u-joints.
- Frame – The frame should not have any welds and not cracked or significantly rusted.
- Fifth wheel – The fifth wheel should be properly greased and not broken.
- Fuel tanks – Fuel tanks should not be leaking.
- Stairs and catwalk – Stairs and catwalk should be free of debris and not broken.

Tires should be checked with a tire gauge.
Tip . This is especially if you are slip seating. Tire thumpers aren’t very accurate. If you use a tire thumper, still check with a tire gauge from time to time.
Drives and tandems should be inflated to 100-110 psi and have a minimum tread or 2/32in. Steer tires should be inflated to 110-120 psi and have a minimum tread of 4/32in.
Tires under 50 psi should be replaced, as they can’t retain enough air pressure.
Flat spots can occur from dragging tandems in the winter or when trying to slide the tandems. Tires with flat spots should be replaced.
Check tires for damage, nails, and punctures.

Next, I jump in my cab and start my truck.
- Gauges – Make sure air, oil, and water temperature gauges rise to normal levels.
- Mirrors – Adjust mirrors before moving your truck.
- Windshield wipers – Make sure they work and sit flat against the windshield.
- Horn – Make sure the city and air horns both work.
- Heat and A/C – Check to see if heat and/or air conditioning is working.
- Seat belt – Seat belt should not be frayed and should move freely.
Coupling and Air Lines
This is what could happen if you don’t do the tug test.
The pre-trip inspection is a pretty important thing to do.
Learn your pre-trip procedure and do it when required.
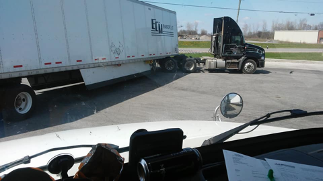
This is why you should always do a tug test when picking up a trailer. The passenger side of the front of the trailer is resting on the frame of the truck and NOT hooked up to the 5th wheel.

The front left corner of the trailer is supported by retracted landing gear only. (Not good!)
The truck driver in this photo (hopefully) learned how critical a pre-trip is. Don’t end up in a pickle like this guy.
Next, I hook up to my trailer.
- Tug test – I back under my trailer until I hear a click, and then immediately do a tug test.
A tug test tests both your coupling and your brakes. If you pull away from your trailer, you aren’t hooked properly.
If you pull your trailer with you, your trailer brakes are out of adjustment. Be absolutely sure to write it up and have it corrected before departure.
- 4 Ways + Headlights. I also turn on my four-way flashers and headlights.
- Airlines and pigtails – Next, hook up airlines and pigtails (electrical connection). Inspect to make sure they aren’t leaking or ripped.
- Visual check of Fifth wheel – Look at the fifth wheel arm under the trailer to make sure it is coupled. The arm should be in.
- Landing gear – Raise the landing gear and check for damage.

Next, I check the bulkhead (front of the trailer).
- Wall – Make sure the wall is not damaged.
- Inspection sticker – Check the DOT inspection sticker to make sure it’s not out of date.
- Registration paperwork – Check the front trailer box to make sure the registration is good.
- Reefer unit – If you are pulling a reefer, select the pre trip function on the unit and run it. It should be completed by the time you are finished your pre trip inspection.
Next step for the pre-trip inspection is to check the side of the trailer and the tandems.
- Lights – Lights should be on and flashing.
- Suspension – springs or airbags should be in good condition, and not covered in oil or grease.
- Tandem pins – Tandem pins should be locked in position, and slider arm should be in its cradle.
- Cables – Make sure the tandem cables aren’t dragging on the ground.
- Underbelly – Make sure there are no damaged beams under the trailer. Check the entire length.
- Mudflaps – Mud flaps should not be torn and hanging.
Back of Trailer
Next, I check the back of the trailer.
- Doors – Doors and hinges should not be damaged.
- Door latches – Doors should be closed and secured.
- Seal – Seal should be intact and match paperwork.
- DOT bumper – DOT bumper should not be damaged
- License plate – Check for the license plate. They tend to wear out and fall off.
Passenger Side
Next, I check the passenger side.
- Brakes – Brake chambers should not be out of round and should be free of grease.
- Suspension – Springs or airbags should be in good condition, and not covered in grease or oil.
- Mudflaps – Mud flaps should not be torn.
Ready to Roll

Finally, I jump in my truck and double check my paperwork and destination.
I release my air brakes, roll forward, and push the service brake.
If everything is good, I’m ready to roll.
Post-Trip Inspection
When I’m done for the day, and every time I swap trailers, I do a post-trip inspection. If I am swapping trailers, I do a pre-trip on the new trailer as well.
A post-trip includes:
- lowering the landing gear
- removing the airlines
- uncoupling, and walking around the trailer checking tires, lights, seal, and mudflaps
Then I finish my paperwork and go home.
Slip Seating
If you slip seat (meaning you are in a different truck each shift), your pre- trip check should be more thorough than if you are permanently assigned a truck.
This also applies to the first inspection after being assigned a truck.
Please be courteous and write up any problems or issues found, so the next driver of the vehicle doesn’t have to deal with it.
Side Note: Clean out your truck and throw away any trash. Common courtesy goes a long way in trucking, between drivers.
Pre-Trip Inspection F.A.Q.
Most breakdowns can be avoided with proper preventative measures, such as daily inspections.
Thorough inspections should be done at the start of each shift. Inspections of trailers should be done every time you swap trailers.
Each driver should do a thorough pre-trip every time they swap drivers.
It should take about 10-15 minutes to perform a pre trip inspection.
The DOT. Make sure you stay in compliance so you don’t end up with hefty fines and an out of service.
The best way to memorize your pre trip inspection routine, is to do it the same way every time. That way you’re less likely to miss something. If you have questions, ask your safety team at your company.
Fluids in the engine, engine hoses and wires, brakes and suspension, mudflaps, trailer registration and inspection paperwork, and license plates.
A Few Trip Planning Tips

- Buy and learn to read a trucker’s atlas. It’s useful to plan routes and avoid restricted roads. I find this road atlas a necessity as a professional truck driver.
- Buy a decent trucking GPS , but don’t rely on it 100%. Use common sense.
- Don’t use the GPS in your elog device. It will put you in a lake.
Please note that minimum requirements for the inspection are established by the FMCSA.
But these may vary by state, trucking company, truck type, and trailer type.
It is your duty as a professional truck driver to perform a thorough pre-trip inspection before each trip and before you drive.
You’ll save yourself from headaches, fines and unnecessary accidents.

More Articles You May Like
- Trucking Terms – A Guide to Our Industry’s Lingo
- The 18 Wheeler – A Comprehensive Guide to Big Rigs
CDL Truck Driver Skills – Tips, Tricks + Knowledge to Kick Your CDL Skills Up a Notch!
- The D.O.T. Physical- A Guide For the Truck Driver

Everything You’ll Want To Know About Paid CDL Training

Custom Big Truck Sleepers Photo Gallery Collection

The Best Trucking Companies to Work For 2024 USA

5 Best GPS For Truckers – A Professional Driver’s Guide
Twice a month we email you the best tips and new articles to help you better navigate the trucking industry..

10 Truck Driving Safety Tips Every Professional Driver Should Follow
A veteran 40+ years truck driver shares 10 of the all time, tried and true truck driving safety tips ALL professional truckers should know AND follow! If every driver of EVERY vehicle on the road followed these safety tips, our roads would be SO much safer.

Trucker Tips Master Guide: Expert Advice From Experienced Truck Drivers
A collection of trucker tips from million milers and experienced drivers. These are gold nuggets for the new truck drivers!

Instruction, clear advice, videos and photos for truck driver skills, maneuvers and information for all professional truck drivers.
A practical guide to paid CDL training programs. Recommended Company Sponsored Schools, Requirements, pros + cons, what to expect from company-sponsored cdl training programs.
Is a Career As a Department of Defense Truck Driver For You?
As a Department of Defense (D.O.D.) truck driver, your role is integral to the logistics and supply chain operations of […]
Navigating Fair Truck Driver Pay: Are You Earning Enough?
Ready to take control of your truck driver pay? Discover key factors impacting your earnings and ensure you’re compensated appropriately […]
The Best Tanker Trucking Companies to Work, U.S., 2024
Top Tanker Trucking Companies in the US To Work For Tanker work typically falls to the ‘better carriers’. Tanker carriers […]
Best Flatbed Trucking Companies, US, 2024: Our Top Picks
There are over 1 million truck drivers working for flatbed trucking companies in the U.S. trucking industry. However, not all […]
Best Trucking Companies For New Drivers in the U.S., 2024
For new drivers entering the trucking industry, diving into the right pool can make all the difference. The foundation of […]
Follow Smart Trucking

- Mobile Tire Service
- Belts & Hoses
- Michelin Tires
- Bridgestone Tires
- Yokohama Tires
- Firestone Tires
- Sumitumo Tires
- Falken Tires
- Continental Tires
- General Tire
- Synergy Tires
- Venom Power Tires
- Commercial Tire Retreading
- Commercial Truck Wheels
- Passenger Tires
- Light Truck Tires
- Small Trailer Tires
- Small OTR / AG Tires
- Medium Duty Truck Tires
- Commercial Truck Tires
- Motorhome / Coach Tires
- Commercial Fleet Services
- Bell County
- Williamson County
- Milam County
- McLennan County
- Lampasas County
- Hamilton County
- Falls County
- Coryell County
- Bosque County
- Ryan Keating
DOT Pre-trip Inspection Guide
If you’re only getting paid when you’re out on the road, you want to make sure you head out as quickly as possible every day. But as great as it is to get started on your route for the day, you should never hit the open road without first doing your DOT pre-trip inspection and completing your DOT pre-trip inspection checklist.
While your CDL school will teach you how to do a DOT pre-trip inspection thoroughly, here’s a quick introduction to get you started so you and others stay safe while you’re heading down the highway.
What Is a Pre-trip Inspection?
A pre-trip inspection is simply a thorough check of your truck to make sure everything is functioning before you get behind the wheel. Completing your DOT pre-trip inspection checklist gives you a chance to make sure your vehicle is safe and allows you to address any issues or potential issues before you head out on the road. A basic DOT pre-trip inspection includes checking your fluid levels, leaks, tires, 5th wheel, brakes, clutch, shock absorbers, ball joints, kingpins, gauges, lights, and more. Once you’ve completed a check of your truck, you can log your DOT pre-trip inspection in your log books and be on your way. While doing a DOT pre-trip inspection properly takes time, it can save your life.
CDL pre-trip inspections should be taken seriously for several reasons:
- First, it’s a required activity by employers
- Second, your own safety is at stake, as well as the safety of those driving ahead of, behind and alongside you;
- Third, if you’re stopped by law enforcement or a Department of Transportation (DOT) inspector, an infraction could result in fines or instantly render your vehicle “out of service,” which could negatively impact your wallet or your career.
How Long Should a DOT Pre-trip Inspection Take?
There’s no standard or required amount of time a pre-trip inspection should take, but on average, a thorough DOT pre-trip inspection takes around 30 to 50 minutes. While some drivers try to cut corners and do their inspection faster, it’s important to take the time to perform a thorough inspection of your truck now, rather than risk having a breakdown or other issues while you’re on the road later.
Failing to do a complete DOT pre-trip inspection checklist can also land you in hot water if you’re pulled over for a DOT inspection while on route. If you fail a routine DOT inspection, there can be some pretty hefty consequences such as a written warning, fine, suspension, or even jail time if the infraction is serious enough. Long story short—don’t rush your DOT pre-trip inspection.
What Is a Level 1 DOT Inspection?
There are six levels of DOT inspections, but a Level 1 DOT inspection is the most common and most comprehensive. Sometimes you’ll need to stop along a route and complete a DOT inspection. While it might feel inconvenient, it’s important for keeping our roads and highways safe. Thankfully, you can speed the process along by keeping an accurate and up-to-date logbook and understanding what a Level 1 DOT inspection covers.
Your DOT Pre-Trip Inspection Checklist
Once you know how to properly perform your pre-trip check, it can be helpful to have a quick checklist to remind you of all the points you need to hit on your inspection. Each company is going to have its own checklist and its own safety process which comply with Federal Motor Carrier and Safety Administration (FMCSA) guidelines. Each State also follows the guidelines set by FMCSA when conducting a commercial vehicle inspection.
Here are the main points for a Level 1 DOT inspection.
☐ Drug or alcohol use ☐ Use of seatbelts ☐ Logbook record ☐ Medical examiner’s certificate ☐ Hours of service
☐ Brakes ☐ Truck frame ☐ Tires ☐ Suspension ☐ Vehicle inspection report ☐ Coupling devices ☐ Wheels and rims ☐ Turn signals ☐ Van and trailer bodies ☐ Lamps on projecting loads ☐ Windshield wipers ☐ Hazmat placarding ☐ Brake lamps ☐ Tail lamps ☐ Headlamps ☐ Safe loading ☐ Steering mechanism ☐ Exhaust system ☐ Fuel system
As you prepare for your CDL permit test you will learn how to properly conduct a DOT pre-trip inspection step-by-step. Knowing what to expect from a DOT Level 1 inspection will help you feel comfortable and prepared when you do get stopped.
Why Is It Important to Do Pre- and Post-trip Inspections?
The reasons you need to do DOT pre- and post-trip inspections are pretty self-explanatory, but it’s still important to understand why these inspections matter for you, your company, and other drivers on the road. You may have even met drivers who rush through their paperwork and pre-trip inspections to get out on the road quicker. While it’s appealing at the time, doing this can easily result in additional downtime for their vehicles, increased safety issues, and accidents on the road.
Why Are Pre-trip Inspections Important?
Pre-trip checks are in place because not all drivers understand the importance of doing a safety check before they hop behind the wheel. When you drive a massive truck, you have a massive responsibility to keep the road safe. Pre-trip inspections help you catch any safety concerns, save money on vehicle repairs, and reduce liability to yourself and your company.
Why Are Post-trip Inspections Important?
When you’ve just finished a 14-hour shift, the last thing you want to do is a post-trip check of your truck for half an hour. However, a post-trip inspection is just as important as a DOT pre-trip inspection because it gives you the opportunity to repair any issues or potential issues before you need to continue or head out on your route the following day.
Taking the time to do a thorough pre- and post-trip inspection will not only save you time and money, but also lives. Pre-trip inspections make sure you don’t start driving until you know the truck is road safe, while a good post-trip inspection will give you time to fix any issues before you need to head back out on your route.
Are Pre-trip Inspections Required?
DOT pre-trip inspections are absolutely required and are essential for trucking companies, drivers, and owner-operators to run a safe and effective trucking fleet. Drivers are required by law to check their truck before they start their shift and once every 24 hours while they’re on the road. Although companies can be held liable for DOT inspection failures, the ultimate responsibility lies with you, the driver, to conduct a proper pre-trip inspection.
Here are a few more reasons you should always take the time to complete your DOT pre-trip inspection checklist:
It’s Required by Law
As previously mentioned, DOT pre-trip inspections aren’t just there to keep you safe and your truck in good repair—they are required by law by the Federal Motor Carrier Safety Administration. Companies that fail DOT inspections can easily rack up thousands of dollars in fines.
It Protects Drivers
Something as simple as checking your tires could mean the difference between life and death for other drivers. If you get a flat or lose a tire on the interstate you could easily cause a major traffic incident for other drivers. On the flip side, a major accident of your own could mean the difference between your life and death.
It Protects Trucking Companies
Aside from protecting yourself and others, a pre-trip inspection also protects your trucking company from legal liability. Whether you work for a company or are an owner-operator, failure to do a pre-trip inspection appears negligent and can result in fines and be used against you if your case is brought to court.
It Helps Identify Problems
Pre-trip inspections also serve another, very useful service: they allow you to track vehicle repairs and maintenance issues with your trucks. If you’re noticing the same issues cropping up again and again, it may mean a part is defective or that a truck needs to be replaced. Noticing these issues before your truck is on its last leg makes everyone safer on the road.
When you only get paid for your time behind the wheel, it makes sense that some drivers try to cut corners and rush thorough inspections. However, a seasoned driver knows that it’s always better to take the time and do your inspection than to risk losing more time and money—and perhaps even your job—down the road.
- NEWS & EVENTS
- REFERENCE MATERIALS
- LANGUAGE: EN:US
- TIRE BASICS
- TIRE SELECTION TIPS
- TIRE MAINTENANCE & SAFETY
- CURRENT GENERATION TIRES
- PREVIOUS GENERATION TIRES
- FIND A DEALER
- MANUALS BULLETINS AND WARRANTIES
- INDUSTRY LINKS
SELECT LANGUAGE
PRE-TRIP INSPECTION
Every haul starts with your tires.
A mandatory step before taking out the next load should be your pre-trip inspection, which increases safety and improves uptime. (Also, pre-trip inspections are a regulatory requirement.) Make sure you own a calibrated air gauge, then follow the steps below.
THE PRE-TRIP INSPECTION IN SIX EASY STEPS:
- Check your tires for proper inflation. If a tire is 20% below its targeted PSI, it is considered flat and should be replaced. Also, dual tires should be within 10 PSIs of each other.
- Check your valve caps to make sure they are properly secured.
- Look for tread wear and check proper tread depth. Click here to learn more about irregular wear patterns.
- Check for tire cuts or bulges in the sidewall.
- Check wheel and lug nut conditions. Make sure there is no rust or bends.
- Inspect suspension components.
- Free Practice Tests
Commercial Driving
- Introduction
Getting a CDL
- Fees and costs
CDL Types & Permits
Endorsements & Restrictions
CDL Exam Preparation
Written exams
Practical exams
- Skills test
- Pre-trip inspection
- TSA background check
- Retake policy
CDL Maintenance
ELDT Training & Certification
CDL how-to guides
Mastering the CDL Pre-Trip Inspection Exam: A Complete Guide
Learn how to conduct thorough pre-trip inspections with our guide, a critical component for commercial vehicle safety.

Written by Andrei Zakhareuski. With over 16 years of expertise, Andrei leads Driving-Tests.org, a top online resource for driver education. His leadership has established vital partnerships with over 2,600 libraries, educational bodies, and state agencies.
The CDL Pre-Trip Inspection Exam is an integral part of obtaining your commercial driver’s license. This guide covers Class A and Class B pre-trip inspections, provides a checklist, and offers tips for memorizing the inspection process.
Start a free Pre-Trip Inspection practice test:
- Alabama - AL - Alabama Pre-Trip Inspection Practice Test
- Alaska - AK - Alaska Pre-Trip Inspection Practice Test
- Arizona - AZ - Arizona Pre-Trip Inspection Practice Test
- Arkansas - AR - Arkansas Pre-Trip Inspection Practice Test
- California - CA - California Pre-Trip Inspection Practice Test
- Colorado - CO - Colorado Pre-Trip Inspection Practice Test
- Connecticut - CT - Connecticut Pre-Trip Inspection Practice Test
- Delaware - DE - Delaware Pre-Trip Inspection Practice Test
- District of Columbia - DC - District of Columbia Pre-Trip Inspection Practice Test
- Florida - FL - Florida Pre-Trip Inspection Practice Test
- Georgia - GA - Georgia Pre-Trip Inspection Practice Test
- Hawaii - HI - Hawaii Pre-Trip Inspection Practice Test
- Idaho - ID - Idaho Pre-Trip Inspection Practice Test
- Illinois - IL - Illinois Pre-Trip Inspection Practice Test
- Indiana - IN - Indiana Pre-Trip Inspection Practice Test
- Iowa - IA - Iowa Pre-Trip Inspection Practice Test
- Kansas - KS - Kansas Pre-Trip Inspection Practice Test
- Kentucky - KY - Kentucky Pre-Trip Inspection Practice Test
- Louisiana - LA - Louisiana Pre-Trip Inspection Practice Test
- Maine - ME - Maine Pre-Trip Inspection Practice Test
- Maryland - MD - Maryland Pre-Trip Inspection Practice Test
- Massachusetts - MA - Massachusetts Pre-Trip Inspection Practice Test
- Michigan - MI - Michigan Pre-Trip Inspection Practice Test
- Minnesota - MN - Minnesota Pre-Trip Inspection Practice Test
- Mississippi - MS - Mississippi Pre-Trip Inspection Practice Test
- Missouri - MO - Missouri Pre-Trip Inspection Practice Test
- Montana - MT - Montana Pre-Trip Inspection Practice Test
- Nebraska - NE - Nebraska Pre-Trip Inspection Practice Test
- Nevada - NV - Nevada Pre-Trip Inspection Practice Test
- New Hampshire - NH - New Hampshire Pre-Trip Inspection Practice Test
- New Jersey - NJ - New Jersey Pre-Trip Inspection Practice Test
- New Mexico - NM - New Mexico Pre-Trip Inspection Practice Test
- New York - NY - New York Pre-Trip Inspection Practice Test
- North Carolina - NC - North Carolina Pre-Trip Inspection Practice Test
- North Dakota - ND - North Dakota Pre-Trip Inspection Practice Test
- Ohio - OH - Ohio Pre-Trip Inspection Practice Test
- Oklahoma - OK - Oklahoma Pre-Trip Inspection Practice Test
- Oregon - OR - Oregon Pre-Trip Inspection Practice Test
- Pennsylvania - PA - Pennsylvania Pre-Trip Inspection Practice Test
- Rhode Island - RI - Rhode Island Pre-Trip Inspection Practice Test
- South Carolina - SC - South Carolina Pre-Trip Inspection Practice Test
- South Dakota - SD - South Dakota Pre-Trip Inspection Practice Test
- Tennessee - TN - Tennessee Pre-Trip Inspection Practice Test
- Texas - TX - Texas Pre-Trip Inspection Practice Test
- Utah - UT - Utah Pre-Trip Inspection Practice Test
- Vermont - VT - Vermont Pre-Trip Inspection Practice Test
- Virginia - VA - Virginia Pre-Trip Inspection Practice Test
- Washington - WA - Washington Pre-Trip Inspection Practice Test
- West Virginia - WV - West Virginia Pre-Trip Inspection Practice Test
- Wisconsin - WI - Wisconsin Pre-Trip Inspection Practice Test
- Wyoming - WY - Wyoming Pre-Trip Inspection Practice Test
CDL Class A Pre-Trip Inspection
Engine Compartment Inspection
Includes checking for leaks, belt tension, and the condition of hoses, among other components.
Cab Check/Engine Start
Involves inspecting the cab’s interior, gauges, and starting the engine to check for abnormalities.
Brake Check
Focuses on air brake systems, including air brake checks and the parking brake test.
CDL Class B Pre-Trip Inspection
Vehicle Overview
Begin with a general overview of the vehicle, checking for obvious signs of damage or issues.
External Inspection
Inspect all external components, including tires, lights, and mirrors.
Internal Inspection
Check all internal controls, ensuring everything is functional and within reach.
Pre-Trip Inspection Checklist
- Lights and reflector s: Ensure all are clean and functional.
- Engine oil and coolant levels : Check for adequate levels.
- Steering mechanism : Ensure it’s secure and functioning.
- Horn : Test for functionality.
- Windshield wipers : Check for operability and condition.
- Mirror s: Adjust for optimal visibility.
- Emergency equipment : Ensure presence and accessibility.
- Air brake system : Test for leaks and proper pressure.
Tips for Memorizing the Pre-Trip Inspection for CDL
- Create a Routine : Develop a consistent order in which to conduct your inspection.
- Use Mnemonics : Create acronyms or phrases to help remember the steps.
- Practice Regularly : Hands-on practice is the most effective way to memorize the inspection process.
- Visual Aids : Use diagrams or checklists as visual reminders.
Pro Tip : Practice the pre-trip inspection in a real-world setting. The more you perform the inspection in a practical environment, the more natural it will become.
Remember, the pre-trip inspection is not just a test requirement – it’s a fundamental safety practice every commercial driver should master. For more resources and detailed guides, visit Driving-Tests.org .
Secure your CDL with confidence!
Our exclusive CDL Premium program offers comprehensive online training with an ELDT certificate, authentic exam questions, and a solid Pass Guarantee, starting at only $49. Ideal for first-time applicants, seasoned drivers, and those new to the U.S. road rules.
Explore CDL Premium
Was this page helpful?
- Start a free Pre-Trip Inspection practice test:
- CDL Class A Pre-Trip Inspection
- CDL Class B Pre-Trip Inspection
- Pre-Trip Inspection Checklist
- Tips for Memorizing the Pre-Trip Inspection for CDL
Prime’s Guide to Pre-Trip Inspections
Tractor-trailers can weigh up to 80,000 lb . if you count the semi, trailer and cargo. Operating a heavy tractor-trailer can be dangerous, so drivers undergo extensive training to earn their CDLs and start their careers.
Whether studying for your CDL test or heading to your next customer, pre-trip inspections help you catch problems with your vehicle or trailer. Unchecked issues can lead to accidents or extensive repairs.
Do you know how to perform a pre-trip inspection? Need a quick refresher? Follow our guide to pre-trip inspections to learn the basics. Reach out to our Safety Department for more in-depth information.
Use these quick links to jump to sections of the article:
- The Engine Inspection
- Driver Door Area & Tires
- Trailer Pre-Trip Inspection
Lights & Reflectors
In-cab pre-trip inspection , large truck crash statistics .
Knowing how to operate a semi-truck safely in various conditions is imperative for drivers. In 2019, there were 510,000 large truck crashes, according to FMCSA’s 2021 Pocket Guide to Large Truck and Bus Statistics .
Of these crashes, 4,479 were fatal, and 114,000 were injury crashes involving large trucks. Most fatal large truck crashes involved those weighing more than 33,000 lb.
Accidents happen. Drivers can mitigate their risk of an accident by being responsible behind the wheel , following federal regulations and performing pre- and post-trip inspections.
Your Pre-Trip Inspection Checklist
Drivers must provide a vehicle inspection report at the end of each day. Vehicle inspection reports list any issues that could affect the vehicle’s operation and safety. Inspecting vehicles before and after each trip helps catch problems and keep drivers safe.
At a minimum, each report covers the following parts of a vehicle :
- Coupling devices
- Emergency equipment
- Lights and reflectors
- Parking brakes
- Service brakes
- Steering mechanism
- Tires and rims
- Windshield wipers
Pre-trip inspections take around 15 to 20 minutes. You’ll examine your truck and trailer to ensure it’s ready for the trip.
Before every haul, you should check that you have your license, registration, medical card, updated inspection sticker and FMCSA Safety Regulation manual. If you’re picking up a trailer, always make sure the trailer number matches the number listed on your assignment.
Follow these steps to inspect your tractor-trailer, and watch our video on Prime’s pre-trip inspections . Chock your tires before you begin, so the vehicle doesn’t roll or slip.
Under the Hood: Examining the Engine
Start your pre-trip inspection by looking at the engine. Lower the gear guard so you can open the hood. Remove pins and unlatch the hood to do so. Once the hood is open, step back and look underneath the truck to see if there are any leaks.
Passenger Side
On the passenger side, make sure that your general hoses and alternator are free of cuts, abrasions or cracks. Hoses should be sufficiently secured, exhibiting no signs of leaks.
Driver’s Side
Walk around to the driver’s side and conduct a similar examination. Look at the parts listed below for signs of wear, abrasions and leaks. Your coolant and oil levels should be filled to the manufacturer’s specifications. Keep an eye out for fraying belts, improperly secured parts, and missing castle nuts and bolts.
- Air compressor
- Belt-driven water pump
- Coolant reservoir
- Gearbox and hoses
- General hoses
- Power steering fluid
- Power steering pump
- Shock absorber
- Spring hangers and arm
- Steering linkage
Check Your Brake System
Drivers must check the brake hose, brake chamber and slack adjuster. When pulled by hand, the push rod should not move more than 1” with the brakes released.
Your brake line should be free of debris and oil, and the hose material shouldn’t be worn too thin.
Outside Driver Door Area & Tires
If the engine looks good, inspect the outside of the truck.
- Check your mirror on the driver’s side to ensure it is clean and firmly mounted to the vehicle.
- Open the driver’s door, and examine the door’s seals and hinges for cracks or dry rot.
- The fuel cap should be on tight, and the fuel seal should not leak.
- Ensure that the catwalk and steps at the back are clear of any objects or debris.
In addition to the steps above, drivers should look at the following parts for damage, wear or debris buildup:
- Brake hose, chamber, lining and drum
- Drive shaft
- Frame and cross members
- U-joints and bolts
Check Your Tires (All of Them!)
The tires on your tractor-trailer should have a tread depth of no less than 0.125” and be aired according to the manufacturer’s standards. You can check the air pressure with a gauge and adjust it based on your load and the temperature .
The rims shouldn’t be bent or broken, and there shouldn’t be cracks around the bolt holes. Behind the tire, the mud flap should not be tattered or loosely attached to the vehicle. There should be space between the mud flap and the tire.
Trailer Pre-Trip Inspection
Is the truck good to go? Check! Now it’s time to inspect the trailer. Walk around the trailer and examine it for cracks, abrasions or broken parts.
- Brake hose, lining and chamber
- Frame and cross members
- Shock absorbers
You’ll also want to check that:
- The landing gear is fully-raised with the crank handle secure in its cradle. The landing gear and mud flap should be a proper distance apart.
- The tandem relief’s handle and locking pins are in the fully-locked position.
- The slack adjuster and push rod don’t move more than 1” when pulled by hand.
The back doors of the trailer should latch properly. The trailer’s lock rods and hinges must be intact and not bent. Your trailer should also have door chains for safety when loading and unloading.
Coupling: Back of Tractor, Front of Trailer
A driver’s next step is to examine where the tractor and trailer connect.
- Electric line — Ensure there are no exposed wires. The line should be secure.
- Air line — Your air line should be secured at both ends and not leaking.
- Gladhands — Check for worn or rotted seals on gladhand couplings. Make sure there are no leaks in the gladhands connected to the trailer’s air brakes.
- Trailer apron — No gap should exist between the apron and the skid plate. The skid plate should be lubed.
You should also check the kingpins, mounting bolts, and the sliding fifth wheel and locking pin.
Refrigerated Trailer Inspections
When you inspect one of Prime’s refrigerated trailers , you start by selecting the “pre-trip” option on the trailer’s display. It will take the reefer 10 to 15 minutes to complete a self-inspection and notify you of anything in need of adjustment or repair.
While the reefer’s self-test runs, you should look for any signs of damage on the bottom rail, top rail and sides of the trailer. Reefers are insulated. Drivers need to examine the trailer for cracks and exposed insulation.
You don’t want to drive off without working lights. The lights on your truck and trailer should be securely in place, not cracked and amber in color.
- Clearance lights
- Marker lights
- Headlights
- Tail lights
- Reflective tape on trailer and mud flaps
Once you’ve checked that the lights and reflectors are intact, you should test your lights and turn signals. Climb into your cab and turn the following lights and signals on:
- Left turn signal
- Right turn signal
- Four-way flashers
- Brake lights
Inside your cab, you’ll check that your seat belt latches and is not too worn. Next, check that you have a fire extinguisher that’s charged. Ensure your cab has three reflective triangles under the bunk area and electrical fuses in the glove box.
Once you’ve reviewed your safety gear, adjust your mirrors, start the engine and check the dashboard’s instrument panel:
- Oil pressure — It should be rising as the engine runs.
- Voltmeter — It should show the alternator charging between 13 and 14 volts.
- Air pressure — It should be around 120 to 125 psi.
While you’re here, test the heat and air conditioning, city horn and air horn.
Air Brake Test
With your tires chocked, you can perform an air brakes test. To do so, release both brakes and turn the truck off. When you turn the truck back on, you will apply pressure.
- Apply hard pressure to the brake.
- Watch for the gauges to stabilize.
- Hold a hard brake for one minute. You don’t want to lose more than four psi during this minute.
- Pump down on the brakes until the gauges read at or before 60 psi. Your warning light and buzzer should come on.
- Pump down on the brakes until the tractor and trailer valves pop up between 40 to 20 psi.
Parking Brake Test
After testing your air brakes, you can test your parking brake. Allow the truck to rebuild its air pressure before testing the parking brakes.
- Remove wheel chock.
- Release the tractor brakes and apply the trailer brakes.
- Put the truck in “drive.”
- Give your trailer brakes a light tug, ensuring they hold.
- Switch. Release the trailer brakes and apply the tractor brakes.
- Give your tractor brakes a light tug, ensuring they hold.
- Release both brakes.
- Pull forward to 5 mph, then use the brake pedal. The truck shouldn’t pull left or right. It should come to a smooth stop.
What to Do if There’s an Issue During Pre-Trip Inspection
Contact your fleet manager or road assistance immediately if you find an issue with your tractor or trailer. Prime will take corrective action and advise you on what to do next. Repairs must be made before the tractor-trailer can be dispatched again.
Inspection violations affect both the driver’s and carrier’s records. Violations can decrease a carrier’s CSA score . FMCSA keeps records of driver and vehicle violations. These records are updated monthly.
CDL Pre-Trip Inspection Test
Truck drivers must begin each work day with a pre-trip inspection. The Class A CDL test requires new drivers to know how to do a pre-trip inspection. Student drivers must be able to identify truck and trailer parts and understand how they operate.
You’ll walk an examiner through a pre-trip inspection for that portion of the CDL test. The best way to remember what’s on a pre-trip inspection checklist is to perform inspections the same way each time. The more you practice, the more it will become second nature.
Are you ready to become a driver?
Do you need CDL training? Our Driver Training Program prepares you for your CDL exam and offers experience hauling real loads.
Apply online to start our CDL training program, or contact our Recruiting Department at 866-290-1568 for details.
Recent Posts

What’s The Difference Between Dry Van & Reefer Trucking?

What’s A Good Gift for A Truck Driver?

Truck Driver Exercises to Keep You Fit on the Road
Transportation solutions, carrier solutions, drive for prime, work in house, success leasing.
Created by: Campaignium
Privacy Overview
- Company Culture
- Company Programs
- Leadership Team
- Fleet Maintenance
- Refrigerated Division
- Flatbed Division
- Tanker Division
- Intermodal Division
- Load Tracing
- Documentation
- Qualifications & Expectations
- Pay & Benefits
- Driver Training Program
- CDL Holders
- Driver Awards
- Salt Lake City
- Pittston, PA
- Springfield, MO
- Jobs At Prime
- View Available Loads
- Prime Power Fleet
- Lease & Lease Purchase
- Benefits of Leasing
- How to Get Started
- Pedigree Benefits
- Financing Information
- Equipment Inventory
- Omnitracs Logs
- Company Store
- Submit Pics from the Road
- Driver Verification
Platform Overview
The Connected Operations Cloud
Apps & Driver Workflows
Messaging, dispatch, documents, ELD
Video-Based Safety
AI cameras, driver coaching, safety reports, in-cab alerts
Equipment Monitoring
Location tracking, utilization, continuous diagnostics
Vehicle Telematics
Real-time GPS, routing, fuel, maintenance, electrification
Site Visibility
Remote visibility, proactive alerting, on-the-go access
Integrations
Developer API
Start building with our API
App Marketplace
Install turnkey integrations
OEM Integrations
Unlock embedded telematics data
Experts Marketplace
Find certified Samsara experts
By Business Need
Reduce costs across your business
Automate regulatory compliance
Ensure safety wherever you operate
Identify and eliminate risks
Sustainability
Prepare for transition to renewables
Customer Experience
Build customer loyalty and retention
By Industry
Transportation & Logistics
Food & Beverage
Field Services
Construction
K-12 Schools
Higher Education
Passenger Transit
Customer Success
Customer Stories
Education & Training
Customer Support
Help Center
Developer Portal
Customer Tips
Case Study Highlight

DHL consolidates 7 separate point solutions with Samsara’s integrated platform
Read more ➔

Nutrien Ag Solutions
Nutrien Ag Solutions cuts distracted driving in half 90 days after installing AI Dash Cams
Video Library
Product Tours
Fleet Safety Guide
Business Resilience

State of Connected Operations
See how leaders are adopting cutting-edge technologies, empowering their workforce, and unlocking new revenue streams.
Optimization

Make More Possible
Find ways to make more possible across your organization to empower your workers, increase efficiency, and reduce operational costs.

Build Your EV Fleet
Get the essentials on fleet electrification and better understand how an EV fleet can benefit your business.
Investor Relations
Samsara Ventures
Brand Assets
Featured News

Apply for the 2024 Connected Operations Awards
Samsara's 2023 Environmental, Social, and Governance (ESG) report
What is a Pre-Trip Inspection for Class B CDL?
October 22, 2021

Get Started With Samsara
Key Takeaways
Pre-trip inspections are an important part of a driver’s daily routine. For Class B commercial driver’s license (CDL) holders — many of whom drive passenger-carrying vehicles — a pre-trip inspection can help ensure everyone stays safe. Learn more about what’s involved in a Class B pre-trip inspection.
What is a pre-trip inspection?
A pre-trip inspection is a thorough review and examination of a commercial vehicle's major systems and parts before heading out on a route. Completing the pre-trip inspection is one of the most common and important tasks commercial drivers must perform. Drivers have to perform this vehicle inspection at the start of a new day, every 24-hours, and whenever they change vehicles. After completing this inspection, drivers must complete a driver vehicle inspection report (DVIR) recording the completed inspection.
Pre-trip inspections for class B licensees
The class B commercial driver’s license (CDL) covers both passenger carrying and non-passenger vehicles. These might include straight trucks, box trucks, large passenger buses, dump trucks, waste collection trucks, tractor-trailers and more. Depending on the vehicle driven, the class B pre-trip inspection may have slight variations.
The Department of Transportation (DOT) requires drivers to perform a pre-trip inspection before driving a commercial vehicle. Similar to Class A CDL holders, the actual daily pre-trip inspection takes about 15 minutes or less. Typically, the inspection includes the following with employer and business-specific inspections.
Brakes and air system
Steering mechanism
Lights and reflectors
Tires, wheels, and rims
Windshield wipers
Rearview mirrors
Emergency equipment
Class B CDL pre-trip inspection checklist
When getting a CDL, passing the pre-trip inspection test is much more intensive than the pre-trip inspections drivers perform while on the job. This pre-trip inspection checklist for a Class B CDL gives drivers an overview of what and how to perform an inspection. Check your state’s CDL manual for a complete list of inspection requirements.
See Class A pre-inspection checklist here.
Engine compartment
Fluids - coolant, oil, and power steering : Reservoirs and tanks should not leak. Check hoses for splits or cuts and that they are securely mounted on both ends. Verify proper fluid levels with a dipstick.
Belts - alternator, pumps, compressor : All belts should be securely mounted without cracks or frays. Belt should have no more than 1/2" to 3/4" of play.
Hoses (passenger and driver’s sides) : All hoses, including the power steering hose and coolant hose, should be secured on both ends. They should not have splits, cuts, or leaks.
Air compressor: May be difficult to see. Ensure it’s securely mounted, not broken, cracked or leaking.
Alternator : All wires are properly connected.
Water pump : All hoses are properly connected and not leaking.
Front of vehicle
Steering gearbox and hoses : No damage or leaks. Hose should be secured on both ends. They should not have splits, cuts, or leaks.
Steering shaft/steering column : Not bent or broken.
Pitman arm : All caste nuts and cotter pins are present and tight.
Drag link : Rubber is not split and properly greased.
Upper and lower control arms and tie rod : Tie rod should be secure, not cracked or bent.
Front suspension
Spring mounts/spring hanger : Not cracked or broken
Leaf springs : None are cracked, broken, or shifted.
U-bolts : All accounted for.
Shock absorber : No visible leaks. Leaks will show at the point where the top and bottom of the shock meet. Rubber is not split or shows signs of dry rot.
Airbag : Check rubber for abrasions, cuts or audible leaks plus any missing bolts.
Side of cab and under vehicle
Mirrors and bracket: Hardware attached properly. Mirror should be clean and not broken.
Door and hinges : Demonstrate door operations, latching properly, hinges intact. Door seals should not be torn or rotten.
Steps : Mounted properly and can hold weight.
Fuel tank: Not leaking; cap is tight with seal intact.
Catwalk (if applicable) : Properly mounted and clear of loose objects.
Baggage compartment (if applicable) : Demonstrate door operations, latching properly, hinges intact. Door seals should not be torn or rotten.
Drive shaft : Not twisted, U-joints not broken and free of debris.
Exhaust system: Not loose, no sign of leaks (exterior soot).
Frame : Nothing broken or unauthorized welds.
Brake system (both tractor and trailer)
Brake hose : Securely mounted on both ends. No splits, cuts, and not leaking audibly leaking air.
Brake chamber : Not audibly leaking air.
Slack adjuster and push rod : When brakes are released and pulled by hand, the push rod should have no more than 1” of play. It should stay at a 90° angle to the brake chamber.
Brake drum : No bluing from excessive heat.
Brake pads/brake lining : Check for oil and debris on the lining. Minimum brake pad thickness is ¼.”
Wheel system
Wheel rims : No unauthorized or illegal welds.
Steer tires : Look for cuts, bulges, and abrasions on the tread and sidewalls. Tread depth should be a minimum of 4/32”. Tread should be evenly worn. Check inflation levels on tires with an air gauge, filled to manufacturer’s specifications.
Drive tires : Look for cuts, bulges, and abrasions on the tread and sidewalls. Tread depth should be a minimum of 2/32”. Tread should be evenly worn. Check inflation levels on tires with an air gauge, filled to manufacturer’s specifications.
Valve stem . Properly secured, metal cap in place. Not audibly leaking air.
Lug nuts : All accounted for. Check for rust or cracks.
Hub seal/axle seal : Should not be loose. No visible leaks.
Spacing (if applicable) : There must be proper spacing between the tires if equipped with duals.
Rear suspension
Airbag : Check rubber for abrasions, cuts or audible leaks, plus any missing mounting bolts.
Torque arm/radius rod : Secure mounting, bushings intact.
Rear of vehicle
Doors and hinges (if applicable): Secured and should open, close and latch properly. Door seals have no separation, no rubber tubing sticking out.
Mudflap : Secured, not missing or broken. At the right height.
Check all lights on the front, both sides, vehicle rear. Turn on to ensure lights and reflectors are working.
Running lights : Walk around the vehicle to examine all.
High beams/low beams: Walk around the vehicle to examine all.
Turn signals : Signal both right turn and left turn. Walk around the vehicle to examine all.
Hazards/4-way flashers and clearance light : Walk around the vehicle to examine all.
Brake lights : Ask the examiner to watch brake lights. Confirma they worked using the side mirror.
License plate lights : Walk around the vehicle to examine all.
Reflector tapes : Clean and not worn. Walk around the vehicle to examine all.
Passenger items
Doors and hinges (if separate from driver door) : Secured and should open, close and latch properly. Door seals have no separation, no rubber tubing sticking out.
Wheelchair lift: No wear, damage, or other abnormal conditions.
Handrails and step lights : Handrail mounted firmly, bolts accounted for. Step lights are all working.
Emergency exits : Labeled and able to open and close. If there is an alarm for the door, ensure it works when the door is open.
Seating : Not torn, securely mounted.
School bus items
Student loading lights: Walk around the vehicle to examine all. None cracked or broken. All lights able to flash.
Stop/safety arm : Able to fully extend with lights
Student mirror : Secure, not cracked or broken. No obstructions and properly adjusted.
First aid and body fluid cleanup kit : Labeled and stocked with supplies. Nothing expired.
In-cab inspection and air brake test
Seat belt: No rips or frays and should adjust and latch properly.
Lighting indicators : See lights and reflectors section
Oil pressure indicator : Demonstrate normal operating range.
Water temperature gauge : Demonstrate normal operating range.
Air pressure gauges : Build to governor cut out.
Ammeter/voltmeter : Charging between 13 and 14 volts.
Mirrors : Secure, not cracked or broken. No obstructions and properly adjusted.
Windshield : No more than a 1” crack is permitted. Clean and free of debris.
Windshield wipers and washers: Turn on to show they are working properly.
Horns (city and air) : Show they are working properly.
Heater/defroster : Turn on to show they are working properly.
Safety/emergency equipment : Must have fire extinguisher, three red reflective triangles and spare electrical fuses. Extinguisher must be fully charged and secured.
Steering wheel : Secured to steering column.
Foot pedals : Free of grease and debris. No obstructions.
Hydraulic brake check : Pump the brake pedal several times. Apply pressure to the pedal and hold for five seconds. The pedal should not move.
Air brake check : Air brake devices vary. Drivers must test three components of the air brake check correctly: applied pressure, warning lights and buzzers, and valve pop-outs.
Parking brake: Apply and put the vehicle in low gear and try to move. Drivers must test separate brakes (tractor and trailer) individually.
Service brake : Release brakes. Drive 3 – 5 mph. Apply the service brake and come to a complete stop. Ensure steering does not pull to the left or right when applying the brakes.
Stay in touch
Sign up to learn more about Samsara.


- Advertising
- Classifieds
- Top 100 For-Hire
- Top 100 Private
- Top 50 Global Freight
- Top 100 Logistics
- Photo Galleries
- TT Newsmakers
- TT Magazine Event Series
- Smart Speaker Briefings
- Perspective
- Fun & Games
- Crossword Puzzle
- Special Coverage
- Trucking's Frontline Heroes
- Special Reports
- Event Coverage
- Upcoming Events
- Submit Your Event
- Resource Center
- Whitepapers
- Government & Industry Resources
- U.S. Government Sites
- State Government Sites
Tire Safety Starts With the Pre-Trip Inspection

More Content About:
Related articles.

Continental Cuts Guidance on Weak Truck Tire Sales

TireHub Appoints John Cavanaugh as Newest CFO
Continental demonstrates tire stress testing process.
- Baltimore bridge collapse
- Port of Baltimore
- oil reserves
Accessibility Tools
- Invert colors
- Dark contrast
- Light contrast
- Low saturation
- High saturation
- Highlight links
- Highlight headings
- Screen reader
- Mon-Fri 7:30am - 6pm | Sat 7:30am - 4pm
BRUNEEL POINT S
Your one stop auto repair shop.
From oil & lube services to assure your vehicle stays in top condition to routine suspension checks, brake servicing, tune ups, alignments, and more!
Our Promise To You
Promise + warranty.
A True, No Hassle, 4 Year, Full 100% Road Hazard Replacement Warranty. Visit your local Bruneel Point S Tire & Auto Service for details.
Locally Owned & Operated
Nokian Tyres
Peace of mind in all conditions.
Nokian offers test-winning performance in all conditions . Buy premium tires from the northernmost tire manufacturer in the world with confidence and a lifetime warranty at your local Bruneel Point S.

Join Our Newsletter!
For up-to-date specials, rebate info, sales and events, we invite you to subscribe to our newsletter!
Trust is earned
We understand that trust is earned. We would like to earn yours. We offer a variety of automotive services and repairs. All our work is performed using quality parts and equipment, and the work is done by technicians who are highly trained and certified.

- Coat Drive for Kids & Families 18 September 2023
- Oil & Lube 20 August 2023
- Brake Service 20 August 2023
- Alignment 20 August 2023
- ASE Certified
ASE-certified automotive technicians and other service professionals can be identified in several ways. The most obvious is to look for the ASE sign on the facility. Once inside, most establishments proudly display the ASE certificates earned by their technicians in their office or waiting room. Finally, the technicians may be wearing an ASE patch on the shoulder of their uniform. All ASE-certified professionals are proud of their achievement and are more than willing to show you their credentials.

- Appointment
- Make Payment
We use cookies on our website to give you the most relevant experience by storing your preferences and data from previous visits. By clicking accept you consent to the use of all cookies.
Nearest Store
- (907) 202-7405
- Get Directions
- Store Details
Mon-Fri: 8:00 AM - 6:00 PM
Sat: 8:00 AM - 5:00 PM
Find Another Store
Your cart has been updated to reflect the products and services at this store
Schedule an appointment
You’re all set, store location.
- (907) 202-7405
Select Service(s):
- New Tires If you don't know which tires you need, we'll work with you in the store to help you select the right ones.
- Flat Repair We fix repairable flat tires on most non-commercial cars and light trucks for free. Come on by and we’ll get you back on the road.
- Wheel Balance We'll correctly distribute your tire and wheel weights so they'll spin as evenly and as smoothly as possible.
- Tire Rotation Have your tires switched to different positions every 5,000 miles or every six months to prevent premature wear.
- Seasonal Changeover Get your winter tires installed before the harsh weather hits, then swapped out when outside temperatures consistently rise above 45 degrees.
- TPMS Service + We can recalibrate or rebuild your TPMS (tire pressure monitoring system) as needed.
- Free Pre-Trip Safety Check Going on a long road trip? We visually inspect everything but your cooler: tires, wheel alignment, brakes, shocks and more for free.
- Uber/Lyft Inspection Official rideshare vehicle inspection for Uber and Lyft vehicles that need a certified inspection.
- Free Brake Check & Consultation We'll inspect your brake system and provide a free estimate if any work is needed.
- New Wheels If you don’t know which wheels you need, we’ll work with you in the store to help you select the right ones.
- Alignment Tires go out of alignment over time. Getting an alignment annually helps maintain a safer ride, better gas mileage and longer tire life.
- Free Visual Alignment Check Before considering an alignment service, we look for uneven treadwear, which could indicate wheel misalignment. If an alignment is needed, we’ll give you an estimate.
- Free Battery Check Dead batteries are no fun, so come by for a free battery check. Did you know we’re one of the biggest providers of batteries in the West?
- Battery Installation We have all kinds of batteries for all kinds of vehicles from cars and trucks to boats and motorcycles to golf carts and lawn mowers.
- Free Shock/Strut/Suspension Check Your suspension should be checked on a regular basis. But if your car isn’t soaking up the bumps in the road, come in sooner than later.
- Shock/Strut Consultation From foam cell to monotube shocks, we’ll help you pick the right one to restore your vehicle’s original handling and control capabilities.
- Lifting/Leveling/Lowering Consultation Lifting, leveling and lowering can transform your vehicle to help meet your driving needs. You'll get added ground clearance, better handling, and a customized look.
- Free Wiper Blade Check Streaked windshields are as annoying as they are dangerous. We’ve got premium wipers to help keep your eyes safely on the road.
- Replace Wiper Blades Streaked windshields are as annoying as they are dangerous. We’ve got premium wipers to help keep your eyes safely on the road.
Would You Also Like?
+Your car may or may not need a tire pressure monitoring system. Pursuant to NHTSA, Les Schwab must install all tire and wheel combinations with functioning TPMS sensors; including tires and custom wheels or winter tires and wheels.
Contact Info
- Receive a reminder via text message to the phone number above. Message and data rates may apply. Terms & Conditions
Vehicle Edit
Vehicle entry not available.
Sorry about that! We'll be up and running shortly. Please come by soon, or You can choose another vehicle details and try again
Additional comment
Entering your vehicle details helps us prep for your arrival and get you back on the road sooner.
Finding your tire size

My vehicle is not on this list (please provide details below)
Please confirm the details below to finish scheduling your appointment.
Customer Wait Preference:
CONTACT Edit
Additional comment:
Text Reminder:
VEHICLE Edit
Services edit.
- (907) 202-7405 (907) 202-7405
- Get Directions Get Directions
Additional information
No-hassle financing now available.
Les Schwab credit plans are easy to understand. The application is even easier. Learn More
Have a question? Call us at (907) 202-7405 (907) 202-7405
We’re sorry, but we had trouble with that request. Please try again and if you continue to experience problems please call the store at (907) 202-7405 to check availability.
We’re sorry but we appear to be having issues with appointment scheduling, please call the store at (907) 202-7405 to check availability., we’re sorry, but that time slot is no longer available. please select another time or call the store at (907) 202-7405 to check availability..
We welcome walk-ins and drop-offs, so feel free to come by and we’ll squeeze you in.
Service durations vary. Please note: we’re closed on Sundays.
Are you sure you want to remove this product?
Do you really want to go back.
In case of any changes, previously entered data will be lost.
Cancel Appointment?
The information you've entered will not be saved.
Are you sure you want to edit your vehicle?
Switching to another vehicle will clear your selected products.
Do you have your tires stored with us?
Want to learn more about our tire storage program? Click here
Please enter your email address so we can retrieve your information
We're sorry, we couldn't retrieve your email, please try again., please check your email.
If an account is registered under the provided email you will receive tire storage retrieval instructions in your inbox.
If you do not receive an email within 10 minutes please contact Customer Support - 1-833-896-9953
- Manage My Account
- Food & Drink
- Submit an Obituary
- View Obituaries
- Legal Notices
- Real Estate
- Advertising in the Daily Herald
- Advertising in The Herald Business Journal
- Advertising in La Raza del Noroeste
- Social media
- Privacy policy
- Terms of Use
- Newsletters

- Follow us on Instagram
- Follow us on Facebook
- Follow us on X
- Classifieds
- Marketplace
- Environment
- Investigative
- Photography
- Street Smarts
- Transportation
- College Sports
- High School Sports
- Prep Football Stats
- Seattle Sidelines
- Hops and Sips
- SnohomDish on Facebook
- Restaurant reviews
- As seen on Instagram
- What's Up With That?
- Family Activities
- Staycation Secrets
- Things To Do
- Aviation & Space
- Paine Field
- Editorial cartoons
- In Our View
- Letters From Readers
- Other Commentary
- Place Obituary
- Local Marketplace
- Senior Resources
- Digital Subscription
- Digital & Print Subscription
- Heraldnet App
- Email Newsletters
- Newsstand Locations
- Education Project
- Environmental & Climate Change Reporting
- Health Reporting Initiative
- Investigative Journalism Fund
- Stay Informed

The Fast Eddie’s Tire Pros and Automotive Repair team in Everett.
A pre-purchase inspection can spare you from driving home a lemon
Check out the new spring tire-swap offer from Fast Eddie’s Tire Pros Automotive Repair
- Thursday, March 28, 2024 6:00am
- Local Marketplace Impress Branded Content

- Test driving to listen for noises and vibrations
- Diagnostic testing to check for error codes
- A close inspection of all major components
- Oil and fluid checks
- Checking for accident and rust damage that may have been fixed or painted over
- Checking safety features including seatbelts and airbags
- Tire and brake inspection
The news and editorial staff of Sound Publishing, Inc. had no role in the preparation of this post. The views and opinions expressed in this sponsored post are those of the advertiser and do not reflect those of Sound Publishing, Inc.
Sound Publishing, Inc. does not accept liability for any loss or damages caused by the use of any products, nor do we endorse any products posted in our Marketplace.
More in Local Marketplace

Aging in place: 5 tips for a better bathroom
How to transform your bathroom affordably and stay in your own home longer

‘They surpassed my expectations:’ Fixing a flagging forever home
Prompt, professional and low-pressure, Snohomish County contractors earn kudos

Empowering seniors: discover your path at the Snohomish County Senior Resource Expo!
Learn, explore hear from speakers including ’Galloping Gourmet,’ Graham Kerr

Comcast Customers in Everett Get a Speed Boost at No Additional Cost
As the need for data increases in ever-connected households in Everett, Xfinity… Continue reading

Update your bathroom this spring – minus the mess, time and cost of a full renovation
Get a bright, clean new space in just days!

Marysville center a beacon of hope for those navigating cancer care
Non-profit team supports patients throughout their cancer journey

Pro tips for first-time solar panel users in Washington
How to enjoy the rewards of solar power AND the tax savings, without long-term contracts

‘Black history isn’t one community’s history, it’s everyone’s history’
Community event kicks off Black History month in Snohomish County

YMCA flag football achievement is a family affair
When Manja Brower joined the Marysville Family YMCA over a decade ago,… Continue reading

First fed makes five-year commitment to arts in the community
When organizations who have spent decades serving their community partner together, great… Continue reading

Celebrate in style this holiday season at the historic APEX Art & Culture Center
History meets the 21st century at this unparalleled Everett venue
Support local journalism
If you value local news, make a gift now to support the trusted journalism you get in The Daily Herald. Donations processed in this system are not tax deductible.
SELECT LANGUAGE
PRE-TRIP INSPECTION
Before you start your haul, start with your tires.
A pre-trip inspection is an essential part of hitting the road. Every time. That's because an inspection increases safety and maximize uptime. Not to mention the fact that pre-trip inspections are a regulatory requirement. Make sure you own a calibrated air gauge, then follow the steps below.
THE PRE-TRIP INSPECTION IN SIX EASY STEPS:
- Check your tires for proper inflation. If a tire is 20% below its targeted PSI, it is considered flat and should be replaced. Also, dual tires should be within 10 PSIs of each other.
- Check your valve caps to make sure they are properly secured.
- Look for tread wear and check proper tread depth. Click here to learn more about irregular wear patterns.
- Check for tire cuts or bulges in the sidewall.
- Check wheel and lug nut conditions. Make sure there is no rust or bends.
- Inspect suspension components.
UPDATE: Biden OKs $60M in aid after Baltimore bridge collapse
Russia extends arrest of US reporter Evan Gershkovich. He has already spent nearly a year in jail
The Associated Press
March 26, 2024, 5:36 AM
- Share This:
- share on facebook
- share on threads
- share on linkedin
- share on email

MOSCOW (AP) — A Moscow court on Tuesday ordered Wall Street Journal reporter Evan Gershkovich to remain in jail on espionage charges until at least late June, court officials said.
The 32-year-old U.S. citizen was arrested in late March 2023 while on a reporting trip and has spent nearly a year behind bars. His arrest was extended until June 30.
Photos from the courtroom released by court officials showed Gershkovich, clad in a black checkered shirt, smiling from the glass defendant’s box.
Gershkovich and his employer have denied the allegations, and the U.S. government has declared him to be wrongfully detained .
His arrest in the city of Yekaterinburg rattled journalists in Russia, where authorities have not detailed what, if any, evidence they have to support the espionage charges.
Gershkovich is being held at Moscow’s Lefortovo prison, which is notorious for its harsh conditions.
U.S. ambassador to Russia Lynne Tracy attended the court hearing on Tuesday and reiterated that “the accusations against Evan are categorically untrue.”
“They are not a different interpretation of circumstances. They are fiction,” Tracy told reporters outside of the courthouse. “No justification for Evan’s continued detention, and no explanation as to why Evan doing his job as a journalist constituted a crime. Evan’s case is not about evidence, due process or rule of law. It is about using American citizens as pawns to achieve political ends.”
Analysts have pointed out that Moscow may be using jailed Americans as bargaining chips in soaring U.S.-Russian tensions over the Kremlin’s military operation in Ukraine. At least two U.S. citizens arrested in Russia in recent years — including WNBA star Brittney Griner — have been exchanged for Russians jailed in the U.S.
Gershkovich is the first American reporter to be arrested on espionage charges in Russia since September 1986, when Nicholas Daniloff, a Moscow correspondent for U.S. News and World Report, was arrested by the KGB. Daniloff was released without charge 20 days later in a swap for an employee of the Soviet Union’s U.N. mission who was arrested by the FBI, also on spying charges.
Copyright © 2024 The Associated Press. All rights reserved. This material may not be published, broadcast, written or redistributed.
Related News

Georgia bill aimed at requiring law enforcement to heed immigration requests heads to governor
What to know about Day of Visibility, designed to show the world ‘trans joy’

Cranes arriving to start removing wreckage from deadly Baltimore bridge collapse
Recommended.

Biden OKs $60M in aid after Baltimore bridge collapse as governor warns of 'very long road ahead'

Lead Fairfax Co. prosecutor calls Gov. Youngkin 'boneheaded' over gun vetoes

Masked robbers enter Prince George’s Co. GameStop, one shot by officer, police say
Related categories:.
Destination Management Company
Your message has been sent
Thank you for using A-DMC GLOBAL
A-DMC GLOBAL takes very seriously its responsibility for personal information supplied by our clients and takes all necessary precautions to ensure protection of personal data in accordance with European law.
Your personal data (e.g. name and surname, telephone numbers, email address, website, Skype details, and information concerning your trip) indicated when filling out the online Proposal Request and hotel-booking form will be accessible only to our representative DMC in the country that interests you and will be used only for the purpose of supplying you with services that you have ordered . You will not be asked on our site to give details of your credit card, and payment will be made in accordance with the conditions that you have agreed with the relevant DMC in accordance with the commercial proposal that the latter will send you after processing your Proposal Request. Thus your personal data are accessible only to the direct executors of your order and will under no circumstances be made available to third parties .
- DMC Austria
- DMC Innsbruck
- DMC Salzburg
- DMC Armenia
- DMC Belgium
- DMC Brussels
- DMC Sarajevo
- DMC Dubrovnik
- DMC Larnaca
- DMC Limassol
- DMC Czech Republic
- DMC Denmark
- DMC Copenhagen
- DMC Estonia
- DMC Tallinn
- DMC Finland
- DMC Helsinki
- DMC Lapland
- DMC Biarritz
- DMC Côte d'Azur
- DMC Marseille
- DMC Strasbourg
- DMC Dresden
- DMC Duesseldorf
- DMC Cologne
- DMC Frankfurt am Main
- DMC Hamburg
- DMC Hannover
- DMC Leipzig
- DMC Mecklenburg-Vorpommern
- DMC North Rhine-Westphalia
- DMC Schleswig-Holstein
- DMC Stuttgart
- DMC Tbilisi
- DMC Mykonos
- DMC Thessaloniki
- DMC Budapest
- DMC Hungary
- DMC Reykjavik
- DMC Palermo
- DMC Liechtenstein
- DMC Lithuania
- DMC Vilnius
- DMC Luxembourg
- DMC Macedonia
- DMC Valletta
- DMC Chisinau
- DMC Monte-Carlo
- DMC Montenegro
- DMC Amsterdam
- DMC Maastricht
- DMC The Hague
- DMC Rotterdam
- DMC Alesund
- DMC Funchal, Madeira
- DMC Madeira Island
- DMC Bucharest
- DMC Romania
- DMC St Petersburg
- DMC Kaliningrad
- DMC Novorossiysk
- DMC Scotland
- DMC Belgrade
- DMC Bratislava
- DMC Ljubljana
- DMC Slovenia
- DMC Alicante
- DMC Barcelona
- DMC Marbella
- DMC Palma de Mallorca
- DMC Sevilla
- DMC Valencia
- DMC Stockholm
- DMC Lausanne
- DMC Switzerland
- DMC Antalya
- DMC Kusadasi
- DMC Istanbul
- DMC Ukraine
- DMC Belfast
- DMC Birmingham
- DMC Cardiff
- DMC Edinburgh
- DMC Inverness
- DMC Glasgow
- DMC Liverpool
- DMC Manchester
- DMC Sheffield
- DMC Ethiopia
- DMC Nairobi
- DMC Madagascar
- DMC Marrakech
- DMC Morocco
- DMC Seychelles
- DMC Cape Town
- DMC Tanzania
- DMC Kampala
- DMC Calgary
- DMC Halifax
- DMC Montreal
- DMC Toronto
- DMC Vancouver
- DMC Costa Rica
- DMC Punta Cana
- DMC Santo Domingo
- DMC Guatemala
- DMC Acapulco
- DMC Mexico City
- DMC Chicago
- DMC Las Vegas
- DMC New York
- DMC Buenos Aires
- DMC Brasilia
- DMC Fortaleza
- DMC Rio de Janeiro
- DMC Salvador
- DMC Sao Paulo
- DMC Santiago
- DMC Guayaquil
- DMC Montevideo
- DMC Cambodia
- DMC Phnom Penh
- DMC Beijing
- DMC Shanghai
- DMC Hong Kong
- DMC New Delhi
- DMC Jakarta
- DMC Mataram, Lombok
- DMC Jerusalem
- DMC Tel Aviv
- DMC Kathmandu
- DMC Bishkek
- DMC Kuala Lumpur
- DMC Malaysia
- DMC Langkawi
- DMC Maldives
- DMC Mauritius
- DMC Palawan
- DMC Singapore
- DMC Colombo
- DMC Sri Lanka
- DMC Kaohsiung
- DMC Dushanbe
- DMC Bangkok
- DMC Chiang Mai
- DMC Hua Hin
- DMC Koh Samui
- DMC Krabi Town
- DMC Pattaya
- DMC Thailand
- DMC Ashgabat
- DMC Samarkand
- DMC Tashkent
- DMC Ho Chi Minh
- DMC Abu Dhabi
- DMC Brisbane
- DMC Canberra
- DMC Melbourne
- DMC Auckland
- DMC Wellington
- DMC New Caledonia
The world’s most exciting destinations
From the world’s most professional DMCs
DMC Moscow invites you to visit our wonderful country.
Moscow is not only the political, cultural, and business centre of modern Russia, but also one of the oldest Russian cities, with a history that goes back 1000 years and many monuments of original Russian architecture and art. The golden domes of its churches, world-famous museums and theatres, broad avenues with high-rises, and cozy, typically ‘Moscow’ streets with merchants’ houses – all make Moscow one of the most popular tourist destinations. In addition to its unique attractions, Moscow is undoubtedly attractive for its economic and business potential. It possesses a wonderful infrastructure, an extensive choice of hotels, and modern exhibition centres hosting important international exhibitions and congresses. Moscow is one of the most colourful and interesting cities in the world, being equally well suited as a location in which to relax and do business.
The Moscow region is represented by DMC Moscow , one of the leading Destination Management Companies (DMCs) in Moscow .
125252, str. Zorge 9, Moscow
A dynamically developing company with considerable experience of working in this field, DMC Moscow has shown itself to be a responsible partner. Our success is built on our constant striving for perfection and our quest for new ideas and opportunities in this constantly developing and competitive field.
DMC Moscow was set up by professionals. Our main aim in founding our company was to bring together experience, knowledge, creative ideas, and creative management in the MICE industry so as to be able to offer you high-quality service which is focused entirely on the client. Organizing unique business events requires profound and comprehensive knowledge of the region, advanced technologies, a team of experienced professionals, and, of course, responsible suppliers of services. We are proud to be able to call upon reliable and professional partners who provide excellent quality of service at competitive prices. Our extensive network of contacts throughout the region gives you access to experienced and well-qualified specialists.
As a leading DMC, we offer a wide range of destination-management services to participants in and organizers of conferences, seminars, exhibitions, and incentive tours in Moscow and in popular cities in our region, offering all our clients exceptional quality of service. We are keen to share with you our knowledge and experience in organizing events – including events in the most unusual forms. During the course of any event that we organize our employees will be at your complete disposal from the moment you arrive in Moscow to the moment you leave. We will do everything to ensure that your event is organized in complete accordance with your desires and is carried out to the highest professional standard. We will put together the most attractive programme for you while keeping within your budget.
Destination-management services in Moscow:
If you are planning a business meeting, conference, seminar, corporate event, incentive or teambuilding programme, or business tour, we will make sure that your programme is organized with the minimum of fuss or effort on your part. Any event of this kind will require a range of services, which we can easily tailor them to match your desires and budget. With our considerable experience in realizing international projects, we will gladly prepare and conduct your event to the highest standard. We offer the following services:
Venues for all occasions in Moscow: We will organize inspection visits and help you draw up a detailed programme. We will organize bids competitions to find the right service provider and venue for your event. We will help you choose a venue to suit both you and your business event. You will have a choice of modern and comfortable hotel conference rooms, luxurious state rooms in palaces, and much else besides. We will find the option that works best for your business event.
Incentive programmes and teambuilding events in Moscow: Realization of original ideas and incentive programmes – fulfilment of your every desire in order to ensure that you experience nothing but positive emotions and the best of moods. Incentive programmes are devised for specific groups and are tailored to the particular client’s objectives, desires, and budget. We can organize and conduct a broad range of teambuilding events – something which is of fundamental importance in improving team spirit and fostering understanding, trust, and mutual help.
An individual approach to selecting and booking hotels in Moscow: We will help you choose and book hotel rooms in the most convenient locations and at special rates to suit your desires, budget, and the status of your delegates. The hotels with which we work are always situated in locations which are as convenient as possible for getting around the city.
Organization and holding of conferences in Moscow: The success of a dynamically developing business depends on the promotion of the goods and services which the company offers. For this purpose participation in business events is essential; conferences, in particular, are especially important for corporate image and a company’s work with its partners. We will help you organize and conduct events of whatever complexity.
Logistics, transport services, transfers in Moscow:
Transport services are essential to the success of your event. Our work in this area includes coordination of transport services for participants in corporate events, provision of business and executive-class cars, provision of coaches and minibuses, meets at airports and railway stations, group transfers, exclusive transport for evening events, VIP services, and provision of chauffeured cars (for groups of whatever size). We can also place banners and notices on buses and provide special transport for baggage.
Special events in Moscow:
Special events are an effective way to underline the importance of an event. They include opening and closing ceremonies, evening receptions, exclusive concerts and shows, and gala suppers held in the location of the client’s choice (including the most exotic locations). We can take care of catering and musical accompaniment.
Provision of high-class service staff in Moscow:
We can arrange for uniformed guides in your company’s corporate style, professional translators, designers, scriptwriters, directors, and audio-video equipment and IT solutions.
Excursion programmes in Moscow:
An individual approach to organizing events for both groups and VIP guests. We can arrange special out-of-hours visits to museums and pre- and post-conference tours. We will do everything to ensure that nothing distracts you from contemplation of our region’s unique beauty and cultural attractions.
We are confident that an event which has been professionally prepared and conducted to the highest standard will make an unforgettable impression on all involved.
IMAGES
VIDEO
COMMENTS
They cannot be retreads as they can on the back of the truck and on the semi-trailer - they have to be brand new. Inspecting a CDL tire - must have 3mm (1/8"inch) of tread on the steer tires; 1.6mm (1/16" inch) on the rear tire; no gashes longer than 2.5cm (1"inch); and not gashes that expose the tread chord.
The Different Parts of a Tire. During your pre-trip inspection, taking a quick glance at the tires or just kicking them isn't enough. You shouldn't just look at the top part of the tire. You need to get in there and inspect all parts of the tire. On the steer tires and drive tires, you'll need to check: Rims; Lug nuts ;
A proper pre-trip inspection will include inspecting the brake system both in-cab and externally. Truck drivers should check the brake adjustment with the slack adjuster for proper alignment. Check brake linings for appropriate thickness. Ensure your truck's air lines aren't damaged, don't leak, and are properly sealed.
THE PRE-TRIP INSPECTION IN SIX EASY STEPS: Check your tires for proper inflation. If a tire is 20% below its targeted PSI, it is considered flat and should be replaced. Also, dual tires should be within 10 PSIs of each other. Check your valve caps to make sure they are properly secured. Look for tread wear and check proper tread depth.
Complete CDL pre-trip inspection checklist with online reference and study guide plus a free PDF pre trip inspection checklist to print. Find A School ... Tread depth should have a depth no less than 4/32 of an inch. Tires must be properly filled to the manufacturer's specifications. This can be checked with an air gauge. Tie Rod. Make sure ...
Learn how to inspect tires for a CDL pre-trip inspection test. Watch the video!! CDL IN-CAB Air Brake CHECKLIST: https://www.smartdrivetest.com/cdl-air-brake...
A pre-trip inspection checklist is a list of vehicle items that truckers must thoroughly examine before starting a trip. It helps identify and address mechanical and maintenance issues early on and prevent unexpected delays, breakdowns and severe accidents. ... Inspections can reveal worn tire treads, which can result in fines or lead to ...
Our Pre-Trip Inspection Study Guide has everything you need to prepare for the Class A CDL Pre-Trip Inspection Exam. Our study guide will cover the pre-trip inspection terminology as well as a thorough list of all of the parts you will be inspecting on the vehicle. For each part you will be inspecting there will also be a list of items you will ...
Next step for the pre-trip inspection is to check the side of the trailer and the tandems. Wall - Make sure the wall is not damaged. Lights - Lights should be on and flashing. Tires - Tires should be properly inflated and have decent tread. If there are flat spots on the tire, it needs to be replaced.
A basic DOT pre-trip inspection includes checking your fluid levels, leaks, tires, 5th wheel, brakes, clutch, shock absorbers, ball joints, kingpins, gauges, lights, and more. Once you've completed a check of your truck, you can log your DOT pre-trip inspection in your log books and be on your way. While doing a DOT pre-trip inspection ...
(Also, pre-trip inspections are a regulatory requirement.) Make sure you own a calibrated air gauge, then follow the steps below. THE PRE-TRIP INSPECTION IN SIX EASY STEPS: Check your tires for proper inflation. If a tire is 20% below its targeted PSI, it is considered flat and should be replaced. Also, dual tires should be within 10 PSIs of ...
Pre-trip inspections of your truck and trailer are mandated by the FMCSA, find out what's required and what extra steps you can take to keep your drivers and...
Our free Pre-Trip Safety Check goes beyond your tires and wheels with visual inspections of your steering, battery, brakes, suspension, and alignment. Inspecting your wheels and tires for leaks, tread wear, and balance to keep you rolling the right way. Potholes, curbs, and more can knock your vehicle out of alignment, reducing fuel efficiency ...
Pre-Trip Inspection. My pre-trip begins as I approach the vehicle. I am looking for leaks, leaning one way or the other (which may indicate a low tire or bad suspension). Hint: Start at the bottom and work your way up. License plate - Secure, clean and up to date. Bumper - Secure, not cracked, bent or broken.
This includes checking the engine compartment, brake system, fuel system, and more. The CDL Pre-Trip Inspection Exam is an integral part of obtaining your commercial driver's license. This guide covers Class A and Class B pre-trip inspections, provides a checklist, and offers tips for memorizing the inspection process.
Tractor-trailers can weigh up to 80,000 lb. if you count the semi, trailer and cargo.Operating a heavy tractor-trailer can be dangerous, so drivers undergo extensive training to earn their CDLs and start their careers.. Whether studying for your CDL test or heading to your next customer, pre-trip inspections help you catch problems with your vehicle or trailer.
A pre-trip inspection is a thorough review and examination of a commercial vehicle's major systems and parts before heading out on a route. Completing the pre-trip inspection is one of the most common and important tasks commercial drivers must perform. ... Steer tires: Look for cuts, bulges, and abrasions on the tread and sidewalls. Tread ...
sleeper. electric. Infrastructure. Earnings. FedEx. Ensuring that thorough tire inspections are part of every pre-trip checklist can extend tire life and help ensure that truck drivers make it to ...
For over 55 years car owners in Idaho have trusted the Bruneel family when it comes to keeping their vehicle on the road!!! Your search for quality, affordable tires ends here. Bruneel Point S Tire & Auto Service is a full-service tire shop with locations across the Treasure Valley, Lewiston, Moscow, McCall and Ontario, OR.
Finding your tire size. 3801 SW Alaska St View larger map. Seattle, WA 98126. (206) 932-1212. Get Directions Get Directions. Schedule an appointment in seconds online and visit your nearest Les Schwab Tire Center for tire repair, wheel & alignment services, battery checks and more!
Book your pre-purchase inspection or tire swap over the phone today at 425-355-7110, for more information visit fsteddie.com and follow them on Facebook for the latest deals and promotions!
THE PRE-TRIP INSPECTION IN SIX EASY STEPS: Check your tires for proper inflation. If a tire is 20% below its targeted PSI, it is considered flat and should be replaced. Also, dual tires should be within 10 PSIs of each other. Check your valve caps to make sure they are properly secured. Look for tread wear and check proper tread depth.
The 32-year-old U.S. citizen was arrested in late March 2023 while on a reporting trip and has spent nearly a year behind bars. His arrest was extended until June 30.
Our сontacts: 125252, str. Zorge 9, Moscow. [email protected]. Tel.: +7-495-621-4-45. DMC Moscow was set up by professionals. Our main aim in founding our company was to bring together experience, knowledge, creative ideas, and creative.