- PlayStation 3
- PlayStation 4
- PlayStation 5
- Xbox Series
- More Systems
Path to the Mountain

God of War — Guide and Walkthrough (PS4)

Guide and Walkthrough (PS4) by GfaqCodebreak
Version: 2.02 | Updated: 04/10/2020
- Previous: The Marked Trees
Table of Contents
- Next: A Realm Beyond
- Introduction
- The GameFAQs
- Combat Tactics
The Journey
- The Marked Trees
- A Realm Beyond
- The Light of Alfheim
- Inside the Mountain
- A New Destination
- The Magic Chisel
- Behind the Lock
- The Sickness
- The Black Rune
- Return to the Summit
- Escape from Helheim
- A Path to Jotunheim
- Realm Between Realms
- Jotunheim In Reach
- Mother's Ashes
- Leviathan Axe
- Blades of Chaos
- Guardian Shield
- Enchantments
- Wayward Spirits
- Free Dragons
- The Realm of Fire
- The Realm of Mist
- Treasure Maps
- Special Items
After the battle with The Stranger, Kratos will begin to leave the house with his son Atreus. Right near the house as we walk towards the new crevice in the area will be the Husked Toy . Be sure to pick this up as it is an Artifact of The Lost and Found artifact quest. Begin traveling through the crevice, by auto-jumping and climbing with Atreus on your back. Pick up some Hacksilver in the corner of the mountain before we climb to the next puzzle.
Path to the Mountain ( Chain and Bridge Puzzle )
We will make it inside a cave within the mountain. There is a chest in the right corner of the area, break it open for more Hacksilver. There is also some more Hacksilver and health lying around the area, within old crates and other breakables. Players should next head to the mechanism in the back of the area. Use the mechanism and hold the L stick down to move it. This will close the bridge to form a path for Atreus. Command Atreus to lower the chain and now Kratos can climb above. The problem is that we must once again go across the bridge with both Kratos and Atreus.
To solve the puzzle, head back down the chain and go back to the Mechanism . Use the mechanism, except this time hold the Mechanism in place and draw the axe with Kratos other hand. Throw the axe at the runic symbol in front of Kratos and this will freeze the bridge in place. Afterward, simply climb up the chain and cross the bridge.
Make your way up and out of the area with Kratos and Atreus. We can break more objects for possible Hacksilver and health. Continue along the linear path until we reach Wildwood's Edge. This is actually The Riverpass region, which is the second region of God of War . Be ready for the toughest battle yet on Give me God of War Mode.
Battle Tactics #4 - Dragur ( Projectile )
This is the hardest fight I have come across so far in the game. There will be 3-4 Waves of successive Dragurs and fire tossing Dragurs to defeat. Players should definitely take note of the health pack in the corner or crevice within the area. This crevice will also serve as a semi-safe spot from the Fireballs that the Projectile Dragur will toss at Kratos and Atreus.
Remember that Back Attacks and Fist attacks add more Stun Damage to enemies. When Kratos performs a Stun-Kill, foes are more likely to drop an item, such as Health or Spartan Rage. Your Spartan Rage meter also fills quicker this way. It is important and very helpful to get Spartan Rage during this segment, so try using your fist and stunning opponents.
Always be firing off arrows with Atreus! If Atreus is sitting with three arrows for more then a few moments, you are probably wasting time or doing something wrong. More damage output equals the quicker and more efficiently we can complete the waves/battles. It also means death to our foes, rather than death to Kratos. Also, stun meter will build up quicker when arrows are shot. Unfortunately, it is rather hard to Stun level two Dragur. With that being noted, we should attempt to take out the level one Dragurs as quickly as possible, with Fist and Guardian Shield attacks.
Players should also acquire a very important Stun inducing skill for this battle. This skill is called the Guardian Sweep and cost 500 XP to unlock. The Guardian Sweep will trip weaker Dragur and deal extra stun damage. It can even trip up two or possibly three weaker Dragur ( level one ) at a time. Remember, knocking foes back into a wall and back attacks also increase Stun Damage.
Once the first wave is down a Fire Dragur will appear, these Dragur have much lower hit points than the others. We should immediately kill the first one that spawns. Note, that the Guardian shield can block and parry the fire projectile attacks from the Dragur. Another Fire Projectile will appear to the right of the large brown tree in the middle of this "arena". Immediately kill this one as a major priority! It will spawn with 2-3 other Dragur and if you don't take this one out quickly enough it will have great position on Kratos.
Try and not take damage early on. If you get lucky from your stun kills, conserve the health unless you are below half-health. There is also a health item in the back of this area. Use this area, especially during the final wave! In the final wave, there will be five Dragur to kill in total. There will be three Sword-wielding Dragur and two Projectile Dragur. Standing in the crevice near the health will have the Fire Projectile Dragur above, almost always miss Kratos with his fireball attack. We can save that Dragur for the last foe in this case.
While in the crevice, stay in the corner, but do not get completely cornered or you will die! Use the Guardian Shield and get perfect parry's on the Dragur. Try chipping away at them slowly combining the parry and light attacks, do not get greedy or you will have to start all over. When Spartan Rage becomes active, quickly attack and defeat at least one of the Dragurs, this could be a Fire Projectile Dragur , whatever makes you feel more comfortable.
Once the three Dragur are down and the second to last fire tossing Dragur, we can throw our axe at the one standing on the mountainside above Kratos and Atreus. Don't get greedy here, Dodge its fireball, and throw the axe with R2 tosses, it is a tough battle, but perseverance and practice will pay off!
Path to the Mountain - Ruins
Shortly after a tough fight, we will encounter another strange Blue Enemy. There are only one of these guys and we have reached a checkpoint. This is a simple defeat, that I am sure will get worse later on when they are in packs. After the quick fight, open the Legendary Treasure Chest. Inside this chest will be our first Rune, Hel's Touch. Don't forget to read the Rune Lore , after the previous boss battle in that same location.
Hel's Touch can be equipped with the Light Runic Attack cube in the weapons section of the Main Menu. Equip the rune and press L1 + R1 to use it. At the start, it has a 45-second cooldown ratio. It hits all enemies within a range in front of Kratos. It can also stagger them for a few precious moments as well as deal some damage. It will be an asset in the next amazingly tough battle segment on Give me God of War Mode.
Battle Tactics #5 - The Ruins Battle
If you thought the last fight was tough, this one is about 60 deaths harder! Players will fight Dragur in the Ruins and there will be around 7-8 of them on the screen at a time. There will also be two Fire Projectile Dragur on top of the area in the second wave. If that wasn't enough there is no place to hide from them this time. Finally, there will be a Melee Fire Projectile Dragur on the ground floor that spawns with the other two! It was insanely difficult that I made a 20+ minute video with a breakdown on the fight as well as the text here.
First players want to attack the Dragur near the pit on the left. Players can knock this Dragur off with a Heavy R2 attack, into a light R1 attack. Quickly afterward, switch to Fisticuffs. Make sure that you have the Guardian Sweep skill for the Guardian Shield. Also, Executioner's Cleave and possibly Pride of the Frost skills. If you like the Grinding Storm skill you can use that as well. However, I find it difficult to use. See our Skills section for more information.
Using your fist, and constantly shooting areas with Atreus, pound away at the Dragur. Make sure to get that Stun meter up and finish with an R3 grab attack. Attacks from the back with the Fisticuffs will deal much more Stun meter points and even damage. Always keep an eye on your Hel's Touch cooldown, and use it as often as possible. Once there are three Dragur left in the first wave, focus on the higher level Dragur. Once there are two Dragur left the next wave of horror will begin.
There will be the remaining Dragur from the first wave which is two. There will be two fire projectile dragurs above and the melee fire dragur. 1-2 more level one dragurs may also spawn. The reason we kill the higher level dragur is because he is more powerful with his strikes. Since this segment is so difficult it will also be wise to chip down the remaining two Dragur from the first phase and finish them off with a Hel's Touch in wave #2.
Players must throw the Leviathan Axe at the Fire Dragurs above. This should be done very quickly, most essentially as they Spawn. Once the first one is down, attack the second one. Players may want to Lock-On with Atreus, which can be difficult but it works as he can chip away at their health and even kill them. Once both of those enemies are down.
We can focus on dodging the Melee Fire Dragur. All the while we will be spamming Atreus arrows and waiting for Hel's Touch to be active. At this point begin playing ranged to make things much safer. Players should have the four health crystals from the breakables in the area untouched. If you used too many of them in Wave #1 , you might be in big trouble in Wave #2 . Players want an Excellent or Perfect first Wave. Rinse and repeat the ranged attacks and when there is only the Fire Dragur with Melee capabilities left, also finished him off safely from a distance.
That will complete this amazing tough battle segment, Please see the video if you feel like it will help you more. The hardest part of the fight was dodging the fireballs. They can add damage over time and just make your life as Kratos a living hell. Try and conserve the health crystals for wave #2, specifically after at least one of the Dragur ( Projectile ) enemies are down. In conclusion, practice and these tips will make perfect and the bragging rights are well worth it!
After the fight, there will be some rune inscriptions to read on a totem of stone. Be sure to read them and pick up the Lore . There will also be one of Odin's Ravens nearby above Kratos. He seems to glow a bit green and your axe aiming reticule should change slightly if its targeted. Throw your axe at the raven to unlock another labor called " Eyes of Odin ". After getting the collectibles, and inspecting the Rune Totem, there will be a crashing noise. Inspect the crashing noise and a Heavy Dragur will pop out and do battle with Kratos.
Battle Tactics #6 - Heavy Dragur ( Ruins )
Thankfully, this fight is two very small waves and is much easier than the hellacious previous battle. Heavy Dragur is a new enemy to add to our bestiary, and they can be difficult in our first encounter here. I like to use Executioner's Cleave for the extra damage. However, this is only to be used after a perfect parry on their " Strong " attack. Their strong attack is telegraphed by the Yellow Ring that surrounds their weapon prior to attacking Kratos. They may also poke attack Kratos with their Halberds shortly after. This attack is blockable and will not stagger Kratos upon blocking. This attack can be perfectly parried as well, however, the opening time to hit the Heavy Dragur afterward is not very big.
There will be two Dragur in the first wave, once the first Heavy Dragur goes down, 2-3 lesser Dragur will appear along with the other Heavy Dragur. Players should also note that Heavy Dragur can grab Atreus . If Atreus is grabbed, players can either throw or melee attack the Heavy Dragur to have them release his son. If you fail to do this, Atreus will be incapacitated for a time and Kratos must Revive him by going near his body and holding down the Square Button.
There are only about five enemies in this fight and it can still be tough, but after the previous battle, we should handle this one rather easily. These Heavy Dragur will be much tougher later on in the game in packs I suspect. After the battle, we can now climb the rubble into the next area which is the Caverns as we progress onward to the Mountain. Please watch the video below on Battle Tactics #5, the battle prior to the Heavy Dragur in the Ruins.
Path to the Mountain - ( Ruins )
After climbing the mountain-side and its rubble, we will enter into some Caverns on the side of the mountain. We will hear some very creepy singing and we should follow it to see where it leads. To the left of the Caverns entrance is a brown wooded barricade, break it down and we will see a dead body. On that body will be some Hacksilver. After the collection, continue into the caverns and we will fight our first Revenant.
Battle Tactics #7 - First Revenant Encounter
The first Revenant can still be pretty difficult even one on one. Many players know to shoot the Revenant with Atreus bow and arrows because Kratos axe is too slow. After the enemy is Stunned, sprint towards it, and then we can follow up with some Axe attacks. Grinding Storm or Pride of the Frost are good options here. Hel's Touch Light Runic attack will also work, use it when it is off cooldown.
Atreus Arrows do a nice amount of damage to the Revenant. Try and dodge the Revenants ground fusion trail attack. It comes twice, so dodge appropriately. The Revenant also has the awesome ability to Poison Kratos. Poison Damage is like fire damage, and it will drain Kratos health over time. There is a Health Crystal , in some breakables to the left of this "arena" use the health crystal when needed.
I really suggest playing ranged vs this Revenant in this first encounter. Fire off arrows with Atreus, and get close in enough so we can lock-on to the Revenant and so Atreus arrows do not hit walls. Dodge the ground burst fusion poison attacks, twice each time. Next, we can throw our Leviathan Axe at the head of the Revenant everytime it is stunned from one of Atreus Arrows, this should get us out of the situation.
Save your Spartan Rage Ω
Proceeding after the Revenant battle, players will come to a fork in the road. First, take a look outside with Atreus, after crossing the gap. To the east of the view, there will be a Coffin Treasure Chest with Svar Steel inside. There are now also three Optional Paths to take before lowering the bridge. The first one is a Nonnir Treasure Chest . We will have to hit the three Seals to break this seal on the chest and open it. The First Seal is in plain sight, The second one is above and behind Kratos if he was looking at the treasure chest.
The third seal is tricky and can not be hit until the bridge is lowered. We must lower the bridge, by hitting the obstacles to have it fall down. Do Not take the path to the right just yet. If you look forward from the first side of the bridge you should see the Third Seal. Throw the Leviathan Axe at the seal and return to the Nonnir Treasure Chest. Inside will be our second Idunn Apple . ( Food of the Gods )
I mentioned a disclaimer above to save your Spartan Rage. If you notice a Rage Crystal on the ground right near the Nonnir Treasure Chest, do not hit it just yet. We have another path to take for some XP and Hacksilver . There is also a Lore Shrine after the battle. Take the path to the West of the Treasure Chest, this will lead to another battle segment. It is Optional, but we will gain XP and Hacksilver after the breakables in the area. If we climb the stone in this area, there was a strange red crystal I crushed. However, it disappeared on my second load of the battle after a death.
We will have to battle Melee Fire Dragur and several Fire Projectile Dragurs. it seems tough, but that is only if we don't use the walls in the area to our advantage. Kratos and Atreus can poke out of the walls and just throw the axe at the foes. Try and lead some of the weaker Dragur out and face them one at a time. Later we can mop up the projectile enemies with Long Range axe tosses and Atreus arrows. Hel's Touch is avoidable because if you get too close, the Three fire tossers can burn Kratos easily. In Give me God of War mode, this most likely means Game Over.
Use your Spartan Rage Ω
Players may have noticed another Coffin Chest below the area we fought the revenant. Players may also have checked out this area, after the first coffin chest and checking outside the area with the Square Button prompt with Atreus. The enemy down below is a Level 3 Heavy Dragur and he is almost out of our league. He will deal Red Ring attacks. This means they cannot be blocked, Kratos will just take damage, in this mode, it is a one-shot kill. However, Kratos can dodge these attacks. Two will come in succession, so dodge them both.
Use your Spartan Rage here and preferably Fury Drive , or the R1 attacks in rapid succession. This should lower about 50-70% of the Heavy Dragurs health bar. Afterward, players can fire arrows with Atreus and Throw the axe at the beast until it dies. This will work and its probably a good idea to acquire the Coffin Treasure Chest. It Contains some Hacksilver, Aegir Gold (11), and Svar Steel in Give me God of War mode.
The next battle will also be coming up and you may wonder why I used my Spartan Rage at this point. I felt the Heavy Dragur was the toughest encounter in this location. More so, we can now backtrack and smash the Rage Crystal near the Nornir Treasure Chest from Earlier. Finally, we can take the path to the east over the bridge. This once again is another battle segment, but there will be another Rage Crystal in the breakables around the area. Those two Rage Crystals will bring our Spartan Rage Meter , back to full.
Battle Tactics #8 - Revenant + Heavy Dragur ( Ruins )
We can finally cross the bridge and continue our journey through the ruins, towards the mountain. However, there will be another tough battle segment here vs a Revenant, two Heavy Dragur, a Melee fire Dragur, and a fire projectile Dragur. This fight can also be tough if you don't get off to a good start. Since we once again have a full Spartan Rage Meter, and we can take a look at the Rage Crystal in this location. Knowing this it would be a safe bet to Start out this battle using Spartan Rage. Note ( There will also be a Frost Reaver here, but he is easy and alone )
Using the Spartan Rage, players should attempt to knock the first Heavy Dragur that appears on the right side of this arena. Try knocking him off the ledge. Players can afterward focus on the Revenant. To do this while still in Spartan Rage , make sure to shoot the Revenant with Atreus arrows. Remember Spartan Rage will dissipate normally, it goes down faster when you use your Rage Skills. Knowing this you could save precious time in rage mode, players can also Cancel Spartan Rage Mode at any time to conserve some Rage Meter. Once again, try knocking the Revenant off the edge of the arena. If you can get both the Heavy Dragur and the Revenant at the start of the fight, you are looking excellent.
Knocking off the enemies is only part of the battle, however, but it gets easier from this point if it is accomplished. If you fail to knock them both off, I don't suggest giving up, as practice makes perfect. Instead, go for the Heavy Dragur first, and practice killing the Revenant. After the Revenant goes down, Players can use the corner where the bridge is. Players can have the Heavy Dragur walk towards Kratos and he can deal with them one on one. Finally, we can use ranged Leviathan Axe attacks, by poking out and retreating to dodge the fireballs from the Fire Dragurs.
As for crossing the bridge, Notice the opening in the gate when holding the circular mechanism with Kratos after the battle. If you hold the mechanism and release it or pull it halfway, we should see a Target for our Leviathan Axe near that gate. Toss the Axe at that target and the bridge will drop completely, making a constant way through, for Kratos and Atreus.
Fight off the Reavers
After that battle segment, there will soon yet be another. This one is rather simple if not extremely easy. We will be fighting mortal men at this point. They are all level one and have really low hit points and damage output. After we wipe them out, there will be some Frost Reavers that spawn from their dead bodies. These guys are a bit tougher, but using Fist attacks and Spartan Rage will make quick work of them.
Path to the Mountain - ( Spike Room Puzzle )
If Kratos touches the spikes he will lose health. Players may notice one piece of the first spike wall that doesn't have any spikes on it. Throw your Leviathan Axe at this wooded piece and the door will open. Do this to get through the areas first few doors. There will be a few enemies in this area, but we can crush them by utilizing the Spike Roof Mechanism. There aren't many enemies and it's really nothing to worry about even in Give me God of War Mode. Once we learn the puzzle the tough part is opening the Nornir Chest.
Players will have to circle around this room a few times. Lowering and going on top of the spiked roof by using the rotating mechanism. The first two seals are easy enough, The third seal can be tricky, players should stand atop the spiked roof and on the right side of the roof looking down at the Rotator we threw the Leviathan Axe at earlier. Throw the axe at this rotator and it will raise or lower the spiked roof. Either way, the third and final seal should be in sight at this point. Open up the Nornir Treasure Chest for our first Horn of Blood Mead , special item. Collecting Three of these will increase Kratos Rage Meter.
Meeting Brok ( Path to the Mountain )
Players will hear a voice in the distance, if we take the alternate path down via the chain, we can come across a shortcut that leads back to the ruins. There is also a Coffin Chest here with some Soft Svar Steel . Heading back and taking the next corner will be a corpse and near that corpse will be our first Mask. Collect the mask to start another Artifact quest called, The Faces of Magic , collecting them all will sell at the blacksmith and reward us with some XP . See our Artifact section for more information.
After meeting Brok he can now upgrade our Leviathan Axe. He has given us some Frozen Flame, which is required to upgrade the axe. Finish the Tutorial and upgrade your axe. You can also upgrade the Talon Bow and purchase or upgrade some Armor. I went with the Boars Hide Armor and the Melee ( red ) armor for Kratos and Atreus. These increase strength mainly and in this difficulty setting, where enemies have much more HP ( hit points ) I felt it was a good idea. Players can still purchase the other armors if they have enough Hacksilver, so don't worry if you change your mind on your statistic choices later.
Players should be sure to equip their Armor Enhancement Slot via the menu, the Tutorial does not tell us this and the current gem to slot it with is already in our inventory. This will further increase our defense. Deal with the somewhat easy battle by using the arena near Brok to your advantage. Brok has a small inventory at the moment, so get what you can afford for now. Before continuing towards the mountain through the large gate, we can take the bridge. The bridge will lead to a shortcut back to the ruins. I may have mentioned this earlier. If you missed it, pick up the Coffin Chest and the Svar Steel inside. Following this path will also lead to another Mask for The Faces Of Magic artifact quest.
Breena Daudi [ Troll ]
Players will come across a huge troll shortly after meeting Brok the Blacksmith. This troll deals fire damage and can be tough. The biggest killer for me was the Shadow Reavers that toss poison balls at Kratos. Take those guys out with Ranged attacks whenever you see them. Remember our axe is now Level Two. This means we can get some more powerful skills. I suggest going with the Ranged Skills for now against this Troll ( Breena Daudi ).
Players should look our for one attack mainly from Breena Daudi. This is when the beast stomps the ground with fire. Fire wil spawn right near Kratos shortly after and he must roll or avoid it by sprinting. This attack has tons of range and can get Kratos rather easily if you are not careful. There are tons of Health Crystals in this area to make things easier. There will also be a Spartan Rage Crystal. This should give us at the very least Two Spartan Rage usages during this fight. Start off the fight and use the Leap Smash Rage Skill . This skill deals nice damage to the troll and we can jump at least three times with it. It can also take out nearby Shadow Reavers due to the AoE ( Area of Effect ).
Continue fighting the beast using charged Levianthan Axe throw attacks and always fire off the arrows with Atreus bow. We can also run in and use some Executioner's Cleave attacks which deal nice damage. However, if you are not careful the fire from the Troll can cost your life. Kratos burning is never a good thing, so beware the fire that oozes from the beast as well as the fire it tosses. Our Rewards for this battle will be excellent! We will gain a New Rune , a Legendary Resource item and tons of XP + Hacksilver, Congratulations!
Meeting the Witch ( Path to the Mountain )
Shortly after the troll battle, we can inspect this area. There will be three bells to ring near the chest. The first two are on the left and right sides of the Nornir Treasure Chest. The final bell is behind it near the water to the left. Ring all three bells quickly and the chest will open, it contains another Idunn Apple #3.
Continuing onwards we can go through the tunnel and we will end up finding the boar. This boar is magical and Atreus shot will bounce off of it. Continue chasing the boar through a burnt down village. Inspecting the back end of the village will result in finding another Mask , for the Faces Artifact Quest. The area is also filled with tons of small chest and hacksilver as well as some other materials such as Steel. It has a few reaver enemies and smaller encounters, but nothing major.
After the village, we will reach the boar once again. This time Atreus will nail it with a deathly arrow. The boar will run off and we will lose Atreus for a bit. The music changes here as Kratos begins to panic in the fog. We must find Atreus! The area is rather linear so it is hard to get lost if you hit a dead end just turn around. Eventually, we will find the boy with a beautiful woman, this is the Witch . This is a beautiful area we can admire as we carry the boar to the Witches abode. Once inside she will ask us to gather some Sheeps Cress. This is easy to find to the left of Atreus as he is in the garden. Return the sheeps cress and we will earn the Story or Key Item, the Witch Compass .
With the Witch Compass, we can pin-point marker locations on our map and they will also show how close or far they are in the HUD. We can next get into the boat, but first, we should explore this area a bit. We will run into Nightmare enemies for the first time. In this first encounter, they are rather simple. They can nearly one-shot kill Kratos even at full health with their Flash of Death attack. The Nightmare will fly towards Kratos a explode. This attack will not only blind Kratos and the player but deal massive damage. Be sure to take these guys out first with Axe throws, or the best method possible.
There is also a legendary chest over a jump in this location. Open up the chest for a new Talisman, which is common in rarity. This Talisman can give Kratos a health burst when used with L1 + Circle. We will find many more of these in the game and some have passive abilities. Now we are ready to get into the boat and head down the stream towards the Lake of the Nine.
Lake of the Nine ( World Serpent )
Head towards the marker which is the glowing statue. Once we are there read the Inscription with Atreus. Kratos will toss his Axe in the water and the World Serpent will appear. The game states the axe gets Imbued with something after the World Serpent returns it to us. Don't worry about that for now, just continue with the quest. The tide will lower and there will be plenty more to explore now. However, I suggest sticking to the main quest. I will cover the optional areas at the end of this guide and possibly in a different section.
Broks New Shop
We will meet Brok again shortly after docking at the marker. Make sure to upgrade your armors and weapons, we will also gain the stone of the World Tree, which will allow us to make waypoints through the realms. Ignore that for now as there are no other waypoints at the moment. Once you are finished upgrading you can exit the area and head all the way down to the opposite side. There will be some Poison Reavers here, these guys are easy even at the games Hardest Difficulty. Atreus will now be able to assist us with melee attacks, use this to your advantage and defeat the reavers.
Meeting Sindri (Path to the Mountain, Foothills)
After making it through the poison areas and dealing with our first Tatzelwurm we can meet Sindri outside. The first Tatzelwurm is simple, these guys are much tougher in the next battle, especially if you don't know how to beat them. Sindri will offer pretty much everything Brok has at the moment with a huge exception. Resurrection Stones can be purchased, they have rarity levels and can revive Kratos by use of Atreus. Currently, we can only carry one at a time. These stones will bring Kratos back to around 25% of his health . If you die often I found the stone does not reload correctly. Sometimes I died and the stone reappeared, other times I died and stone would be lost and I would lose Hacksilver purchased along with it.
The next battle segment is tough, I suggest getting a Resurrection Stone, and leveling up your armors as much as you can. You may want a different armor for Atreus of your choosing. Players should undoubtedly level up and take new Leviathan Axe skills, Precision Throw is excellent and one of my favorites. Frost Rush is also nice and easy to use. Finally, my current favorite is Permafrost . This skill will increase the damage we do with the axe as long as we consecutively hit enemies without taking damage or interruption. The kicker is the Axe Icon on the bottom left of the screen fills with a frost after effect, it's really an amazing touch!
Battle Tactics #9 - Tatzelworms at the Foothills
The biggest problem here is the Tatzelworms , these enemies explode if you are too close and hitting them in succession while they are on the floor will only get Kratos killed. The trick is to block there attack and then use a Heavy Attack with R2. Only when these enemies are airborne can we safely attack without them exploding in fire. They are still tough and there will be tons of other Poison Reavers that spawn, as well as Two Tatzelworms total. This battle is much easier if you use R2 Heavy Attack , I provided a video with no commentary below if you are still stuck.
After that battle, we can explore the area a bit. There is a Nornir Treasure Chest to the east. To open it we will have to remember the three sigils and use a bit of trial and error to solve the seal puzzle. If we do this we can pick up another Horn of Blood Mead #2 . Next, if we freeze the poison pod nearby with the Leviathan Axe we can open the Coffin Treasure Chest which contains Arcane Wasit Guards ( Wasit Armor ). If we head down the road to the north we can find another poison pod, freeze this poison pod and open the Coffin Treasure Chest. Inside we can find the Arcane Wrist Guards. Finally, we can head towards the main objective.
We will encounter tons of poison pods here and a Revenant. If we freeze some of the pods and take the left path we can acquire the Arcane Shoulder Pads. Afterward, we can defeat the Revenant just be sure to dodge the poison appropriately. Once the Revenant goes down there is a hidden chamber to locate if you would like to the west. To the east is the path to the mountain and an odd blue crystal structure. Ignore the structure for now and head towards the Mountain.
Before going near the door we can open another two chest. One of them is a coffin treasure chest which contains some materials or the Arcane Shoulder Pads. The second chest is a Legendary Treasure Chest, which contains a Light Runic Attack Rune . This is the Charge of the White Bear, which is really awesome, equip it and level it up if you would like. Just be sure to blow up the Urns so the boulders explode then freeze the Poison Pods so we can open both treasure chest. Afterward, head to the doors and we will battle an Ogre next.
Battle Tactics #10 - Ogre at the Foothills
The Ogre and the Poison Shadows that surround him can be a tough encounter. Players should have saved their Spartan Rage for this battle. If not they are going to have a much harder time and may want to take down the Ogre first. If they do, we can ride the Ogre and knock the Shadows off the mountain. However, there may be two waves of shadows even if you defeat the Ogre first.
If you have your Spartan Rage , use it immediately in the center of the arena. This will knock tons of Poison Shadow Reavers off of the map. Make sure to use the Leaping Smash Rage Skill. This should leave only one or two Poison Reavers/Shadows left. This makes the fight much easier. Focus on the remaining reavers while sprinting away from the Ogre. Always have Atreus firing off arrows to distract and damage whomever he can. The reavers can heal all their health back, so be sure to kill the one you are focused on. Once the reavers are dead its time to kill the Ogre.
The Ogre has one attack that can Blind and deal massive damage. This is when he charges at Kratos and a red unblockable ring forms around the Ogre. Players must be quick with either Sprinting or a back roll to dodge this attack. Players can get close to the Ogre and he will not do his charging attack. This is recommended, just parry his yellow ring attack. His basic attack is quick and can catch you off guard, it is probably the most dangerous, but it doesn't drain as much health as the red ring attack. Finally, the Ogre may Push Kratos , this looks like an attack but it deals no damage. However, it will knock you back a bit so be ready.
Once the Ogre is at low health it is susceptible to the grab. Hurry and grab the ogre to ride him. Be very quick here as new Poison Shadows will appear on the mountain. Knock them off or kill them quickly while riding the Ogre. Once we come off the Ogre finish it as quick as possible. If there are any reavers left, finish those off as well. If there are too many Shadows/Reavers on the map at this point you may need to reset. Have the following skills and items.
- Hel's Touch - this is a quick attack and interruption of all the Ogre and Reaver attacks.
- Ivaldi's Hammer - not many other options at this point in the story.
- Simple Resurrection Stone, Use only when you are confident you can finish the battle.
- Talisman of Concentrated Vitality - Health Burst is always nice!
Please see the video below for the battle if you want a bit more assistance. Once we have beaten the Ogre we can travel towards the Mountain. We will meet the Witch and see some black smoke that blocks our path. The Witch will tell us we need to go to another Realm to solve this problem. This will finally complete the Path to the Mountain Main Quest! Congratulations! See our next section which is " A Realm Beyond ".
- Privacy Policy
God of War Nornir Chests: All Locations and Puzzle Solutions
Nornir Chests are just one of many different chest types to collect in God of War on the PS4 and PC. Most contain hacksilver, while others will contain runes. Nornir Chests, however, contain upgrades for Kratos, such as health and rage boosts. You’ll want to take advantage of these upgrades, but their boons are locked behind rune puzzles .
To unlock Nornir Chests in God of War , you’ll need to solve the puzzles guarding them by breaking the three seals locking them. Some runes will be easy to find, while others will take some ingenuity to destroy. This guide will show you how to find each Nornir Chest, as well as where to find each and every rune-covered seal.
Jump to a specific location by clicking the links below:
- River Pass + Witch’s Cave
- The Mountain
- Lake of Nine
- Fafnir’s Storeroom
- Tyr’s Temple
- Veithurgard
All God of War Nornir Chest Locations and Rune Puzzle Solutions
Wildwoods: 1 nornir chest, nornir chest #1: after your first battle (health upgrade).
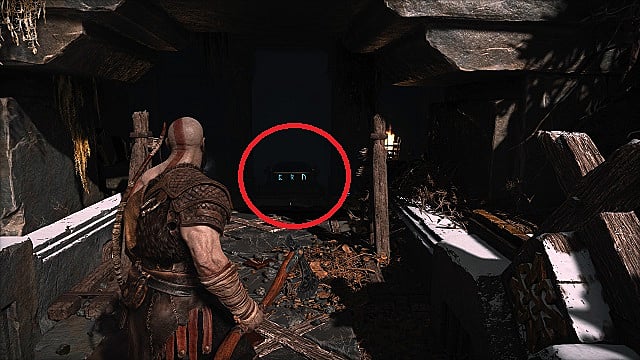
Once you’ve defeated your first set of Draugr in the Wildwoods, head straight ahead. Go past the life stone on the ground and toward the blocked passage in front of you. Break through the wood to find this Nornir chest.
- Seal 1: As you walk into the alcove, the first rune seal is immediately to your right — on the other side of the stairs. Throw your ax to break it.
- Seal 2: The second rune is to the right of the Nornir Chest, sitting against the wall.
- Seal 3: The third rune is on the left-hand side of the room in a stone sarcophagus.
River Pass and Witch’s Cave: 5 Nornir Chests
Nornir chest #1 after the revenant (health upgrade).
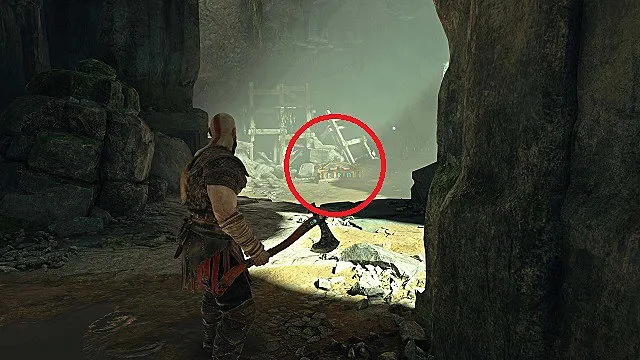
Just like with the first artifact in this area , it will take you a while to get to the first Nornir Chest in the River Pass. After you fight the Revenant, who will come after the Heavy Draugr, climb up to the second story and turn right. You’ll see the chest among some debris straight ahead.
Note: If you turn left instead of right, you’ll find a shrine.
- Seal 1: In the top right-hand corner when facing the Nornir Chest.
- Seal 2: Turn around and look upward. To the left of the bridge in the distance (not the one closest to you) and past the chain, you’ll see a second rune.
- Seal 3: Lower the bridge closest to you and go across. Once you cross over, stop and look up and left. The third rune seal is in an alcove there.
Nornir Chest #2: After the Spiked Ceiling Puzzle (Rage Upgrade)
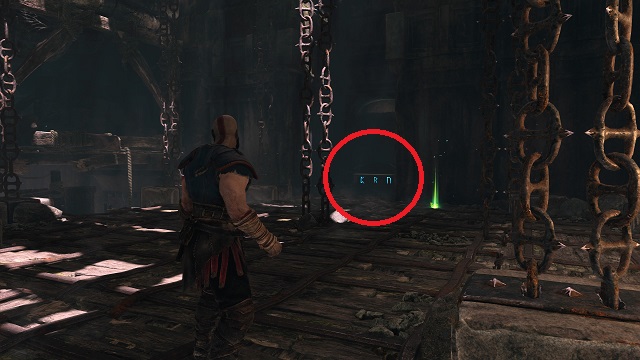
After completing the spiked ceiling puzzle (and after Atreus joins you on the other side), turn around and climb on the spike contraption. Look right and find the Nornir Chest.
- Seal 1: Turn around from the Nornir Chest and see the rune seal on a rock.
- Seal 2: From 1, turn left and look up.
- Seal 3: This one is a bit tricky. From 2, look left again and see the blue wisps of the seal behind a beam. Raise the platform you’re on to get a good angle from which to throw your ax.
Nornir Chest #3: After the Sand Puzzle and Troll Fight (Health Upgrade)

Once you’ve completed the sand puzzle, you’ll go through a cavern and fight a troll on the other side. Defeat them and look to the left of the area. At the edge, you’ll find this Nornir Chest. The seals here are bells, and you must ring them in quick succession to open it.
- Bell 1: Just above the chest.
- Bell 2: Look left and up. This bell is right behind you on the cliff overlooking the waterfall.
- The easiest method is to hit the bells in this order: 3,1,2 . You’ll only have a few seconds to strike each bell. You’ll get an Idunn Apple for your troubles.
Nornir Chest #4: In the Witch’s Cave (Cannot Reach on First Visit)
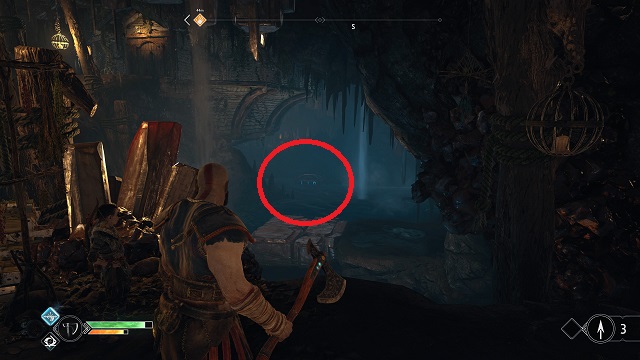
This Nornir Chest can be found in the witch’s cave after you beat the nightmares. From the bridge, turn around and look toward the back of the area (toward the witch’s house). Down below, you’ll see the chest in the water.
You can’t get this Nornir Chest yet, though. You can revisit when Atreus can build bridges.
Nornir Chest #5: Exiting the Cave Through the Well (Cannot Reach on First Visit)
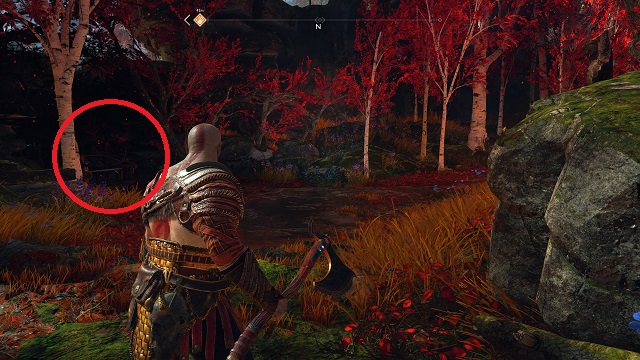
Since you’ll also need Atreus to get you across the water in the cave, you won’t be able to exit through the well the first time you visit this area. But once you can reach the Nornir Chest, you’ll need the Winds of Hel to open it. We’ll update this guide with a screenshot and steps when we access this area.
Foothills: 1 Nornir Chest
Nornir chest #1: after meeting sindri.

Eventually, you’ll meet Brok’s brother, Sindri. After speaking with him, leave his camp and go straight ahead. Enemies will spawn and a protracted conflict will ensue. Once you’ve defeated all of the enemies, head up the hill and go right. In the back of the area, you’ll find this Nornir chest.
To open it, you’ll need to align each of three turnable poles to the runes on the chest. It does matter which poles show which runes since each pole doesn’t have all of the runes carved into them. Here’s what you need to do:
- Pole 1: Directly to the left of the Nornir Chest. This one should be turned to the “squiggly” symbol .
- Pole 2: Turn around and go back down the hill. Turn left, and you’ll see this pole nestled in the cliff just above eye level. This one should be turned to the “P” symbol .
- Pole 3: Turn right and follow the path around to the fallen tree. This pole will be mostly obscured by the poisonous fog. Throw your ax at the fog pole to reveal the rune. This one should be turned to the backward “B” symbol .
Alfheim: 4 Nornir Chests
Nornir chest #1: light elf sanctuary (health upgrade).
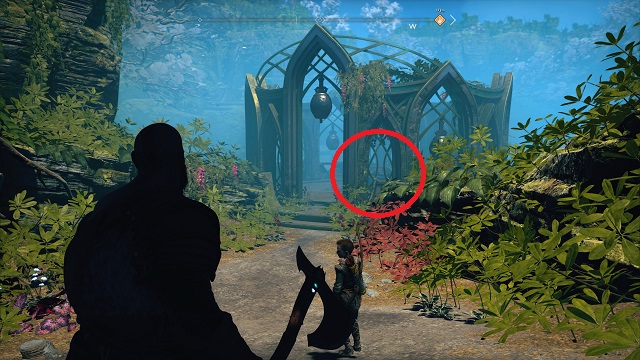
After defeating the enemies on the beach at Light Elf Sanctuary, follow the path until it forks. Take a left and you’ll come to the area pictured above. The Nornir Chest is inside the shelter.
There are no runes on the bells in this area, but the sequence to open the chest is this:
- The bell above the doorway
- Turn left and ring the third bell
- Turn left and ring the sixth bell
Inside the Nornir Chest, you’ll find an Idunn Apple .
Note: If you don’t know how to get to Light Elf Sanctuary, turn right as soon as you enter the Lake of Light. Go all the way to the end. Then turn right and follow the channel around. You’ll find the shore and can dock there.
Nornir Chest #2: Ringed Temple Trench (Health Upgrade)
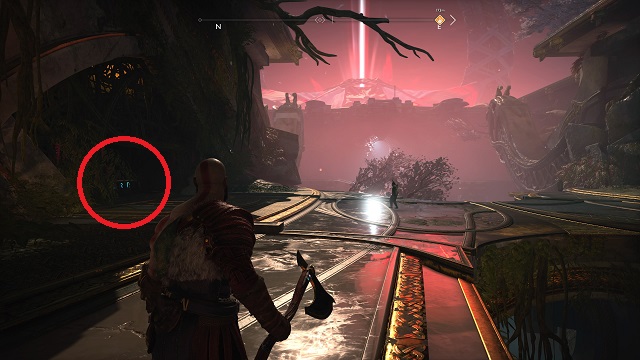
After you enter the Ringed Temple, prepare yourself for a fight against the Dark Elves. Once you’ve defeated them, continue along the trench on the left side. Eventually, you’ll come across the next Nornir Chest nestled in the wall.
Go to the right side and activate the wheel so that the middle section in front of you descends. Throw your ax to cement it into place.
- Seal 1: Drop down. Across the platform in front of you.
- Seal 2: Turn around. On the wall behind the wheel.
Now climb back up and turn the wheel all the down so that both pieces of the floor (the middle part and the part you’re standing on) descend. Throw your ax to cement it into place.
- Seal 3: Turn around. Climb up the ledge to find it nestled in the wall.
You’ll get an Idunn Apple for all your efforts.
Nornir Chest #3 Ringed Temple Sealed Doors (Rage Upgrade)
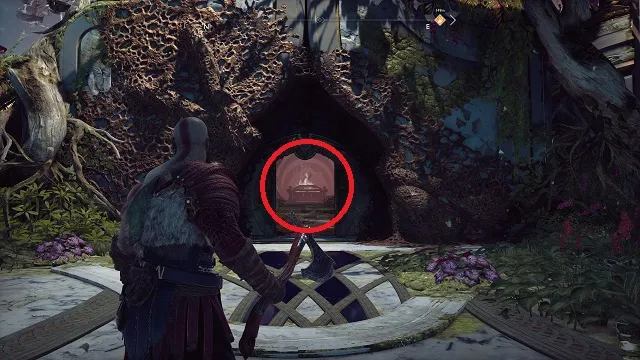
When you reach the Ringed Temple proper, the blue doors in front of you will be locked. Before continuing with the story, turn left and follow the steps downward toward a Nornir Chest. At the bottom, turn right, and you’ll see a gate with two nodes, one holding it shut and the other hanging from the ceiling behind. Throw your axe and destroy both at the same time.
Once the gate is open, you’ll need to ring three bells in quick succession.
- Bell 1: At the end of the corridor above the chest.
- Bell 2: To the left of the gate, nestled in the wall.
- Bell 3: Behind you, turned at an angle.
There’s no easy way to open this chest other than being fast. We found that the sequence 3,2,1 was most effective . Claim your Horn of Bloodmead .
Nornir Chest #4: At the Gate (Rage Upgrade)
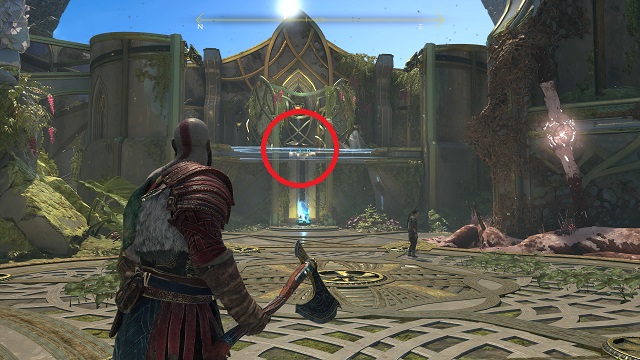
After Atreus receives the ability to build light bridges, you’ll eventually make it back to the temple’s main doors, the ones you could not near Nornir Chest 3. But don’t go through the doors just yet! Instead, turn around and place the crystal in the socket under the shelter.
Once the light bridge is created, climb to the top to find the fourth Nornir Chest. Opening this one is another test of speed and accuracy.
- Bell 1: Inside the shelter, just above the chest.
- Bell 2: Above the stairs on the right (where you climbed up).
- Bell 3: Outside the window on the opposite side of Bell 2.
A Horn of Bloodmead will be inside.
The Mountain: 2 Nornir Chests
Nornir chest #1 inside the mountain (rage upgrade).
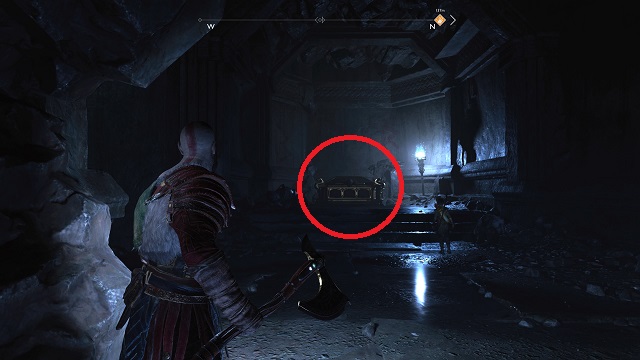
After you complete the light puzzle when you first enter the mountain (where the deer god sits on the throne), a passageway will open on the right side of the room. Go through and follow the path. After fighting the Revenant, climb up the ledge and defeat all of the Draugr.
From the ledge you originally climbed to get into this area, go left. Have Atreus create a lightbridge and go up it. You’ll find this Nornir Chest there. And like the chest in the Foothills, you’ll need to align runes on three turnable poles.
- Pole 1: At the foot of the bridge to your right. This pole should show the “R” symbol.
- Pole 2: Go to the ledge you climbed to get in this area. Look up and left to find it nestled on the cliff above. This pole should show the “B” symbol.
- Pole 3: Drop down off the ledge from Pole 2 and turn immediately right. This pole should show the “N” symbol.
You’ll be rewarded with a Horn of Bloodmead .
Nornir Chest #2: After Getting Shock Arrows, Where Hel-Walkers Worship (Health Upgrade)
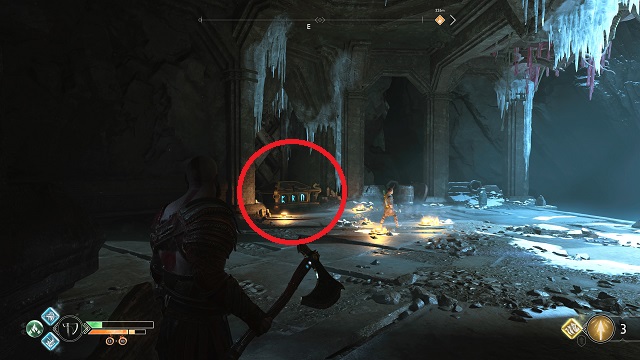
After finding Artifact 3 at the bridge and using the sap bucket there to make a new path, you’ll pass an alcove covered in sap. It won’t have a crystal to shoot.
However, move toward the Hel-Walkers worshiping ahead. You’ll they are worshiping the next Nornir Chest. Defeat them and use the sap dispenser to open the alcove that was previously locked (there is also a Shrine in the alcove).
- Seal 1: In the room with the shrine. Turn right and look up.
- Seal 2: Go back to the room with the sap dispenser and use the sap to lower the bridges. As you cross the bridge, look right. There is an opening with the Seal inside.
- Seal 3: After defeating the enemies across the bridge, use the wheel to raise the bridge to the next level. Freeze the gears next to it. Go up the bridge and look right. The Seal is along the wall.
You will receive an Idunn Apple for your efforts.
Lake of Nine: 4 Nornir Chests
Nornir chest #1: lookout tower’s spike trap (health upgrade).
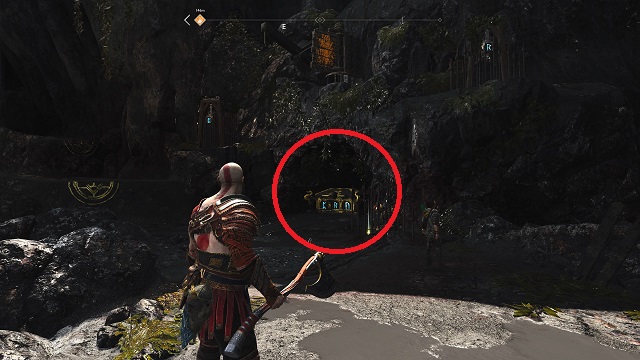
Go to the end of Tyr’s Bridge (toward the Foothills) and take a right. Drop down and head straight. After a few steps, you’ll see a Nornir Chest on your left. You’ll need to ring three bells to open this one — but they’re stuck behind three spike traps. To lower the spikes, hit the turnable pole above the chest.
- Bell 1: To the left of the turnable pole.
- Bell 2: Up and right of the Nornir Chest.
- Bell 3: Right of Bell 2.
Claim your Idunn Apple .
Nornir Chest #2: On the Shore at Forgotten Caverns (Health Upgrade)
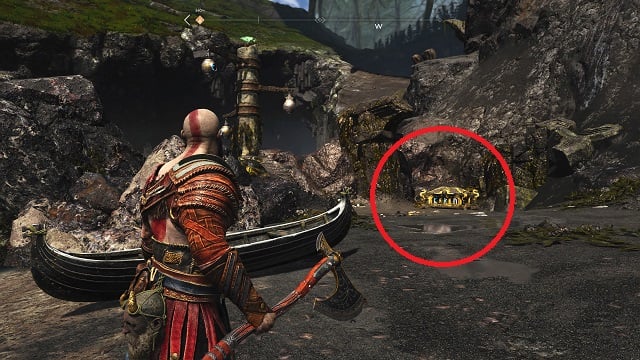
You really can’t miss this Nornir Chest. You’ll see it on the shore as soon as you dock at Forgotten Caverns. Take out the enemies first, then head to the left to find the seals. They’re all in one place this time, but the puzzle is a bit different.
The seals are on individual rotating arms. Hit one, and all of the arms will spin. Hit another, and the arms will spin faster. You only have a few seconds to hit all of them, so the best sequence is: Bottom, Middle, Top or Top, Middle, Bottom.
Hitting the middle seal second stops all of the seals from spinning . Complete the puzzle and open the Nornir Chest to get an Idunn Apple .
Nornir Chest #3: Light Elf Outpost After Water Descends Second Time
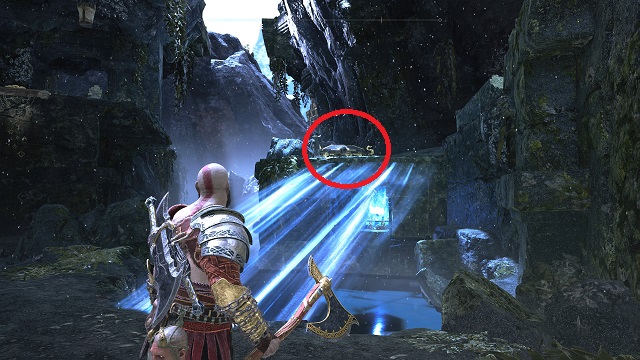
After the water in the Lake of Nine descends a second time, Light Elf Outpost will be revealed. It’s to the left of Helheim Tower — the area with the ruins in the water. There’s a Level 5 Troll on the island, as well as a handful of high-level poison enemies.
Defeat your adversaries and look to the left of the gate. Smash the boards to reveal a crystal. Create a light bridge up to the Nornir Chest.
- Seal 1: Look toward the cliff behind the Nornir Chest. The seal is at eye level on the opposite side of the ruins.
- Seal 2: From the chest, turn right. Go through the gate and stop. Turn right again and look out to the broken bridge in the water. The seal is on the column closest to you.
- Seal 3: From there, go left and down the path. Follow it all the way around — until you can either climb up the wall or down the chain. The seal will be nestled in the gate wall in front of you.
Nornir Chest #4: Cliffs of the Raven Using Winds of Hel

Another area that will be revealed after the water in the Lake of Nine descends a second time. Dock at the new landing at the Cliffs of the Raven. Make your way around the path, and you’ll eventually come to the Nornir Chest naturally. To destroy the seals, you’ll need to clear out the growth found here, as well as use the Winds of Hel to select the correct runes.
Note: To select the runes on the pillars around the area, activate each pillar with the Winds of Hel and let the runes rotate. When the rune you want appears, remove the Winds of Hel from the node to another node. That final step will lock the rune into place, ultimately giving access to the Nornir Chest .
- Seal 1: To the right of the Nornir Chest up on the highest cliff. Should show the “R” symbol.
- Seal 2: To the right of the Nornir Chest, but on the same level as the Nornir Chest. Should show the sideways “N” symbol.
- Seal 3: To the left of the Nornir Chest, up on the cliff. Should show the “P” symbol.
Fafnir’s Storeroom: 1 Nornir Chest
Nornir chest #1: the forest area before the storeroom (rage upgrade).
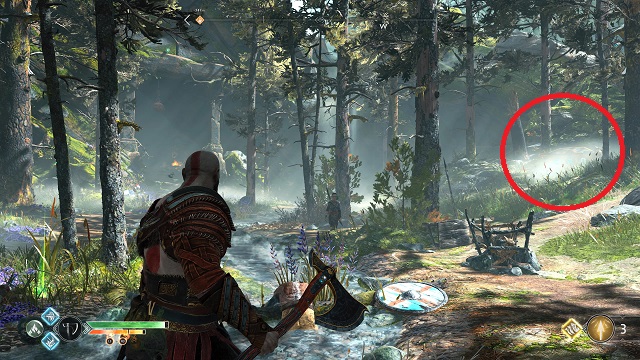
After passing Sidnir, you’ll crawl through a cliff and exit in a forest area. As you make your way up from the crawlspace, you can find a Raven perched on a branch in the stream (on the left side, before you climb the first ledge).
Continuing forward, you’ll encounter Reavers. Defeat them and look to the right side of the area for the Nornir Chest. The seals for this chest are once again bells.
- Bell 1: Directly above the Nornir Chest.
- Bell 2: Up and to the right of the chest.
- Bell 3: Above the waterfall at the far end of the area.
The reward for opening this Nornir Chest is a Horn of Bloodmead .
Helheim: 1 Nornir Chest
Nornir chest #1: after you get the “round 2” trophy (rage upgrade).
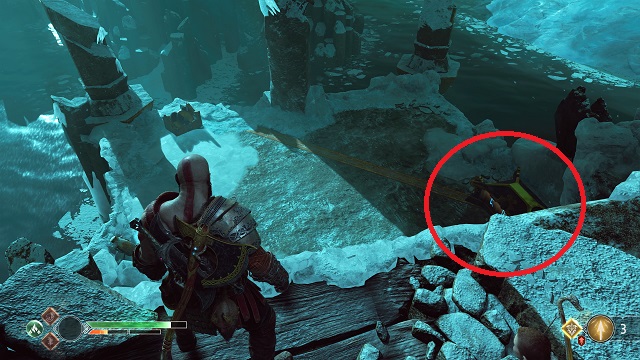
When you return to Helheim, go straight ahead and look down. This chest is below on the right-hand side of the screen. You can’t get this one quite yet, but follow the story path for a few more minutes, and you’ll be able to nab it.
Eventually, you’ll come to a ship. But instead of boarding it and continuing your journey, follow the path. You’ll end up at the Nornir Chest.
- Seal 1: There’s a giant block to the right of the Nornir Chest. Move it halfway out and then step into the gap to the left. The back of the block will be open and the seal will be inside.
- Seal 2: Move the block all the way out. This seal is behind the block.
- Seal 3: Climb the block after moving it completely out. Look to the right of the chest. The seal is on the pillar in the water.
Tyr’s Temple: 1 Nornir Chest
Nornir chest #1: behind the spiked traps in tyr’s vault (symbol of bounty).
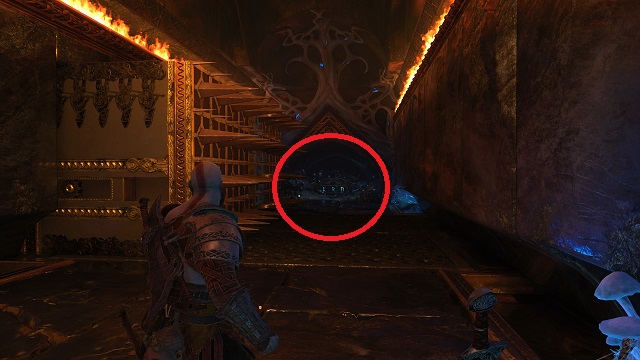
As you move through the story, you’ll come to Tyr’s Vault. The security here is intense and stands in your way. The main hall has three concentric rings that require you to use Hel’s Wind to get past. Each time opens a new area of challenges.
When you use Hel’s Wind on the second ring, you’ll open two doors. The one on your right will have a Nornir Chest, which is pretty hard to miss.
- Seal 1: In the room with the wheel. Turn around from the wheel to find it nestled in the wall behind you.
- Seal 2: Go into the room with the spiked traps coming down from the ceiling. Look on the right arm of the first trap.
- Seal 3: Go to the Nornir Chest and turn around. The seal is in a small hole at the bottom of the first spiked contraption.
Veithurgard: 1 Nornir Chest
Nornir chest #1: to the left of the dragon on a cliff.
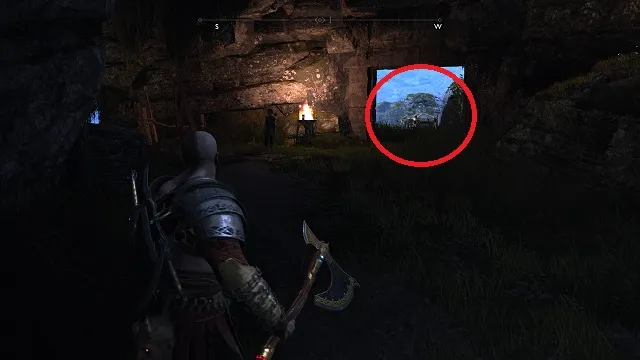
Go to the dragon tether and turn left. Continue up the path past the bridge and through the Stonehenge-like worship area. Turn right, up the steps, and right again. Climb up the small ledge and the Veithurgard Nornir Chest will be straight ahead on the cliff.
- Seal 1: As you approach the Nornir Chest, turn right as you get to the doorway. The seal will be in the wall.
- Seal 2: Continue past the Nornir Chest until you get to the small bridge. Turn right and the seal is nestled in the rocks.
- Seal 3: Continue from the last seal and turn right when the path branches. Go to the end of the path, which overlooks the water. The last seal is out in the rocks.
Konunsgard: 1 Nornir Chest
Nornir chest #1: after collecting the mythic items.
The Nornir Chest at Konunsgard is by far the most intensive Nornir Chest to find in all of God of War . It requires that you complete all of the Dwarven side quests presented to you by Brok and Sindri. Then(!), you’ll still have to go through the entire area before getting to it.
However, after you’ve acquired the three mythic items you’re tasked with retrieving, you’ll come across a balcony on your path back. The Nornir Chest will be there. To activate the seals, you’ll need the Winds of Hel and quick reflexes.
- Activate the blank rune with the Winds of Hel
- Remove the winds when the rune is still blank to activate it
- Spin the other bell with the Winds of Hel
- Hit the stationary bell
- Throw the ax to hit the other two bells
Performing all of those steps should open the Nornir Chest for you. Finish the quest and get the Like Oil and Water trophy for completing all of Brok and Sindri’s side quests.
Related guides :
- All Hidden Valkyrie Locations
- How to Get Smoldering Embers
- Best Light & Heavy Runic Attacks
- How to Get the Frozen Flame
- What is Anchor of Fog? Answered
- Where to Find Every Chaos Flame
- Where to Find Every God of War Dragon
And that’s how you find all of the Nornir Chests and solve their rune puzzles in God of War . There are tons more collectibles to find along your journey. From artifacts to shrines and Odin’s Ravens , make sure to check out our other God of War guides while you’re here.
Follow Polygon online:
- Follow Polygon on Facebook
- Follow Polygon on Youtube
- Follow Polygon on Instagram
Site search
- What to Watch
- What to Play
- PlayStation
- All Entertainment
- Dragon’s Dogma 2
- FF7 Rebirth
- Zelda: Tears of the Kingdom
- Baldur’s Gate 3
- Buyer’s Guides
- Galaxy Brains
- All Podcasts
Filed under:
God of War guide: Escape from Helheim walkthrough and collectibles
But it is who you have become of late.
Share this story
- Share this on Facebook
- Share this on Reddit
- Share All sharing options

Share All sharing options for: God of War guide: Escape from Helheim walkthrough and collectibles
/cdn.vox-cdn.com/uploads/chorus_image/image/68787060/God_of_War_Escape_from_Helheim_guide_000.0.jpg)
God of War ’s “Escape fromHelheim” Journey begins after Kratos and Atreus’ plan to visit Jotunheim doesn’t go as expected during “ Return to the Summit .” You’ll find yourself back in Helheim. Leaving is a lot more complicated this time.
A note on God of War spoilers
God of War is full of surprises, and that makes guides particularly tricky to write. We want to help you with the game. We don’t want to spoil it. So we want you to know that we’ve written every guide with spoilers in mind.
If our guide doesn’t appear to get you every item (a chest, for example), there’s a reason for that. Rather than spoil that reason, our tables of contents and a big image in the guide indicating spoilers ahead will tell you when and why you find yourself in that situation — in the least spoilery way possible.
:no_upscale()/cdn.vox-cdn.com/uploads/chorus_asset/file/10678045/God_of_War_spoiler_warning_image.jpg)
Find a way out of Helheim
After your “conversation” with Atreus, climb the pillar to your left, which will bring you to Helheim Landing . At the top, you’ll fight a Hel-reaver guard. Double-tap L1 to break through his shield, and remember to use your Blades of Chaos against these icy enemies.
Opening the gate
Items in this area: wooden chest, Traveler drops (Traveler’s Grizzly Trophy, Chaos FlameTraveler’s Armor Shard)
Light the bramble to clear a path, walk out and around and punch the wooden chest open for some hacksilver . Lift the gate next to the chest, walk through, turn right and cross the bridge. Jump across the part that collapses, and fight the various Hel-Walkers, including a new horror called a Hel-Shadow Scout , who uses ice magic. There are also Ice Nightmares . Use Atreus to defeat them first from a distance.
Open the gate, watch the cutscene, and grab onto the wall to climb down.
:no_upscale()/cdn.vox-cdn.com/uploads/chorus_asset/file/10655797/God_of_War_Escape_from_Helheim_guide_009.jpg)
Clear away the bramble surrounding the Winds of Hel on your right, and use your weapon to ignite the left Wind Trap on the locked door. Throw your axe at the gear between them to freeze it in place, and then take the Winds from the left and throw it into the right trap.
Open the door, and fight the Hel-traveler . You can’t block most of his attacks, so roll out of the way. If you have any Spartan energy, use it. It’s incredibly effective. Defeat him for a Traveler’s Grizzly Trophy , a Chaos Flame (to upgrade your Blades of Chaos), a Traveler’s Armor Shard and a lot of hacksilver .
Hidden Coffin
Before you leave this area, head back to where you picked up the Winds. There’s a place you can climb down just to the left of the pillar. Climb down and to the right until you find a path under the bridge. Open the coffin you find there for some Hardened Svartalfheim Steel and a Symbol of Resilience .
Handle the Hel-walker that pops up behind you and climb back up to Atreus.
The c offin and climbing down
Items in this area: coffin (Hardened Svartalfheim Steel)
Clear the bramble opposite the gate, and walk onto the balcony. See the stuff in the distance? That’s your next objective.
Open the gate, turn right and clear more bramble. Fight the enemy who appears, and push the block in front of you until it’s nearly over the edge. Backtrack to the balcony and jump from there to the block to collect the multicolored crystal. Jump across from there to open the c offin for some Harde n ed Svartalfheim Steel . As soon as you collect it, another Hel-walker will appear on the balcony. Use Atreus to defeat it or just throw your axe.
:no_upscale()/cdn.vox-cdn.com/uploads/chorus_asset/file/10655819/God_of_War_Escape_from_Helheim_guide_026.jpg)
Head the only way you haven’t gone, jump the gap, listen to Baldur’s conversation with his mom, and climb down.
:no_upscale()/cdn.vox-cdn.com/uploads/chorus_asset/file/10655827/God_of_War_Escape_from_Helheim_guide_029.jpg)
Walk all the way to the end of the platform, and climb down. Destroy the weapon racks blocking access to the low hole in the wall behind them. Crawl through to open a c offin for one Hardened Svartalfheim Steel .
Make your way down to the next level, where you’ll square off against several enemies. Use Atreus to defeat the Ice Nightmares first. Then concentrate on the weaker enemies. Fight the mace-wielding Hel-vikens last, one at a time. For winning, you’ll receive hacksilver and a Symbol of Survival .
You have two options at the intersection ahead: right to the boat and left to treasure. Let’s go left first.
Left to treasure
Items in this area: wooden chest, Nornir Chest

Push the block, jump over the gap, turn right and burn away the Hel bramble blocking access to the block . Pull it back as far as you can, climb up and onto the surrounding structure. Smash the wooden chest up there for some hacksilver .
Here’s how to find and destroy the three ruin seals:

- While standing next to the wooden chest, turn to your right, and throw your axe at the rune seal (R ) on a pillar in the distance.
- Hop back down, turn left and enter the doorway on your left. Turn left on the balcony, and throw your axe at the Rune Seal (C) in the distance.
- Leave the balcony and push the block back toward the doorway you just left. Leave enough space to walk through the door, then turn around and throw your axe at the Rune Seal (N) inside of the block.
Open the chest for a Horn of Blood Mead , which increases your maximum Rage. If you’ve gotten the rest, this is the final one, and you’ll earn the Quick Tempered trophy .
To the ship
Go back the way you came, toward the ship. A weak enemy and two Ice Nightmares will appear. As always, use Atreus to take down the Nightmares first. The other dude won’t present much of a challenge. Lift the stone to clear a path ahead.
Objective: Use the ship
Items in this area: coffin (Stone of Fire Supremacy)
:no_upscale()/cdn.vox-cdn.com/uploads/chorus_asset/file/10655935/God_of_War_Escape_from_Helheim_guide_055.jpg)
Clear away the bramble on the deck to create two bonfires , and then walk to the wheel to raise the sails. When you get stuck on an iceberg, walk to the other end of the ship and use your axe to chop the wood and release the sails. Return to the wheel, and pull it to move the sails again. When you get stuck again, exit on the starboard (right) side.
:no_upscale()/cdn.vox-cdn.com/uploads/chorus_asset/file/10655949/God_of_War_Escape_from_Helheim_guide_059_2.jpg)
Head directly to the c offin in the distance, where you’ll find the Stone of Fire Supremacy , a Legendary enhancement that increases all Burn damage inflicted by 25 percent.
The elevator and two chests
Items in this area: wooden chest, coffin (Icarus Storm light runic attack), drops (Sturdy Sign of Fortune, Symbol of Fortune)
Head back the way you came, and walk through the doorway on your left. This is an Helheim elevator. Throw your axe at the orange wood , retrieve it, and repeat the process twice more. When it won’t turn anymore, freeze the gear above it.
:no_upscale()/cdn.vox-cdn.com/uploads/chorus_asset/file/10655975/God_of_War_Escape_from_Helheim_guide_072.jpg)
Exit at the top, and retrieve your axe. When the elevator gets back to the bottom, take the path to the wooden chest for some hacksilver .
Walk out on the ledge closest to the ship, and turn around facing the elevator shaft. Grab the wall to the left, and climb back down. Repeat the process of getting the elevator up, freezing it at the top and climbing back down. Yellow bars block your entrance to the raised elevator, but run around to the left of the shaft, and you can get through there. At the end of your path, open the c offin for Icarus Storm , a light spinning runic attack that hits all enemies along its path.
Walk back as if you were returning to the ship, but turn the wheel to the right of the bridge. That will dislodge the ship, and you’ll have to fight two Hel-Revenants . Have Atreus shoot them with arrows and unleash your most powerful attacks, which had plenty of time to recharge as you were getting the chests.
For your efforts, you’ll receive hacksilver , a Sturdy Sign of Fortune (a Legendary Enchantment with boosts to Luck and Cooldown and a very low perk activation change to grand a gift of Defense when damage is taken) and a Symbol of Fortune (a Rare Enchantment that grants three Luck and four Cooldown).
Ride the elevator up one more time, and cross the rock bridge to your ship.
Objective: Escape Helheim
Items in this area: drops (Symbol of Cunning, Hardened Svartalfheim Steel, Symbol of Survival)
:no_upscale()/cdn.vox-cdn.com/uploads/chorus_asset/file/10656043/God_of_War_Escape_from_Helheim_guide_092.jpg)
Back on the ship, you’ll hear some voices and discover a new area: Skies of Helheim . Now it’s time to fight.
Pay attention to the sides of the ship. You can knock enemies off as they climb aboard. Aside from fighting them, you’ll also need to relight your fires, which the bad guys want to extinguish. Late in the fight, a harpoon will tear a hole in your ship. Approach it, and hit the Circle button to remove it. When the baddies are dead, you’ll receive hacksilver and a Symbol of Cunning , an enchantment that boosts Runic.
Now you’re in for a repeat of the last fight, only more difficult. After defeating several weaker enemies (and reigniting the fires they put out), you’re up against a Hel-Revenant , the witch-like creates that Atreus has to hit with an arrow before you can hit them. You’ll also have to dislodge three harpoons this time. For your trouble, you’ll receive hacksilver and health.
Now it’s time to do it all over again, but with even harder enemies. Win, and you’ll receive one Hardened Svartalfheim Steel and a Symbol of Survival (buffs to Defense and Vitality). After the fight’s over, dislodge the two new harpoons in an interesting way. Watch the cutscene that follows, and you’ll receive the Past Haunts trophy for riding the ship out of Helheim.
Secret Chamber of Odin
Items in this area: coffin (Eye of the Outer Realm)
:no_upscale()/cdn.vox-cdn.com/uploads/chorus_asset/file/10656051/God_of_War_Escape_from_Helheim_guide_117.jpg)
Back on solid ground, you’ll be in a Secret Chamber of Odin . Before you enter there, turn around and enter the other doors on the opposite side of the room. Inside, open a c offin for Eye of the Outer Realm , an Epic Enchantment that grants bonuses (7) to all stats, and pick up a lore scroll (The Missing Tower) on the ground.
Go through the other doors and, in the second room, you’ll find the missing panel from a lore board you found earlier. Tuns out, you have a way into Jotunheim.
With that, you’ll complete “Escape from Helheim” and start the Journey “A Path to Jotunheim.”
The next level of puzzles.
Take a break from your day by playing a puzzle or two! We’ve got SpellTower, Typeshift, crosswords, and more.
Sign up for the newsletter Patch Notes
A weekly roundup of the best things from Polygon
Just one more thing!
Please check your email to find a confirmation email, and follow the steps to confirm your humanity.
Oops. Something went wrong. Please enter a valid email and try again.
- Dragon’s Dogma 2 guides, walkthroughs, and explainers
The best recipes in Dragon’s Dogma 2
All pawn specializations in Dragon’s Dogma 2

Pokémon Go Bagon Community Day Classic guide

Alone is the nasty little thriller you need to watch on Netflix
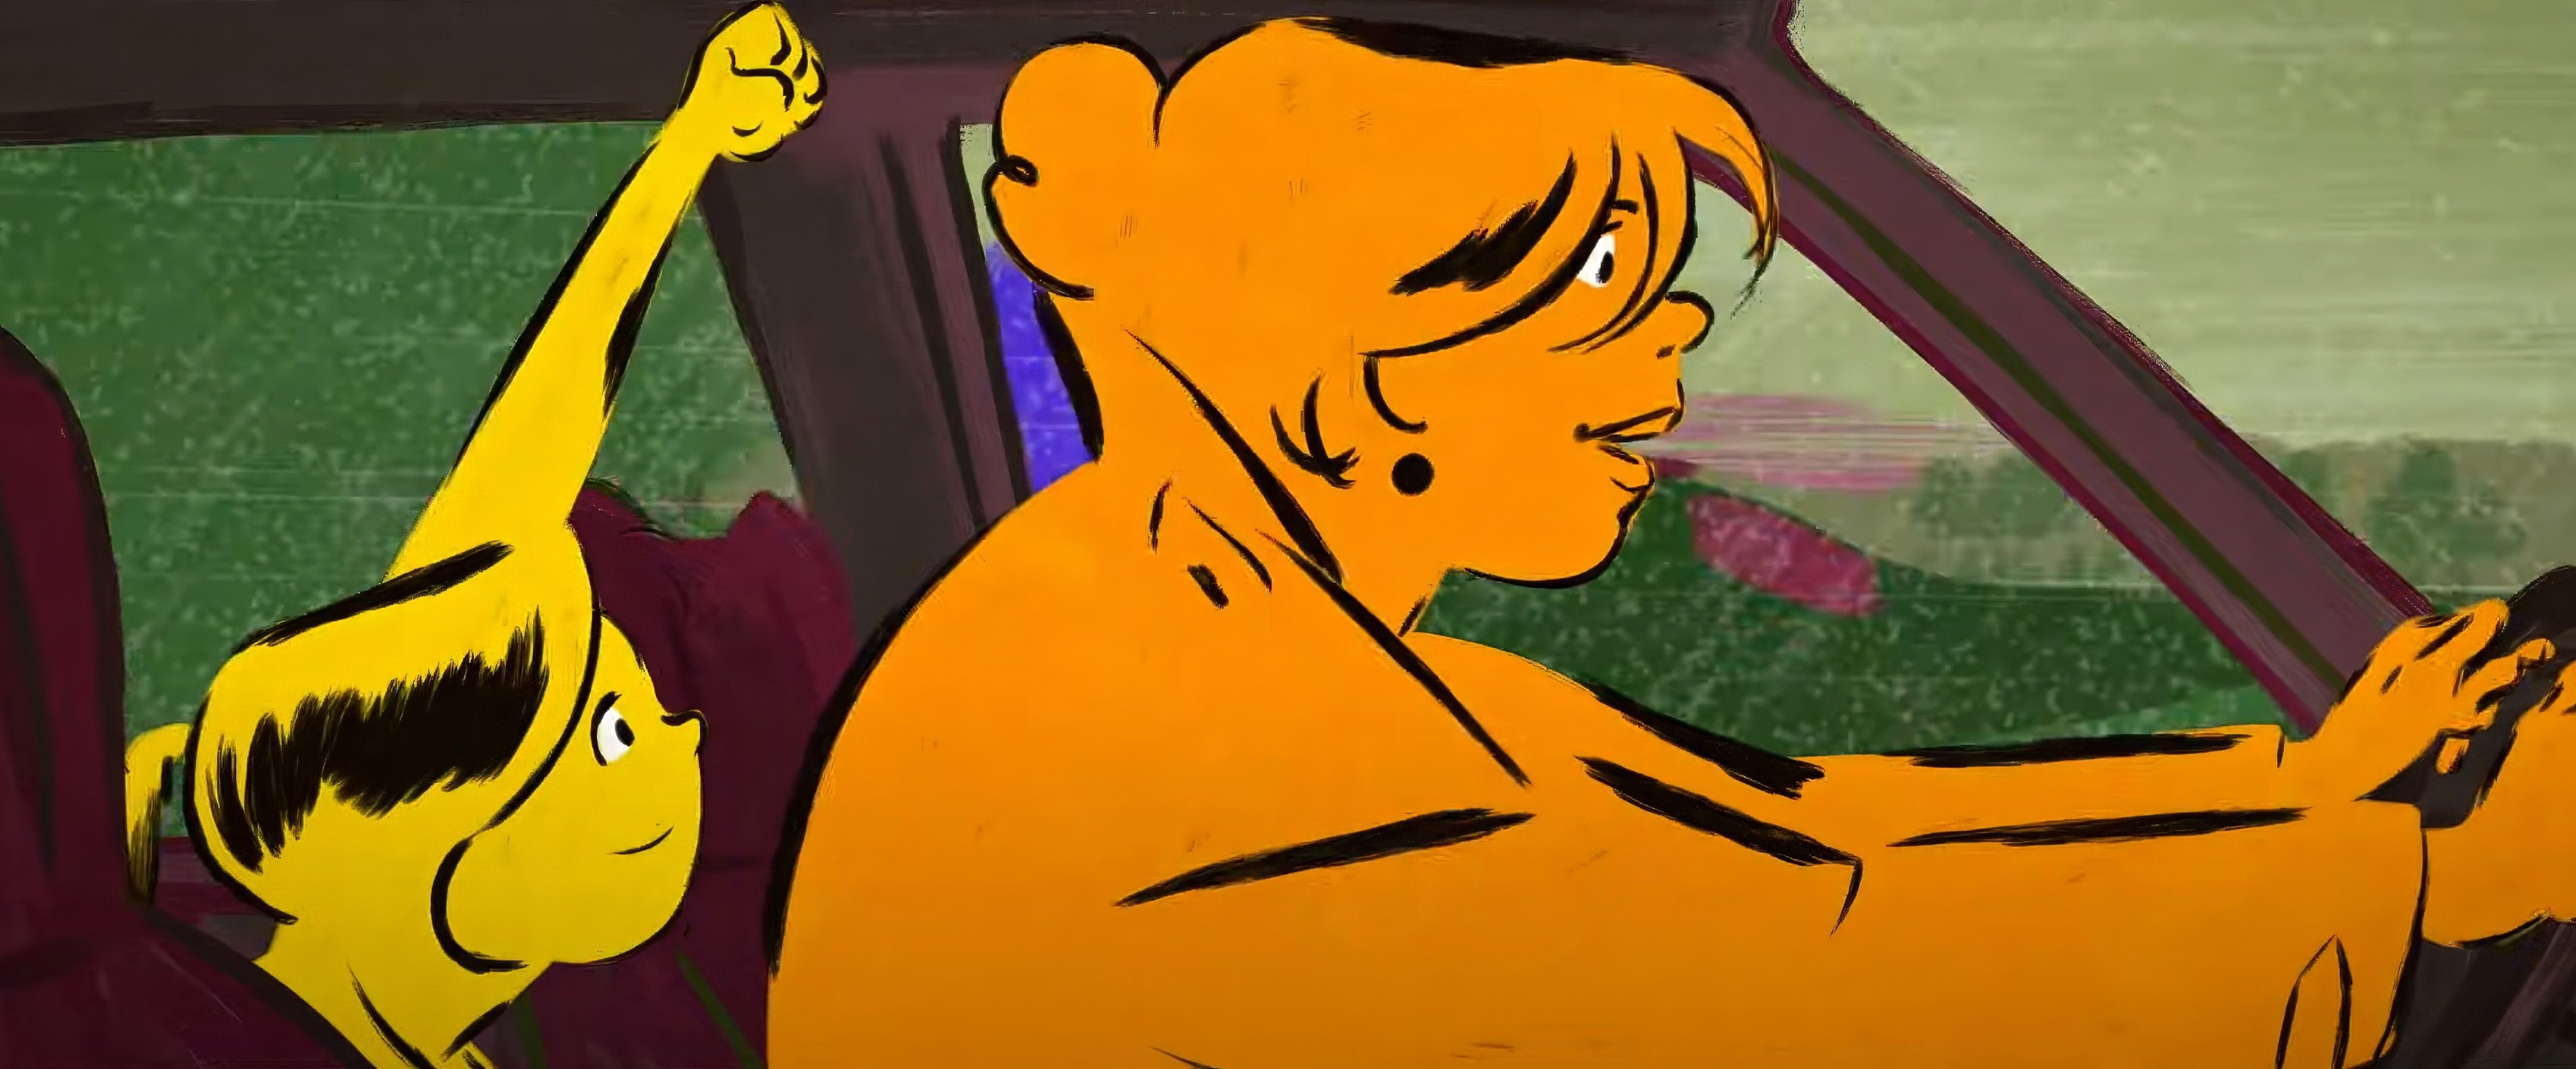
Chicken for Linda!’s animation needs a big screen and emotional processing space
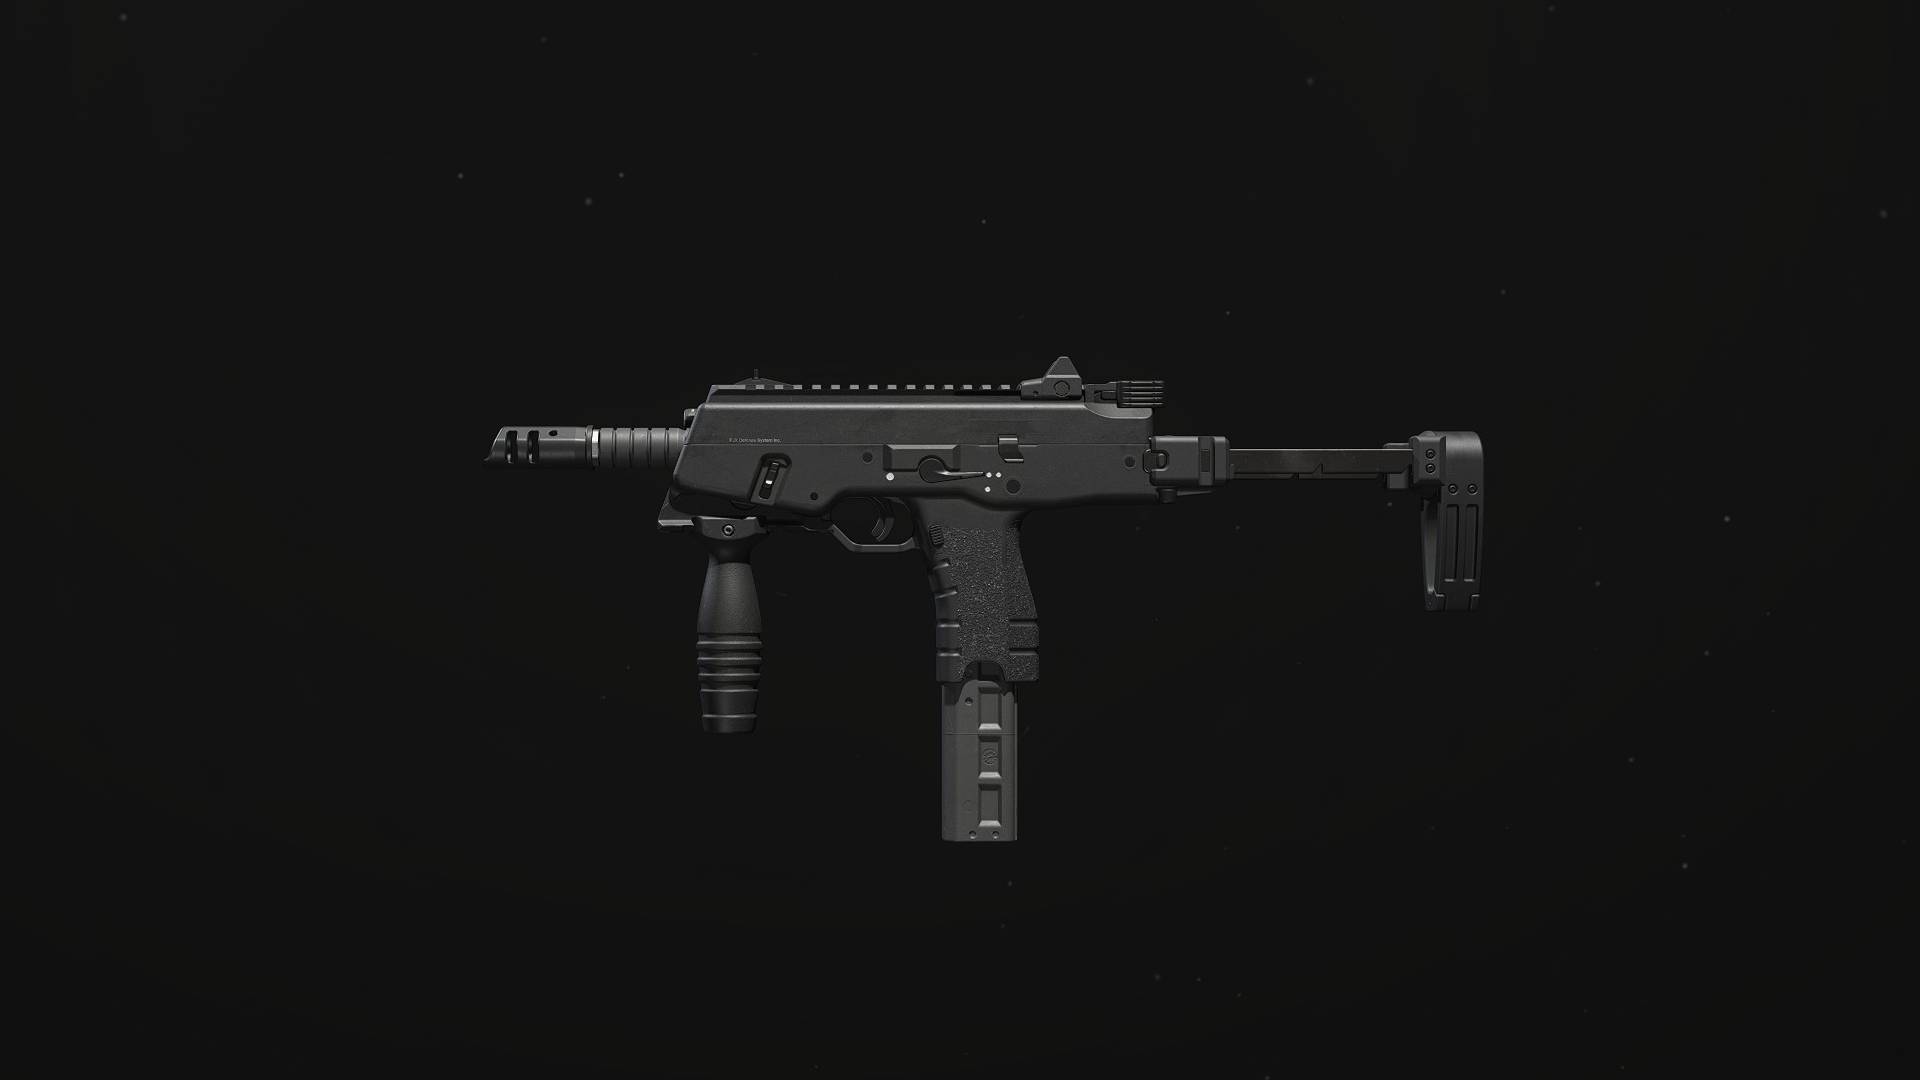
Best FJX Horus loadout, class build in Modern Warfare 3
New to Shacknews? Signup for a Free Account
Already have an account? Login Now
- Subscribe
- Latest Pets
- Forum: Posts today 779
God of War: The Journey - A Realm Beyond
Take a leisurely stroll while learning about realm travel in God of War.

A Realm Beyond is the third chapter in God of War . This walkthrough will help navigate each mission objective, providing puzzle solutions, riddle solutions, and information on how to access all the goodies found along the path.
Follow the Witch
The witch will lead the way down the mountain. Kratos and Atreus must only follow her to the lift, then Kratos needs to spin the wheel to get it moving. Take the ride and enjoy the conversation, then follow the witch until a door blocks her path. Open it and follow the witch all the way back to Brok’s Shop at the Lake of Nine.
Realign the Bridge

Kratos will then need to head down the stairs, wait for a bridge to be made, and approach the axel as the witch instructs. Interact with the axel to place it back on its rails and align it with the track. Next, push the bridge along the track, stopping only when the bridge can be moved no further.
Head back up and follow the witch inside to where Brok’s Shop would normally be. She’ll take Kratos and Atreus into the Realm Travel Room, which is about when I realized that God of War was much larger than it first appears.
Travel to Alfheim
The Realm Travel Room will act as a hub that allows Kratos and Atreus to travel between Realms as the game progresses. However, most realms are not accessible from the start. Players must progress the story to get the runes required to access each realm. The first accessible realm will be Alfheim, and it just so happens that the story takes Kratos and Atreus there at the end of this chapter.

A Realm Beyond is very short chapter, but it serves to educate players about realm travel and how they can move about the world in God of War. For now, though, it’s on to the next chapter, The Light of Alfheim . Navigate through any part of the game by visiting the Shacknews God of War walkthrough and guide .

Bill, who is also known as Rumpo, is a lifelong gamer and Toronto Maple Leafs fan. He made his mark early in his career through guide writing and a deep understanding of editorial SEO. He enjoys putting in the work to create a great content, be it a wild feature or grinding out an in-depth collectible guide. Tweet him @RumpoPlays if you have a question or comment about one of his articles.
- PlayStation 4
- Sony Santa Monica
- God of War 2018

- God of War Complete Walkthrough

IGN's God of War (2018) complete strategy guide and walkthrough will lead you through every step of your Journey from the opening seconds to the end credits and beyond.
Departing from the style of previous entries this God of War for the PS4, PS5, and PC is as much adventure as it is action, as you'll explore a variety of large regions that your main journey takes Kratos and his son Atreus though. This walkthrough will highlight which paths to take, tips on the enemies you'll fight, and point out any chests, coffins, and any collectibles you might find along the way - like Artifacts , Nornir Chests , Legendary Chests , and more.
God of War also includes lots of side content not immediately covered in the main walkthrough, including Side Quests (Favors) - which you can see a list of here . There are also many regions that can be unlocked outside of the central story, noted in the comprehensive Regions page. Late in God of War's story, you'll also be able to undertake a series of powerful and optional boss encounters, which you can read more on unlocking here .
God of War Walkthrough Sections
IGN's God of War Walkthrough is presented by the chapters of the journey you'll undertake, and include relevant information on everything that can be found on your visit through the region or realm Kratos and Atreus explore in that chapter. Note that certain collectibles and optional content won't be available your first time through an area, and it's important to see the pages for regions and collectibles like Odin's Ravens (Spies of Odin) , Lore Locations , Nornir Chests (Locked Rune Chests) , and others as the story unlocks more options for you. Luckily, all collectibles can be obtained after the story concludes, thanks to a post-game section.
To learn more, select a section below:
Looking for even more on God of War ? Why not check out some of our other comprehensive guides:
- How to Find All Nornir Chests (Locked Rune Chests)
- God of War Niflheim - Quests, Maze, and Items Guide
Up Next: The Marked Trees
Top guide sections.
- Things You Should Know Before Playing God of War
- Tips and Tricks
- How to Defeat Valkyries
Was this guide helpful?
In this guide.


Gospel singer Dennis Quaid details his journey from drugs to Jesus: 'I lean on God'
Dennis Quaid has long been a familiar face in Hollywood, starring in hits and cult classics such as "Traffic," "Parent Trap," and "Innerspace." While he continues to appear on celluloid, lately he has also been mounting stages to sing God's praises.
Shortly after releasing his gospel record "Fallen" in June 2023 — which landed in the top 15 on Billboard's Top 200 Christian/Gospel chart — Quaid provided BlazeTV's "Relatable with Allie Beth Stuckey" incredible insights into his renewal of faith and road back to an intimate relationship with God.
Quaid, a 69-year-old Houston native, recently expounded on some details of his spiritual revival while promoting a new television special , telling the Christian Post how after a period of disillusionment with his inherited Baptist faith, he "started asking questions that didn't have answers."
The Emmy Award-winning actor apparently looked to the Orient in search of understanding, consulting the Buddhist Dhammapada, the Bhagavad Gita, as well as the Quran. Evidently, he was left unsatisfied.
Quaid revisited the Bible, but he remained spiritually obstinate.
"I read the Bible cover to cover as well, back then, and I got hung up in the Old Testament, how violent it was. God seemed like a punishing God back then to me," Quaid told the Post. "A lot of it just didn't make sense."
Rather than embrace what then appeared to be an omniscient disciplinarian, the actor apparently turned to pleasure and lawlessness, experimenting with drugs. The road well traveled left Quaid addicted to cocaine.
In 2002, the New York Times characterized this period of Quaid's life as his "decade in the Hollywood wilderness."
Quaid hinted at the seed of a return to faith at the time, telling the paper, "Mostly, I was mad at God, you know? Why was I in this predicament? I knew it was all my own fault, but at the same time I wasn't thinking straight. I was caught in a place, living a life that I didn't want to live but couldn't escape."
When speaking last year to Allie Beth Stuckey, Quaid recalled his realization at the time: "I saw myself as either dead or in jail or losing everything I had ... so, I did get myself straight with that, but that still didn't fill the hole that was there — in fact, it was a very deep hole after that."
The actor recently underscored to ChristianHeadlines that to get out of this hole, he had to once again crack open the Bible.
"I got clean in 1990 of cocaine, and I read the Bible again. I'd read it as a kid, and I read it again. And this time, I was really struck by the red words of Jesus," said the actor. "And that's really what started, I think, what I've been looking for all along — and which, you know, my mother told me and other people [told me], but I never really understood, which is having a personal relationship with Jesus. And, of course, that has grown over the years. But I never really understood it until then."
"I lean on God. I talk to Him every day," added Quaid. "I talk to God about problems. ... And gratitude for the blessings that I have."
Quaid made expressly clear that drugs could never satisfy and comfort the way that faith does.
"Everybody has that [void] — they try to fill that with relationships or with drugs or with money or with whatever it is, you know, our heart's desire," said Quaid. "What we're really looking for is to fill that ... God-sized hole."
Quaid told the Post that after reading the Bible through multiple times, he is now particularly fond of the book of Ecclesiastes for its insights into life and morality. The Gospel of John, however, appears to be the actor's favorite biblical text, not least because it underscores Christ is the Logos.
"I think John brings together physics and the Spirit and explains it in a timeless way," said Quaid. "He points to a bigger truth that we have no words for."
Extra to the DVD special for his gospel album, the prayerful actor is set to appear in "Reagan," a feature film about the 40th U.S. president, which will reportedly hit theaters in late August.
Like Blaze News? Bypass the censors, sign up for our newsletters, and get stories like this direct to your inbox. Sign up here !
Want to leave a tip?
Joseph MacKinnon
more stories
Man who arrived in us unlawfully allegedly murdered wife, 'nearly decapitating her': dupage county state's attorney's office, biden pressures netanyahu for israel to strike deal for return of hostages, no labels won't field a 2024 presidential ticket, sign up for the blaze newsletter, get the stories that matter most delivered directly to your inbox..

IMAGES
VIDEO
COMMENTS
Path to the Mountain is the second story mission in God of War, introducing several new mechanics to the game, as well as new NPCs, and loads of collectibles. This walkthrough will be free of ...
This video will guide you through How To Solve The Line Up Runic Phrase Puzzle | God Of War THE JOURNEY MISSION (Path To The Mountains Wheel). The Giant 3 Ge...
God of War: The Journey - Inside the Mountain. Solve puzzles and loot Nornir chests while working the inside of the mountain. Inside the Mountain is the fifth story mission in God of War, and it ...
Path to the Mountain. Path to the Mountain. Path to the Mountain. After the battle with The Stranger, Kratos will begin to leave the house with his son Atreus. Right near the house as we walk towards the new crevice in the area will be the Husked Toy. Be sure to pick this up as it is an Artifact of The Lost and Found artifact quest.
Solve puzzles and learn new gameplay mechanics in The Light of Alfheim chapter. The Light of Alfheim is a story mission in God of War, and it's one of the longer chapters in the game due to its ...
When you see the torch on the floor, take a left and jump over the log. At the next fork take a right and follow the path through a cave. At the final fork, take a left and follow the path to the end to be reunited with Atreus and a rather strange woman. (1 of 3) Turn left at the first torch.
Welcome to IGN's Walkthrough for God of War. This page contains information on the fifth step of your Journey - Inside the Mountain - which will include paths to take, enemies to fight, and any ...
Path to the Mountain. Welcome to IGN's Walkthrough for God of War. This page contains information on the second step of your Journey - Path to the Mountain - which will include paths to take ...
Journey to The Mountain God of War. God of War Journey to The Mountain objective Path to The Mountain. You can see how to complete Journey to The Mountain Go...
With his newfound knowledge, Mimir has a plan on how the duo can reach Jötunheim. Exit out of the hidden library, take the elevator down and realm travel back to Midgard. Head over to the now united dwarven brothers and have them make the key needed to enter Týr's mysterious door. Access the shop to find a whole host of new recipes to craft ...
updated Jul 3, 2022. Welcome to IGN's Walkthrough for God of War. This page contains information on the fourth step of your Journey - The Light of Alfheim - which will include paths to take ...
God of War's "A Path to Jotunheim" Journey starts simply and becomes complicated not long after. In this walkthrough, we'll take you through the quest, helping you solve every puzzle ...
Where to Find Every God of War Dragon; And that's how you find all of the Nornir Chests and solve their rune puzzles in God of War. There are tons more collectibles to find along your journey. From artifacts to shrines and Odin's Ravens, make sure to check out our other God of War guides while you're here.
At the top of the cliff, continue past the first scorn pole alcove until you fight a pair of Hel-walkers. Take them out, then backtrack to the scorn pole. Freeze the one outside of the alcove ...
The God of War experience continues in the mission titled The Black Rune. Our walkthrough follows Kratos and Atreus in their search for the namesake artifact, besting a series of puzzles and traps ...
Items in this area: wooden chest, coffin (Icarus Storm light runic attack), drops (Sturdy Sign of Fortune, Symbol of Fortune) Head back the way you came, and walk through the doorway on your left ...
God of War - The Heroic Journey Begins! - Walktrught PART 11 / 4K / PS5Throughout their journey, Kratos and Atreus must solve various puzzles and challenges...
A Realm Beyond is the third chapter in God of War.This walkthrough will help navigate each mission objective, providing puzzle solutions, riddle solutions, and information on how to access all the ...
IGN's God of War (2018) complete strategy guide and walkthrough will lead you through every step of your Journey from the opening seconds to the end credits and beyond. Departing from the style of ...
God of War - The Heroic Journey Begins! - Walktrught PART 10 / 4K / PS5Kratos and Atreus embark on an exciting adventure filled with challenges and puzzles ...
God of War - The Heroic Journey Begins!Kratos and Atreus embark on an exciting adventure filled with challenges and puzzles as they journey towards Jötunheim...
Gospel singer Dennis Quaid details his journey from drugs to Jesus: 'I lean on God'. Joseph MacKinnon. April 04, 2024. support us. Dennis Quaid has long been a familiar face in Hollywood, starring in hits and cult classics such as "Traffic," "Parent Trap," and "Innerspace." While he continues to appear on celluloid, lately he has also been ...
God of War - The Heroic Journey Begins! - Walktrught PART 15 / 4K / PS5New Challenges: Exciting and bolder adventures await as our hero progresses through t...