How to use travel times with Calendar for iPhone and iPad

Have a lot of appointments and meetings to juggle? Would it make your life a little easier to be able to easily see how long it will take you to get from one place to another? Apple's Calendar can use location information to figure out just that, and best of all, it's easy!

How to get travel times with Calendar for iPhone and iPad
- Launch the Calendar app on your iPhone or iPad.
- Tap on the event you'd like to calculate a travel time for or create a new one.
- Tap on Edit at the top right.
- Tap on Travel Time .
- Turn On travel time.
- Tap on Starting Location and tell Calendar your starting location either by entering an address or the name of a place or business .
- Tap on Based on location for either driving or walking directions.
- Tap on Edit Event at the top.
- Look for travel time under the date area.

Master your iPhone in minutes
iMore offers spot-on advice and guidance from our team of experts, with decades of Apple device experience to lean on. Learn more with iMore!

Mick is a staff writer who's as frugal as they come, so he always does extensive research (much to the exhaustion of his wife) before making a purchase. If it's not worth the price, Mick ain't buying.
A future Apple Watch could call for help if it detects someone might be drowining
Apple is working on AI software that can outperform ChatGPT, which could appear in iOS 18
iOS 17.5 finally arrives alongside macOS 14.5 and visionOS 1.2 after weeks of no developer betas
Most Popular
By John-Anthony Disotto March 18, 2024
By Gerald Lynch March 18, 2024
By Lloyd Coombes March 15, 2024
By Alex Blake March 07, 2024
By John-Anthony Disotto March 07, 2024
By Brady Snyder March 06, 2024
By Alex Blake March 06, 2024
By Tammy Rogers March 06, 2024
By Lloyd Coombes March 04, 2024
By Matt Evans March 04, 2024
By Brady Snyder March 04, 2024
- 2 Apple is working on AI software that can outperform ChatGPT, which could appear in iOS 18
- 3 iOS 17.5 finally arrives alongside macOS 14.5 and visionOS 1.2 after weeks of no developer betas
- 4 New iOS 18 leak hints at an Apple Vision Pro-inspired redesign for the iPhone as WWDC preview nears
- 5 This new MagSafe device patent from Apple could be a dial control for your devices
How To Factor In Travel Time On Your Apple Calendar Reminders

Maintaining a calendar app on your mobile phone is one of the most effective ways of getting a handle on your daily schedule . Whether you go to school or work or regularly have appointments and meetups, placing every activity you need to attend (whether virtually or in real life) on its designated date and time can aid you in making preparations prior to the event.
For activities that are taking place at a certain destination, it's common to tag the location within the calendar event so that when it pops up on your phone on the day, you can use it to launch your map app of choice and plan the most efficient route and mode of transportation to get there on time. In addition, those who want to ensure that they arrive promptly for scheduled events can give themselves a time allowance for travel by rigging the notification to pop up a bit earlier than the official start.
iPhone users who have the device's built-in Calendar app keep their daily, weekly, and monthly schedules organized can do a lot by simply adding events. A new Calendar event may contain a location or a FaceTime video link for remote meetings. It can be scheduled as "all-day" to block off the entire date or have start and end times to reserve a certain slot. It can be programmed to recur a number of times as well as include attachments and other users as participants so that the event shows up on their respective calendar apps, along with any files they need to see. Finally, if you intend to get to an in-person activity by driving your own vehicle or taking public transit, you can tack on however much time you need to get to your destination.
How to include travel time in a new Calendar app event on an iPhone or iPad
To create a brand-new event that includes travel time, do the following on an iPhone or iPad:
- Launch the Calendar app.
- Tap the plus symbol at the top of an iPhone or iPad screen.
- Type in a Title for the event.
- Tap the Location or Video Call field to include a physical address for the event or the option to FaceTime, if the meeting is happening remotely.
- Choose a start and end time for the event's duration.
- Tap Travel Time, and enable the toggle next to Travel Time.
- Pick a Starting Location or choose one of the time increments suggested.
By default, the starting point of the Travel Time option will detect your current location. Whatever address you put in this field will automatically determine travel time options for driving, walking, or taking public transit as well as time increments between 5 minutes to 2 hours.
You can technically use the Travel Time feature in a calendar event even if you don't put in a destination in the Location field. However, without an actual physical address, you can only choose one of the manually set time increments instead of the precalculated options based on your starting point.
You also have the option of tweaking other fields in the new event, such as setting it to repeat at your chosen interval, adding it to a certain calendar (if you are maintaining several), including invitees, setting up an alert, and adding attachments and other notes. Once you've placed all the relevant information, tap Add to save the event.
Do note that if you choose the "All-day" option and don't define a start and end time for the event, the Travel Time feature will be disabled.
How to use the travel time feature in a new Calendar app event on Mac
The process of carving out some time to get to a certain destination in a new calendar event is similar on a Mac computer. Here's the easiest way to include travel time on a new Calendar app event:
- Launch the Calendar app and make sure you're in Month view.
- Find the month you want and double-click on the day you want to add an event.
- Type in a title in the New Event field.
- Type in your event's location in the "Add location" field.
- Tap on the date and time duration to expand the field.
- Tap "travel time" and choose one of the suggested options or hit Custom to assign your own.
Again, if you want the option to choose a travel time precalculated according to your starting location, you must assign a location to the event itself. Otherwise, you'll have to choose a time increment yourself. To save the event, simply click out of the New Event window after you've added all the necessary details.
How to tack on travel time to existing Calendar app events
You can modify already-created events on the Calendar app so that your travel time is also accounted for. Here's how to do it on an iPhone or iPad:
- Tap on the event entry and hit Edit.
- If the event doesn't have a specified destination, tap Travel Time, pick one of the given time intervals, and skip to step 7. Otherwise, go to step 4.
- For an event that has a destination entered, tap Travel Time and enable the feature's toggle.
- Make sure you pick the correct address for the event's Starting Location to generate accurate travel time suggestions.
- Choose one of the suggested time intervals.
- Hit the back arrow and tap Done when you've checked and added all the pertinent information.
The steps are similar on a Mac. Simply double-click on the event entry you want to modify, hit the date and time to expand the field, click "travel time," and pick one of the generated time interval options or choose your own. Restrictions are the same for existing events that don't have a location defined: You will only be able to choose a manually estimated time increment rather than a time based on Apple Maps calculations. In addition, it's important to note that if the event has a location defined and you modify it to a different one, you might need to click on the time travel option again to get updated time suggestions related to the new address.
More about the Calendar app's travel time option and setting event alerts
As previously mentioned, the Apple Calendar app 's Travel Time feature works in conjunction with Apple Maps in providing travel estimates that have been determined based on current traffic conditions and available transit options. When you add or modify a calendar event with a location defined and enable the travel time toggle on it, you'll be able to set alerts to go off before you're scheduled to leave. There's a wide variety of time intervals to choose from: You can set an alert one, two, or seven days before the event or several minutes before your scheduled travel time.
An extra option to turn on a "Time to Leave" alert for the event will also become available. This alarm will likely go off at a time that's determined by Apple Maps based on your current location and chosen mode of travel (i.e. drive, walk, or public transit) in the Travel Time field and should give you enough time to prepare to start your journey. Alternatively, you can also set an alert to go off "At start of travel time" so you know exactly when to hit the road, in case you're ready to go ahead of schedule and are merely burning time before you have to leave.
How to use Travel Time in Calendar on iPhone and Mac

Travel Time is a nifty addition to Apple’s Calendar app, capable of precisely estimating the duration of your upcoming trip based on parameters such as milage and traffic. Used properly, it can notably ease some of your daily scheduling woes, but paradoxically, a large contingent of regular Calendar users still routinely overlook the feature.
Formerly introduced as frequent locations and traffic conditions widgets , the service has only slowly gained traction amongst users. Travel Time today however has come of age and is now neatly integrated into one of the most popular productivity applications both on iOS and macOS . So if you didn’t get the memo on the virtues of Travel Time in Calendar, here’s what you need to know.
Why you should use Travel Time
We have all been there before: you have a jam-packed day ahead of you and already squander way too much time just scheming routes and plotting where to leave at what time. Thorough preparation cannot hurt, I grant, but keep in mind that Apple’s Travel Time has been put in place to – if not supplant – at least assist you with exactly that. Setting up addresses and checking more boxes with every Calendar entry might sound gratuitous at first, but if the payoff is a lot less private time wasted mulling over your schedule, it is decidedly anything but that.
The moment Travel Time is integrated, Calendar entries will send you timely alerts as to when you want to leave (accounting for changes in traffic conditions) in order to show up on time, and appointments are going to intelligently expand in your day-to-day view in order to reserve the time spent on the road. If you like the sound of this (why wouldn’t you?) and want one less thing to worry about on a busy stretch, check out our walkthrough.
How to use Travel Time on iPhone, iPad or iPod touch
Rigging up Travel Time on your iPhone or any other device running on iOS 10 can feel a little bit jarring if you are new to it, but once you have gotten the hang of it, the setting is added in no time. It is also somewhat intelligent in helping you set locations, but let’s not get ahead of ourselves.
1) First of all, open your Calendar and create a new entry.
2) On filling in event information, make sure to provide the appointment’s precise address. This will be important later on to ensure accurate travel estimates that you can trust. Tap Location .

3) If you know the event’s location, just go ahead and type it in the search bar, then click Done . Alternatively, start writing and wait for Calendar to suggest places. Suggestions will pop up right under another smart list labelled Recents. Tap the one you’re happy with to confirm.
4) Now that Calendar knows where you are headed, it needs to learn about your starting point. To feed it with that piece of information, find Travel Time in the list of items and select it.

5) Toggle the switch to the right in order to unveil a new menu.

6) You are now handed two options: there is a generic submenu of preset travel times, and above it (marked red), the superior smart tab. Preset times will not send you smart alerts accounting for traffic or actually take into account real data (miles), so we disregard those and instead tap Starting Location .

7) Immediately following your touch, you are prompted to detail your departure location. The interface is akin to the one from Step 3 , so type or select your starting point. Keep in mind that you can quickly hit Current Location if this is your first appointment of the day and you are situated at home.
8) After this has been taken care of, a new set of items will pop up in the Travel Time register: this time however they are smart suggestions. As indicated by the icon next to it, Calendar has run the numbers and will predict the time you should block to get to your destination. Either by car, foot or public transport. Tick which of the three options applies to you and go back by hitting New Event .

9) This is the final sprint: as marked below, Travel Time will now have the predicted duration locked in. Finally, make sure that the Alert field reads Time to Leave .

10) When clicked, the tab preceding the fine print Calendar uses your location, this event’s location and traffic conditions to tell you when you need to leave should be active. This option is auto selected and will not be a concern of yours for future events you create.

11) You are all set for the first entry. Click Add to place the appointment in your Calendar.
While thus far the process may look like an awful ordeal, do know that from here on, things get easier for two reasons.
- Step 9 and 10 can be skipped from here onwards.
- More importantly, and this is where Travel Time really shines, subsequent Calendar entries (taking place on the same day) are still going to ask you for the event’s location, but they will adopt your previous event’s location as the starting point for route calculations to your next event. If that is too technical, next time you arrive at Step 5 and toggle on Travel Time, the location will automatically appear based on where you have been roaming around before. You can of course choose to edit that if you travelled elsewhere in the meantime, but if you have a tight schedule this will be correct most often and function as a welcome shortcut.
As soon as you have implemented Travel Time for your day, Calendar entries will reflect the additional travel time in block size and inform you when you need to scoot to get from from home to point A, or from A to B and so on and so forth:
How to add Travel Time on macOS
The steps required to make your Calendar entries a whole lot smarter on Mac are perhaps a little faster thanks to the trackpad. Navigation tools aside, it is pretty similar to the process on iOS, which is why I recommend skimming through the upper half of the tutorial first to get an overview of what Travel Time does and where it ultimately pays off.
As alluded to earlier, events including smart Travel Time settings are going to take up more space in your Calendar. Here is a look at what three entries of that kind look like on my Mac. Instead of going through the basics again, this time we will hit the ground running and simply add another (green) smart Calendar entry to the already existing ones. We don’t have to start from square one here chiefly for two reasons: one, the clicks necessary are largely identical and two, you can always refer back to the iOS tutorial if you feel a question is unanswered.
1) In the final screenshot of the iOS rubric, you can see that I have created three blue Calendar entries, all of which already have locations attached to them.
2) We will now create a new entry (the green box) and squeeze it between two existing appointments. What a day!
Double click on the timeline (that’s in the Day view). Or click + and adjust the time of the event.

3) What’s vital for Travel Time to work is that your Mac knows the location of the event (this step) and the point you are starting out from (next step). Start typing the appointment’s exact location at Add Location . Click it once suggested to confirm.
4) The only difference compared to the iOS tutorial is that we are planting an event in the midst of others, which are each already assigned to locations. In other words, the fifth line reading travel time is already magically delivering travel estimates on the basis that Calendar knows your whereabouts before the green event. Simply select if you are travelling from the preceding event by car, foot or public transport.

5) Click apply and your Mac will notify you whenever you need to get up from your last appointment, intelligently taking into account changing traffic conditions and alerting you if you need to leave earlier.

To reiterate a point made earlier, if you do not have a location-based appointment scheduled prior to the entry you are currently working on, the Travel Time bracket is not going to automatically generate an approximate travel time until you actually click it once. In that event, as soon as you hit Travel Time, it is going to calculate the travel time required from home, inferring this is your first event of the day.
Congratulations, you have made it to the end of it. Let me tell you that it takes a certain amount of discipline to perpetuate the habit of feeding the Travel Time bracket with your locations – but in the end it does save you some headaches and adds a lot of convenience to your day. If you are an avid Calendar user and have heaps of commitments day in and day out, on all accounts try to force yourself to make use of this feature.
iPhone Calendar Appointments: Travel Time

Creating an appointment
Add a new appointment to your iPhone calendar by tapping the plus sign at the top right of the “Calendar” app’s interface.
Then enter the time and date, a title and the location. By adding the exact address, we enable our iPhone to use Apple Maps data in the background later on.

Enable the “travel time” feature
Scroll down and tap “Travel Time” , then either select one of the predefined options or base the time on your current location, or another address.
Using your current location is of course the most precise option at hand. Let’s try this one, then. Your iPhone will automatically calculate the time needed to reach the destination and attend your appointment in time. You can also select the appropriate mode of travel, such as by foot or by car and public transit, if available.

How to set up an alert that takes into account travel time
Now here’s where it gets interesting: We can set an alert that actually takes into account how long it will take you to get to your appointment. In the event detail view, scroll down to “Alert” and select “Time to Leave” as your alert time.

Depending upon your location, your iPhone will now select the most appropriate time to notify you of the perfect departure time.
We explain and teach technology, solve tech problems and help you make gadget buying decisions.
How to Add Travel Times to iPhone and iPad Calendar
If you tend to have tons of appointments and meetings that take most of your day, then your iPhone or iPad Calendar app must be one of the apps you spend time on the most. Here is a trick to make it a lot easier for you to see not only your event, but also how long it will take for you to get there. Very few iOS users know about this, but actually both the iPhone and the iPad can use your location information on the Calendar app to figure out how long it will take you to reach your appointment.

Follow the steps below to learn how to enable this great feature.
Step 1: The first thing you have to know before proceeding is that in order for this tip to work, the event for which you want the travel time needs to have a location. You can easily add one when creating the event.

Step 2: Okay, with that done, start by opening the Calendar app on your iOS device and then look for the event on which you want to add a travel time. Tap on it to open it.

Once on the event screen, tap on the Edit button to make a couple of modifications.

Step 3: On the next screen, scroll down and tap the Travel Time option. Next, tap on the button next to Travel Time to turn the feature on.

Step 4: If you did things correctly, you will now see the option to select a travel time by either location or by choosing any of the default times shown below.
This is why it is important to introduce a location when you create your new event. If you fail to do so, you will not be given the option to use a travel time based on real distance measured by your iPhone’s map.
Step 5: After enabling Travel Time, you will see the option to select a starting location. Tap on that option and then enter the starting location just as if you were entering any other entry on the Maps app . Once your desired starting point shows up, select it and back up to the previous screen.

Step 6: Now that you have selected your starting point, on this screen you will be given the option to display the travel time of your event based on location for either driving or walking directions (as shown on the image above).
Step 7: Make your selection and then tap on the Edit Event button at the top left of the screen. After that, tap on Done .

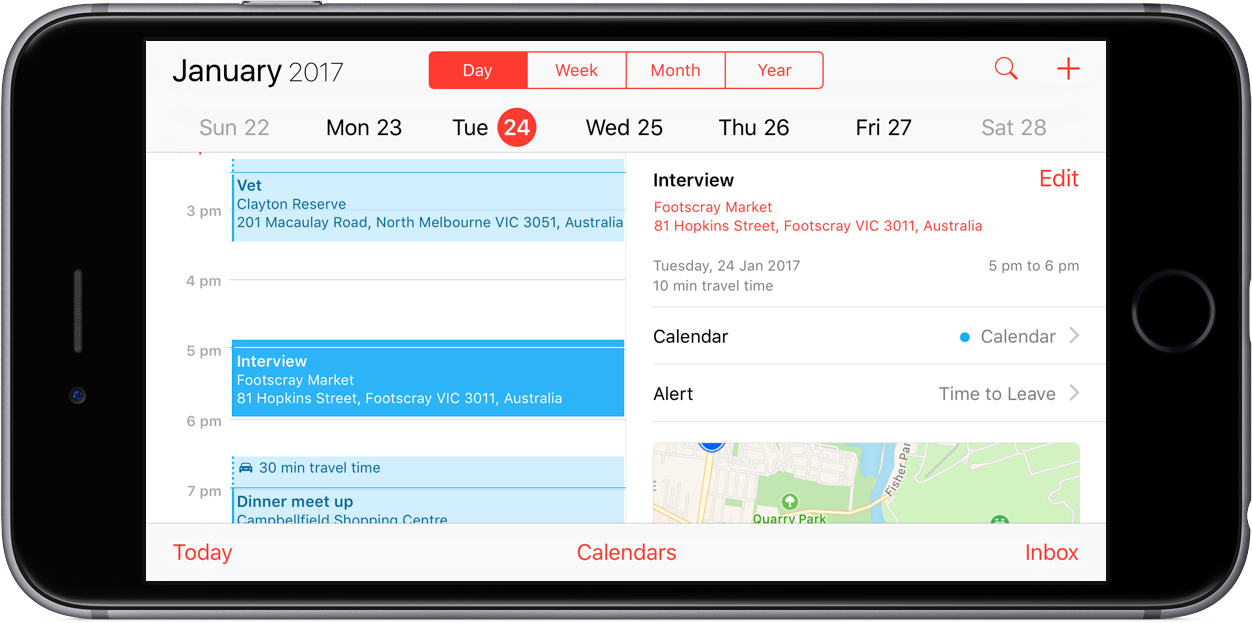
And that’s it. Now every time you open that event, it will display both the travel time and even a small section of the map where your appointment will take place. Enjoy!
Was this helpful?
Last updated on 03 February, 2022
The above article may contain affiliate links which help support Guiding Tech. However, it does not affect our editorial integrity. The content remains unbiased and authentic.

The article above may contain affiliate links which help support Guiding Tech. The content remains unbiased and authentic and will never affect our editorial integrity.
DID YOU KNOW

Alvaro Bernedo
Contributor at Guiding Tech
More in iOS

How to Restrict Cellular Usage While on Wi-Fi in iPhone and iPad

How to Turn Off Haptics on Apple Watch
Join the newsletter.
Get Guiding Tech articles delivered to your inbox.
- Share full article
Advertisement
Supported by
Set Your Schedule in Your Smartphone’s Free Calendar
As daily life feels more familiar, apps from Apple and Google can keep you organized and get you to your in-person events on time.

By J. D. Biersdorfer
If your phone’s personal calendar app hasn’t gotten much use in the past two years of social distancing and working from home, it might be time to brush up. Here’s a quick guide to tools in Apple’s iOS Calendar and Google Calendar that help you plan your social life, get to your events on time, share your hybrid work schedule with family and more.
Back to Basics
Your Apple ID or Google Account includes a default calendar app that can sync with any device logged into that account. Adding and editing events in either Apple’s iOS Calendar app or the Google Calendar app for Android and iOS is straightforward: Tap the plus (+) button on the screen and fill in the details. (Apple’s Siri and the Google Assistant can add appointments on command or from events mentioned in email.) You can also add a location and adjust the amount of time alerting you to the event.
On an iPhone, tap the Today button in the bottom-left corner of the calendar’s monthly view to see what’s immediately ahead. In Google’s Calendar app, tap the Menu icon in the upper-left corner and select Schedule to see your next appointments. You can use search to find events. Want to see the full week on display? Turn your phone sideways.
Get There on Time
Scheduling an appointment is easy. Getting there on time can be harder, but Apple and Google have tapped into their maps software for help.
When you create an event (or edit an existing one) in Apple’s iOS Calendar, select the Travel Time option for the appointment and tap the button to enable it. The app will automatically calculate the time needed to get there by car, foot or other transit methods based on distance and travel conditions from your current or stated location. (Alternatively, you can just tack on a generic block of time.) The feature also works on the Mac desktop calendar app .
Using Google Calendar in a desktop browser is the most direct way to add travel time. To do so, create or edit an event and click on the location. In the Google Maps panel that opens on the right, browse the suggested travel directions and click the Add to Calendar button to schedule the predicted travel time ahead of your appointment.
Customize Your Views
Want to change the day your week starts or adjust other calendar behaviors? Visit the calendar app’s settings. On an iOS device , open the Settings app from the home screen and select Calendar. In Google Calendar for Android and iOS , tap the Menu icon and select Settings and then General.
Both apps can display the dates from a religious or cultural calendar. Tap Alternate Calendar and select one; Apple offers Chinese, Hebrew and Islamic/Hijri options, as does Google — which also includes Indian, Korean and Persian calendars.
Share and Subscribe
Apple and Google allow you to add calendars alongside your personal calendar — like ones for holidays, birthdays or the book club. At the bottom of the main iOS calendar screen, tap Calendars and then Add Calendar. To share it with others, create an iCloud Calendar and, in the Shared With area, tap Add Person and enter the email addresses of the other people using the calendar. (If you want to add your company’s official office calendar, check with your employer for guidance.)
Sharing full access to a calendar is easiest if everyone is on the same platform. If you’ve already set up Apple’s Family Sharing feature or created a “family” through Google , you automatically have a shared Family calendar for your household to use.
You need to use a browser to create an additional Google Calendar. Log into the program on the web and click the plus sign next to Other Calendars on the left side of the screen. After you create the calendar, select it in the Settings for My Calendars area and add the email addresses of the people who’ll be sharing it .
Some sports leagues and other groups offer online public calendars for subscription on their sites ( The New York Times has a free astronomy calendar , too) and you need only a web link to subscribe. In the iOS Calendars app, tap Add Calendar, select Add Subscription Calendar and paste in the URL. In the Google Calendar settings in the browser, click the + next to Other Calendars and choose “From URL” to paste in the link; the “Browse calendars of interest” menu option has several freebies to explore.
Need to mind-meld separate Apple and Google calendars into one app? Google’s support site has instructions for iOS users who want to add a Google calendar. Apple’s iCloud Help site explains how to publicly share your iCloud calendar and get the URL needed to view it in Google Calendar.
J.D. Biersdorfer has been answering technology questions — in print, on the web, in audio and in video — since 1998. She also writes the Sunday Book Review’s “Applied Reading” column on ebooks and literary apps, among other things. More about J. D. Biersdorfer
How to Make Your Smartphone Better
These days, smartphones include tools to help you more easily connect with the people you want to contact — and avoid those you don’t. Here are some tips .
Trying to spend less time on your phone? The “Do Not Disturb” mode can help you set boundaries and signal that it may take you a while to respond .
To comply with recent European regulations, Apple will make a switch to USB-C charging for its iPhones. Here is how to navigate the change .
Photo apps have been using A.I. for years to give you control over the look of your images. Here’s how to take advantage of that .
The loss of your smartphone can be disruptive and stressful. Taking a few simple steps ahead of time can make things easier if disaster strikes .
Many default settings make us share superfluous amounts of data with tech companies. Here’s how to shut those off .
- Apple Calendar Guide: Everything You Need to Know About iCal
In this Calendar guide on how to use Apple Calendar, also known online as iCal, you will learn how to get started using this digital calendar found on your Apple devices. This includes your MacBook calendar, iPhone calendar, iPad calendar, and Apple Watch calendar. Getting started includes learning how to create a calendar on the calendar tool, including multiple versions for work, personal life, and family to use it throughout 2020 and beyond.
You’ll get tips and tricks for customizing these calendars as well as the best way to create events in Apple Calendar. Additionally, the Calendar guide offers suggestions on how to change the view of your Apple Calendar so you can see it by the day, week, or month.
Although Apple Calendar is easy to use, things can go wrong. That’s why this Calendar guide also includes a section on troubleshooting so you can easily fix things that are not working and get the most out of your Apple Calendar.
The concluding section of the Apple Calendar guide gives you ways to use this digital calendar with the Calendar app during 2020 to drive greater productivity and keep pace with the speed of change in business and life.
Table of Contents
1. getting started with apple calendar, 2. creating a calendar, 3. creating events in apple calendar, 4. how to change the view of your apple calendar, 5. troubleshooting apple calendar.
A lot of things are easier on a Mac. Apple Calendar is one of those things that works well on a Mac. It’s also easier to keep your files secure, to move work from your computer to your iPad, and to look cool when you’re working in a café. It’s also easier to use to keep your life organized.
Buy a PC, and the default calendar application you use will be Outlook, a part of Microsoft’s Office Suite. For most users that’s overkill. Outlook is the sort of application you want to use if you’re managing the lives of busy executives from the front desk of a large corporation.
A guide to Outlook Calendar would be a pretty big thing.
An Apple iCal Guide, though, is a lot simpler to use and understand because the application that Apple used to call iCal—and now calls Apple Calendar—is a lot simpler.
It’s the kind of application you’d want to use if you need to keep track of your meetings, your deadlines, and your family events. In other words, it’s the kind of application that people rather than corporations use. In this Apple Calendar Guide, we’re going to walk you through everything you need to know about iCal and Apple Calendar and how to leverage this productivity tool in 2020.
Apple Calendar is easy to find. It’s likely to be sitting in the dock at the bottom of your screen just waiting for you to click. Place your cursor over it, and the app will bounce up to grab your attention. If you can’t find it there, you can bring it up from your Launch Pad.

Apple Calendar in Mac dock
As soon as you open Apple Calendar, you’ll find that you’re thrown right into your current month. That’s an excellent place to begin, but you can change the view. Before you start adding events and creating your calendars, you should change the settings so that Apple Calendar works precisely the way you want.
Open the drop-down menu under “Calendar,” and choose “Preferences.”
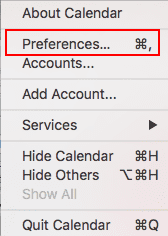
Preferences in the Calendar menu
Apple Calendar will offer a pop-up with four pages. The default page, “General,” has a bunch of fun settings that allow you to personalize your iCal.
Set the Default Calendar App
First, you can set the default calendar app . You could choose a different calendar app here, but Apple Calendar will be good enough to do just about all you want to do, and it’s hard-baked into OS X. The best option is to make sure that the default calendar app is set to “Calendar.”
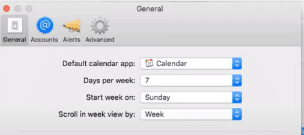
The General tab in Apple Calendar’s Preferences
Set the Number of Days to Show
Next, you can choose the number of days to show in a week . That might sound a little strange. You can’t add—or remove—days from a week, unfortunately. But you can make your calendar only show your working week, or display two weeks or more at a time. “Seven” is the default choice and unless you have a good reason to change it, it’s likely to be the one you keep.
Choose the Start of the Week
You can also change the day to start the week on . Apple thinks that the week begins on Sunday; you might think it starts on Monday or Saturday—or wish it started on Thursday and ended on Friday. iCal lets you change the day that shows first here. You can also change how much of the calendar flies past when you scroll in week view . iCal sets that to a week, and it’s unlikely you’ll want to change it.
Choose When Your Day Begins
The next section is a bit more fun. Just as you can set the first day of the week, so you can also set the time the day starts and ends .
Again, it’s an excellent way to see your work week instead of the entire day. You’re unlikely to be taking appointments at the crack of dawn so you can set your calendar to show times you need most: the hour you fall out of bed until the time you knock off work.
Choose Your Default Calendar
The default calendar is an outstanding choice. Digital calendars are platforms on which you can build multiple schedules. Confusingly, those schedules are also called “calendars.” You can have a calendar for work, for family events, for birthdays, for holidays, and so on. By placing particular kinds of events onto specific calendars, you can share those events with specific groups of people.
You might want your colleagues to have access to your work calendar, for example, so that they can set meetings at times that you’re available. But you might not want to share with them the dates and times of your family events or your children’s soccer matches.
We’ll see in the next section how to create multiple calendars and how to import calendars you’re already using on other platforms. But for now, you have to choose which of your calendars you want to set as the default. The default is the calendar you’ll see when you open Apple Calendar and the one to which new events will be added unless you tell it otherwise.
You can also select other calendars to display by default. Deciding which calendar to show first is useful as a preference setting. If you don’t want to open iCal and see every event on every calendar you’ve created, then you can uncheck some of the calendars here. You won’t see them when you open iCal, but as we’ll see, you can quickly bring back those events when you check your calendar.
Those are the basic preferences you’ll need to set up in iCal. They’ll determine how you see the calendar. The next tab in the preferences page is “Accounts”. That’s a big issue so we’ll deal with it in the next section .
For now, skip to “Alerts.”
Setting Alerts
The third tab in the Preferences dialog box is “Alerts.” They’re a bit like notifications; they remind you of an upcoming event so that you’ve got no excuse for skipping a dentist’s appointment or forgetting your spouse’s birthday.
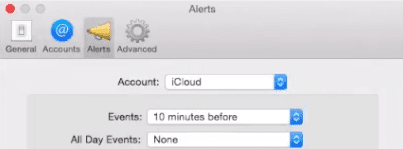
Setting Alerts in Preferences
You can change many settings here.
First, you can select the account. Apple lets you set different alerts for the events shared from your iCloud calendar, or your Google Calendar, or any other calendar.
You can also set different alerts for different kinds of events. So you can be notified of regular events ten minutes before the event begins, for example. For events that last all day, you might prefer to receive an alert the day before. And for birthdays, you might want to have a few days notice so that you have time to buy a gift or organize a party.
A checkbox lets you set these defaults only on this computer—so you can expect different alerts if you’re using your Apple Calendar on a different device. Two other checkboxes let you turn off the shared calendar and invitation messages in Mac’s Notification Center. Check the boxes if you don’t want messages and event invitations to bother you while you’re working.
Advanced Settings
The last tab in the Preferences dialog box is “Advanced.”
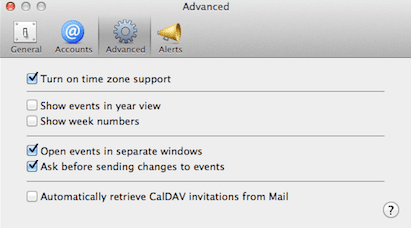
Apple Calendar’s advanced settings
There’s not much about it that’s advanced. There are about half a dozen checkboxes here, and most of them are pretty basic. You can turn on time zone support which is useful if you’re arranging meetings with people in different time zones. When you come to create an event, you’ll be able to choose the time zone of the hours you’re setting.
Choosing is a simple thing, but if you’re arranging calls coast-to-coast, you’ll find that it’s beneficial.
You can opt to show events when you’re looking at the entire year —which might make it a bit hard to read—and you can add the week numbers to the calendar which is nice if you’re counting down.
More important are the options to open events in separate windows and asking before sending changes to events . Those options will enable you to check events without losing your view of the calendar, and they’ll stop you from changing events accidentally.
That option is particularly useful for shared events, but if you’re confident you’re not going to change an event accidentally, you can leave it unchecked and save yourself a click during an event edit.
The final option is the most important. iCal can automatically retrieve CalDAV invitations from Mail .
Check that box, and when someone sends you an invitation to an event from their calendar, you’ll see it automatically in your calendar.
The downside is that it can be a little creepy. If you don’t recall the invitation, you might wonder who put that event in your calendar, but it also makes sure that none of your events gets forgotten. You’re much more likely to forget to add an event to your calendar than forget why an event was added automatically.
Those are the preferences and those are the settings that will determine how your iCal behaves. They’re easy to change and they don’t substantially affect the way you use the application.
There’s one more tab that we haven’t mentioned: Accounts. That concerns the different calendars that you’ll want to create.
When you first open iCal, you start with a default calendar. If you don’t already have a calendar on a different platform, then you’ll be ready to go. You’ll be able to create more calendars to suit different kinds of events. We’ll explain how to do that in this section of the iCal Guide.
But you probably already have a calendar. You might have been using Outlook or Google Calendar, for example, and you’ll need to bring your events and entries over from those platforms and from those accounts.
You can bring events from other platforms from within the Preferences sections.
How to Bring Your Google (and Other) Calendars to iCal
Select the “Accounts” tab, then press the “+” icon at the bottom of the screen.
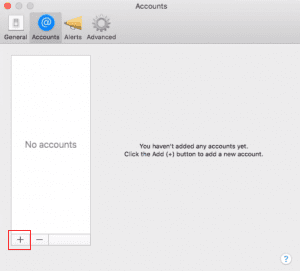
Add calendar accounts to Apple Calendar
iCal will offer you a choice of Calendar account providers, including iCloud, Microsoft Exchange, Facebook, Yahoo, any other CalDAV account, and Google.
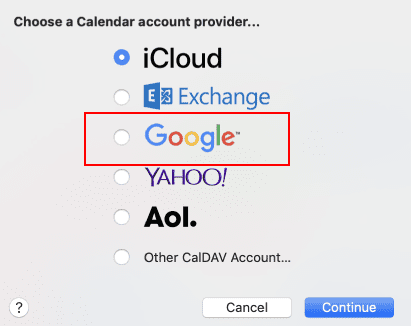
Adding Google Calendar events to Apple Calendar
(You can reach the same screen by choosing the “File” menu, then “Import”).
Choose Google, then enter the email address and password of your Google account.
Google Calendar has access to a ton of information, not all of which you might want to bring to iCal. In addition to your calendar entries, it can also bring over your notes, your contacts, and your messages. Make sure that “Calendars” is checked, mark any other content you want to import, then press “Done.”
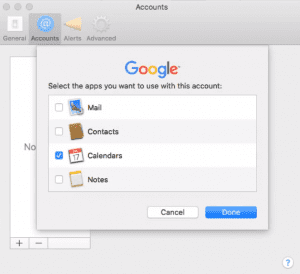
Choose the content to import to Apple Calendar
iCal will now start bringing over all the events you had stored on your Google Calendar. It doesn’t take long. Close the dialog box, and you’ll see the events listed on your Google Calendar listed on iCal.
You can repeat the process for any other calendar you use, selecting iCloud, Yahoo, or Exchange as appropriate and enter your account details. It’s all straightforward. You don’t even have to do it from the “Preferences” dialog box.
Another way is to open the “Calendar” menu and choose “Add Account.”
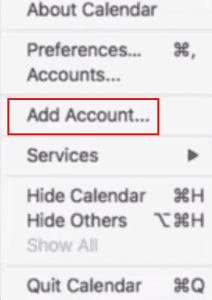
Add calendar accounts to Apple Calendar from drop-down menus
Again, you’ll be offered a list of different calendars that you can import.
How to Create a New Calendar in iCal
Adding accounts lets you import calendars from other platforms. But you can also create additional calendars inside those accounts. You might want to create separate calendars for your sports club, for your family events, or for your family birthdays, for example.
There are two benefits to creating multiple calendars.
The first benefit is that you can share those calendars with others without revealing other events. Your admin manager at work might need to know when you’re available during work hours when he’s planning the sales meeting. He doesn’t need to know about your date night.
Creating different calendars allows you to share some dates but not others, and it keeps certain parts of your life private. The other benefit is that different calendars will enable you to keep different parts of your life organized .
Because you can color code different calendars, you’ll be able to see at a glance the different parts of your life. You can also make some of those events invisible. Unchecking a calendar removes it from view and makes your schedule easier to see.
Bringing that organization to iCal requires multiple calendars.
To create a new calendar, choose “File” then “New Calendar.” If you have more than one kind of calendar account, you’ll need to choose an account in which to place the calendar. Otherwise, select “On My Mac.” Bear in mind that if you’re trying to add a calendar to your Google account, it won’t work.
You’ll need to go to your Google Calendar at calendar.google.com, add the calendar there, then export it and import it to iCal. It’s a lot easier if you want to add a new calendar to your Mac or iCloud accounts. A new calendar will be added to the list on the left of the screen. Enter a name for the calendar.
Apple then automatically assigns your calendar a color. To change the color, click on the calendar’s name and pick a different color.

Color your Apple Calendar
That new calendar will now appear on the left after you press the “Calendar” button at the top of the screen.
How to Delete a Calendar in iCal
After you’ve added a calendar, you might want to delete it. Bear in mind that when you delete a calendar, you lose all of its events. Be sure that you want to delete it and not just hide it. That will let you keep the events even if you can’t see them.
To delete a calendar, select it from the list of calendars on the left.
Open the Edit menu, then choose “Delete.”
The selected calendar will now be deleted — unless it isn’t.
Some calendars you can’t delete .
If you’ve delegated access to a calendar account, for example, then you’ll first have to remove that delegation before you can delete it.
Open “Calendar” then “Preferences,” and choose “Accounts.” Select the calendar account you wish to remove. Click the people who are sharing your calendar, then press the “-” icon at the bottom of the page. When the account is no longer shared, you’ll be able to go back and delete it.
How to Delegate an iCal Calendar
The benefit of creating new calendars is that you can share your schedule with other people. There are two ways to do that. One way is to delegate an entire account.
Open “Calendar” then “Preferences” followed by “Accounts.”
On the left, you’ll see a list of the calendar accounts that you’ve brought into iCal. You might see your iCloud account here, for example, and your Google account.
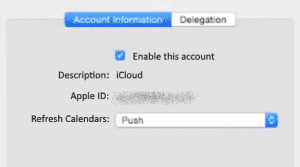
How to delegate an Apple Calendar account
The big space on the right shows information about that account. It also provides an option to delegate that account.
Click “Delegation” then “Edit” then select the “+” icon.
Enter the name of the person you wish to grant access to your calendar account then select their name from the contact list. What they will be able to do with your account will depend on the nature of the account.
If it’s a CalDAV account, then selecting “Allow Write” will allow the person you’re sharing the calendar with to create events on your behalf. If it’s an Exchange account, then the Calendars column will offer a complex series of access levels.
How to Share an iCal Calendar
You’ll only want to delegate an account if you want other people to be able to create events in your calendar on your behalf. It’s more likely though that you’ll only want people to be able to see your schedule.
You’ll want them to be able to see when you’re busy and when you’re available but not be able to create events. There’s an easy way to do that. Next to each calendar in the list on the right is a broadcast icon. Click that icon and you’ll be offered the chance to share that calendar.
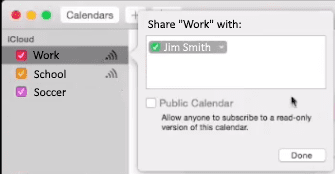
How to share an Apple Calendar
You’ll have two options. The easiest is to enter the names or email addresses of the people you want to share your calendar with. The person you’re sharing with will receive an email inviting them to join your calendar. When they click the “Join Calendar” button in that email, you’ll receive a notification that they joined your calendar.
If you don’t want them to be able to change the calendar entries, control-click their name or email address in the “Shared With” list, and select “View Only.” The other option is to make the calendar public.
Check the box marked “Public Calendar,” and you’ll receive a link that anyone can use to see that calendar. Bear in mind that If that link is spread around, your events won’t be private. Unless you want to share your calendar with lots of people, you’re more likely to be choosing the first option.
How to Add Holiday Calendars to Apple Calendar
So you can import the calendar accounts you’ve already created on other platforms. You can create new calendars. But you can also subscribe to calendars that other people have created and made available. The benefit of this feature is that it lets you quickly add a set of events that you might need, such as national holidays or sports schedules.
Those events will be laid over your calendar. You can remove them from view at will, but you’ll have all the events you need on your calendar without having to enter them yourself.
First, you’ll need to find the URL of the calendar you want to subscribe to. A quick search should lead you to it. Next, choose “File” then “New Calendar Subscription.” Enter the calendar’s Web address and click “Subscribe.” You’ll need to give the calendar a name and a color, then choose “OK.”
You can add as many of these calendars as you want, set the frequency with which they refresh, and add alerts and attachments.
Once you’ve set your preferences, brought over your calendar account and set up any other calendars you want, you’re ready to start creating events. Apple makes that pretty easy.
How to Create a Quick Event
At the top of the calendar, next to the “Calendars” button, you’ll find a “+” icon. Press that button and you’ll be offered the option of creating a quick event.
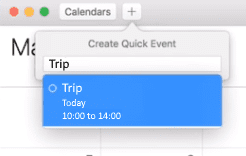
Create an event in Apple Calendar
This option is a lot cleverer than it looks. Start describing the event, and Apple will try to turn it into a calendar entry. Type “dinner tomorrow at 7,” for example, and Apple calendar will automatically place that event in the calendar.
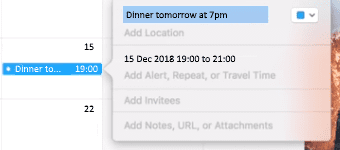
Edit an event in Apple Calendar
You could leave that event as it is or you can click the event in your calendar and add more detail:
First, you can change the calendar to which the event has been assigned. The box in the top right-hand corner isn’t just for color-coding. Select it, and you’ll be able to pick a different calendar. You can change the start and end times , or mark the event as lasting all day .
You can also click to add a location , which might automatically attach a map to the event’s details. Apple illustrates it well:
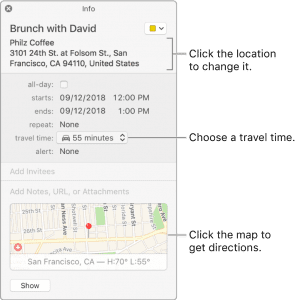
Apple Calendar automatically adds maps
Image: Apple
It’s likely that you’ll know exactly where the event is taking place but if you enter a general location, such as “coffee shop” or “pizza restaurant,” Apple will offer you a list of relevant locations near you. Choose one of those locations and the map will even come with weather information. (That sometimes happens when you enter a location manually too, but not always.)
Apple Calendar gets even more clever. If your event does include a map, Apple will figure out how much time you need to reach the venue based on traffic and transit conditions from your likely location before the start of the event. It will send you a notification before you need to leave, at the time you need to leave, and again if you’re running late and should have left already.
The time is based on information in the Maps application on your iPhone, if you have one, and the starting location is drawn from events listed in your calendar up to three hours before the event is supposed to start. If Apple Calendar can’t find a location, it will use either the home address or work address listed in your Contacts, and it will base its choice on the times you chose in the “Day start at” fields and “Day ends at” fields in the Preferences.
In short, don’t depend on Apple getting you where you need to go on time. Instead, figure out how much time you’ll need to get there, select “travel time” in the Event information window and set the notification manually.
How to Invite People to Events in Apple Calendar
You can use your calendar to keep track of your own schedule, but you can also use it to alert other people to events that they’re all attending. If the event has already been created, double click it to bring up the event’s details. Alternatively, if you’re creating the event, click the day on which the event will be held.
Apple will offer you a small window containing details of the event. Beneath the time and date of the event is an option to “Add Invitees.”
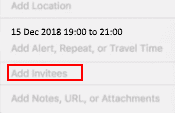
Add invitees to an Apple Calendar event
Click that option and enter the name or email address of each person you want to invite. As you begin typing, Apple will start searching the entries in your Contacts and Mail apps. It’s a neat trick but be aware that if you press Return before Calendar has found the contact, Calendar won’t add them and they won’t be invited. Make sure that Apple has made the match before you’re done.
Apple’s smartness doesn’t stop there. After you’ve added the first two invitees, it will start suggesting more people based on your previous interactions. So if you usually invite your sales team to your Monday morning meeting, and you’re inviting two of them to an event, Apple Calendar will ask whether you want to invite the rest of the team. It can feel a bit intrusive but it’s also a useful feature.
You can even make this option easier by creating a group in the Contacts app. Instead of typing the names in manually, you can also drag the invitees’ names into the event.
Open the Window menu, then choose “Address Panel.” You’ll now be able to pull over contacts but you’ll first have to scroll down the list to find them. You’ll probably find it easier to start typing and let Apple do the searching for you.
Check the Availability of Attendees
Another useful feature is the ability to check the availability of attendees . If you’re sharing your calendar, you should find that after you invite attendees, you see a button marked “Check Availability.” Click that button and a window will show when the invitees are free or busy.
Move the event by dragging the event block or click the arrows at the top of the window to see a different day, and you can find times with fewer conflicts. If you’re struggling, click the button marked “Next Available Time.” This isn’t an option that’s always going to be available—and it’s more likely to be available in a work environment than for private users. But when it works, it can make arranging events much easier.
The Status of Event Invitations: Who’s Coming?
Once the invitations are sent, you’ll be able to see who’s attending. Above the View buttons, you’ll see icons that tell you whether everyone’s coming, no one is coming, and whether there are mixed responses—or a problem with the invitation. When you click on the event, you’ll also be able to see who’s coming, who’s not, and who still has to answer.

You can see who’s coming to an event on Apple Calendar
How to Add Notes, Links, and Attachments to Apple Calendar
There’s one more action you can take when you create an event: you can add information to the event. You can add notes, a URL, and attachments. These aren’t options that you’re likely to take very often but they can be beneficial.
You’ll be able to tell people information about the event to which you’re inviting them, or add reminders to an event you’re attending. You can also attach meeting agendas, decorative invitations, powerpoints or anything else you might want to send invitees.
The option to add notes, a URL and attachments are at the bottom of the event window.
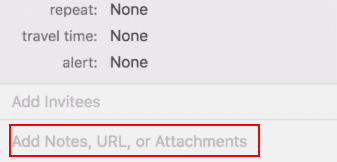
Add notes, URLs, and attachments to an Apple Calendar event
Above the calendar are four buttons representing four different ways of seeing the calendar.
Change the way you see your calendar
The functions of those buttons are relatively clear. Each button changes the view of the calendar, revealing the events of the day, the week, the month, or the year. But how you use Apple Calendar depends in part on the view you’re using.
Apple Calendar’s Day View
A day in your life on Apple Calendar The Day view displays the events for a single day. The starting and ending hours depend on the settings chosen in the Preferences. Similarly, the Week view begins on the day selected in the Preferences.
What both those views have in common is that it’s possible to change an event just by clicking and dragging. In the Day view, you can change the time, and in the Week view, you can also change the day. The Month view is likely to be the most useful.
A month in your life on Apple Calendar
Again, the Preferences let you change the day the month begins. The weekend will also be marked in a darker color.
Finally, the year view is often confusing. You’ll probably find it easier to flick through the month display in the bottom left corner one month at a time to see what’s coming up during the year.
Change the Calendars in Apple Calendar
So you can change the view of the time ahead in your calendar, and you can use the Preference settings to adjust the time and days on which the schedules begin. But you can also change the calendars you view. On the left screen, Apple Calendar displays a list of all the calendars that you’ve created and to which you subscribe. Next to the names of those calendars are colored checkboxes.
Uncheck those boxes to remove the calendars from view. Those calendars will still exist. The events will still have been recorded and shared. You’ll still subscribe to them, and they’ll still be updated if they belong to someone else. But as long as the checkbox is unmarked, you won’t see them.
It’s a simple technique, but it is hugely useful. It means that you can subscribe to multiple calendars, including different national and religious holiday calendars, and keep them off until you need them. It makes using the calendar much easier.
As this guide to Apple Calendar shows, the time management app on your Mac is pretty simple to use. It doesn’t have anything like the complexity of Microsoft’s Outlook and it’s not Web-based like Google Calendar. You can use it on your Mac without having to search for any other calendar applications—and it’s even got a few clever touches, like the attempt to predict travel time and invitation lists for events.
But it’s not perfect. It does have issues. In this section, we’re going to look at some of the most common problems you’re likely to encounter as you use Apple Calendar.
You Can’t Edit Events or Calendars
Sometimes you’ll find that you see an event in your calendar, but you can’t change it. You might want to change the time or the venue or the title, but Apple Calendar won’t let you make the edits.
There are a few possibilities.
Someone else created the calendar.
You can’t change the contents of calendars to which you subscribe. You can change their names and their colors, and you can adjust the alerts you receive for events on those calendars. But you can’t change the events listed in calendars that someone else manages.
One way to see exactly what you can do on a calendar to which you subscribe is to click the “ ” icon next to the calendar in the list on the left. If the calendar says “View Only,” you can look but you can’t touch.
You were invited to an event; you didn’t create it.
The same applies to events themselves. You can change events that you created, but you can’t change all the details of the events to which you’ve been invited. You can change your attendance and reset the alert. And you can change your status and availability. But if you didn’t create the event, don’t expect to be able to change it for everyone else.
You’re using the wrong email address
Google Calendar has a close and clear connection to Gmail. Apple Calendar’s connection to its mail and contacts apps are much less clear. They exist nonetheless, and they’re important. If Apple Calendar doesn’t let you change an event that you know you created, you might be using an email address in the calendar that isn’t on your Contacts card.
Open Contacts, find your card and make sure that all of your email addresses are listed. It’s a strange problem with an odd fix.
You’re trying to change a birthday
One of the effects of the connection between Apple’s Contacts app and iCal is that Apple Calendar can automatically produce a Birthdays Calendar. You’ll find it listed on the left of the screen. It’s a neat trick that helps to ensure that you don’t forget a birthday even if you didn’t add the birthdays to your calendar yourself.
But it does mean that you can’t change the date of a birthday from the calendar. You’ll need to open the Contacts card of the person whose birthday you want to change and make the edit in the Contacts app. You won’t be able to do it on Apple Calendar.
You can’t change the time zone of an event
A much easier problem to solve is the inability to change the time zone of an event. The problem is likely to be that you’ve turned off time zone support.
Open “Calendar” then “Preferences” and “Advanced,” and select “Turn on time zone support.” That should fix the problem.
You Can’t See Your Events
Not seeing the events you expect to find on your Apple Calendar would be a big problem. It’s also a problem with plenty of possible solutions.
You’ve hidden the calendar from the view
If the colored checkbox next to the name of the calendar is unchecked, then you won’t be able to see that calendar or its events. Events that last all day can also have their own calendar. If that calendar’s box is unchecked, then you won’t be able to see those events. Check the box and Hey Presto! the events will be back.
You’re trying to view a declined event
One of the settings in Apple Calendar lets you choose not to see events whose invitations you’ve declined. If you can’t remember whether you declined it or not, select “View” from the menu then “Show Declined Events.”
The time zone is wrong
One reason you might not be able to see the event in the place you expected to find it is that it might be in a different time zone. If you’ve changed the event’s or the calendar’s time zone, the location of the event on your calendar will move to match the new time zone. Look for the event in its local time zone or open “Calendar” then “Preferences” and make sure that the calendar’s time zone is set correctly.
You’re Not Receiving Alerts
Alerts are intended to make sure that you don’t miss an event. So when you miss the alert, you’re going to be in trouble. Not seeing the alert in the notifications isn’t always an easy problem to fix. You might have to look at a few places before you find the solution.
Check the Calendar preferences
Open the “Calendar” menu then “Preferences.” Click “Alerts” and make sure that “Show shared calendar messages in Notification Center” is checked. If you haven’t been receiving notifications of event invitations, you should also make sure that “Show invitation messages in Notification Center” is also checked.
Make sure that you can be disturbed
Mac’s notifications have a Do Not Disturb feature. If it’s on, you won’t be disturbed by calendar alerts. Open the Apple menu and choose “System Preferences.” Click “Notifications” and make sure that the “Do Not Disturb” setting is switched to “Off.”
While you’re in the Notifications section, you should also click “Calendar” and make sure that the alert style is either “Banners” or “Alerts.” If it’s neither, you’ll get nothing.
Check the event
It’s also worth going back to the event whose alert you missed to make sure that an alert was set. Click the event, and scroll down to “Alerts.” If you hadn’t set an alert, you wouldn’t have received one.
Set your email
If you wanted to receive your alerts by email instead of as a notification in your Mac, then the problem might be that your computer is using the wrong email address. Open Contacts, pull up your card and make sure that your email address is one you check.
Your Invitees Aren’t Getting Their Apple Calendar Event Invitations
If people aren’t answering invitations to your events, and telling you that they never received them, then two things are possible: they’re making up an excuse to explain their laziness, or there’s something wrong with the way you’re sending out the invitations. Here are some suggestions of how you can fix it.
Make sure the email addresses are in Contacts
Apple Calendar uses the email addresses in Contacts to send the invitations. If the addresses are wrong, the invitations won’t go out. Check the Contacts details of anyone who hasn’t received their invitation and make sure that their email addresses are correct and up to date.
You should also make sure that your own email address is correct in Contacts. If the sender’s address is wrong, the invitation won’t go out.
Refresh your calendars
If you’ve made changes to an event or a calendar, Apple Calendar might not have registered those edits. Open the “View” menu, then choose “Refresh Calendars.” If you’ve done both of these and your invitees are still not answering your invitations, then — well, they’re ghosting you.
Pros and Cons of Apple Calendar
Apple Calendar is a great option because it is totally free and has a clean and easy-to-use design. Most people looking to schedule basic things such as work meetings and picking up their child from school will be able to get by with Apple Calendar. Additionally, it is great for those that have multiple Apple devices as it integrates smoothly between each of those devices. It will save you some time as you just have to sign into your Apple ID and everything will transition over without having to download another app.
While iCal is great for simple tools, it struggles with in-depth features. There are very limited customization features, and it can feel lackluster compared to other competitors. While the ideal Calendar app may look different for everyone, having the option to have multiple features can never hurt. If you’re in the market for a sophisticated business calendar, a calendar for leaders or CEOs , or a trustworthy personal calendar, check out Calendar to see if it’s right for you.
Apple Calendar, or iCal, is a remarkably simple application. For anyone moving to Mac from a PC with Outlook, that simplicity should be refreshing. But it’s also witty and beautifully designed. The process of importing calendars from other accounts is very straightforward. You rarely have to do much more than enter your email address and password to find all of the events from a different platform on your Mac.
Creating events too is quick and easy, and Apple Calendar’s quiet integration with Mail and Contacts does add some surprising additional features. When the automated travel times work, for example, the app can feel very intuitive. At those times, you’re not just putting events on a calendar; it really can feel like you’re working with a personal assistant who will tell you where you’re going, how to get there and remind you that it’s time to leave.
When you add integration with Apple Calendar to iPhone’s Siri, things get even more interesting. Now you can tell Apple Calendar to add events or to change events. The interface becomes personal and natural when you’re on the move, and yet you can still find all the details you need when you’re in front of your screen.
Apple Calendar might not have Outlook’s complexity. It might not have Gmail’s accessibility when you’re away from your own Mac. But it does have a unique simplicity, broad flexibility and a smartness under the hood that’s hard to beat.
What do Users Have to Say About iCal?
Many Users of iCal have reviewed iCals performance on Trust Radius, a site for software reviews.
A Chief Commercial Office of a small business said that “ Ical seems very well suited for managing personal calendar, bit not necessarily for more complex professional situations where integration with video conferencing may be necessary, or the need to manage multiple calendars in various time some globally”. The user continued on saying that iCal was great for integration with iPhones, other apps, and is easily accessible. However, the same user mentioned that there was very limited integration with Outlook and Google Calendar, and that there was no integration with Zoom.
A Product Manager for a medium-sized business said, “ In our company we have been using this method of Calendar keeping for a few years and it has been of great use to manage our several agendas at the same time, with ease of use between devices. It has also proven to be super useful to manage calendars between team members and their needs and priorities”. This user mentioned that iCal makes it easy to create events and link to multiple calendars. However, the user mentioned that it was difficult for non-iOS users. When comparing iCal to Google Calendar, the user said that “both work just great. Still, having a iOS device based company, iCal has been of great ease of use throughout. Also, the interphase with the user is a bit more comfortable to us.”
Another Manager said, “ For Apple users, iCal is usually the go-to calendar management software as it’s an easy and accessible option since it’s already installed on all devices. I consider it a very basic calendar software, it doesn’t have as many features, but it’s straightforward and the nicest feature is that it seamlessly updates across all devices logged into your iCloud account. It’s an effortless way to keep your calendar online/in the cloud, manage schedules, create different calendars (work, personal, family, etc) and keep all updated across devices. An easy way to keep yourself and your team/family organized.” This user continued on, saying that it was super easy to use, but that the layout seems out of date, the features for calendar sharing across organizations are a little too simple, and there is a lack of third-party integration for things like Zoom.
This guide to Apple Calendar will help you to get more out of that application throughout 2020 and beyond.
Updated May 2, 2023

John Rampton
John’s goal in life is to make people’s lives much more productive. Upping productivity allows us to spend more time doing the things we enjoy most. John was recently recognized by Entrepreneur Magazine as being one of the top marketers in the World. John is co-founder and CEO of Calendar.
Privacy Overview
Pin it on pinterest.
15 Useful iPhone Calendar app tips and tricks (iOS 17)

A digital calendar is a must-have if you juggle multiple commitments and deadlines — or maybe even to aid poor memory. If you’ve never used your iPhone’s built-in Calendar app other than for checking the day’s date, you’re missing out on a lot. The Apple Calendar has pretty nifty features that’ll make your life much easier.
Here are some useful tips and tricks that will help you master iPhone Calendar app in no time!
1. Create reminders and set alerts
Adding your following appointments and schedules is one thing, but it’s useless if you don’t look at them. Setting alerts and reminders ensures that your iPhone reminds you of an upcoming event a week or a few days before.
First, you’ll have to create an event if you haven’t done so yet.
- Open the Calendar app.
- Tap the Add (+) button at the upper right
- Add a title to your event.
- Select from the options from 1 week before to At the time of the event .

If you’re the forgetful type, you can add another alert by tapping the event → Edit . Select Second Alert and choose a time for the alert.
You can also set up a default alert time for all your appointments instead of wasting precious time setting up an alert every time you create a new event. To do this:
- Head to Settings .
- Select Calendar .
- Scroll down to Default Alert Times .

2. Select your preferred calendar view
There are different ways to view your calendar — from a general year view to a more detailed day view.
- Yearly view: To view the entire year, just tap the month at the top left of the calendar to zoom out to the year. You can swipe up and down to see the previous and future years ahead.
- Monthly view: From the year view, tap a month to switch to a monthly view. A monthly view lets you view days with schedules — symbolized by grey dots under them. You can also swipe up and down to view other months.
- Weekly view: To see an overview of your weekly schedule, turn your screen sideways and view your calendar. This format will also show hourly breakdowns for each day.
- Day view: Tap Today to see your day’s hour-by-hour schedule. Tap another day or swipe sideways to see your schedule for a different day.
- Tap the List button on top of the screen beside the Search button to see all your upcoming schedules for the day in a list.
- You can always head back to the present day by tapping Today at the bottom of the screen.
3. Create or add a new calendar
Managing multiple aspects of your life on a single calendar can be perplexing. With Apple Calendar, you can create separate calendars to have a dedicated calendar for your work, personal life, and much more.
For example, if you have multiple projects, having a calendar for each one can help you sort out your schedules and commitments much more efficiently and prevent overlap.
It’s also color-coded, so you’d know at a glance where the event of schedule plotted in your calendar belongs.
To create a new one:
- Open the Calendar app → Tap Add Calendar at the bottom.

- Add Calendar: You’ll need to input a calendar name, the email address you want to use, and the color you want to assign for the calendar.
- Add Subscription Calendar: You’ll need to enter the link to the calendar you want to subscribe to. Subscription Calendars are read-only data feeds that keep you updated on events as the data provider updates them.
- Add Holiday Calendar: Choose the country you want to add to add their holiday to your calendar.
4. Control when you want to start the week
For some, the week starts on a Sunday, while others begin their week on a Monday. The iPhone Calendar starts the week on a Sunday by default, but you can choose a different day.
To do this:
- Go to Settings → Calendar .

5. Open or share files before a meeting
You can add attachments to your calendar invite to easily access or share them with your invitees.
- Go to your event . In any Calendar view, tap on a particular day to see the events for the same.
- Tap Edit → Add Attachment .

- Tap Done .
To remove the attachment from the event, just go to the event, tap Edit, then swipe left over the attachment and select Remove .
6. Let Siri add events from other apps
Siri can also check your activity from other apps like Messages, Mail, and Safari to update your calendar with other events, such as an online meeting sent through your email, a hotel booking, or a flight reservation.
To let Siri do this:
- Go to Settings → Calendar .
- Select Siri & Search .

This enables Siri to suggest events it finds in other apps.
7. Drag and drop an event to organize your schedule
The Calendar list view not only lets you see your daily schedule’s overview, but it also allows you to quickly organize and move your schedule to another day.
Just select an event and drag it to another time slot. You can do this either in your weekly or daily view.
8. Copy and paste events
If an event is recurring, you can easily copy-paste them into your calendar. Just touch and hold the event and select Copy .
- Tap and hold the timeslot where you want to paste the event. This will create a new event.

9. Maximize Siri
You can also use Siri, the trusted Apple digital assistant, to create events in the Calendar for you. Just say, “ Hey Siri, create a new event in my Calendar,” and fill it in with all the details.
For any changes in the event, just say something like, “Can you change an event in my schedule on [date]? ” Select the event you want to edit and inform Siri of the changes you want to make.
10. Delegate your calendar to others
Another great Calendar feature is the ability to delegate your calendar to others. You can let an assistant or a family member manage your schedule, including adding, editing, responding to, and deleting invites. To do this:
- Open the Calendar app → Choose Calendars at the bottom.
- Tap the info (i) button beside the calendar you want to share.
- Enter the email address of the person.
- Tap Add .

If the person didn’t receive your invitation to share your calendar, tap Resend Sharing Invitation . You can cancel sharing anytime by tapping Stop Sharing .
Note that you’ll be receiving notifications and alerts whenever the person you gave editing privileges to add, edit, or modify your calendar. You can toggle off Show Changes to turn off alerts and notifications about the shared calendar.
11. Access your calendar through any device
Placing all your schedules in the Calendar ensures you can easily access them when needed — except when you leave your iPhone behind. Don’t worry, though; you have the option to sync your Calendar across your Apple devices.
This feature is turned on by default, but if you turned this off in the past, then:

Because it’s synced with your iCloud, you can go anytime to iCloud.com to access your calendar there.
12. Add a travel time
Adding an appointment to our calendars helps ensure we don’t miss them. But this doesn’t take into account factors like traffic jams and location. With Calendar, your iPhone will automatically notify you when it’s time to leave based on where you’re coming from and where you’re going.
Once done creating your event, tap Edit → select Travel Time . If you entered a location in the event, enter your starting location. If not, you can choose as little as 5 minutes to two hours as leeway for your transit to your scheduled event.
13. Sync events with CarPlay
Surprised? Don’t be. If you’re using Apple CarPlay , you can also see upcoming calendar events on your dash.
This can also display directions to the location if you’ve added an address to the event.
14. Show or hide individual calendars and all-day events
A cluttered calendar is counterproductive and can be a nuisance instead of helping you organize your life. That said, you have the option to view and hide individual calendars as well as all-day events.
15. Add your contacts’ birthdays
Are you the type who forgets birthdays? Then worry no more! Just input your contacts’ birthdays in their contact information and add them to your Calendar to receive a reminder on their birthday.
- First, head to Contacts .
- Tap a contact → Edit .

- Then open Calendar .

Here’s a more comprehensive guide on viewing birthdays on Calendar .
Wrapping up…
The Calendar app is a powerful tool to help you stay organized. You can use the above tips to optimally use all of its features.
What’s your favorite Calendar feature? Please share in the comments below.
- Apple Calendar vs. Google Calendar: Which one is better?
- Best Calendar Apps for iPhone to Stay Organized
- How to create Public Calendar on iPhone and iPad
- How to sync Google Calendar with iPhone
🗣️ Readers like you help support iGeeksBlog. When you make a purchase using links on our site, we may earn an affiliate commission. Read Disclaimer .

Leave a Reply Cancel reply
Your email address will not be published. Required fields are marked *
Save my name, email, and website in this browser for the next time I comment.

Calendar User Guide
for macOS Sonoma

Get started with Calendar
Set up Calendar and start managing all your events in one app, even if they’re in different accounts like iCloud or Google.
Get started with Calendar on Mac

Color code your life
Create separate calendars for different areas of your life. Then, spot your work, family, or personal events with a quick glance.
How to add a new calendar

Invite and be invited
Quickly set up your own events and send calendar invitations to friends and coworkers.
How to invite people to events

Put your event on the map
All the information you need about an event at your fingertips. When you add the location of your event—like the name of a restaurant—Calendar fills in the address, shows you a map and the weather, and lets you know when it’s time to leave.
How to add location and travel time to events
To explore the Calendar User Guide, click Table of Contents at the top of the page, or enter a word or phrase in the search field.
- Get started
- Add or delete calendar accounts
- Add, modify, or delete events
- Create or modify all-day or multiday events
- Set up or delete a repeating event
- Add location and travel time to events
- Set alerts for an event
- Invite people to events
- Reply to invitations
- Add a FaceTime video call to events
- Add notes, a URL, or files to events
- Use Siri Suggestions
- Move events to another calendar
- Add or delete calendars
- Change a calendar’s name or color
- Show or hide a calendar
- Use Focus filters
- Import or export calendars
- Ways to share calendars
- Share iCloud calendars
- Share individual CalDAV calendars
- Share calendar accounts
- Subscribe to calendars
- Refresh calendars
- Change Calendar settings
- Show or hide the Birthdays calendar
- View Holidays calendar
- Change the days and times displayed
- Use different time zones
- Use a Chinese, Hebrew, or Islamic lunar calendar
- View events in separate windows
- Change default alert settings
- Use Calendar widgets
- Manage notifications
- Print calendars or events
- Symbols used in Calendar
- Keyboard shortcuts
- Troubleshooting
- Short Guides
- Privacy Policy
How To Use iOS 17 Calender[Complete Guide]

Use iOS 17 Calender provides a convenient way to manage your schedule and stay organized. With powerful features like multiple calendar support, Siri integration, and calendar sharing, the use iOS 17 Calender makes it simple to keep track of your events, appointments, and more. This iOS 17 Calender guide will walk you through how to get the most out of the iOS 17 Calender.
Recent Released: How the Beeper App Consolidates Your Messaging Apps on iOS
Introduction
The Calendar app comes pre-installed on all iOS devices, and it provides an easy interface for viewing and managing events and appointments. With iOS 17, Apple has added several enhancements to Calendar, including new options for creating events faster with Siri, viewing events from Mail and Safari, and customizing calendar colors.
Some of the key features of the iOS Calendar app include:
- Create events and invite guests
- View multiple calendars, like work, family, and holidays
- Set up reminders and alerts for events
- Share calendars with other iOS users
- Integrate with Siri, Mail, Messages and Safari
- Customize calendar colors and settings
- Supports calendar subscriptions and read-only calendars
In this guide, we’ll cover how to use all of these features and more to get the most productivity and utility out of the iOS Calendar app.
Creating Events
The most basic function of the iOS Calendar app is creating events and tracking appointments or meetings. There are a few ways to add new events:
In Day View
The easiest way to create an event is in Day view. Simply tap on the plus (+) icon at the top of the screen to open the new event form. Here you can enter the event title, location, date/time, invite guests, set alerts, and add notes or attachments.
You can also use Siri to quickly create events by voice. Just say something like “Add meeting with Jane next Monday at 3pm” and Siri will add it right to your calendar.
To enable Siri event creation, make sure you have Siri enabled in Settings > Siri & Search.
From Other Apps
The iOS 17 Calendar can now suggest events found in apps like Mail, Messages and Safari to add to your calendar. To enable this, go to Settings > Calendar > Siri & Search and turn on “Show in App”.
Importing Events
You can also add events to Calendar by importing an ICS file exported from another app. Just tap the import button in Calendar and select the ICS file.
No matter how you add events, the Calendar app makes it quick and easy to populate your schedule.
Viewing Multiple Calendars
The Calendar app supports viewing multiple calendars simultaneously. This allows you to manage separate calendars like work, family, holidays, sports team schedules, etc.
To add a new calendar:
- Tap Calendars at the bottom of the screen
- Tap Add Calendar
- Choose the type of calendar to add, like iCloud, Google, Exchange, etc.
You can now toggle these calendars on/off from the calendar list to view them individually or together.
Additionally, you can include national holidays or birthdays/events from your Contacts right in your Calendar by turning on those options in Settings > Calendar.
Changing Calendar Colors
With multiple calendars, it can get difficult to differentiate the various events and schedules. Luckily, you can customize the color for each calendar:
- Tap Calendars at the bottom
- Tap the calendar to customize
- Tap the color next to the calendar name
- Choose a new color from the picker
Use colors strategically to color code your different calendars. For example, blue for work events, red for family birthdays, and so on.
Setting a Default Calendar
When you create a new event on iOS, it gets added to the default calendar. To assign a default calendar:
- Go to Settings > Calendar
- Tap Default Calendar
- Choose the calendar you want to make the default
Setting a default calendar is useful to make sure new events go into your main calendar. You can always change the calendar for individual events later if needed.
Sharing Calendars
For families, teams or other groups, you can share calendars on iOS so everyone can view and edit events. To share a calendar:
- Tap Calendars and select the calendar to share
- Tap Add Person and enter the name or email to share with
- Choose the access level to grant them (Make Changes or View Only)
Shared calendars are great for coordinating schedules with a partner, staying in sync with your family, or collaborating with a team.
Calendar Alerts and Reminders
To help you stay on top of your events, the iOS Calendar app offers several options for adding reminders and alerts:
- Default Alerts – Set default reminder times in Settings > Calendar > Default Alert Times.
- Event Alerts – When creating an event, tap Add Alert to have a notification sent before the event.
- Travel Time – Enable travel time in Settings to factor in transit time for event alerts.
Use these alerts judiciously to help you remember important events and appointments without getting overwhelmed with notifications.
Integrating with Siri
iOS 17 takes Calendar integration with Siri to the next level. Here are some useful ways to use Siri with Calendar:
- Add Events – Say things like “Set up meeting with Sarah Monday at 2pm”.
- Search Events – Ask “What’s on my calendar today?” or “When is my next appointment?”
- Edit Events – Make changes like “Move my 3pm meeting to 4pm”.
- Enable Suggested Events – As mentioned earlier, turn on Show in App in Settings > Siri & Search to have Siri suggest adding events from Mail, Safari, etc.
Siri makes it easy to interact with your calendar handsfree.
Additional Calendar Tips
Here are some additional tips for mastering the calendar on your iPhone:
- Use week view to see your full week at a glance
- Turn on time zone support to show calendars in local times when traveling
- Adjust work hours in calendar settings so work events show in work time only
- Use calendar subscriptions to subscribe to interesting calendars like sports team schedules or TV show release dates
- Share read-only calendars to share things like company holiday schedules
- Use the Today view to quickly see today’s schedule
- Enable notifications in Settings to be alerted about events and invitations
- Set up multiple calendars for each area of your life like family, work, hobbies etc.
The iOS 17 Calendar app provides a robust set of tools for organizing your schedule. With options for creating varied event types, viewing multiple calendars, customizing alerts and colors, integrating with Siri, and sharing calendars with others, it’s easy to keep track of your appointments and stay on top of your day. Use this guide to learn how to tap into the many features of iOS Calendar and ensure you never miss an important meeting or event again.
Summary of Key Features:
- Create events quickly with natural language via Siri
- Import events from Mail, Messages, Safari
- Support for multiple calendar types (iCloud, Exchange, CalDAV)
- Share and collaborate on calendars with family/teams
- Set alerts and reminders for events
- Customize calendar colors for easier visual differentiation
- Integrate with Siri to add, edit, and search events by voice
- View week and month views alongside day view
- Subscribe to read-only calendars like holidays or sports team schedules
- Set default calendar for new events and travel time for alerts
With these tips and tricks, you can fully optimize the iOS 17 Calendar to organize your personal and professional events and schedules. The intuitive interface and powerful features make it easy to use Calendar seamlessly alongside your other everyday apps.
Share this:
- X (Twitter)
You Might Also Like
How to hide an app on ios 17, where is my game center app ios 17, how to code an ios app, where is the journal app ios 17, whiteout survival codes april 2024 on iphone, leave a reply cancel reply.
Your email address will not be published. Required fields are marked *
Save my name, email, and website in this browser for the next time I comment.
- More Networks
Sign in to your account
Username or Email Address
Remember Me

5 Ways To Get The Most Out Of Your Apple Watch Calendar
W hen done right, calendars can make living in our chaotic, modern world with so many things that constantly demand our attention a little more bearable. But the thing about calendars is that they're only as useful as how well they're integrated into our daily lives. Whether it is a physical calendar or a digital one, it takes commitment to regularly update them as your needs change and plans evolve with time. Thankfully, the Apple Watch can help keep your calendar alive by letting you access it directly on your wrist.
With so many ways to customize your Apple Watch , it's unsurprising that optimizing your on-the-go scheduling requirements is one of them. Most people are probably aware that you can check your iPhone's Calendar app through your Apple Watch, but you'd be surprised to know that Apple hasn't been slowing down with improved features in its recent OS updates. For example, there are plenty of new cool Watch faces that have popped up, with some of them having complications designed to help put your calendar at the forefront or make it easier to navigate. That being said, you should probably update your watchOS to the latest version as soon as possible.
So, if you're ready to get a better hold of your time (and your life), here are some ways to get the most out of your Apple Watch calendar today.
Read more: Major PC Monitor Brands Ranked Worst To Best
Find A Better View
With the hustle and bustle of life, scheduling time to see friends and family can be a nightmare. If we're not careful, we'll get trapped in everyday tasks and fail to see that years can pass pretty quickly. While it's important to view your day-to-day tasks, having a bird's eye view can change how you spend your time. Thankfully, you can switch calendar views on your Apple Watch in just a few taps. Here's how:
On your Apple Watch, press the Digital Crown.
Select the Calendar app.
Tap the more (or three dots) icon.
Under View Options, select your preferred view.
On your Apple Watch, there are three views that you can use to view your Calendar entries: Up Next, List, and Day. With the Up Next view, you can view the events due to happen within the week, which makes it a great view when you're just trying to get through the day. On the other hand, the List view shows you events from two weeks before the present day and up to two years later. Lastly, the Day, Week, or Month view lets you see a color-coded view of your calendar across a set period. Using the Day view, you can easily switch to the Week or the Month view by tapping the arrow pointing left icon in the upper-left corner of the screen and turning the Digital Crown to view succeeding months.
Manage Events Quickly
Although nothing beats the speed and accuracy of making calendar events on your iPhone or Mac, it's possible to manage events on your Apple Watch while you're on the go. To add an event on your Calendar app via Apple Watch:
On the side of your Apple Watch, press the Digital Crown.
On your home screen, tap the Calendar app icon.
At the bottom of the screen, tap the more (or three dots) icon.
In the upper portion of the screen, select + New Event.
Key in your primary event details, such as title, start date, end date, time, and invitees.
At the bottom of the screen, tap Add to finalize your new calendar entry.
In earlier versions of the watchOS, it was not possible to make changes to your Calendar app event through your Apple Watch. However, from watchOS 10 onwards, it's now possible to make changes to the calendar with the Apple Watch. Just tap the event you want to edit, then Edit. Confirm your changes by tapping the check button. To delete an event on your Apple Watch calendar, select the event and tap Delete. Confirm your decision by choosing Delete again.
Make Sure You're Never Late For An Event
When it comes to staying true to your scheduling commitments, part of it is factoring in how to actually get there on time. Thankfully, Apple introduced the Travel Time feature, which can help you manage your travel time in between appointments better .
Bear in mind that for the Travel Time feature to work on your Apple Calendar automatically, you will need to type in the location of the event. Afterward, your Apple Watch, Calendar, and Maps will work together to determine your location and calculate the ideal time, factoring in traffic and transport options, to remind you to get moving to the next one.
To use the Travel Time feature, launch the Calendar app on your Apple Watch. In the upper-right corner, tap the plus (+) button, fill in your event details, and tap Travel Time. In the next section, toggle on the button next to Travel Time.
If you don't trust the accuracy of GPS in your area, you can manually opt to change the starting location. On your Apple Watch's Calendar app, tap an existing event. Then, in the upper right corner, tap Edit > Travel Time > Starting Location and type your starting point.
Alternatively, you can also select your estimated travel time from five minutes to two hours. Unfortunately, the Time Travel feature has a few limitations. For example, it doesn't let you use it if you're setting an "All Day" event or make multiple reminders.
Fix Your Calendar Notifications
Although most people tend to use their calendars more passively, like choosing when to check it on their phones, your Apple Watch lets it engage with you more actively, especially with notifications. However, notifications can create some degree of anxiety, especially when you don't know how to create boundaries with them. So, if you don't want that little red dot on your Apple Watch to control your life, here's how you can make your calendar notifications work for you.
On your iPhone, which is paired with your Apple Watch, open the Watch app.
In the lower-left portion of your screen, tap My Watch.
Below My Faces, tap Notifications.
In the Notifications tab, scroll down until you see the Calendar app.
Under Notifications, tap Custom.
Depending on your preferences, you can make changes on this screen to turn on or off notifications for alerts, upcoming events, invitations, invitee responses, and shared calendar changes. When you receive a calendar invitation, you can also confirm your attendance by tapping Accept, Decline, or Maybe on the notification itself. Alternatively, you can also locate the request in your notification list, tap it, and respond from there.
Get Siri To Help
One of the best things about Apple Watch ownership is its promise of a somewhat hands-free lifestyle. After all, you get a lot of functionalities, like making changes to your calendar, that you have on your iPhone without having to take it out of your pocket. However, most people still need a finger or two to interact with it, which isn't ideal when you're driving, cooking, or doing any activity that requires two hands.
To take it a step further, you can use Apple's built-in virtual assistant, Siri, for a truly hands-free experience with Raise to Speak. To enable Raise to Speak , simply launch the Settings app on your Apple Watch. Then, select Siri and turn on the Raise to Speak.
Afterward, you can easily ask Siri to make changes to your calendar by saying "Hey Siri" or pressing and holding the digital crown until the indicator appears on the screen. To start with, you can create events by saying "Hey Siri, create a calendar invite with Mike tomorrow at 2 pm." Or, you can even ask Siri what your upcoming event is.
If you prefer ChatGPT on your wrist, instead of Siri, there's also a way you can replace ChatGPT with Siri on your Apple Watch . On the other hand, if you start to regret giving a virtual assistant unfiltered access to your entire life, it's easy to deactivate Siri on your Apple Watch .
Read the original article on SlashGear .

Outside - Countdown Calendar 4+
Widgets, ai planner, organizer, outside hq ltd, designed for ipad.
- 4.7 • 799 Ratings
- Offers In-App Purchases
Screenshots
Description.
THE #1 COUNTDOWN APP. JOIN 50,000+ TODAY. "Tried all others, this is the best" Outside is only free countdown app which lets you add unlimited plans and widgets. Feel organized, productive and excited about everything. From your vacation to your every day routine, Outside is the best way to plan your life. Whether you’re at school, a traveller or simply just trying count the days until your next big event, Outside is the best way look forward to it. We’re a visual calendar made for today that beautiful to look at and easy to use. Add as many widgets as you want across your Home and Lock Screen. At a glance see a gorgeous live timer on your Lock Screen exclusive to Outside. COUNTDOWNS The best way to look forward to what’s next without any restrictions. Make every plan you want a countdown to help you stay organised. WIDGETS With over 10+ styles to choose from, add as many widgets as you want for free. Feel excited at a glance. CALENDAR A clean calendar with all your calendars in one place, easy to manage and use to plan from. AI PLANNER Unique to Outside, you have your own personal AI that will help you discover new things to do or upgrade your plans with new ideas. CUSTOMIZE Choose from millions of wallpapers to make your plans memorable. Even personalize the countdowns to look the way you want. REMINDERS Never forget a plan again with automatic reminders which you can customise however you want. DISCOVER Get unbored by finding unique plans to do from the Outside community and remix it for yourself. YOUR WORLD Perfect for travellers or anyone who wants to see where their plans on, fill the globe with your plans for the best experience. COUNTDOWN TOGETHER Only on Outside, your partner, friends and family can join your plans with a private group chat. We believe it’s important people live a live full of meaningful experiences. We’re sure you do too! Using Outside is a way to break free from the routine, the normal and create the memories you want to look back on. Designed to be used solo or for couples, families and friends. If you’re excited about it, so are we. Download today and always have something to look forward to. Terms of service & privacy policy: https://www.apple.com/legal/internet-services/itunes/dev/stdeula https://outside.so/terms
Version 0.74.0
We're so excited about this major update with an all new feature that's been requested since we started. It's a turning point in the experience and we hope makes Outside much more useful for everyday life. What's new - Introducing the Calendar Tab: Finally see an overview of your week in one place with an inuitive, simple, yet powerful calendar. We believe this take the experience to a new level where you can countdown to what's next but then switch to the Calendar Tab and go in detail. This is the starting point of a major feature planned which will help you plan with the people you care about most. If you want to try it out early, please get in contact. And if you have any feedback on the calendar so far just let us know. - MAJOR performance improvements: Most noticeable for people with busy schedules, the app will faster to navigate and far more efficient. The app is just so much smoother. Ofcourse we've also fixed bugs and improved stability. We hope you enjoy the new calendar view and curious to see what you think.
Ratings and Reviews
799 Ratings
Exactly What I’ve Been Looking For!
I came across a post about this app on Reddit while searching the internet for a free countdown widget. I’ve been searching and searching and couldn’t find anything that was quite what I wanted. Every other app either had super limited options for customization (which were aesthetically unpleasing) or you had to pay for premium to use the widget. I’m SO glad I found this app 🩷
Developer Response ,
Great to hear you found us! Glad to know Outside's helping you with our countdowns. If you have any feedback let us know!
Finally! Free widget!
I’ve downloaded so many apps just to get a countdown widget for free. But apparently that’s hard to find, because every app asked me to pay if I wanted a widget. NOT WITH THIS APP! I can finally add a countdown for my wedding this fall without having to pay for for a subscription! I do wish I could edit the font (type, color, size, etc.), but it’s not a huge deal. Especially considering the price (again, ‘tis free!).
I'm glad you're enjoying the app and our widgets! We've tried to strike a balance between paid and free features so I'm glad we've managed to do that for you! Have an awesome wedding!
Why do developers overcomplicate apps?
All many users want is a simple countdown app that they can see on their homescreen or lockscreen. I was so excited when I first started setting up my timer in your app… Until I got to the mandatory AI screen that promised to offer suggestions and wanted to link all sorts of data and “start exploring”. I immediately deleted the app. I want to be able to look at my phone and see how much longer until my vacation, retirement, etc. I get that there might be people who could use and may even want that optional (intrusive) AI… But at the very least, please offer just a simple basic countdown timer. Thanks
Thank you for the feedback! We added the AI feature to see what peoples reactions would be and we've decided to make this as less of a prominent feature. In the next app update we will be removing it from the main tabs in the app, and then also from the onboarding.
HAPPENING NOW
App privacy.
The developer, Outside HQ LTD , indicated that the app’s privacy practices may include handling of data as described below. For more information, see the developer’s privacy policy .
Data Used to Track You
The following data may be used to track you across apps and websites owned by other companies:
Data Linked to You
The following data may be collected and linked to your identity:
- Contact Info
- Diagnostics
Data Not Linked to You
The following data may be collected but it is not linked to your identity:
- User Content
- Identifiers
Privacy practices may vary, for example, based on the features you use or your age. Learn More
Information
- Outside Pro Annual $19.99
- Lifetime Access $29.99
- Annual Plan $29.99
- Ad supported tier $1.99
- Annual Pro $9.99
- Monthly Plan $4.99
- All Time Pro $9.99
- Outside Pro Monthly $2.99
- Monthly subscription $2.99
- Developer Website
- App Support
- Privacy Policy

Family Sharing
Some in‑app purchases, including subscriptions, may be shareable with your family group when family sharing is enabled., you might also like.
Countdown widget : Day Counter
Countdowns - Event Countdown
Event Countdown - Calendar App
Reminder & Countdown
Widget Studio
IMAGES
VIDEO
COMMENTS
In the Calendar app on your Mac, double-click or force click an event, then click the event's date. (You can also select an event, then use the Touch Bar .) Click the Travel Time pop-up menu, then choose an option. Note: Travel time doesn't update automatically when you change locations. The time to leave is calculated based on the ...
Open the Calendar app and tap the event. Tap Edit on the top right of the Event Details screen. Select Travel Time. Enable the feature on the next screen by moving the slider to green. Select the travel time to your event location. If you entered a location when you created the event, you can enter a starting location.
Tap on the event you'd like to calculate a travel time for or create a new one. Tap on Edit at the top right. Tap on Travel Time. Turn On travel time. Tap on Starting Location and tell Calendar your starting location either by entering an address or the name of a place or business. Tap on Based on location for either driving or walking directions.
Open the Calendar app on your iPhone. Tap at the top of the screen. Add the event details (title, location, travel time, attachments, and so on). Enter the start and end times for the event, then tap Time Zone. Search for a location, tap it, then tap Add. Note: You can edit the time zone of the event later if you need to.
Launch the Calendar app. Tap on the event entry and hit Edit. If the event doesn't have a specified destination, tap Travel Time, pick one of the given time intervals, and skip to step 7 ...
Just open the Calendar app and click/tap the + icon. Or, if you're on Mac, you can also right-click the date that you want to add an event to and choose New Event from the popup menu. Go ahead and add the title, date, and time of your event. If you're not sure how to do this, click here. 2.
Travel Time is a nifty addition to Apple's Calendar app, capable of precisely estimating the duration of your upcoming trip based on parameters such as milage and traffic. Used properly, it can notably ease some of your daily scheduling woes, but paradoxically, a large contingent of regular Calendar users still routinely overlook the feature.
Creating an appointment. Add a new appointment to your iPhone calendar by tapping the plus sign at the top right of the "Calendar" app's interface. Then enter the time and date, a title and the location. By adding the exact address, we enable our iPhone to use Apple Maps data in the background later on.
Once on the event screen, tap on the Edit button to make a couple of modifications. Step 3: On the next screen, scroll down and tap the Travel Time option. Next, tap on the button next to Travel ...
When you create an event (or edit an existing one) in Apple's iOS Calendar, select the Travel Time option for the appointment and tap the button to enable it. The app will automatically ...
In this Calendar guide on how to use Apple Calendar, also known online as iCal, you will learn how to get started using this digital calendar found on your Apple devices. This includes your MacBook calendar, iPhone calendar, iPad calendar, and Apple Watch calendar. Getting started includes learning how to create a calendar on the calendar tool ...
Save my name, email, and website in this browser for the next time I comment. Δ. 15 Useful iPhone Calendar app tips and tricks, 1. Create reminders and set alerts 2. Select your preferred calendar view 3. Create or add a new calendar 4. Control when you want to start the week 5. Open or share files before a meeting...
Go to the "Calendar" dropdown menu and select "Add account". In "Preferences," select the "Accounts" tab and click the "+" sign near the bottom left corner. Either path will take you to a pop-up screen with a list of calendar app providers. You can add as many third-party accounts as you want to Apple Calendar.
All the information you need about an event at your fingertips. When you add the location of your event—like the name of a restaurant—Calendar fills in the address, shows you a map and the weather, and lets you know when it's time to leave. How to add location and travel time to events. To explore the Calendar User Guide, click Table of ...
From Other Apps. The iOS 17 Calendar can now suggest events found in apps like Mail, Messages and Safari to add to your calendar. To enable this, go to Settings > Calendar > Siri & Search and turn on "Show in App". Importing Events. You can also add events to Calendar by importing an ICS file exported from another app.
Using any web browser, go to iCloud.com and log in using your Apple or iCloud ID. For web access to work, your Apple Calendar must be syncing with iCloud. Check on a Mac or mobile device by going ...
The time zone problem Time zones can be confusing, especially if you need to calculate events in Calendar. As Redditor thalassicus notes, Apple's native iOS Calendar app sets (and maintains) calendar events based on the local time of your device.But that means it'll also update any calendar events to the current local time.
To use the Travel Time feature, launch the Calendar app on your Apple Watch. In the upper-right corner, tap the plus (+) button, fill in your event details, and tap Travel Time. In the next ...
Outside is only free countdown app which lets you add unlimited plans and widgets. Feel organized, productive and excited about everything. From your vacation to your every day routine, Outside is the best way to plan your life. Whether you're at school, a traveller or simply just trying count the…