
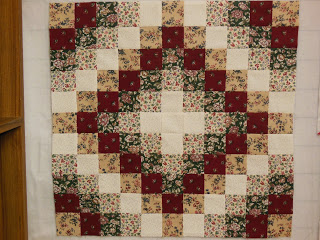
11 Absolutely Stunning Trip Around The World Quilts
If you are looking for an easy, yet gorgeous quilt pattern , the Trip Around the World quilt pattern might just be the perfect pattern for you!
It may look complicated at first, but if you take it one row at a time, it is quite simple to follow the pattern.
Fabric selection is critical as you are creating a layered look beginning in the center of the quilt and moving outward. All the squares are cut the same size, which makes this a great beginner quilt .
We’ve gathered some beautiful examples of this versatile quilt pattern to inspire you to create your very own Trip Around the World quilt.
What's In This Article
1. Buttontree Lane – March is Finishing Month #1

2. Julie Stocker Quilts at Pink Doxies – 4 Blocks In 2 Sewing Sessions

3. Julie Stocker Quilts at Pink Doxies – One Patch Color Theory & Rainbows

4. Quiltville – Trip Around The World ~Helping Katrina~

5 . Quilting Digest – A Striking Trip Around The World Variation

6. Quilting Cubby – Easy Around The World Quilt Pattern

More Related Articles:
25 Stunning Quilt Border Ideas To Inspire You
12 Of The Best Books On Quilting for Beginners
7 Of The Best Quilt Kits For Beginners
7. Aqua Paisley Studio – Tilda Lemon Tree Trip Around the World Quilt

8. The Floral Suitcase – Waddling

9. Cutting Cloth – A Scrappy Trip Around The World

10. Frogma Blogspot – Trip Around The World Quilt Challenge

11. The Next Stitch – Trip Around The World Quilt Pattern

Which Trip Around the World Quilt Do You Like Most?
The Trip Around the World is a great quilt pattern for a beginner quilter or a seasoned professional. As you have seen with these examples, there are no limits to the style and timeless look of this lovely pattern .
Now that you have seen a wide variety of different color variations and examples of this beautiful pattern, I hope you feel inspired and ready to begin your own Trip Around the World quilt. Bon Voyage!

4 thoughts on “11 Absolutely Stunning Trip Around The World Quilts”
how do I order this book
how do i buy your book? email me @ [email protected]
I would love to hsve these patterns.
Could you use 7 squares instead of 11 for a quilt around the world?
Leave a Comment
This site uses Akismet to reduce spam. Learn how your comment data is processed .
Quilts. Tips. Tutorials.

Scrappy Trip Around the World
I managed to take a simple pattern, and make it much more complicated than it needed to be!
That might have been justifiable, if I was simply trying to make a quilt without buying a pattern. However, this pattern has been around long enough, and made by enough quilters and bloggers, that there are many (MANY) free tutorials out there.
I really have no one to blame for this but myself.
But… I took a ton of photos, and I’m not going to let them go to waste. This tutorial will walk you first through my way (with LOTS of photos) and then a quicker version of the tutorial of the way the pattern was originally written.
To make the Scrappy Trip Around the World block, start with 6 strips, 2½ inches by 15½ inches. I made sure all of my sets of scraps included white, and I always placed that strip on one end.

Sew the 6 into pairs, and then the pairs into a strip set.

Up to this point, I’m still on track with the original pattern, but this is where I left the original pattern behind.
Subcut 6 2½ inch units.

Leave unit 1 in place, and slide unit 2 down one square.

Cut open the bottommost seam

and place the unit back, so that the white square is one square down from the white square in unit 1, and place the single square into the empty space above the unit.

Slide unit 3 down 2 squares, so that the white squares continue to line up along the diagonal.

Cut open the seam the separates the squares that are second and third from the bottom. Place the 2 squares into the opening above the remainder of unit 3.

Continue to slide each subsequent unit one square further down than the last, cutting the seam open, and replacing the squares.

Sew the units back together, each seam in my example will sew the black piece to the white piece, and replace in the correct order, making a cascade of while down the diagonal from left to right.

Sew the units into pairs, and the 3 pairs into a Scrappy Trip Around the World block.

The original pattern has you take the strip set from way back at the beginning when you sewed 6 strips together, and fold the set in half, sewing the black strip to the white strip along the remaining free edges, creating a loop.

Then subcut into 6 2½ inch pieces, that are each a little loop.

Cut open each of the 6 loops by cutting apart a different seam. This will give you 6 units, that can be placed in order so that each fabric drops one step along the diagonal, from left to right, just like before.

I found this step difficult to remember which seam I’d already cut, and for that reason, I like my (slightly more complicated) way of doing it better. To each his own, right? It’s the same block either way, just a slightly different way of getting there.
The finished block size is 12 inches, repeat as many times as needed for the number of blocks needed for your quilt, and add necessary borders if desired.
This quilt was part of the 100 Days of Quilting I participated in back in the spring. I had hoped to finish it was part of that project. I got as far as the quilt top completed on the 100 th day. And then summer hit. And it was far too hot to quilt. I’ve also gotten into the bad habit of finishing quilt tops, and then not putting the pieces together to finish the quilt. That’s not like me at all. So this quilt sat, ready for quilting, for a couple of months. And then it sat, in the ready for binding pile for another couple of months. Because if it’s too hot to quilt, it’s certainly too hot to sit with a flannel backed quilt on your lap to get the hand binding done.

Check out that checkerboard border! You’ll see it again soon (and improved!) in a quilt pattern I’m currently writing to sell.

Another finished quilt photo, that shows there is some blue sky in Seattle!
Share this:

- Share on Tumblr

You May Also Like

Flower Boxes Tutorial

Sunset Plaid Quilt Pattern Release

Light and Bright- Star Points
Nice! One of these days I’m actually going to make a quilt. This summer I started repairing an old quilt by re-stitching a bunch of loose appliquéd petals on it. I also found an old partially finished quilt top that my mother in law had worked on years ago – the colours aren’t my favourite, but I may just try to tackle that over the winter…..
You can do it, Jennifer! My goal is to focus on DIY and quilt tutorials, because I want to give everyone the confidence to give it a try. Quilting is just the best hobby, and available to every skill level.
Do all of the blocks need to be of the same fabrics?
I don’t think so. You could do the same six fabrics in each block, for a less scrappy, more uniform quilt. I used dozens of fabrics, my only constant was white on one of the ends of the strip sets, so that wedgie ran down the diagonal of the finished block. But even there, I didn’t use the same white in every block.
The Easiest Trip Around The World Here’s The Layout

While this is the basic pattern, it is possible to make the quilt bigger as you wish. The unfinished quilt top for this design is 17″ square. To make the top larger use the same layout and add more squares. However, if not comfortable yet with the color placement and strip sets, the 17″will be a great start. Chumkie discovered when she looked at the pattern she realized that the design could be divided into four identical units. Then got the idea to try using strip sets and it worked.

Chumkie of Mistress Of Quilts suggests starting first with a mock-up, by coloring the squares on graph paper. This not only shows the layout and color placement but also helps decide the size of the quilt. It’s a good place to start. Almost everyone enjoys a little artwork and it’s fun of designing your own pattern.

The tutorial is very simple and easy to understand.

Give it a try. Use it to make a new and fresh table topper for your home. Any fabric colors are suitable and it’s a quick easy project to have fun with.
Get The Free “Strip Set Trip Around The World” Tutorial Here
Related Posts

Quilting Cubby

- Privacy Policy
- DMCA Policy
- Terms Of Use
- Curation Policy
- Skip to primary navigation
- Skip to main content
- Skip to primary sidebar

- Tips + Tutorials
A Finished Scrappy Trip-Around-the-World Quilt!
Last Modified: April 27, 2023 by Amy · This post may contain affiliate links · This blog generates income via ads · 60 Comments

Someone cue the marching band: another UFO (unfinished object) is complete. Behold the the long-time-WIP (work in progress) Scrappy-Trip-along is finished!

This quilt was started over two years ago . I finally got serious about finishing it this past January when I became determined to start tracking and finishing all those (many, many…many) WIPS.

This is such a fun project – a great way to use up 2 ½″ wide scraps or to just bust through a lot of fabric stash. Bonnie Hunter wrote the original tutorial for this quilt and can be found here on her blog. I used red in every block and made it my center color to give the quilt some unifying design.

One of the reasons I put this WIP away for a while is because the colors weren’t working for me. I just didn’t love it. The trick that gave this quilt new life was adding more non-matchy-matchy fabrics. Some more turquoise, different shades of red for the main diagonals, more ‘sour’ colors including gold, darker shades of green, etc. all made a difference. Picking a “ zinger fabric ” (or two or three or ten, when it’s this scrappy) can give some great life to a quilt.

Since I wanted this to have an old-fashioned, rag-bag, kind-of-look, I had Melissa from Sew Shabby Quilting quilt it with an all-over Baptist Fan design. I love how much it really pops after I washed the quilt.

The binding is also from my stash (*pats self on the back*). I love this bias stripe print. It’s also a couple years old from a Moda collection called Baby Jane. I was originally going to do a red binding, but it making myself stay away from the matchy-matchy-ness I decided to go with mustard/gold. The white stripes kind of lighten it up a lot which gives it a more subtle finish. I think I like it.

I’ve been saving this yardage for a while now to back just the right quilt. This is that quilt. This fabric is an American Jane print by Sandy Klop for Moda from a few years back. I have a fun personal connection to this print (you can read here) , so it’s fun to finally have it on a quilt. I used a few scraps in the quilt blocks too.

I didn’t have quite enough yardage, so I had to piece a back to expand it just a little. Which is hard to really see here since we weren’t getting many great pictures thanks to the wind.

Here’s another “good effort” try at getting a full-body shot of the quilt.

Further proof that the wind had a mind of it’s own.

Which just devolved into to this. I shared a few more outtakes last night on Instagram . (And that is how I learned about the #husbandsholdingquilts hashtag there. It is quite hilarious.) What would we do without our quilt holders?

Share this:
- Click to share on Facebook (Opens in new window)
- Click to share on Pinterest (Opens in new window)
- Click to share on Twitter (Opens in new window)
- Click to print (Opens in new window)
- Click to email a link to a friend (Opens in new window)
More quilts

Reader Interactions
April 7, 2015 at 4:06 am
Awesome quilt finish, Amy. Love the pictures of your quilt holder. What a great sense of humor!
April 7, 2015 at 4:35 am
Amazing quilt. Awesome quilt holding abilities on the part of your hubby. ;
April 7, 2015 at 5:30 am
You did such a wonderful job on this quilt Amy! It is so beautiful! Great fun with the photo shoot too, I see :)!! Loved that you shared the ‘behind scene’ adventure!
April 7, 2015 at 5:32 am
Lovely! And spot on with the quilting, it really compliments the quilt.
April 7, 2015 at 5:34 am
April 7, 2015 at 5:50 am
the quilt looks wonderful and what would we do without our wonderful silly husbands! I always love seeing the mountains in the backgrounds – I don’t think we will get to Utah until fall this year – we will be going to the Zion NP area
April 7, 2015 at 2:27 pm
Oh, that’s awesome. We love Zion NP! And fall is my favorite time there.
April 7, 2015 at 6:02 am
Wow that is a beauty and a true test of your fortitude! Really lovely color work, my heart sings when I see such scrappy beauties. Thank you for sharing – so inspiring.
April 7, 2015 at 6:11 am
It’s beautiful Amy — I love it!!!
April 7, 2015 at 6:15 am
Love your quilt and your quilt holder too. I think the scrappy trips us best with that constant color through the centers.
April 7, 2015 at 6:23 am
Wonderful! I love the scrappiness. You have inspired me to pull mine from the bottom of that unfinished pile and get busy. And Baptist fan quilting really works for this one. Great job,
April 7, 2015 at 6:43 am
Another excellent finish…and post! I love that you brought a bit of continuity to it with the red. It really works and helps the eye. I laughed out loud last night when you posted the windy fun on Instagram. This morning I’m sharing these with my husband and he left for work laughing…which is a very good thing! Thanks.
April 7, 2015 at 2:28 pm
Haha! That’s great. 🙂
April 7, 2015 at 6:45 am
Great quilt! Thank for all the pictures.
April 7, 2015 at 6:48 am
Kudos to the quilt holder (and to the quilter too!) – this is a great finish!
April 7, 2015 at 6:54 am
Absolutely lovely!! I would need lots of patience working with all those 2 1/2 squares. I have been studying how you chose the placement of your fabric. Looks like it would be a great winter project. You’re such an inspiration to all quilters. I find myself checking my email to see if you have posted. Thanks so much! I’m addicted!
April 7, 2015 at 2:29 pm
Aww, thank you. That’s so nice!
April 7, 2015 at 7:02 am
I love how it turned out!
April 7, 2015 at 7:32 am
I see spring winds have hit your part of the country too. Love you scrappy quilt.
Wonderful finish. Stash fabrics, scraps, and a completed UFO, has to feel amazing.
April 7, 2015 at 7:40 am
I love how your quilt looks. For some reason I’ve been intimidate by the Scrappy Trip instructions but your quilt makes me want to try!
April 7, 2015 at 2:17 pm
I would just try a block – it’s one of those things that makes more sense once you actually do it. And after you’ve tried one, they get easier and easier after that.
April 7, 2015 at 8:29 am
I just love this quilt Amy! I am motivated to start one now…….your husband has wonderful quilt holding skills;)! Blessings to you today.
April 7, 2015 at 8:31 am
This is a perfect quilt, and in my opinion, exactly what quilting is all about! Congratulations on a beautiful finish.
April 7, 2015 at 9:47 am
Love, love, love your scrappy quilt; it’s beautiful! Great post, lovely photos!
April 7, 2015 at 10:21 am
I love this quilt! Reminds me of several family quilts my mom and grandmother made many years ago. The backing is beautifully modern! Love the entire project.
April 7, 2015 at 10:48 am
Great finish and ‘holder’ shots. I am very intrigued by your inclusion of the term ‘sour’ colour choices. Would have never thought to phrase them as that! I look forward to seeing more of your UFO’s being checked off the list. Quilt On!
April 7, 2015 at 2:01 pm
I Love everything about this quilt!
April 7, 2015 at 2:53 pm
Wow! It is wonderful. I’ve been wanting to make one of these since they started surfacing on the internet, but can’t say I’ve even started. I have finished other projects though 🙂 You are inspiring! Way to go!
April 7, 2015 at 3:42 pm
Okay so on top of loving the quilt, love the orange peel pillow. Di d you make it or buy it… where did you get it?
April 7, 2015 at 10:05 pm
Bought it. At a store in Utah called Down to Earth at Gardner Village. I love it too. 😉
April 7, 2015 at 4:28 pm
I’ve a TATW quilt on my mental quilt to do list and I like the rawness of yours and the descriptions, especially the non matchy matchy and sour references to the fabrics. I am still learning about colours and quilting in general so I might sit on the thought for a little while longer so it doesn’t just become a UFO. I’d like it to tell a story of my quilting journey, Perhaps I could include a block from scraps of the quilts I have created… hmm… might be a nice way to mark the end of my first quilting decade… now that’s a thought! thank you for that (and for letting me think aloud on your blog!)
April 7, 2015 at 10:04 pm
I love the idea of it documenting your quilting journey! What a great idea.
April 7, 2015 at 4:35 pm
Wow – you got some great pictures after all! And it’s such a fabulous quilt in person too… Thanks for introducing me to #husbandsholdingquilts – Hilarious! You are so talented, and so amazing, and I just love you (and your quilts).
April 7, 2015 at 10:03 pm
Love you too my friend!
April 7, 2015 at 6:43 pm
I love how it turned out!! The bright red really ties all that scrappy goodness together without overwhelming it. You have a great eye for color!!
April 7, 2015 at 9:36 pm
This is so fabulous! I really like the red. Good for you for finishing. I made one of these with grey as my constant fabric ; )
April 7, 2015 at 11:17 pm
You really made it work, Amy! I love everything about your perfect quilt, including the Baptist Fan quilting! Thanks for sharing the link to the original tutorial.
April 8, 2015 at 2:52 am
The quilt is great and I LOVE the back.
April 8, 2015 at 4:43 am
It is gorgeous!!!!!!!!!!!!!!!!!!!!!!!!!!
April 8, 2015 at 5:31 am
Love the whole thing. Your quilt,the fence, the mountains, green grass(none here in Maine yet), your sweet husband to pose for you :). Everything was just darling Amy.
April 8, 2015 at 5:56 am
Love , love your quilt Amy! Dumb question…after reading the pattern where do you place the red fabrics in your sewn rectangle in order to get your look?
April 8, 2015 at 3:46 pm
I kept the red blocks in a diagonal line down the center of the block. That way they were consistent across all blocks.
April 8, 2015 at 6:10 am
Gorgeous, like all of your quilts, Amy. Double pat on the back for another WIP wrapped up. You go! And love the new #husbandholdingquilt hashtag, too. So fun!
Using the red that way was so smart (no pun intended..) It gives the eye somewhere to rest and adds a lot of visual interest. It’s a great quilt!
April 8, 2015 at 6:27 am
I LOVE, LOVE, LOVE THIS quilt! The old-fashioned, scrappy ones are my favorites, and this one really fits that bill. I’ve heard this particular pattern called Many Trips Around the World. I made a Trip Around the World (using 30s repro fabs) that began in the center and continued with concentric trips to the outer edge of the quilt. That was 15 years ago, and I think it’s time I tried a Many Trips. Thanks for your always-inspiring, you-can-do-it attitude.
April 8, 2015 at 3:47 pm
Old fashioned, scrappy are my favorite too. And you’re right, technically it’s Many Trips. I bet a single Trip around the World in 30’s fabrics is fantastic!
April 8, 2015 at 9:32 am
In another post about this quilt I think I remember you saying you were “going for ugly” when you weren’t pleased with how all the colors were coordinating, but your scrappy quilt is what I adore about quilting! As a finished quilt every piece appears perfectly placed. True “scrappy” is a talent I long to develop, I’m grateful for your inspiration. Love that binding too 🙂
April 8, 2015 at 10:48 am
BEAUTIFUL! I understand why it was a WIP for a while. Worth the patience! Wish I had just a little of your talent… Keep the quilt holder…he does add a lot to the picture!
April 8, 2015 at 1:13 pm
This is one gorgeous scrappy trip around the world!! I don’t even have the right words to tell you how much I love this quilt. What a beauty.
April 8, 2015 at 2:50 pm
April 8, 2015 at 3:58 pm
I remember when you first posted about that backing fabric. I can’t believe that was three years ago! I love the windy quilt photos. Very real!
April 9, 2015 at 2:13 pm
I can’t believe it either!!
April 8, 2015 at 5:35 pm
I love your quilt – the scrappiness is perfect and using the red to unify everything was a brilliant move!! Love your pictures too – your husband is a good sport!!
April 8, 2015 at 6:23 pm
Your quilt is irresistable! I love your selections of colors. I’m so glad you finished it so we could see it!
April 8, 2015 at 7:18 pm
I love your style, you have a good eye for color. The pic.s are fun and fabulous too. Keep it up!!!!
April 9, 2015 at 11:09 am
Such a wonderful finish Amy! Thank you for all the great color/fabric-choice tips. I’m new to quilting and really appreciate all the lessons you are willing to share! Thanks!
April 9, 2015 at 12:27 pm
Love your scrappy trip quilt….and I really like the deliberate placement of the red fabrics…gives just the right amount of structure to the blocks while still keeping the entire quilt scrappy! Beautiful finish!!
April 14, 2015 at 5:50 am
My favorite Scrappy Trip so far. Nice job. The red unifies everything so well!
January 26, 2024 at 11:55 am
This quilt is absolutely gorgeous! 😍
Leave a Reply Cancel reply
This site uses Akismet to reduce spam. Learn how your comment data is processed .
- Loyalty Program
- Email Subscription
- Shopping Cart (0)
- FREE US SHIPPING ON ORDERS OVER $75!
- MY ACCOUNT SIGN IN SIGN OUT
- Quilt Kits For Every Season & Holiday
- Quilting Kit Themes
- Patriotic Kits

Trip Around The World Quilt Kit - America the Beautiful
This Trip Around the World Quilt in America the Beautiful fabrics by Moda features the clean lines of the classic quilt design which makes this beginner-friendly quilt a joy to sew. The design stays true to its vintage-inspired origins and makes a visually striking red, white and blue focal point in your home! You'll be proud to display this timeless quilt all summer long! Quilt finishes to approximately 67-1/2" x 79-1/2".
This is a wonderful example of a Quilt of Valor®, which represents a “thank you for your service and sacrifice in serving our nation.” Makes a great gift for Service Members and Veterans who have been touched by war. Quilts of Valor® reflect the best possible workmanship and use of quality materials. This Kit Includes:
- All Fabrics for Top, Borders, and Binding
- FREE US Shipping
Although it appears complicated, it is made with simple piecing techniques and is a great quilt for all skill levels! Don't forget to add the perfectly coordinated backing in the add-ons below!

To order 1/2 yard, enter 0.5
- May We Suggest
- Full Description

Trip Around The World Quilt Kit - America the Beautiful Backing 5 Yards

Creative Grids 6-1/2" x 24-1/2" Ruler - #CGR24 Oversize shipping charges apply, click into product for details.

Creative Grids 4-1/2" x 8-1/2" Ruler - #CGR48

Creative Grids 9" Seam Guide Tool - #CGRSMN9

Kai Embroidery Scissors

Olfa Splash 45mm Rotary Cutter - Navy

Creative Grids 3-1/2" Square Ruler - #CGR3

Olfa Spinning Rotary Mat 12" x 12" Oversize shipping charges apply, click into product for details.

Wool Pressing Mat - 14" x 14" Oversize shipping charges apply, click into product for details.

Folded Star Hot Pad Kit - America the Beautiful - White Stars

Folded Star Hot Pad Kit - America the Beautiful - White Flags
Products Used: Konfetti Thread - KT101 Soft White - High-quality cotton thread for sewing your quilt. Star Singles 3" Half Square Triangle Paper - Perfect for easily making half-square triangles. Creative Grids 6-1/2" x 24-1/2" Ruler - Perfect for longer cuts. Creative Grids 4-1/2" x 8-1/2" Ruler - Great for smaller cuts. Creative Grids 3-1/2" Square Ruler - Very useful for squaring up half-square triangles and 4 patch blocks. Olfa Spinning Rotary Mat - 12" x 12" - Extremely helpful for rotating your blocks when squaring up without moving your ruler. Creative Grids 9" Seam Guide Tool - Great for marking lines when creating half-square triangle blocks. Frixion Clicker Pen - Perfect for marking cut and sewing lines. Kai Embroidery Scissors - Great for precise trimming of fabrics and threads. Clover Magnetic Pin Caddy - Extremely helpful for keeping your pins secure in one spot. Clover Patchwork Pins - Great for keeping fabrics in place when sewing. Olfa Splash Rotary Cutter - Navy - Great for quickly and accurately cutting fabrics. Clover Seam Ripper - Extremely useful for "un-sewing" seams. Schmetz Topstitch Needles - Size 80/12 - 5ct - Perfect size needle for machine stitching your quilt. Olfa 45mm Rotary Blade Replacement - 1 pack - A great option for those who don't go through rotary blades as quickly. Make sure to use fresh rotary blades for precise cuts. Olfa 45mm Rotary Blade Replacement - 5 pack - Perfect for those who need fresh rotary blades frequently. Make sure to use fresh rotary blades for precise cuts. Wool Pressing Mat - 14" x 14" - Perfect for pressing fabrics. Panasonic 360° Freestyle Cordless Iron - Metallic Blue - Very useful for portable pressing.

Added to Cart
You may also like..., product download agreement.
By clicking "Accept" below, I agree to the following terms and conditions:
- Purchasing this product allows me ONE download attempt - I understand that I MUST complete the download once I start it. After the download is completed, the link to download the file will become inactive.
- I understand that I will have 14 days from purchase to download this pattern . After the 14 days are up, the link to download the file will become inactive.
- I acknowledge that this pattern is copyrighted. I understand that I may not reproduce, modify, sell, or otherwise distribute this pattern.
- You must accept the license agreement to continue.
Item Name Here
Notify me when available.
Please enter your phone number below and click CONFIRM to receive a notification from Shabby Fabrics when this item is available for purchase.

Please ensure your phone number is correct!
* Message and data rates may apply. Text HELP to 24608 for help or contact us here . STOP to 24608 to cancel. Message frequecy varies. Carriers are not liable for delayed or undelivered messages.
We'll be in touch soon!
Thank you. We've received your information.

RPQ PATTERN STORE

Red Pepper Quilts - ETSY STORE

Search This Blog
Quilt gallery.
- 2021 FINISHED QUILTS
- 2020 FINISHED QUILTS
- 2019 FINISHED QUILTS
- 2018 FINISHED QUILTS
- 2017 FINISHED QUILTS
- 2016 FINISHED QUILTS
- 2015 FINISHED QUILTS
- 2014 FINISHED QUILTS
- 2013 FINISHED QUILTS
- 2012 FINISHED QUILTS
- 2011 FINISHED QUILTS
- 2010 FINISHED QUILTS
- 2009 FINISHED QUILTS
Follow RPQ on Instagram

Wednesday, October 11, 2017
Many trips around the world quilt.

13 comments:
sweet! the backing makes it absolutely delicious!
Are the instructions for adding the “extra trip” in your pattern in you shop?
Hi Pat - thank you for stopping by! The Scrappy Day Trip Quilt Pattern (pdf file) does not include instructions for the "extra trip". The concept is however the same - the Scrappy Day Trip Quilt is also block based, and each "block" is strip pieced and constructed as far as that is possible, before laying out and sewing the quilt top together. Rita

Magic! Love it!
Just one word.... beautiful!!
Do you explain in your PDF pattern how to sew this together without having to sew it in long diagonal strips? You made reference to adjusting the pattern so that you were able to work on one block at a time. I have looked closely at your white squares to see if they were made of triangles but I'm not seeing that. How did you do it? Thanking you in advance. I do just love this quilt and would love to make it also.
Hi Maxine - the Scrappy Day Trip Quilt Pattern is not sewn in long diagonal rows. Instead it is a block based design with partial construction of each block - some of which is strip pieced. All patchwork pieces are squares (no triangles). I hope that is helpful? Rita

Wow! This is one of your most beautiful quilts!! Well done. Those little pops of black are just the right touch.

I love this quilt. I can see some of the new fabrics too. Well done Rita
What a beautiful quilt............thanks for sharing !

Simply so beautiful. Thank you for sharing and the inspiration! ♡
Thanks Rita for explaining. I'll buy your Scrappy Day Trip Pattern. I think I'm imagining how to do it, but I'll purchase the pattern, just so I know for sure. You have a wonderful sense of color. Thanks for sharing.

It's beautiful!
Thank you for stopping by and leaving a comment! I really appreciate it. Comments are published after review. Feel free to ask questions and I will answer either here or by email, as is appropriate.
Featured Post
Economy block quilt in progress & tutorial.

BUY THE PATTERN

ALL ABOUT BINDING


- Long arm details
- Bag Making Supplies
- Digital Pantographs
- Handmade Items
- Self-print Pantographs
- Beginner Quilt Photography
- Duffel Master
- Quilt Mockup Magic
Bonnie and Camille Trip Around the World Quilt
- Finished Quilts
- Bonnie and Camille Trip Around the World Quilt
This is one of the most fun quilts you can make!
Have you ever made a Trip Around the World quilt? I feel like most everyone has at this point, but it was still a revelation to me. It was so fast, fun, and SATISFYING!

The OG (original) name of this quilt pattern is “Many Trips Around the World”, which has been adapted by Bonnie Hunter of Quiltville to use a t ube strip piecing method for increased speed of construction. It’s so fun, and you feel very clever for using such an amazing time-saving trick. You should really go check it out if you haven’t already!

Somewhere in my Scrappy Trip journey, I saw a beautiful version made by Alli of Woodberry Way. I liked how her blocks came together and formed one uninterrupted line of darker fabrics (rather than a clump of four dark blocks as in other quilts that I had seen).

Then Alli’s post lead me to Cynthia’s version of the quilt , where she shared a tutorial on her pressing technique in order to get all seams to nest. Yes please!! #nopinsforlife

For this quilt, I used the Handmade collection from Bonnie and Camille. The colours are so vibrant, and there a nice number of black prints. Perfect for this design!

I quilted it by stitching in the ditch next to all the blocks, which gives the quilt a nice drape and a beautiful grid effect on the back. I would say that this is somewhat of an advanced technique, but is made so much easier with a ditch stitching foot for your sewing machine. Having the right tools makes all the difference!

Photographing red fabric is quite a challenge, but I hope I can convey the depth and beauty of the colours. It’s a real stunner. 🙂

This quilt measures 39″ x 54″ and is listed in my Etsy shop . The full details can be found at the quilt’s listing page.
Update: This quilt has now sold, but other listings can be viewed by visiting my Etsy shop . Please contact me if you would like me to create something similar for you or someone you love!
Thanks as always for stopping by!

Want to receive my WILDLY popular newsletter?
Sign up and you'll get:
- My Three Things Thursday newsletter
- Links to new blog posts - never miss an update
- Early access to sales and exclusive discounts!

Little Household Additions For Long-Lasting Happiness
- Cookware & Bakeware
- Food Storage Solutions
- Kitchen Furniture & Decor
- Kitchen Gadgets & Utensils
- Kitchen Renovation Ideas
- Small Kitchen Appliances
- Bathroom Accessories
- Bathroom Fixtures
- Bathroom Furniture
- Bedroom Furniture
- Kitchen Furniture
- Living Room Furniture
- Office Furniture
- Outdoor Furniture
- Interior Design Trends
- Space-Saving Solutions
- Garden Tools & Equipment
- Home DIY & Maintenance
- Landscaping Ideas
- Outdoor Entertaining
- Outdoor Lighting
- Outdoor Recreation & Activities
- Outdoor Structures
- Patio & Deck Designs
- Pet & Wildlife Care
- Plant Care & Gardening Tips
- Pool & Spa Care
- Seasonal & Event Decor
- Energy-Efficient Appliances
- Home Entertainment Systems
- Home Office Tech
- Latest Tech Trends in Home Improvement
- Security & Surveillance
- Smart Home Devices
- DIY Projects & Ideas
- Flooring & Tiling
- Home Renovation Guides
- Painting & Decorating
- Plumbing & Electrical
- Tools & Equipment
- Appliance Maintenance & Repair
- Bathroom Appliances
- Cleaning Appliances
- Heating & Cooling
- Home Automation Appliances
- Kitchen Appliances
- Laundry Appliances
- Lighting Appliances
- Other Appliances
- Air Quality & Filtration
- Ergonomic Home Solutions
- Family & Pet-Friendly Home Design
- Healthy Home Cooking
- Home Fitness Equipment
- Mindfulness & Relaxation Spaces
- Building Materials
- Construction Techniques
- Electrical and Plumbing Systems
- Hand & Power Tools
- Professional Contractor Advice
- Safety Gear & Equipment
- Worksite Management
- Energy-Saving Tips
- Home Insulation & Ventilation
- Solar Power Solutions
- Child & Elderly Safety at Home
- Emergency Preparedness
- Home Maintenance Checklists
- Pest Control Solutions
- Safety Equipment & Products
- Seasonal Home Care
- Budgeting & Planning Guides
- Buying Guides
- How-To Guides
- Maintenance & Care Guides
- Product Reviews
- Style & Inspiration Guides
- Bathroom Storage Ideas
- Closet & Wardrobe Organization
- Decluttering Tips & Tricks
- Garage Storage Solutions
- Kitchen Organizing Tools
- Living Room Organization
- Office & Desk Organizers
- Eco-Friendly Products
- Home Hacks & Tips
- Personalized Home Decor
- Seasonal & Holiday Decor
- Specialized Home Improvement Topics
- Unique Home Solutions
- How to Store
Home > Articles > How To Make A Trip Around The World Quilt

How To Make A Trip Around The World Quilt
Modified: February 24, 2024
Written by: Alexander Johnson
Learn how to make a stunning trip around the world quilt with our informative articles. Get step-by-step instructions and expert tips to create your own masterpiece.
(Many of the links in this article redirect to a specific reviewed product. Your purchase of these products through affiliate links helps to generate commission for Storables.com, at no extra cost. Learn more )
- Introduction
Welcome to the wonderful world of quilting! If you have a passion for travel and a love for quilting, then creating a trip around the world quilt is the perfect project for you. This quilt design captures the essence of adventure and allows you to showcase your favorite destinations from around the globe in a beautiful and meaningful way.
Whether you are a beginner or an experienced quilter, making a trip around the world quilt is a rewarding and enjoyable endeavor. Not only does it offer a creative outlet to express your wanderlust, but it also serves as a timeless piece of home decor or a thoughtful gift for a fellow travel enthusiast.
In this article, we will guide you through the step-by-step process of creating your very own trip around the world quilt. From choosing the fabrics to quilting the layers, we will provide you with all the information you need to bring this stunning quilt to life.
So, gather your sewing supplies, put on your explorer’s hat, and let’s embark on this quilting adventure together!
Key Takeaways:
- Embark on a quilting adventure by creating a trip around the world quilt, showcasing your love for travel and diverse cultures through vibrant fabrics and meticulous stitching.
- From choosing fabrics to binding the edges, crafting a trip around the world quilt is a rewarding journey that celebrates wanderlust and creativity, resulting in a timeless and meaningful masterpiece.
Read more : What Is The World’s Largest Swimming Pool
- Materials Needed
Before diving into the quilting process, gather the following materials:
- Cotton or quilting fabric in various colors for the world map
- Background fabric for the quilt top
- Fabric for the quilt backing
- Fabric for the binding
- Batting: A piece of quilt batting that is slightly larger than your desired quilt size
- Thread: High-quality thread in coordinating colors
- Cutting tools: Rotary cutter, cutting mat, and ruler
- Sewing machine: A reliable sewing machine capable of quilting
- Pins or clips: To secure fabric layers during quilting
- Iron and ironing board: For pressing fabric and seams
- Scissors: For trimming threads and cutting fabric
- Quilting gloves or grip aids: Optional, but helpful for maneuvering large quilt layers
- Quilting needles: Needles specifically designed for quilting
- Quilting hoop or frame: Optional, for hand quilting
- Ruler or template: For creating precise fabric cuts
- Pencil or fabric marker: To mark quilting guidelines or placement
Make sure to gather all the materials before starting your project to ensure a smooth and efficient quilting experience.
- Step 1: Choosing Fabrics
One of the most exciting parts of creating a trip around the world quilt is selecting the fabrics that will represent different countries or regions on the world map. Here are a few tips to help you choose the perfect fabrics:
- Consider the Theme: Decide on the overall color theme for your quilt. You can opt for a vibrant and colorful palette that reflects the diversity of cultures around the world or choose a more subdued and monochromatic theme for a subtle and sophisticated look.
- Research World Maps: Look for inspiration by studying different world maps online or in travel books. Observe the colors used for different continents or countries and use them as a reference for your fabric selection.
- Coordinate Colors: Choose fabrics that work well together and create a harmonious color scheme. Consider using complementary colors or different shades of the same color to add depth and interest to your quilt.
- Prints and Patterns: Mix and match prints and patterns to add texture and variety to your quilt. Consider using fabrics with geometric patterns, floral motifs, or even prints that feature iconic landmarks or symbols associated with different countries.
- Fabric Types: Opt for high-quality cotton or quilting fabric that is easy to work with and durable. Avoid fabrics that are too thick or stiff, as they may be challenging to quilt.
Remember, there are no strict rules when it comes to choosing fabrics for your trip around the world quilt. It’s all about personal preference and creativity, so have fun experimenting with different combinations until you find the perfect mix that captures the spirit of your global adventure.
- Step 2: Creating the World Map Block
Now that you have selected your fabrics, it’s time to create the world map block for your quilt. Follow these steps to bring the world to life:
- Print or Draw a Template: Find a template of a world map that is the size you desire for your quilt block. You can search online or use a world map stencil to trace the outline onto paper or cardboard.
- Cut Fabric Pieces: Using the template as a guide, cut out the continents and countries from your chosen fabrics. You can either trace the template directly onto the fabric or use the template as a guide while cutting.
- Arrange and Pin: Lay out the fabric pieces on your background fabric, positioning them to create a cohesive world map design. Once you are satisfied with the arrangement, pin the pieces in place to secure them.
- Sew the Appliqué: Using a small and tight zigzag stitch or a blanket stitch on your sewing machine, appliqué the fabric pieces onto the background fabric. Be sure to stitch close to the edges of the fabric to securely attach them.
- Optional Embellishments: If desired, you can add additional details or embellishments to your world map block. This can include embroidery to mark major cities or national borders, or even using fabric markers to add small icons or symbols to represent famous landmarks.
- Repeat for Multiple Blocks: If you are making a larger quilt with multiple world map blocks , repeat the above steps for each block, ensuring consistency in fabric selection and placement.
Creating the world map block is a crucial step in designing your trip around the world quilt. Take your time with this process to ensure accuracy and precision in representing the countries and continents that hold significance for you.
- Step 3: Piecing the Quilt Top
With the world map block complete, it’s time to piece the quilt top together . This step involves arranging and sewing together the blocks and other fabric pieces to form the overall design of your trip around the world quilt. Follow these steps to create a stunning quilt top:
- Layout Design: Determine the layout of your quilt top by arranging the world map blocks and any additional fabric pieces, such as borders or sashing. Consider the size and orientation of each block, and how they fit together to create a visually pleasing composition.
- Organize and Label: As you finalize the layout, make sure to label each block or section to keep track of their positioning. This will help you maintain the desired arrangement as you begin piecing them together.
- Join Blocks: Start by sewing the blocks together using a ¼ inch seam allowance. Pin or clip the blocks together to ensure they align properly before sewing. Press the seams open or to one side, according to your preference.
- Add Borders or Sashing: If desired, add borders or sashing to frame the world map blocks and create a cohesive look. Measure and cut the fabric pieces for the borders, ensuring they fit correctly with the dimensions of your quilt top.
- Sew Borders or Sashing: Sew the borders or sashing strips to the edges of the quilt top, making sure they are aligned and the quilt top remains square. Press the seams open or to one side.
- Trim and Square: Once the quilt top is fully pieced, trim any excess fabric or uneven edges to ensure a clean and square top. Use a rotary cutter and ruler to make precise cuts.
Piecing the quilt top is an exciting stage as you start seeing your trip around the world quilt take shape. Be patient and pay attention to detail to create a quilt top that reflects your vision and design choices.
When making a trip around the world quilt, consider using a variety of fabrics to represent different countries or regions. This will add visual interest and diversity to your quilt.
Read more : How To Make A Quilt
- Step 4: Adding Borders
Adding borders to your trip around the world quilt not only enhances its visual appeal but also provides structure and framing to the overall design. Follow these steps to add borders to your quilt top:
- Measure and Cut Borders: Measure the length of each side of your quilt top to determine the dimensions of the borders. Cut fabric strips for the borders according to your preferred width. Keep in mind that wider borders can add a bold and impactful look, while narrower borders provide a more delicate touch.
- Pin or Clip Borders: Align one border strip with one side of the quilt top, right sides together. Pin or clip the border to the quilt top, ensuring the edges are even and the corners match perfectly. Repeat this process for the remaining sides.
- Sew Borders: Using a ¼ inch seam allowance, sew the borders to the quilt top, removing the pins or clips as you go. Press the seam allowances towards the borders to reduce bulk.
- Measure and Cut Border Corners: Measure the width of the quilt top with the attached borders. Cut four squares of fabric to create mitered corners. The size of the squares will depend on the desired finished corner size.
- Attach Border Corners: Fold each square in half diagonally to create a triangle. Match the raw edges of the triangles with the raw edges of the borders, aligning the edges of the quilt top and the border. Sew the triangles in place and press the seam allowances open or towards the corners.
- Trim Excess Fabric: Once the borders and corners are attached, trim any excess fabric and square up the quilt to ensure neat and straight edges.
Adding borders to your quilt not only completes the look but also provides an opportunity to incorporate contrasting or coordinating fabrics that enhance the overall design. Take your time to align the borders accurately and sew them with precision to achieve a professional finish.
- Step 5: Quilting the Layers
Quilting is the process of stitching the layers of your trip around the world quilt together, adding both structural stability and decorative detail. Follow these steps to quilt the layers:
- Prepare the Layers: Layer the quilt top, batting, and backing fabric together, starting with the quilt top facing up, followed by the batting, and then the backing fabric facing down. Smooth out any wrinkles or creases.
- Basting: Baste the layers together to hold them in place during quilting. You can use safety pins or temporary adhesive spray to secure the layers, ensuring minimal shifting or puckering as you quilt.
- Quilting Method: Choose a quilting method that suits your preferences and quilting experience. Options include hand quilting, machine quilting, or a combination of both. Select a quilting design that complements the theme and style of your trip around the world quilt.
- Quilting Stitches: Use quality quilting thread and needles appropriate for your chosen method. Ensure your tension is balanced, and practice on scrap fabric before quilting on your actual quilt.
- Quilting Patterns: Consider different quilting patterns such as straight lines, free-motion quilting, or custom designs that follow the contours of the world map blocks. Play with different stitch lengths and patterns to add texture and dimension to your quilt.
- Work in Sections: Depending on the size of your quilt, you may find it easier to quilt in sections rather than tackling the entire quilt at once. Start quilting from the center and work your way out to minimize the risk of puckering or distortion.
- Finishing Touches: As you quilt, periodically check the back of your quilt for any puckers or tucks. Smooth out any issues by gently tugging on the layers and adjusting the tension. Trim any excess batting or backing fabric as needed.
Quilting the layers brings your trip around the world quilt to life while providing structural integrity. Take your time with the quilting process, enjoying the journey as you add beautiful stitching to your creation.
- Step 6: Binding the Edges
The final step in completing your trip around the world quilt is binding the edges. Binding not only gives a polished and finished look to your quilt but also ensures that the layers remain securely together. Follow these steps to bind the edges of your quilt:
- Prepare the Binding: Cut fabric strips for the binding, ensuring they are long enough to cover each edge of your quilt. The width of the strips can vary depending on your preference and the desired finished look.
- Join the Binding Strips: If needed, join the fabric strips together using diagonal seams to create one continuous binding strip. Press the seam allowances open for a neater finish.
- Trim and Fold: Trim the excess batting and backing fabric so that they align with the edge of the quilt top. Fold the binding strip in half lengthwise, wrong sides together, and press it to create a crisp crease.
- Attach the Binding: Starting on one side of the quilt, align the raw edges of the binding strip with the raw edge of the quilt top. Leave a tail of about 6 inches and begin stitching with a ¼ inch seam allowance. Sew the binding strip in place, mitering the corners as you go.
- Finishing the Binding: When you reach the starting point, overlap the ends of the binding strip and trim the excess, ensuring a snug fit. Fold the binding over to the back of the quilt and hand stitch it in place using a blind stitch or a decorative stitch.
- Final Press and Inspection: Once the binding is securely stitched, give your quilt a final press with an iron, ensuring the binding lies flat and the quilt is smooth. Inspect the quilt for any loose threads or imperfections, and trim them as needed.
Binding is the finishing touch that adds durability and a professional touch to your trip around the world quilt. Take your time to sew the binding carefully and accurately, ensuring that the corners are neat and the stitches are invisible on the back of the quilt.
Congratulations! You have successfully completed making your own trip around the world quilt. This quilt not only showcases your love for travel but also serves as a beautiful and meaningful piece of art that can be cherished for years to come.
Throughout this journey, you have learned how to choose fabrics that reflect different countries and regions, create a world map block, piece the quilt top together, add borders for structure, quilt the layers, and finally, bind the edges to give it a finished look.
The process of making a trip around the world quilt requires patience, creativity, and attention to detail, but the end result is a truly unique and personalized masterpiece. Your quilt tells a story of adventure, wanderlust, and the beauty of diversity across the globe.
Remember, quilting is not just about the final product; it’s also about the joy and satisfaction that comes with the creative process. Take pride in your accomplishment and share your quilt with friends and family, who will surely appreciate the time, effort, and love that went into making it.
Now that you have completed your trip around the world quilt, you can continue to explore new quilting projects and techniques, fueling your passion for both quilting and travel. Let your creativity soar as you embark on your next quilting adventure, creating beautiful pieces that reflect the world—and your own unique story—one stitch at a time.
- Frequently Asked Questions about How To Make A Trip Around The World Quilt
Was this page helpful?
At Storables.com , we guarantee accurate and reliable information. Our content, validated by Expert Board Contributors , is crafted following stringent Editorial Policies . We're committed to providing you with well-researched, expert-backed insights for all your informational needs.
0 thoughts on “ How To Make A Trip Around The World Quilt ”
Leave a comment cancel reply.
Your email address will not be published. Required fields are marked *
How To Organize Your Office Desk
How to level a bathtub already installed, how to set up a cat litter box, how to decorate around bathtub, how to get rid of bugs on mums, related post.

By: Ethan Hayes • Articles

By: Oliver Mitchell • Articles

By: Sophia Turner • Articles

By: Emily Roberts • Articles

By: Isabella Mitchell • Articles

By: Lily Evans • Articles

By: Daniel Carter • Articles

By: Chloe Davis • Articles

By: Sophie Thompson • Articles
Please accept our Privacy Policy.
STORABLES.COM uses cookies to improve your experience and to show you personalized ads. Please review our privacy policy by clicking here .
- Privacy Overview
- Strictly Necessary Cookies
This website uses cookies so that we can provide you with the best user experience possible. Cookie information is stored in your browser and performs functions such as recognising you when you return to our website and helping our team to understand which sections of the website you find most interesting and useful.
Strictly Necessary Cookie should be enabled at all times so that we can save your preferences for cookie settings.
If you disable this cookie, we will not be able to save your preferences. This means that every time you visit this website you will need to enable or disable cookies again.
- https://storables.com/articles/how-to-make-a-trip-around-the-world-quilt/
- Trip Around The World Quilt
Trip Around The World Quilt an incredible job with a different touch that should be done calmly and that has a very stylish and modern result that many will love. In the decoration of the room this bedspread can leave the atmosphere cheerful and stylish, in addition to being very beautiful and charming. It is worth making pieces of this type that make us proud of our craftsmanship skills. The colors of your quilt will depend on your taste, keep this in mind as it is important.
Choose your fabric according to the decoration of the room you want to place it, this way everything is easier because it will match anything. Practice, this type of quilt leaves the house always well prepared to receive your visits, which helps a lot. It is an excellent product option for sales because it is a different piece and requires time to be made.
Certainly when doing your job you usually have a lot of doubts about how it is the best way to do a perfect job, we know what it’s like to have these doubts. But with love and patience it is possible to do incredible jobs and with wonderful charm. Thank you for visiting our website. We always try to bring the best for you.
Pattern/Images/Tutorial By: Chumkies Hobbies
The Mock-Up First I colored a mock-up on graph paper, which is how I decided the dimensions of the quilt. There would be 11 rows across and 11 columns down, and each finished square would measure 1.5″, which would make a finished quilt 16.5″ square. Much more manageable than a queen size quilt!
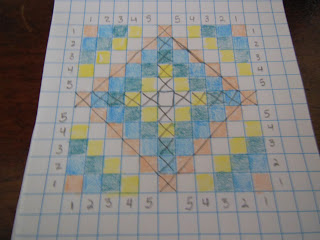
Take a look at the four identical segments I talked about before. The ‘X’s down the vertical and horizontal centers of the quilt divide it into four segments and the top half of the quilt is a mirror image of the bottom half. Similarly, the left half of the quilt is a mirror image of the right half.
Fabric Selection & Preparation I picked out 5 fat quarters that were light, medium and dark greens and reds.
They were washed, ironed to remove all wrinkles, and cut into 2″ strips.
Making the Strip Set and Tube The strips were then sewn into a strip set going from lightest, light, medium, to dark and medium.
The raggedy ends of the strip set were cut off and starting from the bottom of this strip set, each strip of fabric was assigned a number from 1 to 5. Turning the strip set over, with the wrong side up, I joined the first (Fabric 1) and last (Fabric 5) strips to form a tube and pinned them in place.
The two end strips were sewn together to form a tube and the strip set was cut into 2″ segments. One strip set yielded 10 two-inch segments, so a total of 2-1/2 strip sets were used to make this small quilt. The top section needed 11 segments and the bottom section needed 11 segments, the horizontal center strip of the quilt needed 2 segments and an extra 2-1/2″ square was required for the dead center of the quilt. Therefore, 11+11+2=24 two inch segments + 1 two-inch square of fabric 5 were needed in total.
To keep the 2″ segments from scattering, they were placed in a paper-mache bucket that cost $1.00 at JoAnn Fabric and Crafts.
You Can See The Rest Of The Pattern With Images Here
What Our Team Thinks About The Trip Around The World Quilt
This Quilt is incredibly beautiful and can help you a lot when composing your decor. This quilt will provide you with amazing models that will delight everyone who sees them, as this quilt is simply amazing and can be made in various colors, which helps a lot and can provide you with amazing models that you can sell.
Do you want to make this beautiful Trip Around The World Quilt to use in your home? So just separate your tools, your material and follow the tutorial we brought you today, it’s simple like that !! This quilt is very beautiful and will help you a lot with making new and beautiful pieces !!
You might also be interested

Cleopatra’s Fan Book & Template Set

Nearly Insane Quilt – Free Pattern

Joyous Dream Quilt

Madison’s Star Quilt

Loyal Heights Quilt – Free Pattern
You Are Here:
- Free Quilt Patterns ›
Like it? Share it!

Trip Around the World quilt

The Trip Around the World quilt pattern is a delightful exploration of color and symmetry that takes quilters on a visual journey around the globe. This design is characterized by strips of fabric arranged in a radiating pattern, with each strip representing a different country or region. As you embark on the creation of a Trip Around the World quilt, you’ll be captivated by the endless possibilities for color combinations and fabric choices, allowing you to infuse your quilt with a unique cultural flair.

To begin your journey, select a range of fabrics that capture the essence of the various destinations you’d like to visit. You might choose warm, earthy tones for African countries, vibrant and exotic prints for Asian nations, and cool, tranquil shades for European cities. These fabric choices will bring depth and richness to your quilt, creating a visual representation of the diverse landscapes and cultures found around the world.
As you piece together the strips of fabric, you’ll watch your quilt evolve, much like a traveler exploring different corners of the globe. Each strip represents a new chapter in your journey, with its own distinct color and pattern. Consider using gradations of colors to mimic the changing hues of landscapes as you move from one region to another. This technique will add depth and movement to your Trip Around the World quilt, making it a truly captivating piece of art.
As you progress, take note of the interplay between colors and patterns. Experiment with different block sizes and arrangements to create captivating visual effects. Play with the placement of colors to highlight specific regions or to achieve balance and harmony throughout the quilt. Remember, this quilt is a representation of your personal journey, so let your creativity guide you as you explore the endless possibilities.
One of the joys of creating a Trip Around the World quilt is the ability to infuse it with your own travel experiences and memories. Consider incorporating fabric scraps or patches from places you’ve visited, adding a personal touch to your quilt. These unique elements will not only make your quilt one-of-a-kind but will also evoke cherished memories as you admire the finished piece.
As you approach the final stages of your quilting journey, take a step back and marvel at the beauty and complexity you’ve created. Your Trip Around the World quilt is a testament to the power of color and design, a celebration of diversity and the connections that span the globe. Whether you choose to display it as a wall hanging or use it to adorn your bed, your Trip Around the World quilt will be a conversation starter, inviting others to join you on a visual adventure.
In conclusion, the Trip Around the World quilt pattern offers quilters an exciting opportunity to embark on a creative journey that traverses continents and cultures. With its radiant design and a myriad of color possibilities, this quilt invites you to explore the world through fabric and stitch, resulting in a masterpiece that embodies the beauty of global connections. DOWNLOAD PATTERN
RELATED ARTICLES
American pride quit pattern, astrodelic quilt pattern, hexometry quilt pattern free, leave a reply cancel reply.
Save my name, email, and website in this browser for the next time I comment.
Kite Flight Quilt Pattern
Peppermint swirl bargello christmas tree skirt free, joyeux noel tree skirt pattern, ambience quilt pattern free, most popular.
- Privacy Policy

Gold and Black Ultimate Trip Around the World Quilt

$ 1,295
Stunning! A gorgeous and unique twist to the Trip Around the World quilt, making it the ULTIMATE! Beautiful and striking, this quilt makes a statement. Gold and black with appliqued flowers and hearts on a soft printed white background. Patchwork borders bring it all together. This quilt is VERY well made with careful patchwork piecing and excellent quilting stitches. Made here in Lancaster by an Amish woman.
The back of the quilt is covered with a white on white star print 100% cotton fabric. The quilting density is good, averaging about 100 linear inches of stitching per square foot. The hand quilting is wonderful with 8 tiny stitches per inch.
Out of stock
- Satisfaction Guarantee
- Quilter Information
We want you to be completely satisfied with this quilt. If, for any reason, you are not satisfied, this quilt may be returned for exchange or credit within 10 days after you receive it provided only that you return it in its original condition. Once received and its condition confirmed, the refund will be processed. Please note that, unless it was received damaged or defective, shipping costs are not refund-able.
If this is a gift, within reason, the satisfaction period will be extended so that the ten day period begins on the day you present the gift.
This quilt is made by Hannah and sold by Ada Martin. Click here to contact Ada.
Related products
Earthtones Evening Star Cabin Quilt
Charming! A beautiful rendition of the Log Cabin pattern with an ‘Evening Star’ put together to make a lovely quilt! Attractive fabric selections in cream, brown/tan with turquoise-paisley pattern. Excellent patchwork piecing and fine quilting. Made by an Amish in her Lancaster farm house.
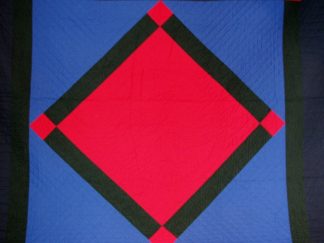
Amish Center Diamond Quilt
The Center Diamond is one of the oldest Amish quilt designs. This quilt with its navy border, deep red diamond, royal blue fill, and hunter green sash uses the classic Amish color scheme. Thin batting and abundant quilting give it both the look and feel of an antique quilt. Hand quilted here in Lancaster County by an Amish woman.
Teal and Brown Rhapsody Song Bargello Quilt
Fascinating! This vibrant quilt is sure to brighten any room in your home! A twist on the Bargello pattern gives a stained glass look. Piecework is very well done. Hand quilted by a local Amish woman in shades of teal, brown and tan with black. Made here in Lancaster County.
- Small Quilts
- Ready to Ship
- C Jean Horst
- Connie Lapp
- Dolores Yoder
- Gwen Gwinner
- Hannah’s Quilts
- Indiana Amish
- Karel’s Kreations
- Lancaster Select
- Custom Quilts
- Wedding Quilts
- Crib & Baby Quilts
- Patchwork Quilts
- Table Top Quilts
- Applique Quilts
- Amish Colors Quilts
- Christmas Quilts
- Interesting Quilt Websites
IMAGES
VIDEO
COMMENTS
Quilting Cubby - Easy Around The World Quilt Pattern. 7. Aqua Paisley Studio - Tilda Lemon Tree Trip Around the World Quilt. 8. The Floral Suitcase - Waddling. 9. Cutting Cloth - A Scrappy Trip Around The World. 10. Frogma Blogspot - Trip Around The World Quilt Challenge.
Patrons get access to over 100 posts and videos herehttps://www.patreon.com/thelasthomelyhouseBack in May 2019 I got a quilt commission to make this trip aro...
ENTER GIVEAWAY! https://jordanfabrics.com/pages/giveaway-1Free Pattern Here! https://jordanfabrics.com/pages/free-patterns-thumbnailsEverything you need to m...
Blue, Gray and Black Scrappy Trip Around the World Quilt (171) $ 325.00. FREE shipping Add to Favorites Vintage Trip Around the World Quilt ... Many of the trip around the world quilt, sold by the shops on Etsy, qualify for included shipping, such as: Elizabeth Princess Cut Diamond Quilt Pattern From MJ Kinman;
In this video, Jen introduces the Trip Around The World Quilt Kit in the America the Beautiful collection from Moda Fabrics, and shows you just how easy it i...
Decorate your home with this patriotic quilt filled with vibrant red, white & blue prints, or make as a memorable gift! Get the FREE download here! COORDINATING FABRICS PROJECTS. - America the Beautiful Yardage & Projects. NOTIONS USED IN THIS VIDEO: - Star Singles 3" Half Square Triangle Paper. - Creative Grids 3-1/2" Square Ruler.
Hand Pieced Traditional Trip Around the World Quilt. The finished quilt measures 58 inches x 58 inches. 1625 squares measuring 2" x 2" (includes seam allowances). Started: 26 December 2019. Finished: 22 February 2020. Hand Pieced.
Sew the units into pairs, and the 3 pairs into a Scrappy Trip Around the World block. The original pattern has you take the strip set from way back at the beginning when you sewed 6 strips together, and fold the set in half, sewing the black strip to the white strip along the remaining free edges, creating a loop.
Once the strips sets are made the layout is quite easy to follow. Keep the project on a small scale for easier handling. An experienced quilter will find this method a breeze. While this is the basic pattern, it is possible to make the quilt bigger as you wish. The unfinished quilt top for this design is 17″ square.
Below are links to the directions and videos for making a 45 1/2″ by 45 1/2″ quilt using 7″ squares. Around the World Pattern. Around the World Cutting Directions. Quick & Easy Around the World - Part 1. Strip Piecing Around the World - Part 2. You can also use different sized squares or set this block on point.
Step 3. Put the quilt (right side down) on top of the backing (right side up), and pin around three sides of the quilt. Sew around these three sides. Now, put the quilt which is front to back on top of the batting, then trim off the excess backing and batting. Whipstitch the batting to the quilt through the seam allowance all the way around ...
'Anita' asked if I could make a Trip Around The World Baby quilt...well this isn't quite a baby quilt, but fabric choice is fun anyway! Hope you enjoy this ...
Behold the the long-time-WIP (work in progress) Scrappy-Trip-along is finished! This quilt was started over two years ago. I finally got serious about finishing it this past January when I became determined to start tracking and finishing all those (many, many…many) WIPS. This is such a fun project - a great way to use up 2 ½″ wide ...
The Trip Around the World Quilt pattern is easy enough for a confident beginner. Although the quilt appears complicated, it is made with simple piecing techniques and is a great project for all skill levels! Full color instructions and diagrams are included. Quilt finishes to approximately 67-1/2" x 79-1/2".
Folded Star Hot Pad Kit - America the Beautiful - White Flags. $21.50 $17.20. Details. This Trip Around the World Quilt in America the Beautiful fabrics by Moda features the clean lines of the classic quilt design which makes this beginner-friendly quilt a joy to sew. The design stays true to its vintage-inspired origins and makes a visually ...
Many Trips Around the World Quilt. The finished measures 49 inches x 61 inches. 49 rows of 39 squares. Each finished square measures 1.25" x 1.25". Total number of squares: 1911. Fabric Used: 100+ different small scale prints including. many stash basics - dots, stripes, checks, gingham. Solid Fabric: Robert Kaufman Kona Cotton in White.
The OG (original) name of this quilt pattern is "Many Trips Around the World", which has been adapted by Bonnie Hunter of Quiltville to use a t ube strip piecing method for increased speed of construction. It's so fun, and you feel very clever for using such an amazing time-saving trick. You should really go check it out if you haven't ...
Fold the binding strip in half lengthwise, wrong sides together, and press it to create a crisp crease. Attach the Binding: Starting on one side of the quilt, align the raw edges of the binding strip with the raw edge of the quilt top. Leave a tail of about 6 inches and begin stitching with a ¼ inch seam allowance.
Eleanor shows how to make our new Trip Around the World pattern with the Accuquilt cutter. The beautiful Trip Around the World quilt is a great first quilt t...
Trip Around The World Quilt. Pattern/Images/Tutorial By: Chumkies Hobbies. First I colored a mock-up on graph paper, which is how I decided the dimensions of the quilt. There would be 11 rows across and 11 columns down, and each finished square would measure 1.5″, which would make a finished quilt 16.5″ square.
The Trip Around the World quilt pattern is a delightful exploration of color and symmetry that takes quilters on a visual journey around the globe. This design is characterized by strips of fabric arranged in a radiating pattern, with each strip representing a different country or region. As you embark on the creation of a Trip Around the World ...
In this tutorial I show how to use strip and chain piecing to create a trip around the world quilt. The same method could be used to make a wall hanging or t...
Stunning! A gorgeous and unique twist to the Trip Around the World quilt, making it the ULTIMATE! Beautiful and striking, this quilt makes a statement. Gold and black with appliqued flowers and hearts on a soft printed white background. Patchwork borders bring it all together.