- EXPLORE Random Article

Packing Your Bike for Air Travel: 10 Tips for a Simple, Affordable Trip
Last Updated: July 4, 2022 References
This article was co-authored by wikiHow Staff . Our trained team of editors and researchers validate articles for accuracy and comprehensiveness. wikiHow's Content Management Team carefully monitors the work from our editorial staff to ensure that each article is backed by trusted research and meets our high quality standards. There are 7 references cited in this article, which can be found at the bottom of the page. This article has been viewed 9,266 times.
Taking your bike with you on a trip lets you explore your destination in a whole different way. If you’re planning to travel with your bike, make sure to pack it correctly for air travel to guarantee it arrives in good shape. We’ve compiled a bunch of great tips to help you do just this. These are tried-and-true methods suggested by people who’ve flown with bikes before, so take heed!
Choose an airline that lets you check your bike as luggage.

- If your bike exceeds the weight or size limits for an airline, it doesn’t necessarily mean you can’t fly with it. You can usually pay an extra fee for larger or overweight items. In this case, opt for an airline that has a more affordable extra baggage fee.
- Some airlines also have specific policies regarding bikes. For instance, they may charge an extra bike fee of $30-$100. Make sure you read carefully to find out about any such fees before booking a flight.
Take your bike apart.

- Removing the handlebars is another optional step. It’s a good idea if your handlebars are on the bigger side, but if they’re pretty small you can just turn them to the side when you pack your bike.
- If your bike has disc brakes, remove these to pack them separately as well.
Put spacers between the dropouts on the frame and the fork.

- You can either buy a dropout spacer kit online or from a bike shop or you can ask your local shop if they have any spare plastic spacers that come with the bikes they sell that they’re willing to give you.
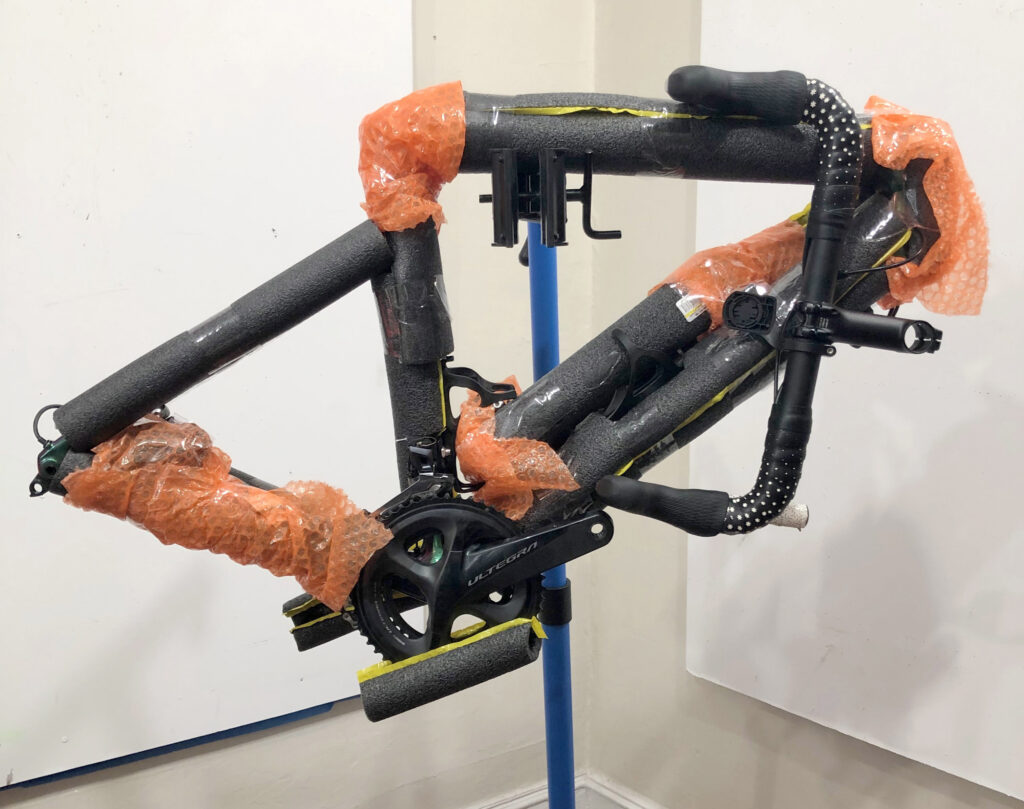
Cover the main tubes of the frame with foam pipe lagging.

- You can buy foam pipe lagging at most DIY and home improvement stores. Ask an employee where the pipe insulation is to find it.
Wrap individual components in bubble wrap.

- Bubble wrap and packing tape are available at home improvement centers and packing supply stores.
Place small components inside a separate bag.

- Small bike bags may fit alongside your bike when you pack it. Or, they can go inside of another larger checked bag or suitcase.
Pack your bike in a bike box for the most protection.

- You can buy these boxes online or at a bike shop. However, they can be quite expensive, sometimes costing hundreds of dollars.
- Make sure you get a bike box that fits your frame and wheel size.
Put your bike in a bike bag for a cheaper option.

- You can buy bike bags online or from bike shops. They are more affordable than bike boxes, costing as little as $30.
Pack your bike in a cardboard box if you’re really on a budget.

- Ask around in local bike shops for spare cardboard boxes that the bikes they sell come in.
- Another way to separate pieces and add protection is to wrap them in smaller pieces of cardboard inside the box.
Pack your riding gear along with the bike.

- Zip-tie or strap accessories to the frame of your bike to secure them in place or use any of the attached straps that are free if you’re using a bike bag or bike box.
Expert Q&A
You might also like.

- ↑ https://www.bicycling.com/skills-tips/a26358342/best-airlines-for-cyclists/
- ↑ https://www.redbull.com/int-en/how-to-become-pro-at-travelling-with-your-bike
- ↑ https://www.bikeradar.com/features/routes-and-rides/how-to-pack-your-road-bike-for-a-trip-abroad/
- ↑ https://road.cc/content/feature/stuff-they-never-tell-you-about-flying-your-bike-271269
- ↑ https://www.cyclinguk.org/cyclists-library/bikes-public-transport/bikes-air
- ↑ https://www.welovecycling.com/wide/2017/08/15/get-bike-ready-air-travel/
- ↑ https://www.singletracks.com/beginners/the-other-bikepacking-how-to-bag-your-bike-for-the-airplane/
About this article

Did this article help you?

- About wikiHow
- Terms of Use
- Privacy Policy
- Do Not Sell or Share My Info
- Not Selling Info
How To Fly With Your Bike: The Ultimate Guide
Exploring new terrain on your bike is one of the true joys of cycling. But if you’re unprepared when flying to your destination, your trip can be ruined by expensive fees, damaged equipment, and logistical challenges. Luckily, flying with a bike can be fairly easy and affordable if you plan ahead. What do you need to know before embarking on your next cycling adventure?
Table of Contents
- Flying With a Bike: An Overview
- Baggage/ Case Options
- Packing Your bike
- Typical Costs/ Airline Policies
Flying With a Mountain Bike
Flying with a bike: an overview .
There are three major variables to consider any time you fly with your bike. First, the safety of your equipment—you want to be confident your bike will arrive intact and undamaged at your destination. The second factor is the cost of getting your bike there, which can vary dramatically depending on the airline and on how you pack it. Finally, the third factor is simplicity— it can be difficult and time-consuming to rebuild a fully-deconstructed bike, especially if you’re in a hotel room or unfamiliar environment with limited tools.
Every method of traveling with a bike balances a mix of these three factors. No option is perfect, but understanding the pros, cons, and logistics of each in advance can help you determine which is best for you and your equipment.
Basic Advice
However you choose to get your bike to your destination, you’ll need some basic technical knowledge and tools to do so. All travel cases and bags require some amount of deconstruction— usually at least the removal of pedals, wheels, and handlebars. It’s notable that for some modern road bikes with fully integrated cockpits, this can be a very laborious and time-consuming job, and these bikes may require special cases that allow handlebars to remain attached.
Many airlines are becoming more bike-friendly, but fees can vary dramatically . In some cases, you may save money overall by choosing a more expensive airline with lower baggage fees. And note that no matter how welcoming an airline is to cyclists, baggage handlers may be very rough with your bike, and airlines are often not responsible for damage that occurs during transit. Consider purchasing luggage insurance for your trip, especially if traveling with an expensive carbon bike. Some homeowners’ and renters’ policies, as well as certain credit cards, may cover your baggage already, so check your specific policies for details.
Don’t save anything for the last minute . Practice packing your bike well in advance, and consider all aspects of your trip’s logistics and how they relate to your bike. Will your box or case fit in your transport upon arrival? Will you be able to comfortably rebuild and later repack your bike in your lodging? How will you get your bike to the airport when it’s time to head home?
Finally, it’s worth considering whether it’s actually necessary to bring your bike on the plane with you in the first place. Bike shipping services can send it in advance, and this option may be economical depending on your destination and itinerary. Alternatively, if having your own bike with you isn’t necessary, consider renting one from a local shop for the duration of your stay.
Note: A few bikes have frames specifically designed to come apart for easy packing. These bikes can be worthy investments for frequent flyers, but this post is primarily intended for athletes traveling with their existing standard bikes.
Flying With a Bike: Packing Options
Three main options exist for packing your bike for flight— cardboard bike boxes, soft-sided bike bags, and hardshell cases. It’s also worth mentioning that a few bikes are made with special frames designed to come apart for easy packing, and these bikes can be excellent options if you are a frequent traveler. But the packing discussion in this post
Cardboard Bike Boxes
A cardboard bike box is the simplest container for your bike during travel. Cardboard boxes do have a few things working in their favor— for one, they’re easy to get (often for free) from almost any bike shop. Most are large enough to fit your bike nearly intact, so they are fairly easy to pack.
But that’s about it when it comes to positives. Cardboard boxes are prone to damage, especially in wet conditions. Cardboard boxes are easily punctured, and their handles often tear out and rip off. Bikes packed in cardboard boxes need significant additional padding and must be very carefully packed to arrive safely. Additionally, cardboard bike boxes are large and ungainly. They might not fit into small vehicles bringing you to and from the airport, and they’ll definitely incur oversize baggage fees. To add insult to injury, most airlines won’t insure or cover any damage to bikes packed in cardboard boxes. Use at your own risk.
Cardboard Box Pros: Cheap, easy to pack. Cons: Large, fragile, difficult to transport, airlines won’t insure, always incur oversize fees.
Bike Bags/ Soft Cases
Soft-sided bike bags vary widely in their design and features. Most have straps and wheels that make them easy to move around, and they’re generally small enough to fit in a rental car without a problem. On the downside, many airlines require a liability release for bikes packed in soft-sided bags. Also, they aren’t cheap— costs typically range from about $400–$600 USD. Some companies allow you to rent one for your trip instead of purchasing the bag outright.
Larger bags allow you to leave your fork on your bike and may include an internal mount for your frame which can make them easy to pack. They usually include some amount of internal padding and protection, but you may want to add additional padding to your frame and components. These bags are usually lighter than hard-sided cases, but they are still quite large, and invariably incur oversize luggage fees.
Smaller bike bags are designed specifically to avoid airline oversize fees and are about the size of a large suitcase. These bags are somewhat challenging to pack and require significant bike deconstruction— fork, handlebars, pedals, both wheels, and rear derailleur usually need to be removed. But if packed with some extra padding on crucial components, they’re quite sturdy and safe, and are by far the easiest option for transport to and from the airport. This blog post’s author has used one of these bags for several years, with no damage or additional fees.
Soft Case Pros: Easy to transport, can avoid airline fees. Cons: Difficult to pack, expensive, often require extra padding.
Hard-Sided Cases
Most protective of your bike but also the most expensive option, hard cases range in size and design. Some are quite compact and challenging to pack. Others are extremely large and heavy, but allow you to travel with your bike almost fully assembled. All offer the promise of robust protection against impact, though some travelers believe baggage handlers are more likely to be rough with hard cases than soft-sided bags. On the plus side, if you use a hard-sided case, airlines are usually willing to insure your bike and compensate you if damage occurs during a flight.
Hard cases are generally less convenient to transport and get around than soft bags, but some have multiple handles and wheels to make things easier. Unfortunately, most hard cases are big enough to incur an oversize luggage fee. It’s also quite obvious what’s in one of these cases, so if your airline charges a bike-specific fee there’s no avoiding it when using one.
Hard Case Pros: Highly protective. Moderate packing difficulty. Cons: Heavy, awkward, expensive, usually incur extra fees.
Packing Your Bike
When it comes time to pack your bike for travel, there are two main tasks— protecting your equipment and preparing it for potential opening and inspection. The more systematic and organized your packing job, the more likely it will be safely repacked after inspection by transportation safety agents.
Packing Your Bike Step-By-Step
- Remove any components needed to fit the bike in your chosen container. This almost always means removing the handlebars, pedals, and front wheel. Depending on your luggage it may also require removing your rear wheel, fork, and seat post. Put shipping spacers or thru axles into your dropouts, and put spacers into your disc brake calipers.
- Wrap your bike and components in padding. Some cases include this, but many riders use bubble wrap, pipe insulation, or pool noodles sliced in half and cut to size. Securely tape or zip-tie the padding in place.
- Attach handlebars/ fork/ seat post to your frame and zip-tie in place. Where you put them depends on your case and your bike, but by attaching everything together it will be easier for TSA agents to put your bike back into your case after inspection, and less likely anything will get lost.
- Remove rear derailleur and any other protruding component (computer mount, derailleur hanger, eTap batteries, etc) that could potentially be impacted if your bag or case is mistreated. Wrap these parts in padding/ attach to your frame. Wrap your chain in padding and attach it to your chainstay. Remove disc rotors from your wheels and wrap in bubble wrap or clothing.
- Photograph your gear before you put it into your bag. It will come in handy if you need to file a claim with the airline, and will help you repack your bag on the way home.
- Write your name and contact information on a sheet of paper and tape it to your bike. Insert the bike into your bag or case. Insert wheels into the case, slightly deflating tires if needed to fit.
- Fill extra space in your bag or case with kit and shoes. Wrap your pump in padding and insert it. Wrap other components you removed in padding (such as pedals, rotors, and saddlebag) and place them together in a small bag, which can also go into the extra space or pockets in your travel bag/ case. Put every tool you used to deconstruct the bike into a small bag, wrap in padding, and place them in the luggage, too.
- Close the bag/case and carefully feel around the outside. If any part of your bike (such as your chainring) can be felt protruding, reopen and reposition/ attach extra padding to this area.
- Verify all old barcodes/ destination stickers are removed from the exterior of your luggage. Mark the exterior prominently with your name and contact information.
Other Important Packing Tips
- Bikes are often damaged by contact with objects inside the case. Add padding anywhere two parts touch each other in the luggage. Wrap every loose component in padding and secure inside.
- Bent disc rotors are the most common damage during travel. Even if your case doesn’t require it, remove your rotors, wrap them in padding, and secure them somewhere safe.
- Zip-tie everything together inside the case, so if a security agent removes your bike during an inspection they won’t lose anything or have trouble putting it back in. Make it foolproof!
- Don’t forget your tools. Many bike tools are prohibited from carry-on luggage, so wrap all the tools you’ll need together and secure them in your case. Don’t forget an air pump, and always bring a torque wrench!
- Your tires won’t explode on an airplane. Some airlines require you to deflate your tires, but always leave enough air in tubeless setups to keep the tires seated.
- Most airlines prohibit CO2 containers in carry-on and checked luggage. Remove them from your flat kit and grab new ones at your destination’s local bike shop.
- Electronic groupsets bring some additional considerations. Remove batteries from SRAM derailleurs, so they don’t get lost if your case is opened. Shift levers can be inadvertently pushed inside of bags and cases, so remove the coin cell battery from SRAM shifters and unplug shifter cables under Shimano hoods.
- If your power meter has a removable battery, remove it during packing to prevent battery drain.
- Remember to bring chargers for any electronic components, including head units, lights, and derailleurs.
The Typical Cost of Flying With Your Bike
So you’ve got your bike packed and ready to fly. How much will it cost?
The answer depends on the airline and your specific equipment. Some airlines charge no special fees, while some charge an all-inclusive fee for bikes, and some layer multiple fees for bike, luggage weight, and luggage size. Check your airline’s policies, but you can usually use this formula to find your expenses:
Cost to Bring Bike = Bike Fee + Standard Checked Bag Fee + Oversize Fee (if Applicable) + Overweight Fee (if applicable)
For most airlines, oversize fees kick in if the combined length, width, and depth measurement of your luggage add up to more than 62”. While many popular bags and cases do exceed this limit, these fees are inconsistently enforced by gate agents. Overweight penalties usually start at 50 lbs, and for even larger and heavier bags most airlines have more severe fees.
All told, costs can vary dramatically. If you have a lightweight road bike in a small, soft bag and you’re flying on an airline with no bike fee, you’ll only be charged for a standard piece of checked luggage. On the other hand, with a large mountain bike, in a hard case, on an airline with a bike fee, you may need to pay $300 or more each direction in bike, weight, and oversize charges. Discount carriers usually charge more in additional fees, so do your homework and research potential costs before you buy your ticket. In the end, it’s often worth paying a little more upfront for a premium carrier without bike penalties.
Best Airlines for Flying With a Bike
Here is a comparison of major airlines’ policies on bikes, to help you find the best option for your next trip. Note: If an airline layers multiple fees, all are listed. Some fees marked N/A may still be incurred if your case is very large/ heavy. Policies are accurate as of 10/5/21. Prices USD unless noted.
Adaptive Training
Get the right workout, every time with training that adapts to you.
In most ways, bringing a mountain bike on an airline is the same as bringing a road or gravel bike. However, mountain bikes are generally bulkier, with thicker tubes and wider axles. This means mountain bikes may not fit in all travel cases, and you may need a case or bag specifically designed for large bikes. Pay close attention to weight, as adding extra kit and equipment to a bag containing a mountain bike may incur an expensive overweight penalty.
When preparing your mountain bike for travel, it’s often easier to remove the handlebars from the stem, than it is to remove the stem from the steerer tube. If possible, flip your fork backward to shorten your wheelbase and make your bike more compact for packing. As with road bikes, always remove your brake rotors, and only deflate your tires enough to fit your luggage. Don’t allow your tires to come off the bead, and bring a small container of sealant in your checked bag just in case you need it upon arrival.
If your bike still won’t fit, let some air out of your suspension to reduce height (but make sure you bring your shock pump with you). Resist the temptation to fly with your dropper post down— a long flight with the cartridge under pressure can stress the hydraulics, so remove the post from your frame instead. And on that note, service any hydraulic components in need of maintenance before you travel. Extended periods in your bag in an unusual position can push worn seals beyond their limits, and you don’t want to arrive at your destination to find a crucial part no longer works.
Finally, bring a large rag or towel along with you for your trip. You might not have the ability to wash your bike at your destination before repacking it for your return, but at least you’ll be prepared to give your equipment a good wipe-down.

Sean Hurley is a bike racer, baker of sourdough bread, and former art professor. He is a connoisseur of cycling socks and a certified USAC level 3 coach. Rumor has it he also runs a famous cycling instagram account, but don't tell anyone about that.
Related Posts

Bike Setup Tips
Cycling Numbness: Dealing with Numb Hands, Feet, & Saddle
Bike Setup Tips Successful Athletes Training
Facing Challenges and Overcoming Limitations With Triathlete Zach Josie

A Conversation About Bike Fit With Dr. Andy Pruitt
How to pack a bike for travel

If you're going to transport your bike by air, then twenty minutes of packing will give your bike a flighting chance when at the mercy of the airline baggage handlers. We've put together our guide to packing your bike into a bike box and a bike bag.
What you need:
1. Foam pipe lagging - get different diameters to suit different tube
2. Bubble wrap - always useful and you can never have too much!
3. Packing or masking tape
4. Allen keys or multi tool
5. Condor frame spacer kit (£16.99) or Condor Dummy Hub (£11.99)

Step 1 - Pedals and the chain
Take off the pedals and remove the wheels from the frame. Put the chain in the outer chainring. This will prevent the teeth cutting through the bottom of the bike bag or getting bent.
Step 2 - Remove the derailleur
Next, remove the rear derailleur using a 5mm Allen key. There is no need to disconnect the cable. Wrap the derailleur in bubble wrap. We recommend using our frame spacer (£16.99). This sits in place, holds the chain taught, and will help stop the rear seatstays being pushed together if there is pressure on the rear drop out.
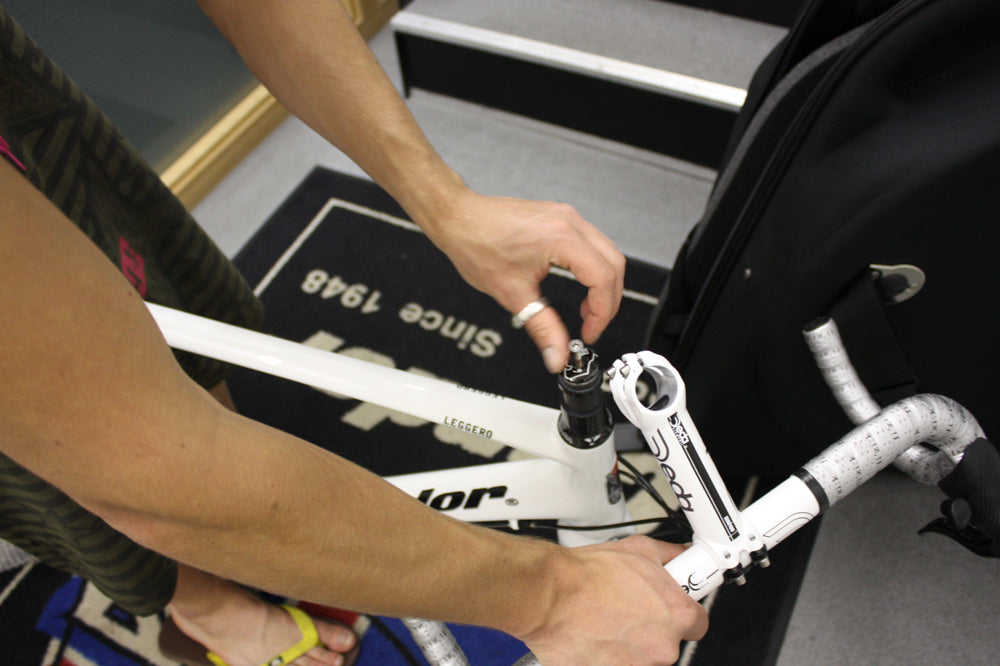
Step 3 - Protect the fork
Insert a fork spacer into the front front. For maximum protection use an old pair of worn out hubs.

Step 4 - Remove the handlebars
If you are packing your bike into a box you will need to remove the handlebars from the fork. Read a little further below about what to do if you are packing into a bag.
Loosen the stem cap bolt and then pull the stem upwards so the stem and handlebars a no longer attached to the bike.
Remember to put the stem cap back into the bike, so you don't leave it behind.
If you are packing your bike into a bike bag you need to turn the bars.
Mark the position/angle of the bar with tape. Put a line on the tape next to the clamp bolts to you can easily align your bars instead of messing around with your position later.
Loosen the front clam bolts and stem clamp bolts too. Keep the forks facing forward and rotate the stem 90 degrees. Then rotate the bars and hook under the top tube. Once the bars are in position lightly tighten the bolts.

Step 5 - Mark the seatpost
Mark the position of the seatpost before removing and wrapping in bubble wrap.

Step 6 - Protect the frame
Use lengths of pipe lagging to protect the frame from chips. Wrap the front forks with bubble wrap and secure with tape.
Step 7a - Secure the wheels for a bike box
Place the frame into the base of the bike box, with the handlebars next to the bike. The cables are still connected so be aware of pulling on the cables or kinking them. Cover the frame with the foam.
Undo the smaller bolt from the skewer. Put the wheel in the arch on the inside of the box. Push the quick release skewer through the hole in the box and tighten with the bolt on the other side of the box. This holds the wheels in securely.
Step 7b - Wheel bags
If you are taking a bag - place the wheels into wheel bags and make sure you remove the skewers and place them in the little pockets.

Packing Tips
Don't leave loose items floating around in the bag or box that can chip your frame; use internal pockets or secure items with bubble wrap.
Keep an eye on the overall weight of your packed bag. If you are going to put energy drinks, shoes and other bulky items in the bike bag, to save space, be aware airlines are clamping down on oversize baggage weights.
Use zip ties or padlocks to keep prying eyes out of your bag.
Off to ride a foreign sportive? You probably won't be the only cyclist on your plane, so make sure that your bike bag/box is distinctive so you don't end up with the wrong package.
Shop Bike Bags and Boxes
" style=" ;object-position:50.0% 50.0%; " > " style=" ;object-position:50.0% 50.0%; " > " > Speed Hound
A complete guide to air travel with your bike.
Whether you’re traveling for a big race or just excited to explore some new terrain, bringing your bike is a must. Unfortunately, air travel is a little more (fine, a lot more ) complicated than strapping your bike into the rack on your car just before you hit the road. Bringing your bike on an airplane requires much more planning on the logistics front, as well as the financial front.
Do all airlines allow bikes? How much will this adventure cost? How do I keep my bike safe on the airplane? These are all some basic considerations to keep in mind when you’re planning your trip. However, this is just the tip of the iceberg. There are plenty of other things to know… before you go.
But there’s good news ahead! Through our own experience and research, we’ve compiled a complete guide of how to take your bike on an airplane. Up next, we’ll share all the details, so you can avoid any surprises along the way while successfully getting your bike from point A to point B.
Which Airlines are Bike Friendly?

First and foremost, what airlines even allow bikes? While many airlines claim bikes fly free, or that they’re a “bike friendly airline,” there’s often some hidden messages to decode.
For example, there are airlines that say you can check your bike as long as it fits within their size restrictions, but unless your bike is child-sized, or you’re fine taking it completely apart to get it to fit into a suitcase, then checking your bike isn’t an option.
Instead of doing a deep dive into each airline to:
- Determine whether or not bike travel is even an option,
- Figure out how you’re going to get your bike on the plane, and,
- Plan for how much this is going to set you back…
… we’ve put in the legwork to make a list for you. And, what you need to know with bike travel in each airline.
Southwest is a solid option for air travel with your bike, simply for the fact that they make it easy. Southwest will allow you to bring your bag, as long as it’s packed in a hard sided case. However, the bike bag is in place of one of your two luggage items. So you’ll have to pay for any additional checked bags. And, if you’re using a soft-sided case, you’re accepting Southwest’s limited release terms .
American Airlines
As long as your bike doesn’t weigh more than 50 lbs, it’s treated like a checked bag . And, even better, there are no extra fees. You’re simply paying the traditional baggage fees, which is just $30-$40.
Once upon a time, Delta charged upwards of $150 for cyclists to bring their bikes on their aircrafts. Thankfully, Delta recently revamped their bike policies, so air travel is much easier. Similar to AA’s bike policies, Delta charges a $30-$40 fee for bikes , as long as they’re packed in a hard-sided case.
For bikes in soft-sided cases, a limited release form is assessed, so they’re not responsible for any damages.
If your bike is packed properly and fits the standard weight limit (50 lbs. or less), it’s considered just regular baggage. You’ll still have to pay $25-$35 for the checked bag fee, but that’s not too bad. However, if your bike goes over the weight limit, or it’s bigger than 62 linear inches, you’ll be charged a pretty hefty oversized baggage fee. If it’s overweight, then you can expect to pay $100, but if it’s oversized, you’ll have to shell out $200! Insert scared face emoji here.
Other Considerations
These are our top three choices for bike-friendly airlines. Each of these airlines is easy to access, as they fly into most airports. These three airlines also make it easy to bring your bike, as long as you follow the rules.
In addition to the airline specific regulations listed above, these are a few other things to keep in mind that apply to all three airlines:
- Bikes weighing over the specific weight limits will be charged a fee for overweight baggage.
- All bike carrying bags must still fit within the specified range of length and width restrictions. Be sure to measure before you bring your bike to make sure it fits.
- Read the fine print. As of now, the above information is accurate, but airlines are notorious for sneaking additional fees into airfare, so it’s always wise to double check.
- Each airline has a specific way to pack your bike, but all require pedals to be removed. Some require handlebars facing a certain way, while others just ask that they’re taken off. Check the specific airline you’re flying to make sure you’re following their rules.
For a quick overview of what you can expect when traveling with your bike on each of these airlines, check out this table:
The bottom line here is that no matter what airline you’re flying, you’re at their mercy to safely get your bike to your destination. And let’s be honest, what’s more disappointing than booking a trip to explore Moab, or finally realizing your dream of competing in the Malibu Triathlon… only to have your bike get left behind? So once you land on an airline choice, pay close attention to their details.
How to Pack Your Bike for Air Travel
Your ultimate end game here is to get your bike to your final destination, all in one piece. Well, not all in one piece per se, since you’ll be breaking it down into a few pieces before you go. But you get the drift here. You don’t want to leave too much up to the airline, and if you’ve ever seen luggage being tossed into the cargo hold, then you know exactly why it’s important to pack your bag carefully.
Choose Your Bag
While it would be really nice to just roll your bike right down the jet ramp and onto the airplane, clearly that’s just not the case. What you need is a storage bag that protects your bike while en route to your destination. And, a bag that’s already anticipated any potential disasters and prevents them before they even happen.
Here are a few things to consider in choosing the best bag for travel with your bike:
- How easy is it to navigate a busy airport with your bag in tow?
- Does the bag meet guidelines for the airlines you use frequently, or plan to use frequently?
- Is there a separate compartment for the bike chain, to prevent a potentially messy situation when you unpack your bike?
- What kind of bike can you fit in the bike travel bag?
- How sturdy is the material used to make the bag? Again… careful isn’t the main priority for baggage handlers when they’re responsible for getting thousands of pounds of luggage on the plane within a short amount of time.
- Is the bag easy to store when it’s not in use?
Our FREEDOM Bike Travel Bag considers all of the above, and more. Here are a few key features that make this bike travel bag one to the top choices, and best options for your travels:
- When your bike is securely packed in this bag, the dimensions read 53" x 31" x 15,” so it fits right in with most airline restrictions.
- The FREEDOM bag is fabricated with incredibly durable ripstop nylon. And, there’s a zipper closure to keep everything safely tucked away inside the bag during travel.
- This bag is made for mountain bikes and triathlon bikes.
- Everything has a home in this case. There are compartments galore! When you pack your bike, you’ll know exactly where you put everything, making unpacking and assembling a much easier task.
Prep Your Bike
Again, it’s really important that you pay attention to the specs required for the airline your traveling. But, for each of the airlines we’ve mentioned here, you’ll at least need to follow these steps:
- Remove the handlebars, wheels, saddle and pedals.
- Let just a little bit of air out of the tires. There’s a significant change in pressure with air travel, so this is a necessary precaution to help avoid tire damage.
- Carefully wrap parts with bubble wrap. Use tape to secure the ends.
- Label each piece. You’ll know what they are, but this will just help streamline your assembly process later.
- Make sure to keep all necessary tools and screws/bolts with your bike when you’re breaking it down.
If you’re using our FREEDOM bag, this part is easy peasy! Just put each of the parts in it’s designated home. Include tools and screws/bolts. Again, keeping the chain separate is essential, so you don’t unpack your bike to find everything covered in grease. Yuck!
Label the Bag
Make sure you have an identification tag that’s easily visible on your bike bag. While we all like to think it’s impossible to lose a piece of luggage like a bike, this is one of those better to be safe than sorry situations.
Also, many bags, like our FREEDOM bag, make it known that there’s a bike inside. Other bags do not, so it’s important to label the outside of the bag, to make it easier on those that check the bags, and load them onto the aircraft.
Tips and Tricks for Air Travel with Your Bike
We’ve done this song and dance a time or two, and learned lots of things along the way. So, instead of learning from your own mistakes, we’ll do you a favor and share all the mistakes we’ve made, so you don’t have to learn the hard way!
Here are just a few things that will make your life a little easier when traveling with your bike, from packing to unpacking, and everything in between:
- Before you remove the seat, use a piece of tape to mark the height.
- Remember how they remind you a million times that objects may shift during flight? Take that to heart while packing your bike, and leave as little room for movement as humanly possible. The less wiggle and jiggle inside the bag, the better.
- Keep the tools with the bike, just safely wrapped. Do not, again, do not, put the tools in your carry-on bag. They’ll get taken away at security. Just don’t do it.
- Measure and weigh several times just to make sure your bike really fits the airlines restrictions, no questions asked.
- Even though your bag might have wheels, there are going to be some points along your journey that you have to hoist your bag into place. Be mindful while packing, so you don’t make your bag too heavy.
Final Thoughts
And there you have it! The ins and outs of air travel with a bike. Not just any bike, your bike. So therefore, it’s important that you get it to your final destination without issue. Luckily, if you follow our guide above, that shouldn’t be a problem.
If you’re planning an upcoming trip and hoping to take your bike on the airplane with you, then a bike bag is a must. Consider our FREEDOM bag to keep your bike safe and secure during travel. Safe travels!
How to pack up your bike for air travel
Taking your bike on a plane? Neil Pedoe explains how to pack and protect it for the flight, and picks three types and levels of protective bike bags and boxes to choose from…

Gone are the days when you could turn up with your bike at check-in and the nice airline staff would wheel it out to the plane with admiration for your sense of adventure. Now, if you’re taking your own bike abroad by plane you need to pack it in a way that it neither damages anything else, nor gets broken itself.
Dedicated bike boxes and various semi collapsible bike bags like those listed below will provide more protection with less dismantling – at a price.
Here we explain the main steps for a full bike break down and pack – the sort of packing and protection job you’d need to do for a small cardboard box or unpadded bag.
1 Remove the seatpost, leaving the seat attached – if you’re worried about the quick release or Allen bolt clamp falling off, then taken it off and put it in your small parts bag.
2 So that you can remove and reposition the handlebar, create slack in your gear and brake cables by pulling the cable outer ends out of their stops on the frame and releasing the tension at the brake bodies or levers where possible. You can get more slack in the gear cables by putting the chain in the front big cog and rear big cog, and then shifting back down with the levers – without pedalling so that the chain doesn’t actually shift.
3 Remove the pedals – don’t forget that the right pedal undoes anti-clockwise, while the left pedal undoes clockwise. Put them straight in the small parts bag before you forget! If you’ve got bottle cages, then put bottles in them – these can make for useful storage for energy gels and bars. Make sure they’re not full of water!
4 Remove the stem and the handlebar, then loop the bars around the front fork wrapping the fork and bars where they touch, and using zip ties to keep them in place. Put the stem and all its bolts loosely screwed back in into the small parts bag.
5 Remove the front wheel, taking out the quick-release skewer completely, doing it back and putting it in your small parts bag so that you don’t lose any of those springs. Protect your fork by putting one of those plastic spacers in it that came with the bike when it was new. If you’ve thrown them out then ask your friendly local bike shop for some.
6 If you’re removing the back wheel for a small bag or box (although packing will be so much easier if you don’t!), then put another plastic spacer between the rear drop outs. Then unbolt the rear mech, with the chain still treaded and swaddle it in bubble wrap. Then tape or zip tie it to the rear triangle. The plastic spacer between the dropouts will keep the chain stretched out and tidy.
6 Wrap, pad and protect all the frame tubes and fork legs, as well as the bottom of the chainring if you have had to remove the rear wheel. Pipe lagging used to be perfect for this job with traditional steel-framed bikes, but you may find foam sheeting and zip ties best for modern aluminium or carbon fibre frames with their over-sized tubes and box sections. Wrap the seat clamp, top tube, fork ends to protect them should the box or bag be dropped, then slot the frame into the box or bag.
7 Let about half the air out of the tyres, then use more bubble wrap to protect the ends of the hubs, before sliding the wheels down the side of the bike. Sheets of cardboard are useful as protection between the wheels and the frame, and down the sides of the bag if using a soft one. Fill the voids with clothing, or newspaper so that things don’t rattle about, concentrating on protecting any parts which will be touching each other.
8 Don’t forget to take spare tape or zip ties for the return journey!
Three levels of protection
Basic bike bag.
Vaude Bike Bag Pro, £115
Weighing 3.1kg and measuring 95 x 118 x 27cm, the Vaude Bike Bag Pro is a good sized bag for packing your bike into as described above, with both wheels taken off and slipped into its two wheel pockets. Although padded, the bag has no base to mount the bike, nor any frame, nor rigid or semi-rigidity panels. The advantage of this is that the bag is very light and foldable, making it easy to store, or even put in the post if you’re on a long A to B tour. The downside is that you’ll need to do a thorough packing and protection job to your bike. Another major sacrifice to weight and foldability is the lack of wheels – there are shoulder straps but you won’t want to be hefting this bag more than a few metres.
Simi-rigid bike bag with wheels
Evoc Bike Travel Bag, £339
Measuring 130 x 80 x 36cm, and weighing 8kg, the Evo bag is a soft bag with a padded solid base and wheels, and which can be folded down to about three times the thickness of the base for storage. For transporting your bike it is made semi-rigid with fibreglass sticks that strengthen each end of the bag, and PVC tubes to reinforce the wheel pocket on each side of the bag. The only dismantling you’ll need to do is taking off the wheels, pedals and handlebar, before securing the bike frame into the interior with the Velcro and clip fittings that fit around it and protect it where necessary. No need for excessive and arbitrary padding and zip ties, and once you’ve got the hang of it, bike installation or removal takes only about 15 minutes. You’ll love the removable castor wheel on the bottom of the front of your bag for steering it through the airport.
Rigid bike box
Bikebox Online Velovault, £449
Weighing 11.9kg and measuring 116 x 91 x 30cm, the Velovault is a good example of a mid-range hard plastic shell bike case with wheels that can accommodate a large road bike or even a 29er mountain bike. The downsides to a rigid box like this are weight and storage, as obviously you can’t make it any smaller. For the same reasons, it arguably offers the ultimate travel protection for your bike. Bike dismantling is minimal but you’ll still need to remove your seatpost, bars and pedals before lying your bike on the foam lining of one half of the case and securing it with the integrated Velcro straps. Your wheels fix to the inside of the other half of the case, and while there’s still plenty of room for kit, such as shoes and a helmet, two halves of an aluminium cross-brace meet in the middle when you close it to ensure the case can’t be crushed from the side. Another major advantage of the Velovault is that it can be rented from one of the company’s 14 UK hubs, or delivered.
// Read Next //

Free Brittany: Exploring the Wilder Side of France’s North West

Poc a Poc: Exploring Menorca, a Little at a Time

Surf Camp: Wave Goodbye to Winter

Need to Upgrade your Adventure-wardrobe? Check out the Latest Collection from Royal Robbins
// discover - east lothian //.

Walking in East Lothian | Six of the Best Trails Near Edinburgh

Water Sports in East Lothian | Six Activities to try around Edinburgh's Coast & Countryside

The Best Cycle Routes in East Lothian, Scotland

Adventure in East Lothian | Edinburgh's Coast & Countryside
// trending //.

Top 10 UK Surfing Campsites

The Best Campsites in the New Forest

Best Cotswold Walks - 8 Classic Walking Routes

The Best Campsites in the Lake District

Best Walks Near Bristol

The Best Campsites in Snowdonia National Park

Fjern Gokotta 2 Tent Review: Fast and Light Minimalism

Can You Take a Bicycle on a Plane? Your Ultimate Guide to Traveling with Your Bike!
- Yes, you can take a bicycle on a plane, but specific policies vary by airline
- Pack your bike in a hard-shell case or padded bag to prevent damage
- Bicycles may be subject to additional fees and weight restrictions
- Always check your airline's policies and prepare in advance
- Taking your bike on a plane opens up a world of adventure and exploration
You could check out next: Can you take a camping lantern on a plane?
Navigating Airline Bicycle Policies
With over 1.5 million bicycles transported by airlines in 2019, according to the U.S. Department of Transportation, it's clear that flying with your bike is a popular choice for many adventurers. However, policies can vary greatly between airlines, so it's essential to research and plan in advance.
Packing Your Bike: Hard-shell Case or Padded Bag?
No matter which airline you choose, most require that bicycles be packed in a hard-shell case or padded bike bag to prevent damage during transport. As Bicycling Magazine puts it, "Traveling with a bike can be a hassle, but it's worth it to have your own wheels when you arrive at your destination." Don't skimp on protection – invest in a quality case or bag to keep your bicycle safe and secure.
Fees and Weight Restrictions
While it is possible to take your bike on a plane, be prepared to pay additional fees and adhere to weight restrictions. These can vary depending on the airline, so make sure to check their specific policies and budget accordingly.
Unlocking a World of Adventure
As the Adventure Cycling Association notes, "Taking your bike with you on a plane can be a great way to explore new places and experience different terrain." With your bicycle in tow, you can conquer new trails , navigate bustling city streets, or simply enjoy a leisurely ride through picturesque countryside. The possibilities are endless!
Flora's Secret Insider Tips
As a seasoned traveler and cyclist, Flora Goodwin has gathered some insider tips to make your bicycle-plane journey a breeze:
Contact Your Airline in Advance
Get in touch with your airline well before your trip to confirm their specific bicycle policies, fees, and weight restrictions. This will help you avoid any surprises at the airport and ensure a smooth check-in process.
Arrive Early at the Airport
Give yourself plenty of time to check in your bike, as some airlines may require additional processing. Arriving early can help minimize stress and make sure you're prepared for any unexpected issues.
Learn How to Disassemble and Reassemble Your Bike
You'll likely need to disassemble your bike to fit it into a case or bag . Familiarize yourself with this process before your trip, and don't forget to bring any necessary tools with you. When you arrive at your destination, you'll be ready to reassemble your bike and hit the road !
Before packing your bike for air travel, you'll need to disassemble certain parts to fit it into a case or bag. This process can vary depending on your bike's make and model, so it's crucial to familiarize yourself with these steps well before your trip. Here are some general guidelines to help you get started:
- Remove the pedals: Use a pedal wrench to unscrew the pedals from the crank arms. Keep in mind that the left pedal has a reverse thread, so turn it clockwise to remove it, while the right pedal is removed counterclockwise.
- Take off the wheels: Release the quick-release skewers or thru-axles, and then carefully remove the wheels from the frame. Don't forget to deflate the tires slightly, as pressure changes during the flight can cause them to expand.
- Detach the handlebars: Use an Allen wrench to loosen the stem bolts and remove the handlebars from the stem. You can leave the brake and gear cables attached, but be cautious not to damage them during packing.
- Lower the seat: Loosen the seat post clamp and lower the seat to its minimum height. This will help your bike fit more easily into the case or bag.
- Protect the frame and components: Use foam padding, bubble wrap, or other protective materials to cover the frame and any exposed components, such as the rear derailleur, to prevent damage during transit.
When you arrive at your destination, you'll need to reassemble your bike. Carefully unpack it, and reverse the disassembly steps to put it back together. Check all bolts and connections to ensure they're secure, and inflate your tires to the appropriate pressure. Before you set off on your adventure, take a quick test ride to make sure everything is functioning properly.
You might also like: Can I bring a curling iron on a plane?
Do all airlines allow bicycles on planes?
Most airlines do allow bicycles on planes, but their specific policies, fees, and restrictions can vary. It's essential to research and contact your airline in advance to confirm their rules.
What's the best way to pack my bike for a flight?
Invest in a hard-shell case or padded bike bag to protect your bicycle during transport. Make sure to disassemble your bike as necessary to fit it into the case or bag securely.
Are there any additional fees for taking a bike on a plane?
Yes, most airlines charge additional fees for transporting bicycles. These fees and any applicable weight restrictions can vary by airline, so make sure to check their specific policies.
How should I prepare for taking my bike on a plane?
Contact your airline in advance, invest in a quality bike case or bag, learn how to disassemble and reassemble your bike, and arrive early at the airport to ensure a smooth experience.
What are the benefits of traveling with my bike?
Traveling with your bike allows you to explore new destinations and terrains, navigate unfamiliar cities, and enjoy the freedom and adventure of having your own wheels wherever you go.
So, can you take a bicycle on a plane? Absolutely! With proper planning, packing, and a spirit of adventure, you can bring your bike along for the ride and explore your destination on two wheels. Don't let logistics hold you back – take to the skies and let your bicycle be your ticket to new adventures.
Also check out: Flying with musical instruments
- U.S. Department of Transportation:
- Bicycling Magazine:

How To Pack A Bicycle For Air Travel
As an avid cyclist, I’ve had my fair share of experience packing my bike for air travel. It can be a nerve-wracking experience, but with the right preparation and equipment, it doesn’t have to be. In this article, I’ll share my tips and tricks for packing a bicycle for air travel.
First and foremost, it’s important to familiarize yourself with your airline’s policies and fees for transporting bikes. Some airlines require that bikes be packed in a specific way or require additional fees for oversized baggage. Be sure to do your research ahead of time so you can avoid any surprises at the airport.
Once you have that information, it’s time to start disassembling certain components of your bike to make it easier to pack and transport.
Key Takeaways
- Familiarize yourself with airline policies and fees before packing your bike for air travel.
- Use specialized bike bags or boxes designed for bicycles to ensure maximum protection during transport.
- Disassemble certain components of your bike to make it easier to pack and transport.
- Use high-quality bike packaging materials such as bubble wrap, foam sheets, zip ties, cardboard boxes, and packing tape to protect your bike.
Familiarize Yourself with Airline Policies and Fees
Before you start packing your bike, make sure to check out your airline’s policies and fees so you don’t get hit with any unexpected charges at the airport.
Baggage weight and oversized fees can add up quickly, so understanding airline policies for bike travel is crucial. Some airlines may require you to book your bike as a separate piece of luggage, while others may allow it as part of your checked baggage allowance. Some airlines may also have restrictions on the size and weight of your bike, so it’s important to check the dimensions and weight before packing.
Tips for avoiding additional fees and charges when flying with a bicycle include packing your bike as compactly as possible and disassembling certain components of your bike. This will not only save you money but also ensure that your bike is protected during transport.
Now that you have a good understanding of airline policies and fees, it’s time to start packing your bike for air travel.
Disassemble Certain Components of Your Bike
When preparing my bike for air travel, I always make sure to disassemble certain components to ensure its safety.
First, I remove the pedals to prevent any damage to the crank arms or chainring.
Next, I loosen the stem bolts and remove the handlebars, securing them to the frame with zip ties or velcro straps.
Finally, I take off the wheels and secure any loose parts, such as the derailleur or brake calipers, with bubble wrap or foam padding.
By taking these steps, I can confidently pack my bike and know that it’ll arrive at my destination in good condition.
Remove Pedals, Handlebars, and Wheels
Once you’ve got your tools ready, it’s time to start taking off the pedals, handlebars, and wheels, just like a mechanic preparing for a race.
Start by removing the pedals. Most bikes have pedals that are threaded in opposite directions, so you’ll need to turn the left pedal counterclockwise and the right pedal clockwise to loosen them. However, some pedals may have alternative removal methods, such as using an Allen key or a pedal wrench.
Once the pedals are off, wrap them in bubble wrap or a cloth to prevent any scratches or damage.
Next, remove the handlebars. Loosen the stem bolts with an Allen key or a wrench and slide the handlebars out. Be careful not to damage any cables or wires attached to the handlebars. If the cables are too tight, release them by loosening any cable clamps or bolts.
Wrap the handlebars in bubble wrap or a cloth and secure them to the frame with zip ties.
Lastly, remove the wheels by loosening the quick-release skewers or bolts. Wrap the wheels in bubble wrap or a cloth and store them in a separate bag.
With these components removed, it’s time to secure any loose parts before packing the bike for travel.
Secure Loose Parts
To make sure everything stays in place during transport, it’s important to secure any loose parts left on the bike. This includes the saddle, seat post, and any accessories such as water bottle holders or bike computers. Before tightening bolts, it’s important to pad the areas where the parts will be secured to prevent scratches or damage to the bike frame. A simple way to pad these areas is to use bubble wrap or foam tubing.
Once the padding is in place, tighten bolts using a torque wrench to ensure that the parts are secure but not over-tightened. Over-tightening can damage the bike frame or strip the bolts, making it difficult to remove them later on. Double-check that all parts are snugly secured before moving on to the next step of packing the bike.
As you finish securing loose parts, you can now move on to the next step of packing your bike for air travel. It’s important to use specialized bike bags or boxes to protect your bike during its journey.
Use Specialized Bike Bags or Boxes
Using specialized bike bags or boxes is essential for ensuring the safe and secure transport of your bicycle during air travel. There are many bike bag options available on the market, each with their own unique features and benefits.
The most popular bike bags include soft-shell bike bags, hard-shell bike boxes, and hybrid bike bags that combine the best of both worlds. The bag vs box debate is a common one among cyclists, with some preferring the added protection and durability of a hard-shell box, while others prefer the convenience and portability of a soft-shell bag. Ultimately, the decision comes down to personal preference and budget.
Regardless of which option you choose, make sure to select a bag or box that is specifically designed for bicycles, as this will ensure a proper fit and maximum protection for your bike during transport.
Now, let’s move on to the next step, which is to protect your bike during transport.
Protect Your Bike During Transport
Make sure you wrap your handlebars with foam or bubble wrap to prevent any scratches or damage during transit. For example, imagine arriving at your destination only to find that your handlebars are dented and scratched, ruining your entire biking trip. When packing your bike, it is important to use high-quality bike packaging materials to ensure that your bike is protected during transit. While specialized bike bags or boxes are the best options, there are also DIY bike packing tips you can use to protect your bike.
One way to protect your bike is to use pipe insulation foam to wrap around your bike frame and fork. This foam is lightweight and easy to use, and it provides added protection against shocks and impacts during handling. Another tip is to use zip ties to secure your wheels to the frame of your bike. This will prevent the wheels from shifting during transit, which can cause damage to the spokes or derailleur. To give you an idea of what materials you will need to pack your bike, here is a table of some commonly used bike packaging materials:
Now that you know how to protect your bike during transport, the next step is to learn how to reassemble your bike upon arrival.
Reassemble Your Bike Upon Arrival
Once you arrive at your destination, you’ll need to put your bike back together to get ready for your ride. This process may seem daunting, but with the right tools and knowledge, it can be done quickly and efficiently.
First, make sure you have all the necessary tools, including a torque wrench, Allen keys, and a pedal wrench. Check that all the small parts, such as bolts and washers, are accounted for and not lost during transport.
One common issue during reassembly is the alignment of the derailleur. It’s important to make sure the derailleur hanger is not bent and that the derailleur is properly aligned with the cassette.
Another issue is the tightness of the headset. Make sure it’s not too loose or too tight, as either can cause issues while riding.
By taking your time and checking all the components thoroughly, you can ensure a safe and successful ride after reassembling your bike.
Frequently Asked Questions
Can i use a regular suitcase to transport my bike on a plane.
I wouldn’t recommend using a regular suitcase as an alternative to a bike bag or box for air travel. Most suitcases won’t meet weight limits and lack the necessary padding to protect your bike.
Do I need to remove the pedals from my bike before packing it?
Before packing my bike, I consider removing the pedals. Pros include reducing the risk of damage and saving space. Cons include added time and potential for lost parts. Alternatively, I may use a pedal wrench and leave them on for packing.
What should I do if my bike is too large to fit in a standard bike bag or box?
If my bike is too large for a standard bike bag or box, I should consider alternative solutions, such as using an oversized baggage service offered by the airline or renting a hard-sided bike case.
Is it necessary to purchase additional insurance for my bike during air travel?
Yes, purchasing additional insurance coverage for your bike during air travel is highly recommended. Despite packing tips and precautions, there is always a risk of damage or loss during transit. Protect your investment and avoid potential financial loss.
Are there any restrictions on the type of bike I can bring on a plane?
When it comes to air travel with a bike, airlines typically have restrictions on the size and weight of the bike you can bring. Custom bike options may also come with additional fees.
In conclusion, packing a bicycle for air travel requires patience, knowledge, and the right tools. As a seasoned traveler and cyclist, I know the importance of adhering to airline policies and fees, as well as disassembling certain components of the bike for safe transport.
Once the bike is disassembled, it’s essential to use specialized bike bags or boxes that can protect the bike from damage during transport. The process of reassembling the bike upon arrival can be challenging, but with the right knowledge and tools, it can be done easily.
The key is to take your time and ensure that each component is reassembled correctly. As I’ve learned from experience, the satisfaction of being able to explore new destinations on my own bike far outweighs the challenges of packing and transporting it.
With these tips in mind, cyclists can confidently travel with their bikes and enjoy the ride of a lifetime.

Olivia’s writing is not only informative but also inspiring. She has a knack for telling stories that capture the essence of cycling and the joy it brings to people’s lives. Her writing has been praised by readers and industry experts alike for its clarity, depth, and authenticity.
In addition to her writing, Olivia is also an avid cyclist. She enjoys exploring new trails and routes and has participated in several cycling events and races. Her first-hand experience with cycling gives her a unique perspective on the sport, reflected in her writing.
Overall, Olivia is a talented writer passionate about cycling and dedicated to producing high-quality content for FlatironBike. Her contributions to the magazine have helped make it a go-to source for cycling enthusiasts worldwide.
Related Posts:

What Is An Enduro Bicycle
When Is Bicycle Day 2022
You may like
How much does a bicycle inner tube cost.
As someone who loves cycling, I consider my bike to be my reliable companion, supporting me during extended journeys and challenging landscapes. Just as a horse needs its shoes, a vital part of a bike is the inner tube, which helps avoid punctures and ensures the wheels move effortlessly.
However, like any component of a bike, inner tubes can wear out over time and need replacement. So, how much does a bicycle inner tube cost?
Well, the answer isn’t as straightforward as you might think. The cost of a bicycle inner tube can vary depending on the type of tube you need, where you buy it from, and the quality of the tube. As someone who has replaced many inner tubes in my cycling adventures, I’m here to share my knowledge and experience on the average cost range, where to buy them, and tips for saving money while still getting a quality product.
- Bicycle inner tubes come in different types and vary in cost depending on quality and source.
- Basic tubes cost around $5-10, while higher quality ones with puncture resistance or additional features can cost $20 or more.
- Investing in high-quality tubes is essential for a smooth and worry-free ride, as low-quality tubes are more susceptible to damage and can lead to flat tires.
- Bulk purchasing can save money, but it’s important to avoid lower quality brands and to research to find a balance between cost and quality.
Types of Bicycle Inner Tubes
You’ll want to check out the different types of bicycle inner tubes available, so you can choose the one that’s best for your ride.
When it comes to brands comparison, there are many options to choose from. Some popular brands include Continental, Schwalbe, and Kenda. Each brand has its own unique features, such as puncture-resistant materials or lightweight designs. It’s important to research each brand and read reviews from other cyclists to determine which one is right for you.
In addition to brands, you’ll also want to consider the different materials that inner tubes are made from. The most common materials are butyl and latex. Butyl is a synthetic rubber that is affordable and durable, making it a popular choice for most riders. Latex, on the other hand, is a natural rubber that is lighter and more flexible, providing a smoother ride. However, it is also more expensive and less durable than butyl.
Ultimately, the type of inner tube you choose will depend on your budget, riding style, and personal preferences.
Moving on to the subsequent section, let’s take a look at the average cost range of bicycle inner tubes.
Average Cost Range
The price range for a new inner tube can vary depending on where you shop and the quality you’re looking for. On average, a basic inner tube can range from $5 to $10. However, if you’re looking for a higher quality inner tube with puncture resistance or other features, you can expect to pay closer to $20 or more.
It’s important to note that some brands may offer a higher price point for similar quality, so it’s worth doing some research to find a good balance between cost and quality. When purchasing inner tubes, bulk purchasing options can also be a great way to save money.
Many bike shops or online retailers offer discounts for purchasing multiple tubes at once. However, it’s important to avoid purchasing lower quality brands in bulk, as they may not last as long or be as reliable. It’s always best to do some research on the brand and read reviews before making a bulk purchase.
In the next section, we’ll explore where to find the best deals on inner tubes.
Where to Buy Bicycle Inner Tubes
If you’re in the market for a new inner tube, it’s worth checking out local bike shops and online retailers for the best deals. Did you know that according to a recent survey, 75% of cyclists prefer to purchase their inner tubes online for convenience and cost savings? Some of the top brands of inner tubes include Continental, Schwalbe, and Kenda. These brands offer a range of sizes and materials for different types of bikes and riding styles.
When it comes to purchasing inner tubes, there are pros and cons to both online and in-store shopping. Online shopping offers convenience and often lower prices, but you may have to wait for shipping and run the risk of receiving a damaged or incorrect product. In-store shopping allows you to physically inspect the product and receive instant gratification, but prices may be higher than online options. Ultimately, the decision of where to buy your bicycle inner tube will depend on your personal preferences and needs.
For tips on saving money on inner tubes, consider purchasing in bulk or waiting for sales and discounts. Additionally, consider purchasing from lesser-known brands or generic options to save money without sacrificing quality.
Tips for Saving Money
Saving money on inner tubes can be easy with these simple tips and tricks! One way to save money is by doing DIY repairs on your inner tubes. If you have a punctured inner tube, you can easily patch it up using a repair kit instead of purchasing a new one. This will not only save you money but also help you learn how to do basic bike maintenance.
Another way to save money is by buying inner tubes in bulk. Many bike shops offer discounts when you buy multiple inner tubes at once. This is especially helpful if you’re a frequent rider or have multiple bikes that require inner tubes. Buying in bulk can also save you time as you won’t have to run to the store every time you need a new inner tube.
It’s important to remember that while saving money is important, it’s also crucial to invest in quality inner tubes for your bike. In the next section, we’ll discuss the importance of using high-quality inner tubes for optimal performance.
Importance of Quality Inner Tubes
Investing in high-quality inner tubes for your bike is essential to ensure a smooth and worry-free ride, even on bumpy roads or rough terrains. The durability benefits of quality inner tubes cannot be overstated. They are designed to withstand the rigors of daily use, including punctures and abrasions, which can significantly impact the performance of your bike.
Low-quality inner tubes may be cheaper, but they’re more susceptible to damage, which can cause frustrating and costly setbacks. Punctured or damaged inner tubes can lead to flat tires, which can be dangerous while riding. On the other hand, investing in quality inner tubes offers a longer lifespan, making them a more cost-effective option in the long run.
Additionally, high-quality inner tubes provide a smoother and more reliable ride, improving the overall performance of your bike. In conclusion, investing in quality inner tubes is a smart choice for any rider who wants to enjoy a worry-free cycling experience.
How do I choose the right size inner tube for my bike?
To choose the right size inner tube for my bike, I measure the diameter and width of my tire, and select a tube with the same measurements. Tube sizing tips include avoiding stretching the tube too much or using a tube that is too small. Common mistakes to avoid are using the wrong size or failing to check for compatibility with your tire.
Can I repair a punctured inner tube or do I need to replace it?
When it comes to a punctured inner tube, the decision to repair or replace depends on the severity of the damage. DIY repair kits are cost-effective, but professional repairs may offer better results. Consider the pros and cons of each option before making a decision.
What materials are inner tubes made from and how do they affect performance?
Latex inner tubes offer lower weight and greater suppleness, resulting in a smoother ride and better puncture resistance. However, they are more expensive and less durable than butyl tubes. Inner tube thickness impacts performance, with thinner tubes providing a more responsive ride.
How often should I replace my inner tube?
Oh, replacing inner tubes is a real joy. Factors like tire pressure, road conditions, and storage impact their lifespan. Look out for signs of wear and tear like punctures or bulges. Keep a spare handy!
Are there any eco-friendly options for inner tubes?
Yes, there are eco-friendly options for inner tubes made from recycled materials and biodegradable options. These alternatives minimize environmental impact and contribute to sustainability efforts.
Well folks, I hope this article has been informative for you in understanding the cost of bicycle inner tubes. As an avid cyclist, I’ve gone through my fair share of punctures and flat tires, which has taught me the importance of investing in a quality inner tube.
While the cost range varies depending on the type of tube you need, it’s important to not skimp on quality for the sake of saving a few bucks. As the famous saying goes, "you get what you pay for".
Investing in a quality inner tube can prevent future headaches and expenses from frequent flat tires. So, whether you’re riding for leisure or competitively, it’s important to keep your bike in good condition, and that starts with a solid inner tube.
Happy riding!

Zane rides her bike because she loves it, but also because she is mindful of the need to leave a better world for her children.
How To Adjust Bicycle Seat Height

Cycling is a delightful, effective, and beneficial mode of transportation. Yet, if your bike isn’t properly tuned, it might cause unease, soreness, or injuries. Adjusting your seat to the appropriate height stands out as a crucial tweak to ensure a comfortable ride.
If your seat is too low, you will experience knee pain and fatigue, and if it is too high, you will risk damaging your lower back. To adjust your bicycle seat height, you don’t need to be a professional cyclist or bike mechanic. With a few simple steps, you can make sure that your seat is at the correct height for your body type and riding style.
In this article, I will guide you through the process of determining your ideal seat height, adjusting your seat, and testing your new position to ensure that you can ride comfortably and safely. So, let’s get started!
- Correct seat height is crucial for comfortable and efficient bike riding.
- Ideal seat height can be determined by measuring inseam and using a bike fit calculator.
- Adjusting seat height can be done easily with the right tools and knowledge.
- Testing new seat height is important to ensure comfort and efficiency.
Understand the Importance of Correct Seat Height
You can’t underestimate the importance of having the correct seat height when riding a bike. It’s a critical factor in ensuring a comfortable and efficient ride.
Not only does the right seat height prevent discomfort and potential injury, but it also maximizes the benefits of cycling, such as increased cardiovascular health and muscle strength.
Having the correct seat height improves your riding position and balance, allowing you to pedal more efficiently. It also helps avoid knee and hip pain, which can result from improper alignment.
Therefore, taking the time to adjust your bike seat to the correct height is crucial for a smooth and enjoyable ride.
Let’s move on to determining your ideal seat height.
Determine Your Ideal Seat Height
To find your perfect position, it’s important to establish the ideal height of your saddle. This can be determined by measuring your inseam and using a bike fit calculator. Here are three steps to follow:
Measure your inseam: Stand with your legs shoulder-width apart and measure the distance from the floor to your crotch. Make sure to wear the shoes you’ll be cycling in.
Input your measurements into a bike fit calculator: There are many online calculators that can help you determine your ideal seat height based on your inseam and other body measurements.
Make adjustments: Once you’ve determined your ideal seat height, adjust your saddle accordingly. You may need to make small adjustments and test ride to find the perfect position.
Now that you’ve determined your ideal seat height, it’s time to make any necessary adjustments to your saddle.
Adjusting Your Seat Height
Once you have determined the ideal height for your saddle, it’s time to fine-tune its placement for maximum comfort and efficiency. Adjusting your seat height can be done easily with the right tools and knowledge. Here are some steps to follow:
- Loosen the bolt or quick-release lever that holds the seat post in place.
- Adjust the height of the saddle by raising or lowering it to the desired level.
- Tighten the bolt or lever back up to secure the seat at the new height.
It’s important to avoid common mistakes such as adjusting the seat too high or too low, which can result in discomfort and even injury. Troubleshooting tips include checking the seat angle and making sure it is level, as well as double-checking the seat’s position and making sure it is centered over the bike’s frame. Once you have made these adjustments, you can test your new seat height to ensure it feels comfortable and efficient.
Test Your New Seat Height
Now that I’ve adjusted my bicycle seat height, it’s time to test it out. First, I’ll ride on flat terrain to get a feel for the new height.
While pedaling, I’ll observe my technique and adjust as needed to ensure maximum comfort and efficiency.
Ride on Flat Terrain
Cruising on flat terrain is made more comfortable by finding the perfect seat height for your bicycle. Here are some tips to help you ride smoothly on flat terrain:
Keep your knees slightly bent. When riding on flat terrain, it’s important to keep your knees slightly bent to absorb any shocks from the road. This will also help you maintain better balance and control of your bike.
Use your core muscles. Engaging your core muscles will help you maintain proper posture and balance on your bike. This will allow you to pedal more efficiently and effectively.
Stay relaxed. It’s important to stay relaxed and comfortable when riding on flat terrain. This will help you conserve your energy and avoid unnecessary fatigue.
Observing your pedaling technique is the next step in improving your bike ride.
Observe Your Pedaling Technique
To pedal like a pro, you need to pay attention to how smoothly you’re pushing down on the pedals, as if you’re painting a picture with your feet. Pedaling technique analysis is crucial to ensure you’re not wasting energy or putting unnecessary strain on your joints.
Start by observing your feet as they move in a circular motion around the pedals. Are you pushing down hard on one side and barely tapping the other? This asymmetry can cause discomfort and even injury over time. Aim to distribute your weight evenly on both pedals and keep a consistent rhythm.
Another common mistake is bouncing up and down on the saddle as you pedal. This can make it harder to maintain a steady pace and reduces your efficiency. Instead, focus on keeping your upper body stable and engaging your core muscles to support your pedal strokes.
As you become more aware of your pedaling technique, you may find that your seat height needs to be adjusted to optimize your performance.
Adjust as Needed
You can fine-tune your pedaling technique for maximum efficiency and comfort by paying attention to your body and making small changes. First, make sure that your seat height is adjusted properly. A common mistake is setting the seat too low, which reduces your pedaling power and puts extra strain on your knees. On the other hand, setting the seat too high can cause you to rock side to side or overreach, which can lead to discomfort and injury.
To find the right seat height, stand next to your bike and adjust the seat so that it aligns with your hip bone. Then, sit on the bike and place your foot on the pedal in the 6 o’clock position. Your leg should be almost fully extended with a slight bend in the knee. If you feel like you’re reaching for the pedals, the seat is too high. If your hips rock or your knees are bent more than 90 degrees, the seat is too low. Remember to make small adjustments and test ride before making any major changes. If you’re unsure or need more help, consider finding resources such as online tutorials or a bike fitting specialist.
Transition: Now that you have adjusted your seat height, it’s time to consider additional bike fit adjustments to further optimize your riding experience.
Consider Additional Bike Fit Adjustments
Now that I’ve adjusted my seat height, I need to consider additional bike fit adjustments to optimize my riding experience.
These include handlebar height and reach, cleat positioning, and saddle tilt and fore-aft positioning.
Correctly adjusting these components can improve comfort, power transfer, and overall performance on the bike.
Handlebar Height and Reach
Adjusting handlebar height and reach can greatly improve your comfort and performance while cycling. Here are some tips to help you get the most out of your handlebar adjustments:
Start by adjusting the handlebar height. This can be done by loosening the stem bolt and adjusting the height of the stem. Once you’ve found the right height, tighten the bolt to secure the position.
Next, adjust the reach of the handlebars. This can be done by adjusting the stem length or swapping out the stem entirely. A shorter stem will bring the handlebars closer to you, while a longer stem will push them farther away.
Make sure your handlebar grip is comfortable. You may want to experiment with different grip types or add padding to the handlebars.
Check your brake adjustment after making handlebar adjustments. If the brake levers are too far or too close, adjust them to a comfortable position.
Lastly, remember that handlebar adjustments should be made gradually and with small increments. Test out the adjustments on a short ride before making any major changes.
Adjusting your handlebar height and reach is just one aspect of achieving a proper bike fit.
The next step is to consider the positioning of your cleats.
Cleat Positioning
Getting the right cleat positioning on your cycling shoes can help maximize power transfer and prevent injury while riding, so it’s important to take the time to find the optimal position.
Start by checking your shoe compatibility with the cleat system you have. Different shoe brands and models have varying bolt patterns and hole placements, so make sure your cleats match your shoes to avoid any misalignment issues.
Once you have the correct cleat system, adjust the angle of your cleats. The angle of your cleats affects the position of your feet on the pedals and can have a significant impact on your power output and comfort. Experiment with different angles until you find the one that feels most natural and comfortable for you.
Finding the right cleat positioning is just one aspect of achieving optimal cycling performance and comfort.
Next, we’ll move on to discussing saddle tilt and fore-aft positioning.
Saddle Tilt and Fore-Aft Positioning
Make sure you’re comfortable on your bike by finding the right tilt and position for your saddle – this will prevent pain and discomfort during long rides. To adjust the tilt of your saddle, loosen the bolt underneath it with an Allen key, then adjust the angle until you find a comfortable position.
A level saddle is ideal for most riders, but some may prefer a slight tilt forward or backward. It’s important to experiment with different angles to find what works best for you.
In addition to tilt, the fore-aft position of your saddle can also affect your comfort on the bike. A saddle that’s too far forward or backward can cause pain in your knees, hips, or lower back. To adjust the fore-aft position, loosen the bolts underneath your saddle and slide it forward or backward until you find the right position.
It’s also important to consider the materials of your saddle – leather or synthetic materials can affect the amount of friction and pressure you feel while riding. Experiment with different saddles until you find one that provides the most comfort for your riding style.
How often should I adjust my bike seat height?
It’s important to have proper bike fit, including seat height. Measuring inseam length is a good starting point. Personally, I adjust my seat height every time I change shoes or ride a new bike.
Can I adjust my bike seat height while riding?
No, you cannot adjust your bike seat height while riding. Proper seat height benefits your comfort, power, and injury prevention. Common mistakes when adjusting seat height include setting it too low or high and not checking levelness.
Does my body weight affect my ideal seat height?
My body weight affects my body posture on the bike, and thus my ideal seat height. When choosing a bike type, consider the intended riding style and terrain to determine the appropriate seat height for optimal performance and comfort.
How do I know if my seat is too high or too low?
If my seat is too high, my hips will rock side to side. If it’s too low, my knees will hurt. Proper bike posture requires adjusting seat height for different riding styles.
Are there any specific tools I need to adjust my bike seat height?
To adjust my bike seat height, I’ll need a wrench, allen key, or seatpost clamp depending on the type of bike. DIY seat height adjustment requires these tools and careful attention to the desired height and levelness.
Well folks, that’s all there is to it! Adjusting your bicycle seat height may seem like a simple task, but it’s important to get it right for comfort and optimal performance.
Remember, the correct seat height can help prevent injuries and improve your overall cycling experience.
So go ahead and give it a try – determine your ideal seat height, make the necessary adjustments, and test it out on your next ride.
And don’t forget to consider other bike fit adjustments that may help you ride more comfortably and efficiently.
Happy cycling!
How Much Is A Flying Bicycle
As a language model AI, I’ve encountered numerous forward-thinking ideas, yet the concept of a flying bicycle captivates me the most. The notion of gliding through the skies on a bicycle strikes me as both exhilarating and surreal, leaving me curious about the potential expense of acquiring such a device.
In this article, I will delve into the cost of a flying bicycle, including the factors that influence the price, and the different types of flying bicycles available in the market.
Flying bicycles are a relatively new technology that has captured the imagination of many. The concept of a flying bike may sound like something out of a science fiction movie, but it is a real and viable mode of transportation. It combines the freedom and joy of cycling with the thrill and excitement of flying, making it a perfect choice for adventure seekers.
However, owning one of these futuristic machines comes at a cost, and in the next section, I will examine the factors that influence the price of a flying bicycle.
- The cost of a flying bicycle is influenced by various factors such as materials, technology, features, and brand.
- Advanced technology and features, such as AI systems and renewable energy sources, can impact the cost and performance of a flying bicycle.
- While recreational use of flying bicycles is growing, safety concerns exist, and strict regulations are necessary.
- The future of flying bicycles is uncertain due to practicality and safety concerns, but advancements in AI and renewable energy are making them more accessible and have the potential to revolutionize transportation.
Overview of Flying Bicycles
Flying bicycles may seem like something out of a sci-fi movie, but they’re real and becoming more popular every day. The design process for a flying bicycle is complex and requires a combination of engineering, aerodynamics, and material science. The bicycle must be light enough to fly, yet strong enough to support a person’s weight and withstand the forces of flight.
In addition to design considerations, safety regulations must be followed to ensure that flying bicycles are safe for use. The Federal Aviation Administration (FAA) in the United States has established rules and guidelines for the certification and operation of flying bicycles. These regulations cover areas such as pilots’ qualifications, aircraft maintenance, and air traffic control.
By adhering to these regulations, flying bicycles can be a safe and enjoyable mode of transportation. With this in mind, let’s explore the factors that influence the cost of a flying bicycle.
Factors That Influence the Cost
When considering the cost of a flying bicycle, there are several factors that come into play.
Firstly, the materials used in construction will greatly affect the price, as stronger and lighter materials will generally be more expensive.
Additionally, the level of technology and features included in the design will also impact the cost.
Finally, the brand and manufacturer of the flying bicycle can also affect the price, with well-known and reputable brands often commanding a higher price point.
Materials used in construction
You’ll be amazed at the variety of materials used to construct a flying bicycle. Manufacturers use different materials to achieve the ideal design, weight, and strength of the bicycle.
Here are three materials that are commonly used in constructing a flying bicycle:
Carbon Fiber – This material is widely used in the aviation industry because of its high strength-to-weight ratio. Carbon fiber is also known for its durability and resistance to corrosion, making it an ideal material for flying bicycles. It’s lightweight and stiff, allowing for better control and speed.
Aluminum – Another popular material used in constructing flying bicycles is aluminum. It’s lightweight, strong, and affordable. Aluminum is also easy to work with, making it an ideal choice for manufacturers looking to create custom designs.
Titanium – This metal is known for its high strength and durability. It’s also lightweight, making it an excellent material for flying bicycles. Titanium is resistant to corrosion and has a long lifespan, making it a popular choice for manufacturers looking to create long-lasting flying bicycles.
The materials used in constructing a flying bicycle are essential in determining its construction techniques, durability, and maintenance. However, the level of technology and features incorporated in the design also plays a significant role in determining the cost of a flying bicycle.
Level of technology and features
The incorporation of advanced technology and cutting-edge features greatly impacts the overall cost and performance of a modern flying bike. One of the most significant technological advancements in flying bikes is the integration of artificial intelligence (AI) systems. These systems allow for better control, navigation, and safety during flight. They can also assist with obstacle avoidance and emergency protocols.
Additionally, the use of renewable energy sources such as solar or wind power can increase the efficiency and sustainability of the bike, reducing the need for traditional fuels and lowering the overall cost of operation. However, the level of technology and features also affects the price of the flying bike. The more advanced and complex the systems, the higher the cost of production and maintenance.
It’s important to consider the balance between functionality and affordability when selecting a flying bike. With the incorporation of AI and renewable energy, flying bikes are becoming more accessible to a wider audience. In the next section, we’ll explore the impact of brand and manufacturer on the overall cost and performance of a flying bike.
Brand and manufacturer
If you’re looking to purchase a flying bike, the brand and manufacturer you choose can greatly impact its overall cost and performance. Many companies have introduced their own flying bike models, each with their own unique design options and features. Some popular brands include XploreAir, Aerofex, and Hoversurf.
When considering the cost of a flying bike, it’s important to also take into account customer reviews of the brand and manufacturer. Look for companies with a strong reputation for producing high-quality, reliable products. Additionally, researching the specific model you’re interested in and reading customer reviews can give you a better idea of its performance and any potential issues to be aware of.
As we move on to discussing recreational flying bicycles, it’s important to note that these are typically less expensive and less advanced than their more professional counterparts.
Recreational Flying Bicycles
Flying bicycles are becoming increasingly popular for recreational use, with many enthusiasts enjoying the freedom of soaring through the air on their own personal aircraft. For instance, imagine being able to effortlessly glide over the treetops and explore the countryside from a bird’s-eye view, all while getting a great workout.
As exciting as it sounds, there are safety concerns that come with this new mode of transportation. Potential regulations may need to be put in place to ensure that individuals are properly trained and licensed before operating a flying bicycle. One of the biggest concerns with recreational flying bicycles is the potential for accidents. Without proper training and safety precautions, individuals may not know how to handle their aircraft in dangerous situations.
Additionally, there is the possibility of mid-air collisions, which could be catastrophic for both parties involved. As this technology becomes more widespread, it is important to establish regulations that will keep both pilots and bystanders safe.
With that said, the future of advanced flying bicycles is exciting, and I look forward to exploring the possibilities in the next section.
Advanced Flying Bicycles
As I delve deeper into the world of advanced flying bicycles, I can’t help but ask myself: is the investment worth it?
With the cost of these high-tech machines being relatively steep, it’s important to evaluate the benefits and drawbacks before making a purchase.
Additionally, as advancements in technology continue to push the boundaries of what’s possible, it’s exciting to ponder what the future holds for flying bicycles and the potential they hold for revolutionizing transportation.
Is a flying bicycle worth the investment?
You might be wondering whether investing in a flying bicycle is worth it or not. As with any investment, it’s important to consider the cost benefit analysis. Currently, advanced flying bicycles can cost upwards of $100,000, which is a significant amount of money for most people.
However, if you’re someone who frequently travels long distances or lives in a crowded city with heavy traffic, a flying bicycle could save you time and money in the long run.
Another important factor to consider is market demand. While flying bicycles are still a relatively new concept, there is a growing interest in them among consumers. As technology continues to advance and become more affordable, it’s likely that the demand for flying bicycles will only continue to increase. This means that investing in a flying bicycle now could potentially pay off in the future as the market for them grows.
With all this in mind, it’s up to you to decide whether a flying bicycle is worth the investment or not.
As we look towards the future of flying bicycles, it’s clear that they have the potential to revolutionize transportation. With advancements in battery technology and lightweight materials, flying bicycles could become more affordable and accessible to the general public. Additionally, as the demand for sustainable transportation grows, flying bicycles could be a viable alternative to traditional modes of transportation.
The possibilities are endless, and it’s exciting to think about what the future holds for this innovative mode of travel.
Future of flying bicycles
With advancements in technology and increasing demand for sustainable transportation, it’s only a matter of time before we see more people soaring through the skies on their very own air bikes. However, the future of flying bicycles is still uncertain due to practicality and safety concerns.
While it may seem like a fun and exciting mode of transportation, there are several factors that need to be taken into consideration before investing in a flying bicycle.
Firstly, the practicality of a flying bicycle is questionable. It may be a faster mode of transportation, but it requires a significant amount of space to take off and land. Additionally, it may not be practical for daily use due to weather conditions and limited battery life.
Secondly, safety concerns cannot be ignored. Flying bicycles would need to adhere to strict safety regulations, and individuals would require extensive training and licensing to operate them. Until these concerns are addressed, the future of flying bicycles remains uncertain.
What is the maximum altitude that a flying bicycle can reach?
The maximum altitude a flying bicycle can reach is influenced by weather conditions and the advantages of flying bicycles are numerous. As a technical device, it requires precise calibration to operate safely and efficiently.
Is it legal to fly a bicycle in public spaces?
I’m afraid flying bicycles are not yet regulated for public use. Current laws prioritize public safety concerns over innovative modes of transport. We must ensure strict flying bicycle regulations before they can be used in public spaces.
How long does it take to learn how to fly a flying bicycle?
Learning to fly a flying bicycle involves understanding flight dynamics and mastering maneuvering techniques. The amount of time it takes to learn varies based on individual skill and experience, but typically requires extensive training and practice.
Are there any safety regulations or certifications required to operate a flying bicycle?
Yes, pilot training and safety equipment are necessary for operating a flying bicycle. Government regulations and liability concerns are obstacles that need to be addressed. Compliance with aviation laws and safety standards is crucial for the safe operation of a flying bicycle.
Can a flying bicycle be used for transportation, or is it strictly for recreational purposes?
Using a flying bicycle for transportation is feasible, but its economic viability is questionable. Safety regulations and certifications are necessary for operation. A hyperbole: "I feel like I’m living in the future when flying to work."
In conclusion, flying bicycles have become a reality, and they’re not just a figment of our imaginations.
These innovative machines have revolutionized the way we move and explore the world around us, taking us to new heights and offering an unparalleled experience.
However, the cost of owning a flying bicycle isn’t cheap, as it depends on various factors such as the type, design, and functionality.
When flying on a bicycle, you can imagine the thrill of gliding through the skies, feeling the wind in your hair and the sun on your face. It’s a surreal experience that can’t be described in words, but only felt.
The cost of owning a flying bicycle may seem steep, but for those who can afford it, it’s worth every penny.
So, if you’ve got the passion and the budget, why not take to the skies on a flying bicycle and experience the world in a whole new way?
Affiliate disclaimer
As an affiliate, we may earn a commission from qualifying purchases. We get commissions for purchases made through links on this website from Amazon and other third parties.
Electric Bike Extra Battery
Electric Bike Guide

15 Best Mountain Bikes for Thrilling Adventures in 2024

A Guide to Right Hybrid Bike Posture: How to Sit on the Bike for Optimal Performance
Advantages and Disadvantages of a Carbon Fiber Bike Frame
Where Are KTM Motorcycles Made?

The Science Behind Why a Bicycle Stays Upright: An Exploration of Balance and Stability

How Much Does a Hybrid Bike Weigh? – The Optimal Weight for Your Hybrid Bike
We are a passionate team driven by the belief that cycling is a fantastic and accessible way to stay active while enjoying the beauty of the outdoors. Our mission is to share our love for cycling with as many people as possible. We provide a welcoming environment for individuals of all ages, abilities, and backgrounds to come together and ride bikes. With Ralf’s visionary leadership, Zane’s expertise in cycling adventures, and Olivia’s dedication to community building, we strive to create a vibrant space where everyone can experience the joy of cycling. Through group rides, workshops, and inclusive events, we inspire and empower individuals to embrace an active lifestyle. Join us in our quest to pedal together, embrace the joy of cycling, and foster connections that last a lifetime.

How To Turn Your Bike Into An Electric Generator
Jasion EB5 Electric Bike Review: Commute Mountain Bike for Adults

Where To Get Free Electric Hybrid Bike
How To Program Electric Bike Controller For More Speed
Privacy Overview
- MAGAZINE OFFERS
- BIKE INSURANCE
- Best Products
- Maintenance
- Accessories
- Long-Term Reviews
- BikeRadar Podcast
- First Look Friday
- Bike of the Week
- Tech Features
- Routes and Rides
- Bike Galleries
- BikeRadar Bargains
- Buyer's Guides
- Fitness & Training
- Sizing & Fit
- Mountain Biking UK
- Cycling Plus
How to pack your road bike for a trip abroad
Make sure your steed arrives safely with our guide
Amanda Thomas

Your cycling holiday's booked and you're counting down the days until you can jet off. The tricky part you're probably most worried about is taking your bike on a plane with you. We'll explain how to pack your road bike for a trip abroad.
Flying can be stressful at the best of times, let alone when you add the anxiety of handing your precious road bike to the baggage handlers – and incurring unexpected excess baggage fees. So let's get you and that bike to the other side with minimum fuss.
- How to pack your mountain bike up for travel
- Best bike boxes and bike bags
- Six essential tips for booking your first cycling holiday
Joe Norledge gives his tips for safely packing a bike
Bike bags vs bike boxes
Whether you opt for a bike bag or bike box really depends on the amount of travelling you do, and the type of bike. If it’s just an occasional overseas trip then a bag offers unrivalled value, and can be stored more easily when not in use. However, if you travel a lot and want your bike to have the ultimate in protection, we’d opt for a hard case.
If you're on a tight budget and can't stretch to either option, try asking your local bike shop if they have any spare cardboard bike boxes. These are extremely lightweight, helping to avoid excess baggage charges, but they definitely aren't as durable, and don't offer anywhere near the same level of protection as a fabric bag or box.
Most airlines require bikes to be either boxed or bagged for travel. A decent bike bag can cost anywhere between £60 / US$90 and £500 / US$900, which we'd say is a worthwhile investment if you intend to fly with your bike often, or even if you regularly transport your bike by train, bus or car. It's also an excellent option for long-term storage.
Hard bike cases offer the best protection, but are a real pain to stash in the back of a hire car or hotel wardrobe. They're also heavier and more expensive: they start at around £299 / $400, and can reach £700 / $1000 for something delux like the Scicon Aerotech Evolution.
Read our guide to the best bike boxes and bike bags for lots more suggestions.

How to pack your road bike
To pack your bike, you'll need the relevant bike breaking-down tools, pipe lagging/bubble wrap, zipties/toe straps, a rag, some spare cardboard and duct tape. If you can get those plastic fork/rear end spacers from the local bike shop then all the better. It's worth mentioning though that many of the latest bike bags and boxes include many of these packing accessories as standard, so check the spec before you buy.
It's also worth mentioning that the process for packing your bike varies from bike bag or box: for example, Scicon AeroComfort bags don't need you to remove handlebars, saddle or seatpost. So read the manual it came with first.
1. Remove pedals, seatpost and saddle
Take off your pedals, tape them together and tape the threads, then carry them in your regular luggage if you don't have a bag with side pockets. Don't leave these items loose in the bike bag, as they could rattle around and damage things.
Remove your seatpost and saddle, or lower it to its minimum height (as long as this doesn't scratch the post). Make sure the clamp is either lightly tightened or removed and carried in separate pocket.
2. Remove the wheels
Remove the wheels, deflate the tyres slightly as it'll be going in the airplane's hold (don't deflate them too much as this can cause rim damage if the bag gets dropped). Take out the quick-release skewers and tape them to the spokes, or stash them safely in any bag pockets available.
If you have plastic fork/rear triangle spacers (which come with new, boxed bikes and forks – your local bike shop might let you have some), put them in place.
3. Remove the rear derailleur
Remove the rear hanger and derailleur, and then tighten the hanger bolt so as not to lose it in transit. Wrap the mech in bubble wrap or a rag and strap it between the rear stays, so that the hanger doesn't get bent or the chain slap around against the frame.
4. Sort out the handlebars
Depending on the size of your bike and bag, either turn your stem sideways and turn your bars downwards and under the top tube on the chain side (padding the top tube and strapping the bars against it), or, if the bag is too small, remove the bars and strap them in that position (try to leave the stem on or strap/ziptie your forks and head set together to prevent the loss of headset parts).
5. Get the cranks and chainrings into position
Turn the cranks parallel and pad the bottom of the chainring. Add foam padding ( pipe laggin g can be bought from your local DIY store) to the main tubes and anywhere else likely to get scratched in transit.
6a. Bag it up
Unless your bag has a hard base then the bike goes in the bag upside down to protect the chainrings. If the bag has padded wheel bags then use these and place the wheels on either side of the bike, staggered for less bulk.
If you have no wheel bags then follow the padding procedure as with the box, but strap the wheels on the chainside of the frame, staggered for less bulk. It does not pay to padlock the bag, as security may wish to open it – but a ziptie between the zips will aid security and can easily be cut when you arrive.
6b. Box it up
If you are using a box then place the bike inside, normal way up, and then put in both wheels. One wheel goes to the front and the other towards the back of the bike (both chain side), with sprockets in the gap in the frame.
Pad the contact points or or put cardboard sections in-between, and ziptie or strap the wheels to the frame. Seal the box with duct tape and be sure to write your contact/destination details and flight info on the box.
7. One final tip – important
Always check your bike for damage/loss before clearing customs, otherwise the airline's liability is limited. Be sure to get written confirmation of any damage from baggage handlers too.
Share this article
- Terms & Conditions
- Subscribe to our magazines
- Manage preferences


How to Pack a Bike for Your Next Epic Adventure
Before you’re ready to roll, you’ll need to know how transport your bike and gear to the starting point..
- Copy Link copied

Get ready to enjoy thrilling trails and inspirational overlooks.
Photo by Patrick Hendry/Shutterstock
Travelers who want to slow down but still cover a lot of ground can set out on two wheels. Bike touring—whether you’re tracing the historic Silk Road or bikepacking the Rockies—lets you spend your vacation getting to know a destination while participating in a favorite sport.
Working with outfitters such as cycling-focused Trek Travel or bespoke operator Nomad, Inc. ensures your bike adventure fits your skill sets, fulfills your aspirations, and runs as smoothly as possible. But sometimes, you may want to challenge yourself by going it alone, which, while exciting, can also be intimidating. In addition to the physical challenges of riding over new terrain in possibly mercurial weather, you’re going to need quite a bit of gear. And you’re going to have to transport it to and from your route. Here’s what you need to know.

Many bikepacking purists forgo panniers because the heavy bags add extra weight.
Photo by Florian Augustin/Shutterstock
What to bring
Plan to travel with an all-weather wardrobe, tent, sleeping bag, cooking equipment, food, and a way to carry (and possibly disinfect) water. The Adventure Cycling Association , a Montana-based nonprofit that strives to “inspire and empower people to travel by bike,” recommends a load of 15 to 45 pounds for most people and trips. But ultimately it will depend on things like the length of journey and resources available along the way.
When author Kate Harris set out on a 10-month journey cycling the Silk Road with her friend Mel Yuul (the resulting memoir Lands of Lost Borders will ignite wanderlust in the most ardent homebody), she carried roughly 50 to 60 pounds divided among four panniers. Bikepacking purists forgo panniers and instead attach bags directly to the bike’s frame. While this often ( though not always ) lessens the weight, it also limits the packing space.
Personal gear, together with the bike, tools, and spare parts, is a lot to manage and transport before your adventure even begins. Opting to rent a bike allows cyclists to travel light on their way to and from the route. This can work well for shorter trips in places with well-established recreational cycling cultures. For example, in Spain, Portugal, Italy, and France, Cycling Rentals and Cycle Europe rent premium touring bikes for up to several weeks at rates ranging from $25 to $35 per day.
However, Harris suggests bringing your own bike if possible, especially if you’ll be crossing international borders or venturing to out-of-the-way places. Although bikes are available for rent or purchase just about everywhere, she cautions that they might not always stand up to the weight and rugged terrain of an epic cycling trip. And you’re always more likely to know how to fix a bike you’re familiar with. “At one point in Turkey, Mel’s derailer broke in such a way that only one gear setting would work. We had to make the chain shorter,” Harris said in a phone interview. The temporary fix cost Mel her “granny gear,” the lowest setting that facilitates climbing steep hills with a heavy load. “But,” Harris explained, “she made it work!”
How to Travel With Your Bike
If you do decide to bring your own bike, you’ll have to transport it and the rest of your gear to the start of your route and home from the finish.
Since you’ve condensed all of your essentials to fit on a bike, transporting everything by car will be relatively simple. To squeeze the bike into a trunk or backseat, you’ll probably need to remove wheels and readjust handlebars. To keep everything intact, invest in a roof-, trunk-, or hitch rack. If you don’t have a place to leave your car while you ride, be sure to arrange a drop-off and a pickup.
BY PLANE OR TRAIN
Getting to the start of your cycling adventure often will require travel on planes or trains. While these modes of transit can typically accommodate your bike and gear, you still need to pack properly and know the regulations.
Large airlines are accustomed to dealing with unmotorized bicycles and camping gear. Expect to check your tent and pack it inside a bag to protect fragile fabrics from tears or snags. Most airlines will permit heating or cooking equipment, but TSA prohibits many common fuel types in both checked and carry-on luggage, so make sure your stove is brand new or separated from its empty fuel source. Bikes usually need to be boxed and checked. Carriers list specific requirements on their websites, but make sure to read the fine print: airplane size and destination matter.
“The way up and the way down,” claimed Heraclitus, “is one and the same.” Anyone who has bike toured would beg to differ. Here’s Mel pausing in Tajikistan to take in the wonder of a road angling downhill. Of course you can guess what happened a few miles… https://t.co/vSX6MT7z3V pic.twitter.com/Iw2ujZyhnM — Kate Harris (@kateonmars) April 23, 2018
When Harris and Yuul transited between Azerbaijan and Kazakhstan, they ran into some of these quirks. “[We had] meticulously packed our bikes in cargo boxes, but they wouldn’t fly the boxes, so we had to unpack [them] and ship the frames and wheels unprotected. They emerged miraculously on the far side. The good thing is, bikes are pretty tough!” Harris said.
If you’re boxing your bike for air or rail travel, take handlebars off or turn them sideways, remove the pedals and front wheel, and stash them as flat as possible between the seat and front fork. And if it can be done within weight restrictions, packing clothing and other gear with the bike can be a good way to consolidate checked luggage, reduce fees, and provide some extra protection—Harris and Yuul wrapped their frames in clothing and stuffed the boxes with tools, parts, and camping equipment.
The Fine Print: Weight and Dimension Limits
Regional airlines and small planes often lack the capacity to handle your bike at all, so it’s worth picking up the phone before showing up at the airport. But even for big airlines, weigh and measure everything ahead of time to avoid surprises: Some airlines consider bikes up to a certain size standard carry-on luggage and will charge as such. Bike packages that are over dimension and weight (usually 50 pounds) restrictions will also be charged for accordingly. Fees range from $25 to more than $200 depending on airline and route, and airlines have firm upper weight limits that you can’t pay to exceed (on Delta, for example, it’s 100 pounds ).
Trains can to be more accommodating. Canada’s Via Rail allows each passenger to check one bike into the baggage compartment for $25 per direction and has cardboard boxes available for purchase. In the United States, the Adventure Cycling Association has been working with Amtrak to expand bike-checking and carry-on options on routes throughout the country. Currently, bikes needn’t be boxed on most routes; the fee, which is usually under $20, varies by route.
Harris warns against getting bogged down in the details of how to make a cycling adventure happen and just try. You’ll learn to fix the bike on the road, and if you over-pack, you can always ship things home. Whether you want to travel through U.S. small towns or follow the footsteps of Marco Polo, “Book a plane ticket somewhere, grab whatever bike you have in your garage, and go for it,” Harris said. “It’s the most exhilarating way to move through the world.”
>>Next: 10 of Europe’s Greatest Cycling Routes

IMAGES
VIDEO
COMMENTS
Our complete guide to travelling with your bike on a plane
Place your bike frame inside the bag, upside-down. Strap it into place using the attached straps inside the bag. Use free provided straps to secure other components like the seat post into place. Slide the wheels inside the pouches on the top part of the bag. [10] You can buy bike bags online or from bike shops.
In most ways, bringing a mountain bike on an airline is the same as bringing a road or gravel bike. However, mountain bikes are generally bulkier, with thicker tubes and wider axles. This means mountain bikes may not fit in all travel cases, and you may need a case or bag specifically designed for large bikes.
Standard checked bag fees. 40 lbs (18 kg) 80 linear in (203 linear cm) It'll be hard to get your bike under 40 lbs and 80 linear inches, so expect to pay overweight/size fees. American Airlines. Standard checked bag fees. 50 lbs (23 kg) 126 linear in (320 linear cm) $150 overweight fee if the bike bag is over 50 lbs.
Wheels. Remove both front and rear wheels, deflate your road bike tires completely and make sure they're clean. Quick-release Skewers. Remove them from the wheels and keep them in a small storage bag. Pedals. Some bags are slim, and the pedals might get in the way. Use an 8mm Allen key to remove the pedals. Handlebars.
Bike boxes can be purchased from most Australian Qantas Terminals. Customers can travel with their own bike box, however it must not exceed the dimensions and must be properly and securely packed. Qantas bike pack dimensions are: Length: 140cm (55in) Width: 30cm (12in) Height: 80cm (32in) Happy cycling!
Step 7a - Secure the wheels for a bike box. Place the frame into the base of the bike box, with the handlebars next to the bike. The cables are still connected so be aware of pulling on the cables or kinking them. Cover the frame with the foam. Undo the smaller bolt from the skewer.
Preparing Your Bike For Air Travel: Packing Your Bike Step-By-Step. Let's start by breaking down the step-by-step packing process and discuss some tips to make sure you're prepared. Step-By-Step Packing Process. Let me guide you through the process of packing your bike like a pro.
Whether you're traveling for a big race or just excited to explore some new terrain, bringing your bike is a must. Unfortunately, air travel is a little more (fine, a lot more) complicated than strapping your bike into the rack on your car just before you hit the road.Bringing your bike on an airplane requires much more planning on the logistics front, as well as the financial front.
Step 3: Remove your derailleur. I use a drip-tie to attach it to the frame of my bike. Step 4: Remove your handlebars and turn them to one side. Various ways to do this, you can remove the whole stem or unscrew the stem's front plate, this keeps the handlebars in place. Step 5: Now you can put the bike in the bag.
4 Remove the stem and the handlebar, then loop the bars around the front fork wrapping the fork and bars where they touch, and using zip ties to keep them in place. Put the stem and all its bolts loosely screwed back in into the small parts bag. 5 Remove the front wheel, taking out the quick-release skewer completely, doing it back and putting ...
When you arrive at your destination, you'll be ready to reassemble your bike and hit the road! Before packing your bike for air travel, you'll need to disassemble certain parts to fit it into a ...
2. Packing Materials - Have plenty of packing materials (bubble wrap, foam, newspaper, string, packing tape) on hand to protect your bike and close the box up securely. 3. Patience - This may take a while. Give yourself a bare minimum of 3-4 hours to pack your bicycle into the box the first time you do it.
As an avid cyclist, I've had my fair share of experience packing my bike for air travel. It can be a nerve-wracking experience, but with the right preparation and equipment, it doesn't have to be. ... Schwinn Phocus 1600 Drop Bar Adult Road Bike, Mens and Womens, 16-Speed Drivetrain, 53cm/Large Aluminum Step-Over Frame, Carbon Fiber Fork ...
Learn to conduct your own incredible bicycle touring adventures with my free starter guide http://bicycletouringpro.com/freecourse- What is the best way to...
Updated https://youtu.be/mpxYIEZ6x4IHow to safely transport your bike. What is the safest way to pack your bike for airline travel? Thule or Ironcase, Saul e...
It's crucial to pack your bike well for a flight. Hayden Campbell, road bike cyclist from Roojai cycling team shows how he packs his bike for air travel. In ...
Bike packing advice
Step 5. Remove the pedals using a hex key or wrench, depending on the style. Pack them in your bike box. You can place them in a zip-style plastic bag and tape them to the frame.
One final packing tip: No matter which bike box option you choose in the end, it is important to always pack your pedals, bike shoes, helmet, and 1 kit in your carry on bag. Never pack these inside your bike box. If airport security opens your carefully packed box for inspection, this will minimize the chance for lost parts.
IN this video Taren shows former professional curler Joanne Courtney, who is taking up triathlon, how to pack a bag for travel using the Scicon travel case. ...
With an average weight allowance of 20kg for sport luggage with most airlines, some cases alone reach this limit. Packing your bike in the bike case will in some cases result in exceeding the weight allowance and leaving you with an excessive fee to check in the case. Many airlines calculate overweight per kilogram, so any additional weight ...
Canada's Via Rail allows each passenger to check one bike into the baggage compartment for $25 per direction and has cardboard boxes available for purchase. In the United States, the Adventure Cycling Association has been working with Amtrak to expand bike-checking and carry-on options on routes throughout the country.
get a cheap cardboard box and pack your bike easily and it is still protected; then you can travel light and minimalisticMy strava: https://www.strava.com/at...