Plans and Pricing
Artificial intelligence (AI)
Business leadership
Communication & collaboration
CX / Customer experience
EX / Employee experience
Hybrid work
Productivity
Small business
Virtual events
Life @ RingCentral
RingCentral newsdesk
RingCentral products
Customer stories
Industry insights
Reports & research
Strategic partnerships

Already a partner?
Interested in partnering with us? Tell us a little about your business here .
Sales: (877) 768-4369

What is jitter? How to test and reduce internet jitter

Need help with call quality in RingCentral?
Click here for help
There’s nothing worse than when you’re on a phone call with a client and suddenly the line drops or their voice starts breaking up.
It leaves you feeling frustrated, and if we’re honest, a little embarrassed. Especially if it’s not the first time.
In this blog, we’ll be discussing what could be the cause of those problems—namely, internet or network jitter. We’ll look into exactly what jitter is and how you can go about fixing it.
What we’ll go over:
What is jitter?
What is acceptable jitter for the internet.
- How do I fix jitter for the internet while on a call?
🔍 Are you thinking about purchasing a new communication tool and unsure how to get started? Here’s a free checklist to help you pick the right one for your business.
✅ Free checklist
Information is transported from your computer in data packets across the internet. They are usually sent at regular intervals and take a set amount of time. Jitter is when there is a time delay in the sending of these data packets over your network connection. This is often caused by network congestion, and sometimes route changes.
Essentially, the longer data packets take to arrive, the more jitter can negatively impact the video and audio quality.
This can be an annoyance when you’re using your computer for recreational purposes. It’s close to unbearable in a professional setting when you’re making a conference call or trying to connect to the team. Jitter can be the difference between a successful voice over internet protocol (VoIP) call and a disastrous, glitchy one.
So, what exactly are data packets and VoIP calls?
- Data packets : Although we may not be aware of it, we communicate online through data packets. When one or more of these packets fails to reach their endpoint, that’s when we may experience high jitter.
- VoIP: Voice over internet protocol (VoIP) converts your voice into data so that it can be transmitted in the aforementioned packets over the internet. Your voice is broken down into data packets and transmitted across the internet to its destination—the receiver of your call.
When choosing a VoIP provider, it’s always beneficial to look out for those that have exceptional HD video and audio quality, like RingCentral. It gives you clear, reliable voice and video quality on any device.
You can connect anywhere, anytime with RingCentral, which is why many businesses use it as their all-in-one solution that goes beyond phone calls:
Low jitter levels are unlikely to have a noticeable impact on your phone connection. Because of this, there are levels of “acceptable jitter.” Acceptable jitter is what we are willing to accept as the minimum fluctuation in transmission.
Jitter is measured in milliseconds (ms). A delay of around 30 ms or more can result in distortion and disruption to a call.
For video streaming to work efficiently, jitter should be below 30 ms. If the receiving jitter is higher than this, it can start to slack, resulting in packet loss and problems with audio quality. Also, packet loss shouldn’t be more than 1%, and network latency shouldn’t go over 150 ms in one direction.
A higher level of internet jitter can cause connectivity problems such as:
- Delayed calls
- Dropped calls
- Static and echoing
- Distortion or choppy audio
You can conduct a ping jitter test to see if your VoIP jitter and average latency are at an acceptable level. To do this, work out the mean round-trip time and the minimum-round trip time for multiple data packets.
You can then use this information to check jitter with an instantaneous jitter measurement. This calculates the average between instant jitter measures and the average jitter measures across multiple data packets.
This method can be daunting, though, so an alternative is to check your bandwidth.
How do I fix the jitter on the internet?
It’s all and well and good knowing how jitter happens, but you might be wondering how you can actually go about fixing jitter on the internet when you’re on a call. Here are a few troubleshooting tips:
Test your connection’s quality
Poor internet connection may be the biggest cause of jitter issues. Some VoIP providers have speed tests. You can test your connection quality with software from VoIP providers like RingCentral. It’s designed to show you the level of quality you would expect to see when making calls through their platform. Some tools, like RingCentral, have HD video and audio functionality, which means you can experience high-quality calls no matter where you are.
If you find that your network performance or connection is unsatisfactory, you can contact your internet provider to see if they offer a superior package, such as business-class high-speed internet.

Use an Ethernet cable for internet jitter
It may seem a little old school, but if you’re in a setting where you’re at a desktop and not a laptop, it can be worth using an Ethernet cable. Wi-fi connections are great when you’re out and about, but interference can occur based on what other users are doing.
This means that an Ethernet cable can provide a more powerful connection at the office. You’re less likely to see jitter, and you’ll often experience higher internet speeds.
Prioritize packets
Your router might have a quality of service (QoS) setting where you can choose to prioritize packets over other types of traffic. If traffic congestion is the cause of your jitter, then choosing to prioritize packets could help!
This is only really necessary if you deem internet calls to take a higher importance over other traffic. For example, if you’re a customer service center that uses VoIP to make calls to customers, this may be the best option for you. It gives you a better chance of lower jitter, so you can engage with customers without any embarrassing or unnecessary interference.
RingCentral offers a range of benefits for customer support contact centers that rely on VoIP beyond HD-voice phone calls. For example, their skills-based routing connects callers with the right agent for their concerns. You can also download real-time reports to monitor agents and improve customer service:

This could also improve productivity, as you may be able to make more calls per hour when you’re not fiddling around with the internet or experiencing delays.
Invest in a powerful router
Most businesses now use the internet for both data and voice. If packet prioritization isn’t a feature on your router, this could affect the quality of your calls.
Upgrading to a decent router can help with internet jitter problems because it will always give priority to voice traffic over network traffic. Although, sometimes it is difficult to gauge exactly how well it will handle jitter. Doing a little research into internet service providers (ISP) can help with this, as you can check out reviews from people who may have similar problems.
Make sure your bandwidth capacity is high enough to handle the devices used in your household (if you’re working remotely) or the office, and try to use a separate modem and router.
Minimize unnecessary bandwidth usage
It’s likely you use your laptop for both personal and professional use, especially if you work remotely . If you’re working from home, then restricting your other household members’ use of Netflix or online gaming during work hours can significantly reduce the chance of jitter, increase download speeds, and stop the dreaded buffering.
Also, try to schedule computer updates when you’re not working. That way, you’ll save bandwidth and minimize essential updates during work hours.
Check your device frequency
In some instances, the issue isn’t with your internet, rather, the device itself. The standard frequency is 2.4 GHz, but if your phone operates higher than this, then this could be why you’re experiencing problems. Phones can run as high as 5.8 GHz, which can greatly interfere with connection and cause jitter.
Use a jitter buffer
One of the most effective ways to minimize internet jitter is to use a jitter buffer. A jitter buffer is a handy device installed on a VoIP system. They work by delaying and storing incoming voice packets. They buffer traffic for around 30 to 200 milliseconds before sending it to the receiver.
This process works to ensure the data packets arrive in order with minimal delay. In some instances, depending on the buffer, they can also reorganize data packets according to when they were sent.
Using a jitter buffer can:
- Re-group data packets affected by transmission
- Improve audio quality
- Make internet phone calls more reliable
One of the criticisms of jitter buffers is that they don’t actually tackle the root cause of the problem; they just plaster over it. A jitter buffer won’t fix your internet speed or router, only the symptoms of the problem.
Choose a reliable VoIP or UCaaS provider
Depending on your VoIP provider, you may experience varying quality of your calls. A reliable, well-reviewed VoIP provider should offer amazing HD video conferencing services as well as high-quality audio on both voice and video calls . Alternatively, you could look beyond just the phone and consider unified communications (UC, sometimes also called UCaaS, or unified communications as a service) instead.
For instance RingCentral is a UCaaS platform that’s a leading choice for many businesses across the globe, in part because of their high-quality service. Not least because there are a plethora of useful features and add-ons to turn it into a literal all-in-one communication solution. It has other features that make it a great all-rounder, such as:
- Team calls with hundreds of participants
- File sharing —within the same app you’d use to make a video call:
- Integrations with popular apps like Salesforce and HubSpot
- Team messaging
- Screen sharing
- Task management
Does jitter affect internet speed?
Jitter and internet speed work alongside one another. With modern internet connections, new hardware, and proper network configuration, internet speed problems can be minimized.
However, VoIP services are reliant on internet speed, which can cause jitter. So, it’s not so much that jitter affects internet speed; it’s more the other way around.
How will you reduce jitter in the workplace?
Jitter can lead to communication problems in the workplace, especially if you rely on phone and video calls over the internet. Although team messaging can be useful, sometimes it can be easier to hop on a call and discuss projects and proposals with colleagues. When you frequently experience internet jitter, communication can break down and lead to misunderstandings.
Controlling jitter in the workplace requires some trial and error, as sometimes it can be difficult to pinpoint exactly why you’re experiencing problems. So:
- Test your connection
- Check your router
- Invest in additional tools, such as a jitter buffer
These steps will get you on your way to helping you reach your clients when they need you the most.
Originally published May 10, 2022, updated Jul 28, 2023

7 ways a phone system helps your small business look bigger
Being a small business owner can sometimes feel overwhelming. You don’t have a large team to handle multiple projects and you often need to wear several hats: project manager, receptionist, accountant, and even IT. Despite being smaller, you still want your business to look as professional as larger businesses. This can help you build your ...
Thank you for your interest in RingCentral.
Related content

3 Ways Free File Sharing Makes Your Team More Productive

The best collaboration software for efficient remote teams

The habits of highly successful remote companies
- How to Login
- Use Teams on the web
- Join a meeting in Teams
- Join without a Teams account
- Join on a second device
- Join as a view-only attendee
- Join a breakout room
- Join from Google
- Schedule a meeting in Teams
- Schedule from Outlook
- Schedule from Google
- Schedule without registration
- Add a dial-in number
- See all your meetings
- Invite people
- Add co-organizers
- Hide attendee names
- Tips for large Teams meeting
- End a meeting
- Manage your calendar
- Show your screen
- Share slides
- Share sound
- Mute and unmute
- Spotlight a video
- Multitasking
- Raise your hand
- Live reactions
- Take meeting notes
- Access wiki meeting notes
- Laser pointer
- Cast from a mobile device
- Cast from a desktop
- Apply a video filter
- Use a green screen
- Join as an avatar
- Customize your avatar
- Use emotes, gestures, and more
- Get started with immersive spaces
- Use in-meeting controls
- Spatial audio
- Overview of Microsoft Teams Premium
- Intelligent productivity
- Advanced meeting protection
- Engaging event experiences
- Change your background
- Change your layout
- Meeting themes
- Audio settings
- Reduce background noise
- Mobile data usage
- Mute notifications
- Meeting controls
- Instant meeting
- Use breakout rooms
- Live transcription
- Language interpretation
- Live captions
- End-to-end encryption
- Presenter modes
- Call and meeting quality
- Meeting attendance reports
- Using the lobby
- Change participant settings
- Record a meeting
- Meeting recap
- Play and share a meeting recording
- Delete a recording
- Edit or delete a transcript
- Get started
- Schedule a live event
- Invite attendees
- organizer checklist
- For tier 1 events
- Produce a live event
- Produce a live event with Teams Encoder
- Use RTMP-In
- Best practices
- Moderate a Q&A
- Allow anonymous presenters
- Attendee engagement report
- Recording and reports
- Attend a live event in Teams
- Participate in a Q&A
- Use live captions
- Schedule a webinar
- Customize a webinar
- Publicize a webinar
- Manage webinar registration
- Manage what attendees see
- Change webinar details
- Manage webinar emails
- Cancel a webinar
- Manage webinar recordings
- Webinar attendance report
- Switch to town halls
- Get started with town hall
- Attend a town hall
- Schedule a town hall
- Customize a town hall
- Host a town hall
- Town hall insights
- Manage town hall recordings
- Cancel a town hall
- Can't join a meeting
- Camera isn't working
- Microphone isn't working
- My speaker isn’t working
- Audio quality is poor
- Volume is too low
- Turn off automatic video
- Breakout rooms issues
- Immersive spaces issues
- Meetings keep dropping

Monitor call and meeting quality in Microsoft Teams
The Call health view in Teams helps you identify and troubleshoot issues you might experience during a Teams meeting or call. In this view you will get data on your network, audio, screen sharing, and outgoing video quality. These real-time metrics are updated every 15 seconds and are best used to troubleshoot issues that last for at least that long.

How to read your call health stats
Screen sharing .
*Exceptionally low values in some scenarios indicate Teams is limiting its peak bandwidth usage to maintain transmission while competing with network traffic or hitting network and service issues between endpoints. In these cases where Teams restricts quality, network conditions should be evaluated to see if something can be improved.
Teams might also limit its peak bandwidth usage if the complexity of screen sharing, video, or audio content is low or if a participant in the call or meeting chose lower-quality settings. Teams will adapt to the current use as well, not just because of network conditions.
Note: Low frame rates don't necessarily imply a poor call experience. If you are experiencing poor video quality and low frame rates, it could be due to the performance of the computer system or insufficient hardware resources.

Need more help?
Want more options.
Explore subscription benefits, browse training courses, learn how to secure your device, and more.

Microsoft 365 subscription benefits

Microsoft 365 training

Microsoft security

Accessibility center
Communities help you ask and answer questions, give feedback, and hear from experts with rich knowledge.

Ask the Microsoft Community

Microsoft Tech Community

Windows Insiders
Microsoft 365 Insiders
Was this information helpful?
Thank you for your feedback.
Microsoft Teams' new analytics tool will help you monitor call quality like never before
Teams is about to help make teams' communication stronger.

What you need to know
- Microsoft introduced Real-Time Call Quality Analytics (RTA) capabilities to Teams on September 30, 2021 via public preview.
- The Real-Time Call Quality Analytics dashboard will provide analysis in, as the title states, real-time, meaning administrators don't have to wait to gather essential intel.
- The dashboard offers information ranging from bitrate and frame rate data to packet loss, jitter, round trip time, and IP address details, as well as much more.
Microsoft brought its Real-Time Call Quality Analytics (RTA) capabilities to public preview on September 30, 2021, and is now going over the benefits of the analytics and their accompanying dashboard. A wide variety of datasets are monitored via the analytics, meaning a multitude of problems during Teams calls can be quickly diagnosed and potentially fixed with faster speed than ever before.
Microsoft's blog post on the RTA functionalities gives a deep dive into what the new tool can and cannot do, as well as how to use it, so be sure to check out the official post for a full rundown of what's what. However, here's a highlight of what analytics and information sets are covered:
- Meeting Participants
- Join & Leave Time
- User & Device Information (Name*, IP Address, Regional Location, Device, OS)
- Devices Including Microsoft Teams Room (Surface Hub, Teams Display, Collaboration Bar), Microsoft Teams IP Phones
- Connectivity Type (Wired, WiFi, WWAN), changes in connectivity type (Wired to WiFi or WiFi to WWAN), changes in IP addresses pertaining to connectivity change
- Network Metrics (Jitter, Packet Loss, Round Trip Time)
- Audio, Video and Application Sharing (Bitrate, Frame Rate)
The new tool is coming to government clouds in the first half of 2022. In that same timeframe, expect dashboard improvements and additional telemetry to make for an enhanced real-time analytics tracking experience that expands on what's already available.

Microsoft Teams is always improving or, at the very least, changing. Now, Microsoft has tools in its communications platform for you to monitor call quality with in real-time.
Get the Windows Central Newsletter
All the latest news, reviews, and guides for Windows and Xbox diehards.

Robert Carnevale is the News Editor for Windows Central. He's a big fan of Kinect (it lives on in his heart), Sonic the Hedgehog, and the legendary intersection of those two titans, Sonic Free Riders. He is the author of Cold War 2395 . Have a useful tip? Send it to [email protected].
- 2 The Division 2 is getting fixes for the extremely annoying bugs introduced in the most recent update
- 3 AMD FSR 3.1 is bringing frame generation to other upscaling solutions and adds support for Xbox game development kit
- 4 Microsoft once again merges Windows and Surface teams under new boss — and that's good news
- 5 Dragon's Dogma 2's wild Dragonsplague mechanic has players feeling conflicted, but at least the memes are top-shelf
Network Jitter or Round Trip Time – which is more important in WebRTC?

Network Jitter or Round Trip Time – which is more important when testing or monitoring a WebRTC application?
You’ve got your WebRTC application. You have users communicating with it. How do you know they are having a good experience? How do you know you’ve placed your servers in the right locations? Got the routes properly configured? Do you need to add a new server in Frankfurt? Or maybe it would be better to beef up your Australian presence?
These answers require looking at the users you have and the quality they are getting. And when the time comes to look at WebRTC quality, you’ll hear a lot the terms network jitter, latency and round trip time thrown around.
So which one is more important to track and focus on with WebRTC? Is it network jitter or maybe it is round trip time?
I’d say both. But not exactly…
Let’s try to break this down to understand it better.
Table of contents
Network vs “glass to glass”, network jitter vs round trip time (or latency), what contributes to network jitter, why is network jitter a bad thing, how does webrtc compensate for jitter, what contributes to round trip time, why is high round trip time a bad thing, how does webrtc compensate for high round trip time, we didn’t talk packet loss, network jitter and round trip time – are these an infrastructure problem or an end user problem, qualityrtc and probertc.
We can look at these metrics, and especially latency and round trip time in different ways, where the first question to ask is what exactly are we measuring?

The illustration above is a simplified version of the network traffic in a WebRTC session. We don’t have servers here and we don’t have a lot of other components. Rest assured that each component along the way can add latency and even affect jitter.
What I did in the illustration is also delineated 3 different areas:
- The peripheral , where the media is acquired and played. Screens, microphones, cameras, speakers – they all add inherent delays and some of it can be considerable. Bluetooth devices for example are notorious for adding delays ( anyone said iOS 15? )
- WebRTC processing , on its own, designed and built to reduce delays and jitter, but a contributor to it as well. This is doubly true in media servers that you own and operate but also true for browsers you don’t control and your users are using to access your service
- Network , which is what we’re trying to measure, at least in this article
Here’s the thing: for the most part, in most use cases, you have little control or knowledge of the peripherals being used. Measuring their own effects is also hard and in many real world applications impossible. So we are going to ignore peripherals.
WebRTC processing and the network are usually bunched together and there’s little in the way of splitting them up. Based on what you see and experience, you will need to decide if the issue is the network (=infrastructure and DevOps) or WebRTC processing (=software bugs and optimizations).
To me, the difference between network latency and round trip time is akin to the difference between weather and climate: Weather reflects short-term conditions of the atmosphere while climate is the average daily weather for an extended period of time at a certain location.
In the same token, jitter reflects short-term conditions or more accurately inconsistencies in the flow of packets over a network while round trip time (or latency) is the average time it takes for packets to flow through the network for a longer period of time and from one location to another.
Network Jitter answers the question how inconsistent the network is.
Round Trip Time (or Latency) answers the question how much delay is there in the network.
What’s “Network Jitter”?
In a WebRTC session, we will be sending over packets continuously. On a voice call, in many cases, a packet will be sent every 20 milliseconds. With video, we will be sending packets to reach 30 frames per second, and there are more than a single packet per frame usually, which means hundreds of packets every second.
Assuming the network experiences no packet loss , then we expect to receive the same number of packets in the same frequency.
Let’s look at a span of 200 milliseconds of audio from a sender’s perspective versus a receiver’s one. That’s 10 packets worth of data:
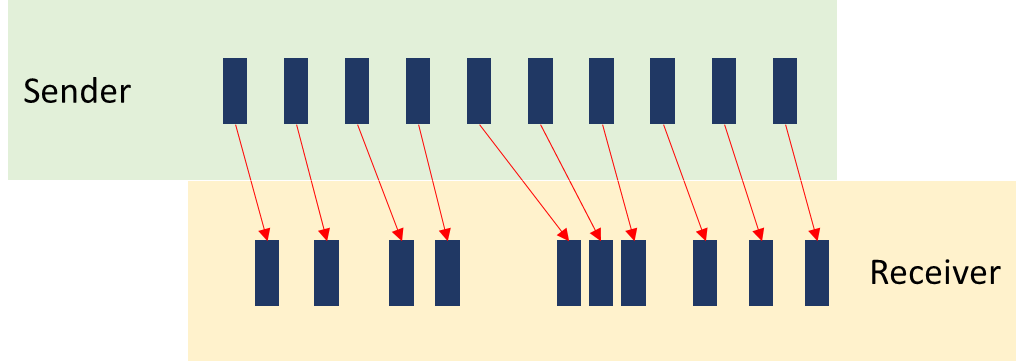
The sender sends an SRTP audio packet every 20 milliseconds in the illustration above, but the receiver doesn’t receive them exactly every 20 milliseconds – they are somewhat jittery… and that’s what we’re measuring with network jitter.
Mainly the network.
When you send packets over the internet, who guarantees that what gets sent is actually received and in a timely manner?
Think about the post office. Not all letters delivered get to their destination, and not all letters delivered get to their destination with the same latency (=on time). The same is true for a computer network, and the more complex the network, the harder it gets to do this properly.
Here are some things that can affect network jitter badly:
- Poor location . A user connecting from inside an elevator over cellular or sitting far away from his WiFi access point will result in bursty connections that will introduce high jitter and packet loss
- Congested network . Either the local one (your daughter on TikTok and your son on Fortnite while you’re trying to have a conversation over WebRTC; an office with too many people on the Internet on a slow connection; 50,000 people in a stadium trying to do Facebook Live at the same time) or the path to the WebRTC infrastructure being clogged by network traffic
- Faulty hardware . A bad ethernet cable… a true story: we had a client some time ago stress testing his service, only to find that packet loss (and jitter) originated from a faulty cable in his data center
- CPU . Local resources on a user’s device or your TURN and media servers in itself can add jitter. If the CPU of a machine starts throttling, the end result is going to be jitter (and packet loss)
Things that end up causing jitter on top of just jitter are packet loss (we never did receive what was sent), duplication of packets (yes, that can happen) and reordering of packets (if they are out of order, there’s definitely jitter, just with an added headache).
Why is this bad? Because if we want to smoothly playback the audio and video being sent, we need to align it yet again towards what the sender intended. Or more accurately, towards what the microphone and camera captured on the sender side.
If we don’t align the incoming media, the audio will not sound natural and the video will look choppy. If you want to experience this firsthand, just make sure the CPU of the device you are using is busy doing other things while being on a video call.
This is something that all VoIP services have, which is a jitter buffer. A jitter buffer is a software component that collects the received packets and decides when to play them out. It is used to handle lip synchronization (playing out audio and video together in sync), to reorder packets, and to take into account the jitter on the network.
If we know that jitter can be around 30 milliseconds, then the jitter buffer can wait for at least that time before playing back packets, so that whenever we need to play back a packet in a smooth manner, that packet has already been received.
Since network jitter is dynamic in nature, so is WebRTC’s jitter buffer – it is an adaptive jitter buffer that tries to understand how much jitter there is on the network, and increase or decrease the buffer size (length) based on what the network exhibits. Why do we do that? Because too little jitter means bad user experience due to dropped packets or improper playback and too high a jitter means adding to the latency of the playout, which we don’t want in real time interactive WebRTC sessions.
Do we look at “Latency” or “Round Trip Time”?
Latency, round trip time and delay are words that get dumped together. Also RTT – which is the acronym for round trip time. While there are nuances between them, and what exactly each one means, the lower they are the better the experience will be and the better interactive the session can be.
Here’s how I usually look at these and categorize them:
Latency for me is the time it takes for a packet of data to get from one point in the network to another.
Round trip time is the time it takes for a response packet to get back.
You can argue around latency and delay and decide if they should include or shouldn’t include the peripheral’s built in delay or even the delay added by WebRTC processing in end units or servers in the network.
For round trip time, the argument can be around the processing time needed to handle the incoming message and then send out the reply to it (if don’t incorrectly, this can add a considerable delay on its own).
And how do you measure latency exactly? If the clocks on the two devices aren’t fully in sync, how can you measure it? The result is, that in most cases, and WebRTC is no different, you rely on the round trip time instead – if I send a message and wait for a response, all I need to do is check the time that passed. And that’s exactly what you can glean out of the RTCP reports and WebRTC statistics.
Besides the things that affect jitter, you’ll find here also the route taken by the packets over the network.
Here’s how I usually explain it – lets say your TURN server or media server or gateway is located in “East US”. That’s the generic name we all give to our first cloud data center choice.
Why? We want a global service, but we try to target the US first, so it needs to be in the US. And on the maps, the best alternative to also reach Europe is the east coast. So we end up with US East on one of the cloud vendors. At least until we grow and distribute our service.
What happens if the session takes place between 2 people who are both located in Paris and the session is routed through our media servers in the US?
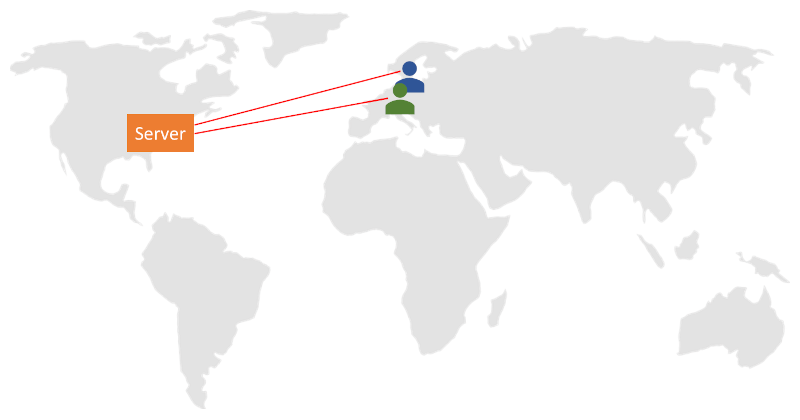
That most probably will take a longer route both geographically and when measured in time, which ends up adding to the latency of the session. In many cases, it also means a higher packet loss as there are more opportunities along that route to lose packets.
This means that the way we design our infrastructure, deploy it around the globe and configure it has a considerable impact on the round trip time users are going to experience.
More latency means it takes time from what we do until the other side can hear or see it.
For live streaming (somewhat related to WebRTC), the effects of latency are simply to explain. Here’s a good video for that:
If you are dealing with surveillance cameras, then latency is bad. When you’re in an interactive session – a 1:1 conversation or a group meeting, then you’ll be expecting latency of below 200 milliseconds. Anything above that would be noticeable and nagging. You won’t know when someone finished speaking so you can contribute to the conversation right after him for example.
So we’d like to have low round trip time as well as low network jitter for a good interactive experience in WebRTC applications.
It doesn’t. Not really. You’re on your own. You’ll need to decide where to place your servers and how to configure the routes between them to reduce latency.
Solutions we’ve seen recently range from:
- Placing more media servers and TURN servers in more data centers closer to where your users are
- Using third party TURN servers that are highly distributed (think Subspace and Cloudflare)
- Go for a service such as AWS Global Accelerator to end up with an optimized route
At the end of the day, you’ll need to invest energy or money or both in order to improve round trip time as you grow your service.
Here’s something you should understand – high round trip time or network jitter can easily cause packet loss.
If there’s congestion on the network, you might end up with packet loss since a network switch or router along the path of your packets decided to drop some of your packets because it is congested.
But if the packets arrive too late (because of high round trip time or high jitter), then playing them might not be an option anymore – their time has passed. In such a case, WebRTC would simply drop the packet even though it received it. The real time nature of WebRTC doesn’t allow it to buffer data forever.
At times, network jitter and round trip time can occur due to infrastructure issues – anything from faulty cables, bad network configurations or just machines that are too busy to process data fast enough.
Other times, your user is to blame. Either due to his device or the network he is using.
Then there’s the network. If everyone is currently trying to access the network, there are bound to be clogged routes, even if only periodically.
It is going to be your job to try and understand where the problem originates from.
How to fix network jitter and round trip time using testRTC’s tools?
Glad you asked 😀
testRTC offers tools for the full life cycle of WebRTC applications. For the most part, fixing jitter and round trip time is going to be part of the operations work on your end – understanding where traffic is routed through and how to redirect it elsewhere (including the possible need to add new regions and servers). Here’s where you’ll meet network jitter and round trip time in our services:
Our WebRTC testing service enables you to conduct integration, regression, function, non-functional, sizing, load and stress testing.
In all tests we collect network jitter and round trip time for all simulated probes in a session. We treat your service as a black box, launch our machines from different locations around the globe (you define which ones) and collect that as part of the metrics we store. We make it available on the channel level, browser level and test level as an aggregate of everything. Access to it is offered via the dashboard and through APIs. You can even add your expectations of these values and cause tests to fail based on your thresholds. If you want, you can dynamically change these values for each browser in the test and see how this affects your service.
upRTC is our WebRTC active monitoring service . Its main purpose is to understand the behavior of your infrastructure. It does that by bringing predictability to the user side and his network, so you can be sure that every time the monitor’s browser runs in front of your infrastructure they behave the same from the side of the network.
Here, looking at network jitter and round trip time and setting thresholds for them to alert you via email and webhook is the way to go.
watchRTC offers WebRTC passive monitoring . It hooks up to your users’ devices and collects their WebRTC metrics. This gets processed, aggregated and analyzed. Part of the metrics we collect and share is network jitter and round trip time. We do that on the individual channel level, the peer level, the room level and in aggregate across complex filters:
The purpose of it all is:
- To let you understand what your end users are experiencing
- Assist you in tracking down outliers in device types, operating systems, networks, locations, etc
- Drill down to a certain user’s complaint when needed
With qualityRTC and probeRTC we help your support and users answer the question “how can I improve my connectivity to your service?”
This is done by a series of tests, many of them collecting network jitter and round trip time data
Need to figure out your network jitter? Have a round trip time and latency issue with users?
Come and talk to us. I am sure we will be able to help you figure out the issues.

Great article and made me think how I troubleshoot network issues for applications that use WebRTC. Thank you!
Leave a Reply:
Save my name, email, and website in this browser for the next time I comment.

Thanks Brandon 😀
Comments are closed

Latency vs. Jitter: Differences, Causes, and Solutions
The technology we utilize has created a global community where physical location and distance are no longer barriers. Real-time communication is vital to that fast-paced, ever-changing, and increasingly digital world.
In addition to rapidly changing technology, global events have transformed the economy over the last few years. Of the many challenges businesses have faced, one thing that hasn’t changed is the need for face-to-face communication. Enabling smooth, real-time communication is critical. Failure to deliver this key aspect not only causes user frustration, but ultimately results in revenue loss.
To remain competitive, it’s essential that developers have a thorough understanding of the factors that affect efficient communication. Enter the latency vs. jitter debate.
Two of the biggest causes of interruption in real-time communications are latency and jitter in your network. Jitter vs. latency is a vital distinction to understand because, although there are some similarities between the two (both have a negative impact on network performance, for example), they are entirely different phenomena.
For your applications to operate smoothly, you’ll need to ensure both jitter and latency are minimized. Understanding the difference between jitter and latency is fundamental to finding the right solutions. In this article, we’ll help you understand what causes jitter vs. latency, how to identify and monitor both, and outline strategies to reduce them so you can optimize real-time communications.
What is Latency?
Latency refers to the delays that occur within a network. More specifically, it is the time taken for data to travel from one endpoint to another. Latency is measured in milliseconds and, in most cases, is calculated as a round trip. To give the example of a webpage, latency is the time it takes between clicking on a URL for the page to load in the browser. A high round-trip time indicates that the network is not performing optimally.
How much latency is OK?
Zero latency is ideal, but this is not practically possible. In theory, internet transmissions can travel at the speed of light. However, a small delay is a natural byproduct of the transmission process. So what is an acceptable degree of latency? According to Cisco , a delay of 300ms or less is sufficient for smooth communication.
What is Jitter?
To properly understand jitter, it helps to first consider how data is transmitted across a network. Information is broken down into packets and sent to the receiver at evenly-spaced intervals. Upon arrival at their destination, the packets are reassembled. In smooth communication, data packets flow consistently and arrive at their destination in the correct order. However, data packets sometimes arrive late or out of order due to network congestion or occasional rerouting. The variation in this latency or delay of the transmission is referred to as jitter. Like latency, jitter is also measured in milliseconds. High jitter denotes a significant variation in latency, whereas low jitter represents only minor changes.
How much jitter is OK?
A uniform delay does not affect audio or video application, but variations in the delay can be disastrous for VoIP and other services. A jitter of 30ms or less is generally regarded as acceptable, but anything above this will affect user experience.
Latency vs Jitter: What’s the Difference?
As we’ve discussed, latency is the delay in transferring data to a given network destination, and jitter is the variation within that delay. However, although many developers think in terms of jitter vs. latency, it’s not necessarily an either/or situation. The two are more interrelated than that because packets jitter can cause delay, aka latency. To minimize both, we must understand the effects and causes, and learn how to test and monitor latency and jitter.
The Effects of Jitter and Latency
High levels of latency or jitter can be a significant barrier to communication performance, especially real-time video and voice engagement. But how do the two manifest themselves in the real-time communication experience?
We can all agree that nothing is more irritating for users than experiencing stuttering calls, robotic feedback, buffering delays, or dropped connections. This is exactly what happens when a network experiences high jitter. Latency can be equally frustrating, causing laggy calls, echo, and overlapping conversations. Put more simply, voice delay is caused by latency, and call quality is impacted by jitter.
Poor communication aside, timeouts on networks with high latency and jitter can have devastating effects for businesses when conversations are time-sensitive. Controlling the effects is therefore vital in optimizing organizational efficiency and productivity. But, how do you know which one is the root cause of your issues? Let’s consider the options for testing and monitoring your network.
Testing Your Network
Your first step in minimizing either disruption is distinguishing between latency vs. jitter as the source of the issue.
Testing for Latency
Latency is often described in terms of “ping time,” with a high ping time indicating a high degree of latency. Ping tests are the simplest way to determine the latency in your network, and are especially helpful if your network includes home users. However, businesses with large and extended networks may wish to take a more comprehensive approach. More on that in the next section, but for now, let’s look at how to measure latency with a simple command prompt:
- Type ‘ping [IP address or hostname]’ and press enter. To ping Google, type “ ping www.google.com -t ”.
- The response time of the ping will be measured and displayed.
- If the response time is larger than expected, there is likely an issue with latency.
- To stop the test, type Ctrl+C .
When you stop the test, you will be presented with minimum, maximum, and average round trip times in milliseconds and a summary of packet loss.
Here is an example output:
PING google.com (172.217.164.196): 56 data bytes 64 bytes from 172.217.164.196: icmp_seq=0 ttl=54 time=17.8 ms 64 bytes from 172.217.164.196: icmp_seq=1 ttl=54 time=17.2 ms 64 bytes from 172.217.164.196: icmp_seq=2 ttl=54 time=17.3 ms — google.com ping statistics — 3 packets transmitted, 3 packets received, 0.0% packet loss round-trip min/avg/max/stddev = 17.2/17.5/17.8/0.2 ms
Testing for Jitter
At first glance, it may not be obvious how a ping test can help to determine network jitter. After all, there’s no direct way to measure jitter vs. ping. However, that doesn’t mean a ping test is entirely unhelpful. You can still identify and derive ping vs. jitter by calculating the average difference in values between each consecutive ping test. This value, in milliseconds, is a measure of jitter. In other words, jitter can be considered the rate at which ping spikes or stutters over time.
Another popular option is to use an online speed test such as TestMy.net , which will display your jitter and latency scores without you having to run your own ping tests.
However, it’s essential to note that tools like this only give a general overview of your jitter score and do not measure the latency and jitter for an entire server.
Monitoring Latency and Jitter
While the tests listed above are a good starting point, they are not without drawbacks. Nor are they a long-term solution for developers. For an accurate picture over an extended period, tests must be continuously repeated so you can track trends and changes. Plus, ping tests are generally considered a reactive approach, and therefore impractical in competitive and time-sensitive business environments. For those looking for a more efficient solution, developers may wish to utilize a more proactive network monitoring system.
There are several options. Products such as the Paessler PRTG Network Monitor contain multiple sensors that can be customized to monitor vast numbers of different network conditions. Monitoring tools like this can be set up to send automatic alerts whenever minimum thresholds are exceeded. They can also save historical data to help you fully understand the health of your network.
Whichever strategies and software you use to test and monitor for jitter and latency in your network, the next step is to determine the causes and eliminate or minimize them. However, as we know, the topic of latency vs. jitter is far from simple. So, if you are looking for an all-round solution that can take the headache and effort out of maintaining a top-quality network to support smooth real-time communication, you will likely benefit from exploring other technologies. For example, Agora Video Chat SDK provides a clear and more seamless experience, without you having to lift a finger or worry about the accuracy of complex testing procedures yourself.
Causes of Latency vs. Jitter
There are several causes of latency and jitter. Some affect only one aspect, while others contribute to both elements. So, before you can take steps to tackle any of them, you must first develop a firm understanding of the factors that contribute to latency, jitter, and both.
Causes of Both Jitter and Latency
- Insufficient bandwidth – Latency and jitter are both caused by inadequate bandwidth, meaning there are too many devices trying to pull excessive amounts of data across the network, and the system simply cannot keep up with the demand. When bandwidth limits are exceeded, the resulting congestion causes packets to be delayed or lost, which will increase the amount of both latency and jitter.
- Inferior transmission medium – If you are using wifi, you may experience greater disruption compared using a network cable. The situation is exacerbated by increased distance from the router and can be affected by low signal strength — even when using a booster. Mediums like WAN and fiber optic cables both have inherent limitations which can produce jitter and latency.
- Old or poorly-performing hardware – The network infrastructure itself can sometimes be the cause of latency and jitter. How efficiently data is received is determined by the weakest point in the network. Older network equipment such as wifi, routers, switches, and cables may not be built to handle large quantities of data. This is especially pertinent in networks where end user hardware may include limited CPU and memory, old browsers, or outdated operating systems that impose restrictions on how much data they can handle.
Causes of Latency
- Distance between source and destination – This is one of the most significant causes of latency. The greater the distance, the further the data packets must travel over multiple networks and numerous routers. If just one of those routers is over capacity, there will likely be a delay.
- Misconfiguration – When software and hardware are poorly configured, packet collisions can occur, slowing down communication.
- Packet loss and jitter – If a significant percentage of packets are misrouted or fail to reach their destination, overall delays are inevitable while the network tries to reroute the packets.
- Packet size – Larger packets take longer to travel than smaller ones.
- Type of data – Text packets travel faster than bandwidth-intensive media like videos. This is a particularly important consideration when managing real-time communication experiences.
Causes of Jitter
- Lack of packet prioritization – If priority is given to the wrong type of packet within your network, there is the potential for packets to be held behind other packets in your network, resulting in greater congestion.
- Routing issues – When packets are transmitted incorrectly, they are rerouted to their destination. This affects the order they are received in, causing jitter.
While all of these factors are worth consideration, it’s also worth noting that the main culprit in underperformance could be the software itself. That’s why it’s essential to choose a reputable platform for real-time communication that uses the most innovative technologies and tools to avoid and resolve problems derived from latency and jitter.
How to Fix and Minimize Latency and Jitter
It’s impossible to eliminate every source of disruption. However, there are several strategies to employ to minimize latency and jitter.
How Users Can Fix Jitter and Latency Issues
The following strategies can help users reduce latency and jitter simultaneously for improved network performance:
- Check Your Internet Speed: The first step in troubleshooting latency and jitter issues is to check your internet speed. This can be done by running a speed test and comparing the results to your ISP’s advertised speeds. If the speed test results are lower than expected, you may need to contact your ISP to resolve the issue.
- Check Your Network Connections: If your internet speed is adequate, the next step is to check your network connections. Ensure all your cables are connected properly, your router or modem is in a good location, and your network settings are configured correctly. You may also need to check for any wireless interference affecting your connection.
- Reset Your Network Devices: If the above steps don’t help, you may need to reset your network devices, such as your modem, router, or switch. Doing so will reset your settings and connections, which could help resolve the issue.
- Update Your Firmware: Outdated firmware can sometimes cause latency and jitter issues, so make sure to keep your devices up to date.
- Use Quality of Service (QoS) Settings: Quality of Service (QoS) settings allow you to prioritize certain types of network traffic. Changing settings can help reduce the latency and jitter caused by competing traffic.
- Try a Wired Connection: If you’re using a wireless connection, try connecting directly with an Ethernet cable. This can help reduce latency and jitter caused by wireless interference.
- Use a VPN: A Virtual Private Network (VPN) can help reduce latency and jitter by routing your traffic through a secure tunnel. It can also help protect your data from being monitored or tampered with.
How Developers can Reduce Latency
Tactics to reduce network latency, focus on reducing how long data packets spend in transit.
- Set up a Content Delivery Network (CND) – Using techniques like caching, connection optimization, and progressive image rendering means visitors have a shorter route to access the content. CNDs send traffic through the fewest possible hoops to provide a better experience.
- Find and eliminate bottlenecks – Monitor the flow of traffic on your network to pinpoint problem areas so you can reroute or upgrade routers as needed, etc.
- Remove problematic endpoints – Prevent using excessive bandwidth by utilizing a software tool like Solar-Winds Network Performance Manager to create a heat map that determines the weakest points.
- Use download managers – Download managers prevent a small number of systems from hogging the bandwidth by managing the load distribution, allowing the network to complete faster downloads.
- Optimize network configurations – Employ techniques like subnetting, traffic shaping, and load balancing as corrective action in instances where specific attention is needed.
Strategies that Reduce Jitter for Developers
The best solution to fix jitter will likely be determined by the specific issue, but the following are good starting points.
- Jitter buffers – Commonly used in voice calling and streaming services, the buffer sits between two endpoints on the network. Buffers stop jitter by holding onto packets and releasing them after a stipulated amount of time, thus ensuring they are transmitted in sequence. There is a trade-off with latency here since the buffer deliberately delays packet release. So careful consideration is required when implementing buffers for two-way communication.
- Switch connections – Switch to a wired connection using the highest quality cable you can find. If this is not an option, try switching between 5GHz and 2.4GHz to minimize congestion.
The Perfect Solution for Developers to Minimize Latency and Jitter
The above strategies can improve latency and jitter issues. However, for developers who want to optimize their websites for real-time voice and video engagement (RTE) of the highest quality, Agora is the solution. Our goal is to empower developers to create better UX designs that elevate user experience by utilizing innovative technology and software that embodies the future of seamless real-time communication.
Because Agora’s global network enables low latency voice and video communication, it reduces jitter. Developers can rely on our platform to reduce latency so that the overall user experience is a smooth one.

- Skip to content
- Skip to search
- Skip to footer
Measuring Delay, Jitter, and Packet Loss with Cisco IOS SAA and RTTMON
Available languages, download options.
- PDF (116.6 KB) View with Adobe Reader on a variety of devices
Bias-Free Language
The documentation set for this product strives to use bias-free language. For the purposes of this documentation set, bias-free is defined as language that does not imply discrimination based on age, disability, gender, racial identity, ethnic identity, sexual orientation, socioeconomic status, and intersectionality. Exceptions may be present in the documentation due to language that is hardcoded in the user interfaces of the product software, language used based on RFP documentation, or language that is used by a referenced third-party product. Learn more about how Cisco is using Inclusive Language.
Introduction
This document describes methods for measuring delay, jitter, and packet loss on the data network using Cisco IOS® Service Assurance Agent (SAA) and Round Trip Time Monitor (RTTMON) features and Cisco routers.
Measuring Delay, Jitter, and Packet Loss for Voice-enabled Data Networks
The importance of measuring delay, jitter, and packet loss.
With the emergence of new applications on data networks, it is becoming increasingly important for customers to accurately predict the impact of new application rollouts. Not long ago, it was easy to allocate bandwidth to applications and let the applications adapt to the exploding nature of traffic flows through timeout and retransmission functions of the upper layer protocols. Now, however, new world applications, such as voice and video, are more susceptible to changes in the transmission characteristics of data networks. It is imperative to understand the traffic characteristics of the network before deployment of new world applications to ensure successful implementations.
Defining Delay, Jitter, and Packet Loss
Voice over IP (VoIP) is susceptible to network behaviors, referred to as delay and jitter, which can degrade the voice application to the point of being unacceptable to the average user. Delay is the time taken from point-to-point in a network. Delay can be measured in either one-way or round-trip delay. One-way delay calculations require expensive sophisticated test gear and are beyond the budget and expertise of most enterprise customers. However, measuring round-trip delay is easier and requires less expensive equipment. To get a general measurement of one-way delay, measure round-trip delay and divide the result by two. VoIP typically tolerates delays up to 150 ms before the quality of the call is unacceptable.
Jitter is the variation in delay over time from point-to-point. If the delay of transmissions varies too widely in a VoIP call, the call quality is greatly degraded. The amount of jitter tolerable on the network is affected by the depth of the jitter buffer on the network equipment in the voice path. The more jitter buffer available, the more the network can reduce the effects of jitter.
Packet loss is losing packets along the data path, which severely degrades the voice application.
Prior to deploying VoIP applications, it is important to assess the delay, jitter, and packet loss on the data network in order to determine if the voice applications work. The delay, jitter, and packet loss measurements can then aid in the correct design and configuration of traffic prioritization, as well as buffering parameters in the data network equipment.
SAA and RTTMON
The SAA and RTTMON MIB are Cisco IOS software features available in versions 12.0 (5)T and higher. These features enable you to test and collect delay, jitter, and packet loss statistics on the data network. Internetwork Performance Monitor (IPM) is a Cisco network management application that can configure the features and monitor the SAA and RTTMON data. The SAA and RTTMON features can be used to measure delay, jitter, and packet loss by deploying small Cisco IOS routers as agents to simulate customer end stations. The routers are referred to as delay and jitter probes. Additionally, the delay and jitter probes can be configured with the remote monitoring (RMON) alarm and event triggers once baseline values have been determined. This allows the delay and jitter probes to monitor the network for predetermined delay and jitter service levels and alert network management system (NMS) stations when a threshold is exceeded.
Deploying Delay and Jitter Agent Routers
Where to deploy.
Delay and jitter can be measured by deploying Cisco routers 17xx or higher with Cisco IOS software code version 12.05T or higher, and configuring the Cisco IOS SAA features. The routers should be placed in the campus networks next to hosts. This provides statistics for end-to-end connections. Since it is not practical to measure every possible voice path in the network, place the probes in typical host locations providing for a statistical sampling of typical voice paths. Some examples include:
a local campus-to-campus path
a local campus-to-remote campus path via a 384 kbs Frame Relay circuit
a local campus-to-remote campus via an ATM permanent virtual circuit (PVC)
In the case of VoIP deployments using traditional phones connected to Cisco routers using Foreign Exchange Station (FXS) ports, use the router connected to the phones to serve as the delay and jitter probes. Once deployed, the probe collects statistics and populates Simple Network Management Protocol (SNMP) MIB tables in the router. The data can then be accessed either through the Cisco IPM application or through SNMP polling tools. Additionally, once baseline values have been established, SAA can be configured to send alerts to an NMS station if thresholds for delay, jitter, and packet loss are exceeded.
Simulating a Voice Call
One of the strengths of using SAA as the testing mechanism is that a voice call can be simulated. For example, imagine you want to simulate a G.711 voice call. You know that it uses RTP/UDP ports 14384 and above, it is approximately 64 kb/s, and the packet size is 200 bytes {(160 bytes of payload + 40 bytes for IP/UDP/RTP (uncompressed) }.You can simulate that type of traffic by setting up the SAA Delay/Jitter Probe as shown below.
The jitter operation needs to do this:
Send the request to RTP/UDP port number 14384.
Send 172 byte packets (160 payload + 12 byte RTP header size) + 28 bytes (IP + UDP).
Send 3000 packets for each frequency cycle.
Send every packet 20 milliseconds apart for a duration of 60 seconds and sleep 10 seconds before starting the next frequency cycle.
Those parameters give 64 kb/s for 60 seconds.
((3000 datagrams * 160 bytes per datagram)/ 60 seconds)) * 8 bits per byte = 64 kb/s
The configuration on the router appears as follows:
rtr 1 type jitter dest-ipaddr 172.18.179.10 dest-port 14384 num-packets 3000+ request-data-size 172* frequency 70 rtr schedule 1 life 2147483647 start-time now
Note: IP+UDP is not considered in the request-data-size as the router adds them automatically to the size internally.
Note: Currently, Cisco IOS only supports 1000 packets per operation. This limit will be raised in a future release.
Delay and Jitter Probe Deployment Example
The routers in the following example simulate 60-second voice calls every 60 seconds and record delay, jitter, and packet loss in both directions.
Note: The delay calculations are round-trip times and must be divided by two to get the one-way delay.
saarouter1# rtr responder rtr 1 type jitter dest-ipaddr 172.18.179.10 dest-port 14384 num-packets 1000 request-data-size 492 frequency 60 rtr schedule 1 life 2147483647 start-time now saarouter2# rtr responder rtr 1 type jitter dest-ipaddr 172.18.178.10 dest-port 14385 num-packets 1000 request-data-size 492 rtr schedule 1 life 2147483647 start-time now saarouter3# rtr responder rtr 1 type jitter dest-ipaddr 172.18.179.100 dest-port 14385 num-packets 1000 request-data-size 492 frequency 60 rtr schedule 1 life 2147483647 start-time now saarouter4# rtr responder rtr 1 type jitter dest-ipaddr 172.18.178.100 dest-port 14385 num-packets 1000 request-data-size 492 frequency 60 rtr schedule 1 life 2147483647 start-time now
Sample Data Collections
Polling the mib tables.
The delay and jitter probes begin collecting data that is subsequently placed in SNMP MIB tables. The rttMonStats table provides a one hour average of all the jitter operations for the last hour. The rttMonLatestJitterOper table provides the values of the last operation completed. For general statistics on delay and jitter, poll the rttMonStats table every hour. For more granular statistics, poll the rttMonLatestJitterOper table at a higher frequency level than the jitter operation. For example, if the delay and jitter probe is calculating jitter every five minutes, do not poll the MIB at any interval less than five minutes.
The following screen capture shows data from the rttMonJitterStatsTable gathered from an HP OpenView Network Node Manager MIB poll.
SAA Report Example
The following SAA data graph is a compilation of delay, jitter, and packet loss data points over an eight-hour period for one pair of delay and jitter probes.
Command Line Data Examples
The data can also be viewed using the Cisco IOS show command at the command line on the delay and jitter probes. A Perl Expect script can be used to gather data from the command line and export it to a text file for later analysis. Additionally, the command line data can also be used for real time monitoring and troubleshooting of delay, jitter, and packet loss.
The following example shows the command output from the show rtr collection-stats command on the saarouter1 router.
# show rtr collection-stats 100 Collected Statistics Entry Number: 100 Target Address: 172.16.71.243, Port Number: 16384 Start Time: 13:06:04.000 09:25:00 Tue Mar 21 2000 RTT Values: NumOfRTT: 600 RTTSum: 873 RTTSum2: 1431 Packet Loss Values: PacketLossSD: 0 PacketLossDS: 0 PacketOutOfSequence: 0 PacketMIA: 0 PacketLateArrival: 0 InternalError: 0 Busies: 0 Jitter Values: MinOfPositivesSD: 1 MaxOfPositivesSD: 1 NumOfPositivesSD: 23 SumOfPositivesSD: 23 Sum2PositivesSD: 23 MinOfNegativesSD: 1 MaxOfNegativesSD: 1 NumOfNegativesSD: 1 SumOfNegativesSD: 1 Sum2NegativesSD: 1 MinOfPositivesDS: 1 MaxOfPositivesDS: 1 NumOfPositivesDS: 7 SumOfPositivesDS: 7 Sum2PositivesDS: 7 MinOfNegativesDS: 1 MaxOfNegativesDS: 1 NumOfNegativesDS: 18 SumOfNegativesDS: 18 Sum2NegativesDS: 18 Entry Number: 100 Target Address: 172.16.71.243, Port Number: 16384 Start Time: 14:06:04.000 09:25:00 Tue Mar 21 2000 RTT Values: NumOfRTT: 590 RTTSum: 869 RTTSum2: 1497 Packet Loss Values: PacketLossSD: 0 PacketLossDS: 0 PacketOutOfSequence: 0 PacketMIA: 0 PacketLateArrival: 0 InternalError: 0 Busies: 0 Jitter Values: MinOfPositivesSD: 1 MaxOfPositivesSD: 1 NumOfPositivesSD: 29 SumOfPositivesSD: 29 Sum2PositivesSD: 29 MinOfNegativesSD: 1 MaxOfNegativesSD: 1 NumOfNegativesSD: 7 SumOfNegativesSD: 7 Sum2NegativesSD: 7 MinOfPositivesDS: 1 MaxOfPositivesDS: 1 NumOfPositivesDS: 47 SumOfPositivesDS: 47 Sum2PositivesDS: 47 MinOfNegativesDS: 1 MaxOfNegativesDS: 1 NumOfNegativesDS: 5 SumOfNegativesDS: 5 Sum2NegativesDS: 5
Proactive Monitoring of Thresholds
There are several ways to monitor the delay, jitter, and packet loss levels in the network once baseline values have been established through the initial data collection. One way is to use the SAA threshold command . Another is to use a feature in the Cisco IOS mainline code called RMON Alarm and Event .
SAA threshold Command
The SAA feature set threshold command sets the rising threshold (hysteresis) that generates a reaction event and stores history information for the operation. The following SAA threshold configuration on the delay and jitter probe enables the monitoring of jitter and creates an SNMP trap upon the violation of a 5 ms threshold.
saarouter1# rtr 100 rtr reaction-configuration 100 threshold-falling 5 threshold-type immediate
RMON Alarm and Event
The delay and jitter probes monitor predetermined thresholds using either the SAA Cisco IOS features, or the Cisco IOS RMON alarm and event method. In either case, the router monitors delay, jitter, and packet loss and alerts NMS stations of threshold violations via SNMP traps.
The following RMON alarm and event trap configuration causes saarouter1 to generate an SNMP trap if the rising threshold exceeds 140 ms maximum round-trip time. It also sends another trap when the maximum round-trip time falls back below 100 ms. The trap is then sent to the log on the router, as well as to the NMS station 172.16.71.19.
saarouter1# rmon alarm 10 rttMonJitterStatsRTTMax.100.120518706 1 absolute rising-threshold 140 100 falling-threshold 100 101 owner jharp rmon event 100 log trap private description max_rtt_exceeded owner jharp rmon event 101 log trap private description rtt_max_threshold_reset owner jharp
Jitter Calculations in Cisco SAA Delay Jitter Probes
Jitter is the variance in one-way latency and is calculated based on sending and receiving time stamps of consecutive packets sent out.
For packet 1 and packet 2 above, use the following source and destination calculations.
Jitter from source to destination (JitterSD) = (T6-T2) - (T5-T1)
Jitter from destination to source (JitterDS) = (T8-T4) - (T7-T3)
Jitter is calculated using time stamps of every two consecutive packets. For example:
Router1 send packet1 T1 = 0 Router2 receives packet1 T2 = 20 ms Router2 sends back packet1 T3 = 40 ms Router1 receives packet1 response T4 = 60 ms Router1 sends packet2 T5 = 60 ms Router2 receives packet2 T6 = 82 ms Router2 sends back packet2 T7 = 104 ms Router1 receives packet2 response T8 = 126 ms Jitter from source to destination (JitterSD) = (T6-T2) - (T5-T1) Jitter from source to destination (JitterSD) = (82 ms - 20 ms) - (60 ms - 0 ms) = 2 ms positive jitter SD Jitter from destination to source (JitterDS) = (T8-T4) - (T7-T3) Jitter from destination to source (JitterDS) = (126 ms - 60 ms) - (10 4ms - 40 ms) = 2 ms positive jitter DS
Delay and Jitter Probe Router Hardware and Software Configurations
CISCO1720 —10/100BaseT Modular Router with two WAN slots and Cisco IOS IP Software
MEM1700-16U24D —Cisco 1700 16 MB to 24 MB DRAM Factory Upgrade
MEM1700-4U8MFC —Cisco 1700 4 MB to 8 MB Mini-Flash Card Factory Upgrade
CAB-AC —Power Cord, 110V
S17CP-12.1.1T —Cisco 1700 IOS IP PLUS
Related Information
- SAA User Guide
- Technical Support - Cisco Systems
Revision History
Was this document helpful.

Contact Cisco
- (Requires a Cisco Service Contract )
This Document Applies to These Products
- High Availability
10 Key Metrics to Assess Microsoft Teams

Originally posted on gsx.com
This entry is part of our series on Microsoft Teams Performance monitoring . In this article, we will define the meaning of the top 10 compulsory Microsoft Teams metrics to measure the ability of your locations to provide a decent user experience before, during, and after any deployment. The following are the top Microsoft Teams metrics to focus on.
Get your guide and take the immediate steps to optimize the Microsoft Teams experience. Free to download!
Microsoft teams metrics, latency one-way or ping in millisecond and round-trip latency (in millisecond too).

- It measures the time taken to send a data packet from point A to B and come back. It is tied to the physical distance between the two points and the speed of transmission and the overhead taken by the routers in between.
- The latency impacts the smoothness of the conversation between two people
- Increased latency provides unnatural pauses during the conversation
- People also report that it feels like using a satellite phone
- In the end, it leads to having people talking at the same time
- Everybody has already experienced that
Packet Loss Rate
- Microsoft recommends keeping it at 1% during a 15-second call
- Inferior to 3% should provide a decent call quality
- Between 3 and 7%, there is a noticeable impact
- Over 7%, the call quality will be severely lacking
- It represents the amount of packet lost for 15 seconds (for example if 1000 packets are sent in 15 seconds and 50 are lost, it will generate a 5% packet loss).
- This measure is extremely important in VoIP as it used as one of the elements to determine the MOS that we will explain right after.
- A high packet loss will lead to a moment of silence during a call (if you have a period of sustained packet loss during a call) or to a degradation of the voice quality giving people ‘robot-voices.’
Packet Reorder Ratio
This statistic is now considered equally as important as packet loss, because packet reordering severely degrades the call quality. High rate flow network has a greater chance of packet reordering.
Packet reordering (when packets arrive in a different order than that in which they were sent) can be recognized as packet loss or as a congestion signal by most network protocol (like TCP). Therefore, they impact the Network MOS the same way as packet loss. On top of that, they can directly impact the packet sending rate which will also increase the round-trip time.
As a result, the call will be distorted and will cut out at times. The threshold where you need to be alerted is usually 0.05%.
Jitter (Also Called Packet Inter-Arrival Jitter: In Millisecond)

- Audio packets are sent at regular intervals on the network. But that doesn’t mean that they are received with the same regularity (usually because of network latency). That is why a buffer is needed, it waits for all the packets before reconstructing them in the correct order.
- The Jitter is the size of the buffer that is needed to store packets before reconstructing them in the correct order. It can be compared to an audio packet waiting room. The value of the Jitter is calculated over every period of 15 seconds.
- A low Jitter number means that the connection to the call is good and solid.
- A large Jitter buffer provides additional delay in calls. It is the sign of a congestion of the network.
- The shrink or the expansion of the buffer will provide audio distortion during the call like speeding or slowing down of the speech.
- As for packet loss, the Jitter value is used in the Network MOS determination.
The Network MOS: Network “Mean Opinion Score”

This concept needs a little bit more of an explanation.
The MOS is usually a score that is based on a questionnaire sent to the users, like the one you have after each call on Skype, Teams or WhatsApp: “Please rate the quality of the call from One to Five stars” (5 being excellent, 1 being poor).
That is why you can’t have a MOS superior to 5. The problem is that when you want to assess your environment or even during migration you don’t have any or enough feedback to get this score.
That is why Microsoft has worked with other network specialists on the definition of Network MOS metric that can predict what will be the value of the Wideband Listening Quality Mean Opinion Score (MOS-LQ).
To calculate that, multiple factors are considered such as the latency, the packet loss, Jitter, the codec used, etc.
As for the real MOS, the Network MOS ranges from 1 to 5. But because of the compulsory impact of the audio codec, the highest score is usually around 4.4.
How to Use the MOS Value?
The Network MOS is a perfect tool to identify if the network conditions are impacting the end-user audio quality experience. It can be used to identify a wide range of issues.
The first way to analyze it is to compare it with a previous average value in time to understand if you are dealing with a degradation of the audio quality or not.
Then, you can combine this information with the packet loss or Jitter to understand what is causing that degradation and in which location. And that is why you need to constantly measure this parameter from all your sensitive locations.
The best example of root cause is the LAN Congestion.
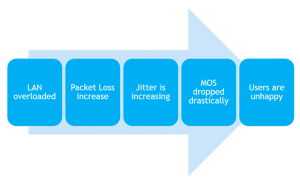
When your LAN starts to be overloaded, the rates of packet loss and amount of Jitter is increasing for all calls going through your LAN.
This will automatically be seen in the MOS score.
If you trend your MOS score you’ll be able to understand exactly at what time and where the LAN was congested, determining your peak time and adjusting your network to prevent this issue from happening again.
We see here how important it is to constantly monitor all these specificities to be able to take proactive actions before users start complaining and opening tickets.
Network MOS Degradation
Another way to analyze the MS Teams end-user experience delivered to your remote location is to understand the Network MOS degradation.
This statistic directly shows the impact of the jitter and the packet loss on the Network MOS. It is generally recommended to keep the value under 1. The higher this value is, the worse the quality of the call is.
Usually, a high value of Network MOS degradation causes distortion in the audio or a blank during the conversation. This is generally due to LAN & wireless congestion and/ or insufficient bandwidth, which directly impacts the rate of packet loss and average jitter.
The statistic is interesting as it is less impacted by the CODEC used during the call than it is impacted by the actual MOS. Knowing this, you can analyze the metrics to understand if the loss of MOS is mostly due to jitter or to packet loss and then troubleshoot the issue.
How Packet Loss and Jitter are Related to the Network MOS Score
The packet loss plays a very important role in the Network MOS calculation. Over 20% of packet loss, your MOS cannot be higher than 2.5.
The latency round trip won’t affect the MOS if it stays under 100ms.
If the Jitter stays under 50ms, the MOS will be as high as it can. When the Jitter rises, the MOS degrades quickly.
Basic Recommendation on Network MOS
As the MOS is a prediction of the end-user experience of audio quality, it is important to constantly measure it. Jitter and the Packet loss should also be measured frequently. Make sure that the Jitter value stays under 50ms, the packet loss as close as 0% as you can and of course the latency under the 100 milliseconds.
Now that we’ve seen what kind of statistics you should collect, let’s see what is recommended as a collection process.
Ratio Concealed Sample Average
An audio sample can be concealed to deal with lost network packets. It is a simple solution to smooth out the abrupt transition that is caused by dropped network packets. That is why these statistics is called “Healed Percentage”.
A high percentage means that many audio samples had to be concealed because of the packet loss. It indicates poor audio quality, which the user experiences as distorted or lost audio.
Usually, it is best to keep the ratio around or below 2%. Over 2% will gradually degrade the audio quality. Over 7%, end users will likely end the call.
Estimated Bandwidth, Bandwidth Minimum, Maximum and Average
This provides the bandwidth values on the client side during the 15 second test call.
MS Teams adapted well to variation of bandwidth by reducing or increasing the packet sending rate. However, bandwidth naturally has a huge impact on the audio quality. Generally, when the bandwidth is under 100Kbps, the quality of the call is degraded. Video calls are even more sensitive to bandwidth variation and packet loss, which is why it is very important to measure bandwidth and keep it within the Microsoft recommendations.
Interpretation of the GSX Robot User Measures and Alerts
Thanks to the GSX Robot Users, you have an easy way to test and collect every statistic you need to assess the readiness of your environment to deploy MS Teams. For further information on how the Robot Users are providing you with MS Teams end-user experience metrics, please read this article >>
You also have a way to easily store and analyze the statistics thanks to our PowerBI reports.
Now, let’s see how to analyze them! First, what should be the results if you want to pass the exam?
Microsoft Teams Metrics – Recommended Results For Readiness Assessment
Microsoft recommends that you perform the test from 2 different “exit points” to analyse what part of your network might cause an issue.
For each location you should have a Robot User performing your tests:
- Directly from where the clients sit to the Microsoft Edge
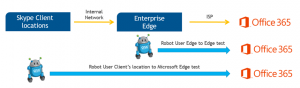
This will give you a pretty good understanding of how your infrastructure is decreasing the call quality of the Teams services.
Here are the recommended values for each of them:
*Network MOS: The MOS score target is usually always the same. A MOS > 4 will provide good audio quality. The closer you are to 4, the smaller distortions you will experience but it will be acceptable.
Between 3 and 4, you can still use the audio (the closer to 4 the better of course) but some users will be impacted by all the issues we explained earlier. It means that you should look at the location to see if you can improve the network quality before deploying MS Teams.
If you have locations with a MOS under 3, you shouldn’t deploy Teams yet. It will create more tickets and frustration than anything.
A heavy look in your network is necessary before doing anything else.
What To Do With These Values?
Now that we have the targets, it is important to compare them with your locations’ values over time.
For that, you want to know what your peak times during the day and during the week are.
It is easy to recognize them with your PowerBI reports that draw all your statistics over days and weeks. You can then identify what are your key moments of the day/week and compare the results of your tests with the Microsoft recommendations.
Finally, as most of the business activity also has a monthly pattern, it is important to keep monitoring this activity for several weeks. You’ll be able to identify these patterns and make sure that you’ve discovered all your peak times.
You’ll see if your network can handle them. If not, you will know directly which location fails and exactly at what time and period of the month.
You’ll be fully prepared to improve the network or handle the users’ complaints.
Microsoft Teams Metrics – Reaching the Target
From a general point of view, to reach these targets you should make sure that:
- The latency one-way is stable during busy and non-busy hours
- The latency RTT is stable and stays close to twice the latency one way
- Packet loss are not increasing too much during busy hours (it is normal if it rises)
- Jitter does not increase too much as well
- Edge connection tests stay better than client connections ones
If all your locations pass the exam during busy and non-busy hours, you can be confident in MS Teams services. User complaints and tickets should stay low, ensuring the best ROI you can have.
But as your infrastructure and the way to use it is in constant change, you should continue to monitor these MS Teams metrics to prevent any crisis, and to predict potential issues at particular locations.
To do so, you must let your Robot User keep working for you.
What Happens If a Site Fails?
We already explained in the statistics description how each of them has an impact on the audio quality. Now, let’s see an example of a site failing the tests:
Data Interpretation
Basically, what’s going on here?
Most of the results exceed the target. Clearly, during the busiest day of the week, the network cannot handle the peak time. The site won’t be able to provide a good MS Teams quality of service .
So basically, the calls will have reduced quality (PSTN, peer-to-peer and conference):
- Users will experience a moment of silence during the call
- They will hear a robot voice for each of the participants
- The speech of the participant will suddenly slow down and then speed up
At the end, the quality will be poor, users will complain, you will have plenty of tickets coming from that location, increasing your administrations costs as well as your user dissatisfaction.
If you have a similar result, you should definitely investigate improving your network before deploying MS Teams.
Finally, the constant monitoring of each site option of the set of Microsoft Teams metrics allows you to easily rank each of your sites and organize them by ROI.
For each site, it is very important to understand the ROI of your network investment.
Sometimes small sites have highly sensitive people and even if the network improvement will be important, the ROI will still be high (like in our Singapore example).
Some other time costs are too high to help remote sites compare to the benefit you will get. In our case, the Geneva costs outweigh the benefits.
The type of Microsoft Teams metrics your team should focus on depends on your organization and what you’re looking to achieve with the platform.
But before going through extensive network design and investment, maybe a first set of simple improvements could enable your organization to provide a decent service across most of your sites. For that please read our article: How to improve your network to meet Teams requirement >>
Learn more about our Microsoft Teams performance monitoring solution and download our ‘Ensuring Teams Performance Under the Hood’ ebook today!

Microsoft SLA for Teams Telephony – 99.999% Uptime Guarantee
Only Part of the Solution for Teams Performance and User Experience This week at Enterprise Connect, Microsoft announced many compelling…

Last Day of The Quarter – Smooth Sailing?
You’re 24 hours away from the next quarter. Have you achieved everything in this one that you wanted to? Got…

The Best Strategy For Microsoft 365 Performance
In today’s lightning-fast world, seamless teamwork and communication are like oxygen for any company. And that’s where having a strategy…
This browser is no longer supported.
Upgrade to Microsoft Edge to take advantage of the latest features, security updates, and technical support.
Dimensions and measurements available in Call Quality Dashboard (CQD)
- 30 contributors
- Applies to: Skype for Business, Microsoft Teams
The Call Quality Dashboard (CQD) for Microsoft Teams and Skype for Business Online allows you to understand the quality of calls made with these services. This article describes the dimensions and measurements visible through CQD. To learn more about CQD, see Use CQD to manage call and meeting quality in Microsoft Teams .
First and Second endpoint classification
Many of the dimensions and measurements in CQD are labeled as first or second. The following logic determines which endpoint involved in the stream or call is labeled as first:
- A server endpoint (AV MCU, Mediation Server, and so on) is considered first when a server is involved in the stream or call.
- A client endpoint is considered second unless the stream is between two server endpoints.
- If both endpoints are the same type, first versus second is set based on internal ordering of the user agent category to ensure that the ordering is consistent.
In the following example, each row represents a pair of User Agents involved in a stream:
That first and second classification is separate from which endpoint is the caller or callee. The First Is Caller dimension can be used to help identify which endpoint is the caller or callee.
Dimensions information is based in part on data uploaded to the CQD portal. Many Dimension values can also be used as filters.
Dimension data types and units
Boolean values are always either True or False. In some cases, True can be represented as 1, and False can be represented as 0.
Dimensions that are provided as range or group of values are shown using the following format:
<sort order string> [<lower bound inclusive> - <upper bound exclusive>
For example, the Duration (Minutes) dimension represents the call duration in seconds with the value reported as a range of values.
The <sort order string> is used to control the sort order when presenting the data and can be used for filtering. For example, a filter on Duration (Minutes) < "065", would show streams with duration less than 2 minutes (The leading '0' is needed for the filter to work as expected). The actual value of the sort order string isn't significant.
You might notice ranges that seem to be invalid for a given dimension. An example is Wifi Signal Strength showing calls in the 082: [100 - 110) range when 100 is the maximum possible value. This range is due to how numbers are assigned to ranges in CQD's data model. If a whole number value is 99, it is counted in the 081: [90 - 100) range. If that value is 100, it is counted in the 082: [100 - 110) range. This doesn't indicate that there are Wifi Signal Strength values greater than 100% being reported.
Enumeration strings
Strings used by CQD are often derived from data files, and these strings can be any combination of character within the allowed length. Some dimensions look like strings, but since they can only be one of a short list of predefined values, they're enumerations and not true strings. Some enumerations strings are also used in pairs.
Enumeration pair
Dimensions that are provided as an enumeration pair are shown using the following format:
<enumeration value from one end point> : <enumeration value from the other endpoint>
The ordering of the enumeration values is consistent but doesn't reflect ordering of the first or second endpoints.
For example, the Network Connection Detail Pair shows the Network Connection Detail values for the two endpoints:
Blank values
The table below describes why a dimension might be blank. Many dimensions and measurements are blank if the QoE Record Available dimension is false. Missing QoE typically occurs when the call isn't successfully established, or when the client fails to send its telemetry to the service.
Available dimensions
The following table lists the dimensions currently available in CQD, in the order listed in the Query Editor used to create reports or edit previously defined reports.
Measurements
Many Measurement values can also be used as filters. The following table lists the measurements currently available in CQD, shown in the order listed in the Query Editor
Notes on measurements
Accuracy limitations.
Certain user and call count measurements rely on performing a distinct countif operation on the data set to compute the count. There's currently an up to 0.2% error inherent with the distinct countif operation depending on the number of rows the operation is performed on. For the most accurate volume, use stream count measures, which don't rely on this distinct countif operation. Filtering to reduce the data volume might reduce the error, but might not eliminate the source of the error in distinct call and user counts. More information about this limitation can be found here dcount aggregate function .
You can use many Dimension and Measurement values as filters. You can use filters in your query to eliminate information in the same way you'd select a Dimension or Measurement to add or include information in the query.
Related articles
Improve and monitor call quality for Teams
What is CQD?
Set up Call Quality Dashboard (CQD)
Upload tenant and building data
CQD data and reports
Use CQD to manage call and meeting quality
Stream Classification in CQD
Use Power BI to analyze CQD data
Was this page helpful?
Coming soon: Throughout 2024 we will be phasing out GitHub Issues as the feedback mechanism for content and replacing it with a new feedback system. For more information see: https://aka.ms/ContentUserFeedback .
Submit and view feedback for
Additional resources
Microsoft Teams performance optimization in eight steps
")
Author: Sandra Ruf Business Development Manager Rimscout – connect on LinkedIn
Microsoft Teams meetings have become part of many companies’ daily business, not only since the rise of hybrid work models. However, nothing disrupts the productivity of a meeting more than frozen videos or dropouts in the audio connection. Often, the fault can be traced to the user’s network.
In this blog article, you’ll learn in eight steps how to quickly identify and pinpoint Microsoft Team performance issues, so nothing can get in the way of a smooth meeting.
Need an expert to troubleshoot your performance issues? We can audit your network in preparation for a new service launch with our Cloud Readiness Assessment, or actively help you troubleshoot your team’s performance. Learn more about our assessment portfolio: Rimscout Network Assessment – Rimscout.
Specific network requirements for good audio and video performance
For a successful Microsoft Teams performance optimization, some terminology and requirements must first be clarified. People often generalize about poor or slow performance . How smoothly Microsoft Teams can be used overall is only minimally influenced by the network . What can be optimized, however, is the quality and stability of the audio and video connections . For this, you first need to look at the network protocols used. Audio, video or desktop sharing are fundamentally different in network behavior from conventional connections, such as access to files, SQL servers or websites.
Most services use the secure transmission of the Transmission Control Protocol (TCP) . The underlying IP stack ensures that lost data is recalled , the correct order of packets is maintained and the transmission is adapted to the available bandwidth. But especially this behavior causes problems for audio and video connections.
Microsoft specifies three essential conditions, which can be easily tracked in a Microsoft Teams Performance Monitoring, for a good audio and video quality:
Latency (RTT or round-trip time) below 100ms
For Microsoft Teams, the transmission time of a packet from the PC to the Microsoft server and back again should be under 100ms . If the latency occasionally exceeds this value, this doesn’t necessarily mean that stable audio and video performance is no longer possible. Especially for connections that are far apart , such as meetings between Germany and the USA, latencies in the range of 150ms to 200 ms are quite normal. However, if the latency exceeds 100ms more often or even permanently, then a degradation of the quality is to be expected and you can assume an ineffective network.
Less than 1% packet loss within a 15s interval
All data traffic (UDP, ICMP, http, etc.) is carried out using packets. Packet loss describes the number of lost packets in a measured period . For UDP connections and therefore for Microsoft Teams audio and video, excessive packet loss leads to stuttering or dropouts in audio and video quality. For other protocols, packets are retransmitted if lost. Here, packet loss becomes noticeable through longer loading times.
Packet inter-arrival jitter lower than 30ms in each 15s interval.
This value indicates the difference between the latencies of the packets . A high jitter means that the delivery time (latency) of the packets varies greatly. Microsoft Teams tries to compensate this with larger buffers and as a result delays the playback accordingly. This means that large variations have a decisive impact on audio and video playback.
In order for Microsoft Teams to be able to capture these key figures and react to them dynamically there is a need for transmission via UDP . When reverting to a TCP or HTTPS protocol, these values are no longer visible.
Proxy servers and SSL VPN connections as the biggest obstacles for Microsoft Teams
In addition to using a TCP protocol , SSL VPNs or cloud proxies can also degrade the quality of audio and video connectivity in Microsoft Teams.
SSL VPNs are systems that allow private data to be transported over public networks and are tunneled in TCP/IP. These are considered to be particularly strong in terms of data security and data protection . But this is exactly where the problem for good and stable audio and video performance lies. With a VPN tunnel, all of a user’s packets do not go directly to the destination in the cloud, but first via configured VPN servers . Often these are located at the site of a company, so that all packets pass through the company network and also through the internal firewall. The path of the packets is therefore extended, which also directly ensures high latency . For audio and video data traffic (UDP), a latency increase of 40ms, triggered by a VPN, can already be critical and cause initial Microsoft Team performance issues . For good audio and video quality, a local breakout should be used with priority so that the packets can take the shortest route. The situation is similar with (cloud) proxies . In general, a proxy is a system that is placed between a SaaS application or a data center and a client . Here, sensitive data can be protected by the proxy acting as a kind of intermediary for the server on which this data is located. All client requests are routed via the proxy to the actual destination. In this way, client and server do not communicate directly with each other and the service can check the transmitted data for malicious content. In this case there is no local breakout used and the result is a higher latency , which in turn is a barrier to good audio and video performance.
How to eliminate of Microsoft Teams performance issues in eight steps
But what can be done if the audio and video performance is no longer sufficient and your daily work routine is severely impaired?
Step 1: Network assessment and client deployment
In order to make a problem visible, a Microsoft Teams performance monitoring is essential. So it is advisable to do a network assessment with Rimscout . This involves selecting users at representative locations within the organization that are affected by acute Microsoft Teams performance problems. Rimscout clients are distributed to these locations and installed on the users’ devices. There, they collect various connection data in the background and test the performance at these locations . The collected data is continuously transferred to the Rimscout portal, where it can be viewed and analyzed. On the one hand, this makes it possible to determine whether some PCs are performing noticeably worse than others. On the other hand, possible causes can be investigated and ruled out so that the Microsoft Teams performance can be optimized.
Step 2: Monitor bandwidth utilization
Before going into further detail with the analysis of the test results, it should be clarified at the beginning if there is enough bandwidth available. Microsoft Teams needs a relatively large bandwidth for excellent performance. For stable audio or video connections, 100 kBit or 2 MBit are required. Compared to the bandwidth required by Outlook (4-8 kBit), Microsoft Teams needs up to 200 times as much continuous load for a good performance.
Step 3: Monitor UDP traffic
The most important indicator of good Microsoft Teams performance in Rimscout is the UDP test . This test determines the latency of UDP traffic to the Teams Media Relay . As specified in Microsoft’s terms and conditions, the measured latency should ideally be less than 100 ms . If the measured values deviate, the cause of the performance problems can usually be found in the network. The causes for this are numerous, but the following steps will help you to narrow them down step by step.

In the Rimscout portal, the measured latency of an affected client is displayed in the test results diagram. If the threshold of 100 ms is exceeded, Rimscout issues a visual warning for this test.
Step 4: Check the firewall configuration
If the UDP test does not return any values at all, the traffic is probably blocked . Microsoft Teams may still work in this case, but audio and video connections will then use TCP, which in turn may cause performance problems. Check the configuration of your firewall or proxy to see if UDP traffic to Microsoft Teams is blocked and change this setting if necessary.

When the Microsoft Teams UDP traffic is blocked, Rimscout no longer displays data for this client in the health overview. This is indicated by gray bars.
Step 5: Check DNS configuration
If the UDP traffic is not blocked but the measured latency is high, another cause may be an incorrect name resolution . Generally, Microsoft Teams determines its cloud peers by means of DNS queries. It becomes problematic when internal clients query the wrong DNS servers, for example on another continent. This problem often occurs with multinational companies .
The Teams Server Name contains a subword that indicates the location of the server, for example swedencentral. For the Exchange Online frontend servers, the IATA code is used analogously to indicate the location . In both cases the specified location should be at least on the same continent as the own client. But if a client from the USA is assigned a Teams server from Japan or Germany during name resolution, this is a clear cause for Microsoft Teams performance issues.
The IATA Airport Code is a code used to uniquely identify locations based on the marking of airports. For example, PAD in this case stands for the location of Paderborn, Germany

Under Clients you can see in the system profile that the user gets a response from the Teams frontend from India, although he works at a location in Germany.
Step 6: Check routing
If the name resolution from the previous step fits, but the latency is still noticeable, the path of the packets should be checked more closely . Microsoft requires short paths, which is why packets from the client to O365 services should use a local breakout if possible. Routing via deployed VPN solutions or (cloud) proxy servers increases latency and worsens the performance. One possible solution is to tunnel the required UDP packets past a VPN or proxy for a Microsoft Teams performance optimization.
Step 7: Check local system devices
Of course, Microsoft Teams performance issues can also have local causes . In Rimscout, the client data of each user can be read out individually to identify possible errors. First of all, the provider’s connection may be insufficient , which has a negative effect on the runtime of the packets. Problems in the local network due to defective cables , overloaded routers and switches or a poor wireless connection can also slow down the speed of all Internet connections. This slowdown is again first noticeable in the audio and video performance.

Rimscout-Portal-First-Hop-Network
In the Client section, the latencies to the first hops into the network are measured (default gateway and Internet provider). In addition, the CPU and RAM load are monitored alongside the WLAN strength.
Step 8: Eliminate the network as the cause
If all the previous steps do not lead to a Microsoft Teams performance optimization and the UDP test also delivers inconspicuous values, the cause may also lay outside the network . Audio and video connections in general place high requirements on the client. Too little RAM , weak CPUs or cheap webcams without any preprocessing of the image signal can also have a negative effect, just like bad or defective headsets . Screen sharing with very high resolutions, such as 4K monitors , also places challenges the client device, and may cause your Microsoft Teams performance issues.
Want to optimize your Microsoft Teams performance? Are you currently experiencing performance issues and need assistance? Our experts can help you not only with a Cloud Readiness Assessment before launching a new service. With a network assessment, we can also actively help you troubleshoot issues with Microsoft Teams, for example. Learn more about our assessment portfolio and request your personalized offer.
Share this blog post!
- Tom Arbuthnot
- Microsoft Teams Podcast
- Tom’s Email Update
What are Thresholds for Good and Poor Network Packet Loss, Jitter and Round Trip Time for Unified Communications?
With Skype for Business and Microsoft Teams, we know that having a “good” network is important for user experience, but what defines good?
At Modality Systems we have a Diagnostics product that reports on Skype for Business network performance and we primarily look at average packet loss, jitter and round-trip time.
- Packet Loss This is often defined as a percentage of packets that are lost in a given window of time. Packet loss directly affects audio quality—from small, individual lost packets having almost no impact, to back-to-back burst losses that cause complete audio cut-out.
- Inter-packet arrival jitter or simply jitter This is the average change in delay between successive packets. Most modern VoIP software including Skype for Business can adapt to some levels of jitter through buffering. It’s only when the jitter exceeds the buffering that a participant will notice the effects of jitter.
- Latency This is the time it takes to get an IP packet from point A to point B on the network. This network propagation delay is essentially tied to the physical distance between the two points and the speed of light, including additional overhead taken by the various routers in between. Latency is measured as one-way or Round-trip Time (RTT).
Different codecs deal with imperfect networks better or worse, modern codecs like RTAudio and Silk dealing better with network issues than older codecs like G711. You should consider that in an SfB environment you’ll be using different codecs in different scenarios. You can argue over exactly what level of the above metrics is “good” or “bad” depending on the codec and the tolerance of the user, ultimately there are no definitively correct or incorrect thresholds as long as they are used to find issues and improve network performance. Getting hung up on exactly what is a “good” vs “poor” threshold is less important than finding and correcting issues.
What does Microsoft Define as Poor?
In QoE (The SfB Server Quality of Experience session performance database), going over one or more of these limits gets your session marked as “ClassifiedPoorCall”
So that’s over 500ms RTT, over 10% average packet loss and over 30 ms Jitter. Reference Jen’s great post here .
Personally, I think these are quite high, but there is little doubt if you are hitting 10% packet loss or over 500ms round trip.
What is Good?
More recent guidance from Microsoft for SfB Online Performance from the client to the Microsoft network edge recommends the following for optimal Skype for Business media quality,
It is interesting in this guidance the RTT must be below 100 for “optimal” performance, Packet loss at under 1% for any 15s interval (so effectively under 1% average) and Jitter under 30ms
The Lync Server Networking Guide from Microsoft ( Lync_Server_Networking_Guide_v2.3.docx –a great detailed document), recommends the following thresholds:
- Packet Loss: On any managed wired network link, a packet loss threshold of 1% is a good value to use to find infrastructure issues
- Jitter: On a managed wired link, you should investigate jitter above 3ms
Thresholds formed around jitter values to determine whether audio is good or poor can be very misleading. This is because most modern VoIP software can adapt to high levels of jitter through buffering
- RTT: Much of the existing documentation about latency thresholds describes the 150ms threshold that the International Telecommunication Union – Telecommunication Standardization Sector (ITU-T) defines as acceptable for VoIP
For our reporting purposes, we use the thresholds of < 1% for Packet loss, < 20ms of Jitter and <300ms RTT as our “good”. The RTT is set as 300 as the ITU-T’s 150ms above is one way, not RTT, and SFB reports RTT.
What’s Impacted?
So there is a range between “good” and “bad/poor”, where it’s OK, but not perfect, to not ideal but maybe passable. At Modality, we refer to that as “Impacted”. Some customers on their cooperate network suggest impacted is unacceptable. Others, with more variable networks or less network investment, might consider some impacted, while not ideal, a reality.
In Microsoft’s reports “impacted” is equivalent to yellow highlighted metrics. I have never been able to get an exact range from Microsoft on what triggers “yellow” on SSRS QoE reports or Call Analytics. Essentially anything between “good” and Microsoft’s “Poor” is “impacted”.
What about Mean Opinion Score (MOS)?
Mean Opinion Score (MOS) is an industry-standard to measure voice quality. It is a score out of 5:
It is a score out of 5, but certain codecs can only reach certain levels. so you can’t consider it a pure network performance score where 5 is good, and 4 is worse. For example, G711 can score up to 4.30, RTAudio Wideband 4.10, but Siren only 3.72 and RTAudio Narrow Band 2.95. So you can only measure MOS relative to the codec used.
Microsoft doesn’t really recommend the use of MOS as a primary measure of Quality:
“ Real MOS measurement relies on individuals to provide their opinion of quality regarding audio clips of standardized lengths. Over the years, computer algorithms and databases have been developed to try to estimate MOS programmatically, based on payload analysis or network metrics analysis. These models are generally very accurate if the test audio samples are also of fixed lengths. Typically, these samples are around eight seconds long. Individuals can generally reach a consistent consensus in evaluating audio quality for short audio samples. However, if the algorithms are used to calculate MOS for entire calls, the metric starts to deviate from real-world opinions of quality. For example, users experiencing audio distortions in calls might also consider the convenience or novelty of being able to place a call from their mobile application and disregard any actual issues. On the other hand, if the distortions interrupted an important conversation, even for a brief moment, individuals might not be so inclined to dismiss them. In large metrics database systems such as QoE, aggregating MOS using statistical functions such as AVERAGE() or MIN() can distort the view even further.” From The Lync Server Networking Guide from Microsoft
References: Technet
docs.microsoft.com
From the MVPs: Being a UC Superhero with Lync QoE Superpowers
https://www.itu.int/rec/dologin_pub.asp?lang=e&id=T-REC-G.114-200305-I!!PDF-E&type=items
About the author

A Microsoft MVP and Microsoft Certified Master, Tom Arbuthnot is Founder and Principal at Empowering.Cloud as well as a Solutions Director at Pure IP.
Tom stays up to date with industry developments and shares news and his opinions on his Tomtalks.blog, UC Today Microsoft Teams Podcast and email list. He is a regular speaker at events around the world.
AWS Machine Learning Blog
Real-time anomaly detection for amazon connect call quality using amazon opensearch.
September 8, 2021 : Amazon Elasticsearch Service has been renamed to Amazon OpenSearch Service. See details .
If your contact center is serving calls over the internet, network metrics like packet loss, jitter, and round-trip time are key to understanding call quality. In the post Easily monitor call quality with Amazon Connect , we introduced a solution that captures real-time metrics from the Amazon Connect softphone, stores them in Amazon OpenSearch Service , and creates easily understandable dashboards using Kibana. Examining these metrics and implementing rule-based alerting can be valuable. However, as your contact center scales, outliers becomes harder to detect across broad aggregations. For example, average packet loss for each of your sites may be below a rule threshold, but individual agent issues might go undetected.
The high cardinality anomaly detection feature of Amazon ES is a machine learning (ML) approach that can solve this problem. You can streamline your operational workflows by detecting anomalies for individual agents across multiple metrics. Alerts allow you to proactively reach out to the agent to help them resolve issues as they’re detected or use the historical data in Amazon ES to understand the issue. In this post, we give a four-step guide to detecting an individual agent’s call quality anomalies.
Anomaly detection in four stages
If you have an Amazon Connect instance, you can deploy the solution and follow along with this post. There are four steps to getting started with using anomaly detection to proactively monitor your data:
- Create an anomaly detector.
- Observe the results.
- Configure alerts.
- Tune the detector.
Creating an anomaly detector
A detector is the component used to track anomalies in a data source in real time. Features are the metrics the detector monitors in that data.
Our solution creates a call quality metric detector when deployed. This detector finds potential call quality issues by monitoring network metrics for agents’ calls, with features for round trip time, packet loss, and jitter. We use high cardinality anomaly detection to monitor anomalies across these features and identify agents who are having issues. Getting these granular results means that you can effectively isolate trends or individual issues in your call center.
Observing results
We can observe active detectors from Kibana’s anomaly detection dashboard. The graphs in Kibana show live anomalies, historical anomalies, and your feature data. You can determine the severity of an anomaly by the anomaly grade and the confidence of the detector. The following screenshot shows a heat map of anomalies detected, including the anomaly grade, confidence level, and the agents impacted.

We can choose any of the tiles in the heat map to drill down further and use the feature breakdown tab to see more details. For example, the following screenshot shows the feature breakdown of one the tiles from the agent john-doe. The feature breakdown shows us that the round trip time, jitter, and packet loss values spiked during this time period.

To see if this is an intermittent issue for this agent, we have two approaches. First, we can check the anomaly occurrences for the agent to see if there is a trend. In the following screenshot, John Doe had 12 anomalies over the last day, starting around 3:25 PM. This is a clear sign to investigate.

Alternatively, referencing the heat map, we can look to see if there is a visual trend. Our preceding heat map shows a block of anomalies around 9:40 PM on November 23—this is a reason to look at other broader issues impacting these agents. For instance, they might all be at the same site, which suggests we should look at the site’s network health.
Configuring alerts
We can also configure each detector with alerts to send a message to Amazon Chime or Slack. Alternatively, you can send alerts to an Amazon Simple Notification Service (Amazon SNS) topic for emails or SMS. Alerting an operations engineer or operations team allows you to investigate these issues in real time. For instructions on configuring these alerts, see Alerting for Amazon OpenSearch Service .
Tuning the detector
It’s simple to start monitoring new features. You can add them to your model with a few clicks. To get the best results from your data, you can tailor the time window to your business. These time intervals are referred to as window size . The window size effects how quickly the algorithm adjusts to your data. Tuning the window size to match your data allows you to improve detector performance. For more information, see Anomaly Detection for Amazon OpenSearch Service .
In this post, we’ve shown the value of high cardinality anomaly detection for Amazon ES. To get actionable insights and preconfigured anomaly detection for Amazon Connect metrics, you can deploy the call quality monitoring solution .
The high cardinality anomaly detection feature is available on all Amazon OpenSearch domains running OpenSearch 7.9 or greater. For more information, see Anomaly Detection for Amazon OpenSearch Service .
About the Authors

- Getting Started
Blog Topics
- Amazon Comprehend
- Amazon Kendra
- Amazon Polly
- Amazon Rekognition
- Amazon SageMaker
- Amazon Textract
- Twitch
- Email Updates
- Documentation
- Screenshots
- Try for Free
The Monitoring Agent
4 types of Agents to help you measure network and application performance.
Network Device Monitoring
Monitor the health of devices like Firewalls, Routers, Switches, Wifi APs and more.
Network Performance Monitoring
Monitor network performance to find and fix issues before they affect users.
Public Monitoring Agents Directory
Proactively Monitor network performance with these service providers.
Understanding & Reducing Network Round-Trip Time (RTT in Networking)
Table of contents.
In the dynamic realm of modern business operations, the heartbeat of connectivity relies on the seamless flow of information across networks. Network administrators and IT professionals, entrusted with the pivotal responsibility of maintaining these vital lifelines, understand the significance of every nanosecond.
In a world where time equates to money and efficiency is non-negotiable, the RTT in networking emerges as a pivotal metric. It represents the time taken for a packet of data to travel from its source to its destination and back again, reflecting the responsiveness and effectiveness of your network infrastructure. As businesses increasingly rely on cloud-based applications, remote collaboration tools, and real-time data analytics, the optimization of RTT has become more critical than ever.
In this comprehensive exploration, we will decode the intricacies of Network Round-Trip Time, demystifying its importance and empowering network administrators and IT professionals with actionable insights to reduce RTT and enhance network performance.
What is Network Round-Trip Time (RTT in Networking)?
First, let’s make sure we’re all on the same page.
Network Round-Trip Time (RTT) in networking, also commonly referred to as Round-Trip Latency or simply Latency, is a crucial metric that measures the time it takes for a packet of data to travel from its source to its destination and back again to the source . RTT is typically expressed in milliseconds (ms) and is a fundamental aspect of network performance.
Here's a breakdown of what RTT encompasses:
- Transmission Time : This is the time it takes for a packet of data to travel from the sender to the receiver. It includes the propagation time (the time it takes for the signal to physically travel through the network medium) and the processing time (the time it takes for routers, switches, and other network devices to handle the packet).
- Propagation Delay : This is the time it takes for an electrical or optical signal to travel over the physical medium, such as a copper or fibre-optic cable. Propagation delay depends on the distance the signal needs to cover and the speed of light or electricity in the medium.
- Queuing and Processing Delay : As data packets pass through routers and switches in a network, they may spend some time in queues waiting for their turn to be processed. This queuing and processing delay can vary based on network congestion and the efficiency of network devices.
In summary, Network Round-Trip Time (RTT) is a key metric in networking that measures the time it takes for data to travel from its source to its destination and back, encompassing transmission time, propagation delay, and queuing/processing delay. It plays a significant role in determining the responsiveness and efficiency of networked applications and services.

The Role of RTT (Network Round-Trip Time) in Network Responsiveness
Network responsiveness, often measured by RTT, is the cornerstone of user satisfaction and efficient operations.
RTT is a critical factor in network performance because it directly impacts the responsiveness of network applications and services. Low RTT values indicate that data can travel quickly between endpoints, resulting in faster response times for applications and a more seamless user experience. On the other hand, high RTT values can lead to delays and sluggish performance.
Reducing RTT is essential in scenarios where real-time communication, online gaming, video conferencing, or the timely delivery of data is crucial. Network administrators and IT professionals often work to optimize RTT by employing various strategies such as using content delivery networks (CDNs), minimizing network congestion, and optimizing routing paths.
- User Expectations : Today's users have high expectations for network responsiveness. Whether it's loading a web page, streaming a video, or making a VoIP call, users demand minimal delays. A low RTT ensures that users experience quick response times, leading to seamless and satisfactory interaction with applications and services.
- Real-Time Applications : Many critical business applications, such as video conferencing, online collaboration tools, and financial trading platforms, require real-time data exchange. RTT directly impacts the effectiveness of these applications. A shorter RTT means that data reaches its destination faster, enabling real-time interactions without noticeable delays.
I. Network Round-Trip Time (RTT) and User Experience
User experience is a key driver of customer satisfaction and loyalty. RTT plays a pivotal role in shaping this experience.
- Website Performance : For businesses with an online presence, website performance is paramount. A website with low RTT loads quickly, ensuring that visitors can access information, make purchases, or engage with content without frustrating delays. Studies have shown that longer page load times due to high RTT can result in higher bounce rates and decreased conversions.
- Video and Media Streaming : In an era of video marketing and content consumption, RTT directly influences the quality of video streaming. Lower RTT values mean faster buffer-free streaming, enhancing the viewer's experience and reducing the likelihood of video interruptions.
II. Network Round-Trip Time’s (RTT) Impact on Business Operations
Beyond user experience, RTT has a profound impact on various aspects of business operations:
- Productivity : In a remote or hybrid work environment, where employees rely on cloud-based applications and data access, RTT can significantly impact productivity. Sluggish network performance due to high RTT values can lead to frustration, downtime, and decreased efficiency.
- Data Transfer : Businesses often need to transfer large volumes of data between locations or to the cloud. High RTT can lead to slow data transfer speeds, potentially affecting data backup, disaster recovery, and the ability to access critical information in a timely manner.
- Customer Service : For businesses that provide customer support or run call centers, low RTT is essential for clear and uninterrupted VoIP calls. High RTT can lead to call dropouts, poor call quality, and dissatisfied customers.
- E-commerce : In the world of e-commerce, where every millisecond counts, RTT can impact sales and customer retention. Slow-loading product pages and checkout processes due to high RTT values can result in abandoned shopping carts and lost revenue.
Understanding the significance of RTT in modern networking is not just a technical matter; it's a fundamental aspect of delivering a positive user experience, maintaining productivity, and ensuring the seamless operation of critical business processes. Network administrators and IT professionals must prioritize RTT optimization to meet the demands of today's digital business landscape.
Ready to Optimize Your Network's Round-Trip Time? Try Obkio Today!
Are you eager to take control of your network's performance and reduce Round-Trip Time (RTT) to boost productivity and enhance user experiences? Look no further than Obkio's Network Performance Monitoring tool, the ultimate solution for network administrators and IT professionals.

Why Choose Obkio:
- Real-Time Monitoring : Obkio provides real-time visibility into your network, allowing you to identify latency bottlenecks and pinpoint performance issues as they happen.
- User-Friendly Interface : With an intuitive and user-friendly interface, Obkio makes it easy to monitor your network's RTT and other critical metrics without the need for complex configurations.
- Actionable Insights : Obkio offers actionable insights and recommendations to help you optimize your network's performance, reduce RTT, and ensure seamless business operations.
- Customized Alerts : Set up custom alerts to be notified of performance deviations, ensuring that you can proactively address issues before they impact your users.
Unlock the Full Potential of Your Network with Obkio. Get Started Today!
Don't let network latency hold your business back. Take the first step towards optimizing your network's Round-Trip Time and providing an exceptional user experience. Try Obkio's Network Performance Monitoring tool now and experience the difference.

Measuring and Calculating Network Round-Trip Time: How to Calculate RTT
While understanding the significance of RTT is vital, the ability to quantify and interpret it accurately is equally crucial for network administrators and IT professionals.
In this section, we’ll equip you with the knowledge and tools necessary to measure, calculate, and make sense of RTT metrics effectively. RTT measurement is not merely a technical exercise; it's a strategic endeavour that empowers you to fine-tune your network for peak performance, deliver an exceptional user experience, and ensure the seamless operation of critical business processes.
So, join us as we explore the RTT formula, discover the range of tools at your disposal for RTT measurement, and learn the art of interpreting RTT metrics.
I. Understanding the Network RTT Formula
The RTT formula is a fundamental concept for anyone aiming to measure and manage network latency effectively. It provides a straightforward way to calculate the Round-Trip Time between two endpoints in a network.
The formula for RTT is as follows:
RTT = (t2 - t1) + (t4 - t3)
- t1 : The time at which the sender sends the packet.
- t2 : The time at which the sender receives an acknowledgment (ACK) from the receiver.
- t3 : The time at which the receiver receives the packet.
- t4 : The time at which the receiver sends the ACK back to the sender.
Understanding this formula allows you to measure RTT manually by recording these timestamps. In practice, however, RTT is often measured automatically using specialized tools and software.
I. Tools for Measuring Network RTT
Accurate RTT measurement is crucial for network administrators and IT professionals. Fortunately, a range of tools and methods are available to simplify this process:
- Network Monitoring Software : Comprehensive network monitoring solutions, such as Obkio's Network Performance Monitoring tool , offer real-time RTT measurement and historical data tracking. These tools provide insights into RTT trends, allowing you to identify performance fluctuations and optimize network resources.
- Ping : The ping command is a simple and widely used tool for measuring RTT. It sends ICMP echo requests to a destination and records the time it takes for responses to return. While ping provides basic RTT information, it may not be suitable for more detailed analysis.
- Traceroute : Traceroute is another command-line tool that helps you trace the path a packet takes to reach its destination. It provides information about each hop along the route, including RTT values. Traceroute is useful for diagnosing latency issues and identifying bottlenecks in the network.
- Packet Analyzers : Packet analyzers like Wireshark capture network packets and provide detailed analysis, including RTT calculations. They are invaluable for diagnosing complex network issues but require a deeper understanding of packet-level data.
- Cloud-Based Monitoring Services : Cloud-based services can measure RTT from multiple locations globally, offering a broader perspective on network performance. These services often include user-friendly dashboards and alerting features.

III. Interpreting Network RTT Metrics
Interpreting RTT metrics is essential for making informed decisions about network optimization. Here's how to understand the data:
- Baseline RTT : Establish a baseline RTT for your network under normal operating conditions. This baseline serves as a reference point for identifying deviations and potential issues.
- Variability : Monitor the variability of RTT values over time. Consistently high or fluctuating RTT can indicate network congestion, equipment problems, or other performance bottlenecks.
- Comparing RTT Metrics : Compare RTT metrics between different endpoints, routes, or network segments. This can help pinpoint specific areas of concern and prioritize optimization efforts.
- Thresholds and Alerts : Set RTT thresholds and network monitoring alerts to be notified when latency exceeds acceptable levels. Proactive alerting allows you to address performance issues before they impact users.
- Root Cause Analysis : When RTT metrics indicate performance problems, use additional tools and diagnostics to perform a root cause analysis. Isolate the source of latency and implement corrective measures.
Interpreting RTT metrics effectively empowers network administrators and IT professionals to make data-driven decisions, optimize network performance, and deliver a seamless user experience.
In conclusion, understanding the RTT formula, utilizing measurement tools, and interpreting RTT metrics are essential steps in managing and improving network latency. These skills enable network professionals to diagnose issues, identify opportunities for optimization, and ensure efficient network performance.
IV. How to Calculate RTT in Networking: An Example
Let's walk through a simple example of calculating Network Round-Trip Time (RTT) for a packet of data travelling between two devices.
Suppose you have a sender ( Device A ) and a receiver ( Device B ) connected to the same network. You want to measure the RTT for a packet of data sent from Device A to Device B and back.
Here are the key timestamps you'll need to measure or record:
- t1 : The time at which Device A sends the packet.
- t2 : The time at which Device A receives an acknowledgment (ACK) from Device B.
- t3 : The time at which Device B receives the packet.
- T4 : The time at which Device B sends the ACK back to Device A.
Now, let's assume the following timestamps:
- t1 : 12:00:00.000 (Device A sends the packet)
- t2 : 12:00:00.150 (Device A receives the ACK from Device B)
- t3 : 12:00:00.200 (Device B receives the packet)
- t4 : 12:00:00.350 (Device B sends the ACK back to Device A)
Now, you can use the RTT formula to calculate the Round-Trip Time:
Plug in the values:
RTT = (12:00:00.150 - 12:00:00.000) + (12:00:00.350 - 12:00:00.200)
RTT = 0.150 seconds + 0.150 seconds
RTT = 0.300 seconds
So, in this example, the calculated Network Round-Trip Time (RTT) for the packet travelling between Device A and Device B is 0.300 seconds, or 300 milliseconds (ms).
This RTT value represents the time it took for the data packet to travel from Device A to Device B and back, including the time it spent in transit and the time it took for the acknowledgment to return.
In this article, we explore the importance of testing network latency for businesses and provide tools and techniques for accurately measuring latency.
How to Measure Network Round-Trip Time with NPM Tools
When it comes to measuring and optimizing Network Round-Trip Time (RTT), Network Performance Monitoring (NPM) tools are your go-to.
NPM tools provide real-time visibility into network performance and continuously and comprehensively monitor various aspects of a network, allowing network administrators to track RTT metrics at multiple points in the network infrastructure.
By offering a granular view of RTT, NPM tools help identify performance bottlenecks, allowing for swift diagnosis and targeted optimization. Additionally, NPM tools often include alerting features that notify administrators when RTT exceeds predefined thresholds, enabling proactive problem resolution before end-users experience the impact.
Moreover, NPM tools are equipped with historical data analysis capabilities, allowing network professionals to identify trends and patterns in RTT values. By identifying long-term RTT patterns, administrators can make informed decisions about capacity planning, infrastructure upgrades, or routing optimization to ensure consistent low-latency network performance.
In a world where network responsiveness is crucial for user satisfaction and business productivity, NPM tools are invaluable for network administrators and IT professionals aiming to maintain optimal RTT and deliver a seamless user experience. Let’s learn how to deploy them!
Step 1. Deploy A Network Performance Monitoring Tool with RTT Monitoring Features
High RTT can lead to delays and sluggish network performance - but how can you know the extent of the problem?
The most accurate way to measure RTT and other key network metrics is by using a Synthetic Network Performance Monitoring Software, like Obkio.
Unlike standalone RTT monitoring tools, Obkio provides a holistic approach to network performance analysis, making it the best choice for measuring RTT and network performance as a whole. With Obkio, gain access to real-time monitoring and reporting features that allow them to measure RTT across their entire network infrastructure, including routers, switches, and end-user devices.
This end-to-end network monitoring tool not only identifies RTT issues but also provides valuable insights into latency, packet loss, bandwidth utilization and more.
Obkio continuously measures network metrics like network RTT by:
- Using Network Monitoring Agents in key network locations
- Simulate network traffic with synthetic traffic and synthetic testing
- Sending packets every 500ms to measure the round trip time it takes for data to travel
- Catch RTT and other network issues affecting key applications and services
Step 2. Measure Round-Trip Time in All Network Locations
Persistent and erratic spikes in Network Round-Trip Time (RTT) measurements are indicative of substantial performance challenges within your network, demanding immediate attention. To pinpoint and resolve these irregularities, implementing RTT monitoring is an indispensable step.
Obkio’s Network Monitoring Solution will measure RRT and other network metrics by sending and monitoring data packets through your network every 500ms using Network Monitoring Agents . The Monitoring Agents are deployed at key network locations like head offices, data centers, and clouds and continuously measure the amount of time it takes for data to travel across your network.
This is extremely important when monitoring RTT and addressing spikes to maintain network efficiency and a smooth user experience, especially in scenarios where real-time data exchange, applications, and services are critical.
For example , you can measure network RTT between your head office and the Microsoft Azure cloud, or even between Azure and your data center.
To deploy monitoring in all your network locations, we recommend deploying:
- Local Agents : Installed in the targeted office location experiencing performance issues or latency spikes. There are several Agent types available (all with the same features), and they can be installed on MacOS, Windows, Linux and more.
- Public Monitoring Agent : These are deployed over the Internet and managed by Obkio. They compare performance up to the Internet and quickly identify if the performance issue is global or specific to the destination. For example, measure RTT between your branch office and Google Cloud .

Step 3. Measure Round-Trip Time for Network Devices
Network Device Monitoring is also crucial for accurately measuring and managing Network Round-Trip Time (RTT). Network devices, such as routers, switches, and firewalls, play a significant role in determining the latency and RTT experienced by data packets as they traverse the network.
Obkio’s Network Device Monitoring feature is a fast and easy solution to get detailed information about the health of your core network devices. Used with the end-to-end Network Performance Monitoring feature, Network Device Monitoring with SNMP Polling helps IT teams quickly and proactively pinpoint issues with devices like firewalls, routers, switches and Wi-Fi access points.
Network devices are key points of control and routing within a network. Monitoring these devices allows you to gain insights into their performance, such as how efficiently they process and forward data packets. Device monitoring helps identify issues like high CPU utilization, memory constraints, or network interface errors, which can all contribute to increased RTT.
Here are the key network devices you should consider monitoring when measuring network round-trip time:
- Routers : Routers are pivotal devices in network traffic management. They determine the path data packets take between networks and subnetworks. Monitoring routers helps identify congestion points, routing issues, and overall device performance.
- Switches : Network switches are responsible for forwarding data packets within a local network (LAN). Monitoring switches helps ensure that LAN traffic is efficiently handled and doesn't introduce unnecessary RTT.
- Firewalls : Firewalls are essential for network security but can also introduce latency. Monitoring firewalls helps verify that they're processing data packets efficiently and not creating undue RTT delays.
- Load Balancers : Load balancers distribute network traffic across multiple servers or resources to ensure load distribution and fault tolerance. Monitoring load balancers helps maintain even traffic distribution and low RTT.
- Gateways : Gateways connect different networks, such as LANs to the internet. Monitoring gateways is essential for ensuring data packets are efficiently routed between internal networks and external destinations.
- WAN Optimization Devices : These devices are commonly used in wide-area networks (WANs) to reduce latency and optimize data transfer. Monitoring WAN optimization devices ensures they're operating as intended to minimize RTT.
- Access Points (APs) : In wireless networks, APs play a critical role in data transmission. Monitoring APs helps maintain consistent wireless network performance, minimizing RTT for mobile or remote users.
- DNS Servers : DNS (Domain Name System) servers translate domain names into IP addresses. Monitoring DNS servers ensures that DNS resolution doesn't introduce delays when clients access network resources.
- Network Endpoints : Monitoring the performance of endpoints (e.g., servers, workstations, and user devices) is vital for understanding how network devices affect RTT from the user's perspective.
- Virtualization and SDN Controllers : In virtualized or software-defined networks, controllers manage network resources and routing. Monitoring these controllers helps ensure efficient data flow and low RTT.
To comprehensively measure and optimize RTT, it's essential to monitor a variety of network devices . The choice of devices to monitor may depend on the specific characteristics of your network and the critical points for your organization.

Step 4. Collect Network Round-Trip Time Measurements
Once you’ve set up your Monitoring Agents for network latency monitoring , they continuously measure metrics like RTT measure and collect data, which you can easily view and analyze on Obkio’s Network Response Time Graph.
Measure RTT throughout your network with updates every minute. This will help you understand and measure good round-trip time measurements for different applications vs. poor latency. If your RTT levels go from good to poor, you can also further drill down to identify exactly why RTT issues are happening, where they’re happening, and how many network locations they’re affecting.
To more accurately measure RTT in your network, and receive alerts when latency measurements are poor, Obkio sends alerts based on historical data and not just static thresholds.
As soon as there’s a deviation in the historical data, and your network is experiencing poor RTT measurements, Obkio sends you an alert.
It’s as simple as that
Step 5. Monitor More Network Metrics Alongside Network Round-Trip Time
Once deployed, Obkio’s Monitoring Agents will begin exchanging synthetic traffic to continuously measure network performance and core network metrics .
When monitoring network performance and assessing the health of your network, it's important to measure a range of network metrics alongside Network Round-Trip Time (RTT) to gain a comprehensive understanding of the network's behaviour and potential issues. Here are several key network metrics to consider:
- Packet Loss : Packet loss indicates the percentage of data packets that fail to reach their destination. High packet loss can significantly impact the quality of network services and applications.
- Jitter : Jitter is the variation in latency or RTT. Consistent RTT values are desirable, but high jitter can lead to unpredictable network performance, which is problematic for real-time applications like VoIP and video conferencing.
- Bandwidth Utilization : Monitoring bandwidth usage helps you identify periods of congestion and overutilization, which can lead to increased RTT. By monitoring bandwidth, you can proactively manage network capacity.
- Throughput : Throughput measures the rate at which data is transmitted over the network. It's essential for assessing the actual data transfer capacity of your network, especially for large file transfers or media streaming.
- Error Rate : The network error rate indicates the number of data packets with errors or corruption. High error rates can lead to retransmissions, increasing latency and packet loss.
- QoS Metrics : Quality of Service (QoS) metrics include parameters like latency, jitter, and packet loss, specific to certain traffic types. Monitoring QoS compliance is essential for prioritizing critical applications and ensuring they meet performance requirements.
- Device Performance : Monitoring the performance of network devices such as routers, switches, and firewalls is crucial. High CPU usage , memory issues, or hardware problems can impact network performance and increase RTT.
- Availability and Uptime : Monitoring network availability and network uptime is essential for identifying periods of network unavailability or downtime, which can impact services and applications.
By measuring these network metrics alongside RTT, you can gain a holistic view of your network's performance, detect issues promptly, and proactively optimize network resources to provide a seamless user experience and support critical business operations.

Understanding Good vs. Bad Network Round-Trip Time Measurements
In the intricate world of networking, the metric known as Network Round-Trip Time (RTT) serves as a crucial barometer of performance. However, RTT is not a one-size-fits-all metric, and its evaluation must be tailored to the specific needs and demands of a network or application.
In this section, we delve into the nuanced realm of RTT measurements, deciphering what constitutes good and bad readings, and how these metrics reverberate through the fabric of network performance.
Good and bad RTT measurements are relative and depend on the specific context and requirements of a network or application. What is considered good or bad RTT can vary based on factors such as the type of network, the application's sensitivity to latency, and the expectations of users. However, here are some general guidelines to consider:
I. Good Network RTT Measurements
- Low and Consistent : Good RTT measurements typically exhibit low and consistent values. Low RTT indicates that data is transmitted quickly, providing a responsive user experience. Consistency ensures that users can rely on predictable network performance.
- Match Application Requirements : Good RTT measurements should meet or exceed the requirements of the applications and services being used. For example, real-time applications like video conferencing or online gaming often require RTT values below 100 milliseconds to provide a seamless experience.
- Minimal Jitter : Good RTT measurements have minimal jitter, meaning that there is little variation in RTT values. Jitter can disrupt real-time applications, so a stable and low-latency network is desired.
II. Bad Network RTT Measurements:
- High and Fluctuating : Bad RTT measurements typically exhibit high values and significant fluctuations. High RTT values can lead to sluggish network performance and application responsiveness, while fluctuations introduce unpredictability.
- Exceed Application Tolerances : For some applications, any RTT values beyond specific thresholds can be considered bad. For example, an online multiplayer game might become unplayable with RTT exceeding 200 milliseconds.
- Frequent Packet Loss : Consistent packet loss and retransmissions can lead to bad RTT measurements. Packet loss is a sign of network congestion or instability, and it can severely impact network performance.
- Long-Term Performance Issues : Consistently bad RTT measurements over an extended period, even if they are not extremely high, may indicate underlying network issues that need to be addressed. It's essential to identify and resolve long-term performance problems to maintain a reliable network.
In summary, good RTT measurements are characterized by low, consistent values that meet the requirements of the network's applications, with minimal jitter. Bad RTT measurements, on the other hand, involve high, fluctuating values, packet loss, and latency that exceeds application tolerances. To assess RTT measurements, it's important to consider the specific network requirements and the impact of latency on user experience in your particular environment.

Identifying, Troubleshooting, and Common Network Round-Trip Time (RTT) Issues
In the world of networking, Network Round-Trip Time (RTT) serves as a vital performance indicator. When RTT issues arise, they can lead to sluggish network responsiveness and user dissatisfaction. This section is your guide to identifying and troubleshooting common RTT problems that can affect network performance.
We'll dive into the practical aspects of recognizing RTT issues, whether through real-time monitoring or user feedback. We'll also explore the common culprits behind elevated RTT, such as congestion and configuration problems.
I. Identifying Network RTT Issues
- Real-time Monitoring : Regularly monitor RTT using network performance monitoring tools, like Obkio NPM . These tools provide real-time data on RTT, enabling you to detect anomalies or spikes that might indicate issues.
- Baseline Measurement : Establish a baseline for expected RTT values in your network. Deviations from this baseline can be an early indicator of RTT problems.
- User Feedback : Listen to user complaints or feedback. Slow application response times or connectivity issues reported by users can be indicative of RTT issues.
- Historical Analysis : Analyze historical RTT data to identify patterns or trends. Consistent RTT issues at specific times or on particular network segments can point to the source of the problem.
- Network Topology Review : Examine your network topology to identify potential bottlenecks or congestion points that may contribute to high RTT.
II. Uncovering The Most Common Network RTT Issues
- Network Congestion : Heavy network traffic can lead to network congestion , queuing delays, and packet loss, resulting in increased RTT. Implement Quality of Service (QoS) to prioritize essential traffic and reduce congestion.
- Long Geographic Distance : Data travelling over long distances, especially in wide-area networks (WANs), can experience high propagation delay, contributing to elevated RTT. Consider implementing content delivery networks (CDNs) to reduce the impact of distance.
- Hardware and Configuration Problems : Outdated or misconfigured network devices, such as routers and switches, can lead to performance issues and high RTT. Regularly review and update hardware and configurations to address these problems.
- Packet Loss : Packet loss , where data packets are dropped or need to be retransmitted, can increase RTT. Troubleshoot packet loss issues by identifying and rectifying network faults or congestion points.
- Jitter : Inconsistent RTT values and jitter can affect real-time applications. Jitter is often a result of network congestion or configuration problems, so minimizing these issues helps reduce jitter and improve RTT.
III. Troubleshooting Network RTT Issues:
So what happens when your NPM tool starts alerting you about sudden spikes in round-trip time? Well, it’s time to troubleshoot! First, you need to understand why the network issue is happening, where and when.
- Isolate the Problem : Start by identifying the affected network segment or path with high RTT. Network monitoring tools can help pinpoint the problematic area.
- Traffic Analysis : Analyze the network traffic on the identified segment to determine if congestion or unusual patterns are causing high RTT.
- Device Inspection : Examine the performance of network devices along the path, such as routers and switches. High CPU usage or configuration errors may be contributing to RTT issues.
- Quality of Service (QoS) Adjustment : If network congestion is the root cause, consider implementing or adjusting QoS policies to prioritize critical traffic and reduce congestion.
- Optimization Techniques : Implement optimization techniques such as route optimization, network load balancing , and the use of CDNs to improve network efficiency and reduce RTT.
- Testing and Validation : After making adjustments, conduct tests to validate that RTT has improved. Monitor the network to ensure that RTT remains within acceptable ranges.
- Regular Maintenance : Ongoing network maintenance, including updates, hardware upgrades, and configuration reviews, is essential for preventing future RTT issues.
By systematically identifying, troubleshooting, and addressing RTT issues, network administrators can maintain low-latency networks, ensure a seamless user experience, and minimize the impact of common RTT problems.
Learn how to troubleshoot network issues by identifying where, what, why network problems occur with Network Troubleshooting tools.
Factors Affecting Network Round-Trip Time (RTT)
As we navigate the realm of Network Round-Trip Time (RTT) and its role in network optimization, we encounter an array of influential factors that shape the journey of data from source to destination and back. In this chapter, we embark on a comprehensive exploration of these key factors, each wielding the power to either elevate or hinder network performance.
Understanding the factors affecting RTT is paramount for network administrators and IT professionals, as it equips them with the knowledge needed to fine-tune their networks for maximum efficiency and responsiveness.
1. Network Congestion on RTT in Networking
Network congestion occurs when there is a higher volume of traffic on a network than it can efficiently handle. This congestion can significantly impact RTT:
- Increased Latency : Congestion leads to packet queuing, where data packets must wait in line to be processed by network devices. The increased latency due to this queuing results in higher RTT values, causing delays in data transmission.
- Packet Loss : In congested networks, packets may be dropped to relieve congestion. This packet loss not only contributes to higher RTT as packets are retransmitted but also affects the reliability and performance of network applications.
- Quality of Service (QoS) : Implementing Quality of Service policies can help mitigate congestion by prioritizing certain types of traffic. This can help ensure that critical applications experience lower RTT values even during network congestion.
2. Geographic Distance on RTT in Networking
Geographic distance plays a fundamental role in determining RTT, especially in wide-area networks and global connectivity:
- Propagation Delay : As data travels over long distances, it experiences propagation delay. This delay is the time it takes for signals to traverse the physical medium (e.g., fibre-optic cables or satellite links) between network endpoints. The greater the distance, the higher the propagation delay, contributing to increased RTT.
- WAN vs. LAN : Wide Area Networks ( WANs ) typically involve greater geographic distances than Local Area Networks ( LANs ). WANs often exhibit higher RTT values due to the inherent challenges of data transmission across extensive physical distances.
- Use of Content Delivery Networks (CDNs) : CDNs can help mitigate the impact of geographic distance by caching and delivering content from servers closer to end-users. This minimizes the effects of long-distance transmission on RTT.
3. Network Hardware and Configurations on RTT in Networking
The hardware and configuration of network devices and infrastructure can significantly affect RTT:
- Router and Switch Performance : The processing capacity of routers and switches in the network can impact the speed at which packets are forwarded. Outdated or underpowered devices can introduce additional latency and increase RTT.
- Network Path Efficiency : The chosen network paths and routing algorithms also play a role. Inefficient routing can lead to longer paths and, subsequently, higher RTT.
- Configuration Errors : Misconfigurations in network devices, such as incorrect routing tables or Quality of Service settings, can lead to suboptimal performance and increased RTT. Regular network audits and optimization are essential to address configuration issues.
4. Packet Loss and Jitter on RTT in Networking
Packet loss and jitter are network phenomena that can cause variations in RTT:
- Packet Loss : Packet loss occurs when data packets fail to reach their intended destination. Repeated packet loss results in retransmissions, which contribute to increased RTT. Reducing and measuring packet loss through network optimization is essential for minimizing RTT.
- Jitter : Jitter refers to the variation in packet arrival times. Excessive jitter can cause fluctuations in RTT, affecting the predictability of network performance. QoS mechanisms and traffic shaping can help mitigate jitter-related RTT issues.
Understanding these factors and their impact on RTT is crucial for network administrators and IT professionals. By addressing these challenges through proactive network management, optimization, and the use of appropriate technologies, it's possible to achieve lower RTT and maintain efficient and responsive network performance.

Network Round-Trip Time (RTT) vs. Latency: Comparing Network Siblings
In the world of networking and data transmission, terms like "Network Round-Trip Time (RTT)" and "latency" often take center stage, reflecting the critical aspect of speed and responsiveness in today's digital landscape. While these terms are sometimes used interchangeably, they represent distinct facets of network performance.
In this section, we’ll unravel the differences between Network Round-Trip Time (RTT) and latency. Understanding these concepts is fundamental for network administrators and IT professionals as it enables them to grasp the nuances of network performance and address specific challenges effectively.
I. Defining Latency
Latency is a general term that refers to any delay or lag in data transmission within a network . It encompasses all delays encountered during data communication, including the time it takes for data to travel between two points (which is what RTT specifically measures), as well as other types of delays such as processing delays, queuing delays, and transmission delays.
Latency can be categorized into several types:
- Propagation Delay : The time it takes for a signal or data packet to physically travel over the network medium (e.g., copper cables, fibre-optic cables, or wireless links). It is directly related to the distance between two network points and the speed of the medium.
- Transmission Delay : The time it takes to push the entire data packet into the network medium. It is influenced by the packet's size and the speed of the network link.
- Processing Delay : The time it takes for network devices like routers and switches to process and forward data packets. This can be affected by the performance of these devices and their configurations.
- Queuing Delay : The time data packets spend in queues at various points in the network, waiting for their turn to be processed. High congestion or network traffic can increase queuing delays.
- Jitter : Jitter refers to variations in latency. Inconsistent latency can affect the predictability of network performance, which is particularly critical for real-time applications.
II. Defining Network Round-Trip Time (RTT)
As we've already discussed in this article, RTT is a specific metric used to measure the time it takes for a data packet to travel from its source to its destination and back to the source . It is a subset of latency that focuses on the round-trip journey of a packet. RTT is measured in milliseconds (ms) and is often used to evaluate network responsiveness.
The RTT calculation typically involves the following timestamps:
- The time the sender sends the packet.
- The time the sender receives an acknowledgment (ACK) from the receiver.
- The time the receiver receives the packet.
- The time the receiver sends the ACK back to the sender.
By subtracting the appropriate timestamps, you can calculate the RTT for a specific packet.
In summary, latency is a broader term that encompasses various types of delays in data transmission, including RTT. RTT specifically measures the round-trip time for a packet, which is crucial for understanding the responsiveness of a network, particularly in applications that require timely data exchange, such as video conferencing or online gaming.
We asked a supercomputer “What is latency”, its impact on network performance, and strategies for minimizing it and created this comprehensive guide.
The Quest for Lower Network Round-Trip Time: How to Reduce Network RTT
In the quest for network optimization and superior user experiences, one metric stands as a sentinel of responsiveness - Network Round-Trip Time (RTT). A lower RTT signifies not only the swift transmission of data but also the realization of network efficiency, seamless applications, and satisfied users.
Here, we will explore the art of reducing RTT through a variety of carefully crafted strategies. From optimizing network topology to the art of content caching and compression, from harnessing the power of load balancing to the efficiency of Content Delivery Networks (CDNs), we will venture into the multifaceted realm of RTT reduction.
I. Strategies for Reducing Network RTT
Reducing RTT is a fundamental objective in optimizing network performance . So, there are several strategies to help you achieve this:
- Optimizing Network Topology : A well-designed network topology that minimizes the number of network hops and ensures efficient routing can significantly reduce RTT. Strategies like hierarchical network design and route optimization contribute to lower latency.
- Quality of Service (QoS) Implementation : Prioritizing real-time traffic and critical applications through QoS policies can reduce contention for network resources and lower RTT for those essential services.
- Edge Computing : Deploying computing resources closer to end-users or IoT devices at the network edge can reduce RTT by decreasing the physical distance that data needs to travel.
- TCP/IP Optimization : Fine-tuning TCP/IP parameters and employing technologies like TCP window scaling and selective acknowledgments can improve data transfer efficiency and lower RTT.
II. Load Balancing and Redundancy for Reducing Network RTT
Load balancing and redundancy are vital components in RTT reduction:
- Load Balancing : Distributing network traffic across multiple servers or paths ensures that no single server or network link becomes overwhelmed. This strategy not only increases network capacity but also reduces the likelihood of network congestion and high RTT.
- Redundancy : Implementing redundancy through network failover mechanisms or backup links can mitigate the impact of network failures. Redundancy ensures that if one path experiences issues, traffic can be rerouted quickly, minimizing RTT.
III. Content Delivery Networks (CDNs) for Reducing Network RTT
CDNs are instrumental in RTT reduction, particularly for web content delivery:
- Caching : CDNs cache content on servers located in geographically distributed edge locations. This means users can access content from a nearby server, reducing the need to retrieve data from the origin server, and consequently lowering RTT.
- Content Prioritization : CDNs allow prioritizing and delivering the most critical content quickly, which is especially beneficial for reducing RTT for web pages, images, and videos.
IV. Caching and Compression for Reducing Network RTT
Caching and compression techniques are powerful tools for minimizing RTT:
- Data Caching : Caching frequently accessed data locally, either at the client side or at intermediate network nodes, allows for quicker retrieval of data, reducing RTT.
- Data Compression : Compressing data before transmission and decompressing it at the receiver's end decreases the amount of data to be transferred, ultimately lowering RTT.
By implementing these strategies and technologies, network administrators and IT professionals can actively work to reduce RTT, enhance network performance, and deliver a more responsive user experience. Each strategy offers a unique approach to address latency and can be adapted to the specific needs and goals of the network environment.
Tools and Technologies for Optimizing Network Round-Trip Time: Network RTT Optimization
In the realm of network performance, the pursuit of lower Network Round-Trip Time (RTT) is both an art and a science. It requires the judicious selection and deployment of tools and technologies that act as enablers, elevating networks to realms of enhanced responsiveness and efficiency.
Here, we uncover the spectrum of tools at your disposal, explore their capabilities, and provide insights into the selection process to ensure you choose the right tools that align with your unique business needs. Earlier in this article, we already talked about measuring RTT and identifying RTT issues with Network Performance Monitoring tools - which are also a key tool for optimizing round-trip time.
With the right tools in your arsenal, you can orchestrate a network that not only understands the melody of RTT but dances to its tune, delivering a harmonious and responsive user experience.
I. Network Monitoring and Analytics Solutions for Optimizing Network RTT
Monitoring and analytics tools are instrumental in the quest for RTT optimization:
- Network Performance Monitoring (NPM) : NPM solutions continuously monitor network performance, providing real-time visibility into RTT metrics. They enable network administrators to detect and diagnose issues promptly, making them a vital tool for maintaining low RTT.
- Packet Capture and Analysis Tools : Packet capture tools allow the in-depth analysis of network traffic. Administrators can use these tools to capture and examine packets, enabling them to identify bottlenecks and other issues contributing to RTT delays.
- Network Traffic Analysis : Advanced network traffic analysis solutions provide insights into application behaviour, network usage , and patterns. These tools help optimize network paths and configurations to lower RTT.
II. SD-WAN and Network Optimization Platforms for Optimizing Network RTT
SD-WAN (Software-Defined Wide Area Network) and network optimization platforms offer dynamic solutions for RTT optimization:
- SD-WAN : SD-WAN technology leverages multiple network connections and dynamically routes traffic over the most efficient path. It includes features such as traffic prioritization and application-aware routing, which are beneficial for optimizing RTT for critical applications. The same goes for Dual-WAN networks .
- WAN Optimization Controllers : These devices optimize data traffic between WAN endpoints by employing techniques like data deduplication, compression, and caching. WAN optimization reduces the amount of data transferred, reducing RTT.
- Content Delivery Platforms : Content delivery platforms, combined with CDNs, accelerate the delivery of web content by distributing it to edge servers. This minimizes the physical distance data needs to travel, resulting in reduced RTT for web-based services.
III. Choosing the Right Tools for Optimizing RTT in Your Business
Selecting the right tools for RTT optimization requires careful consideration:
- Assessing Business Needs : Start by identifying the specific requirements of your business. Consider factors like the nature of your applications, your network topology, and your performance goals. This assessment guides the choice of tools and technologies.
- Scalability : Ensure that the selected tools and technologies can scale with your business as it grows. Scalable solutions can adapt to increased network demands without compromising RTT.
- Compatibility : The tools and technologies you choose should seamlessly integrate with your existing network infrastructure. Compatibility ensures smooth implementation and operation.
- Budget Considerations : Evaluate the cost of implementation and ongoing maintenance. Balancing your budget with the need for high-performance tools is vital to achieving cost-effective RTT optimization.
- Monitoring and Maintenance : Plan for continuous monitoring and maintenance of the chosen tools and technologies. Regular updates and adjustments are necessary to adapt to evolving network conditions and maintain low RTT.
By exploring the array of tools and technologies available for RTT optimization and making informed choices that align with your specific network requirements, you can ensure that your network operates at its peak performance, delivering low RTT and a seamless user experience.

Harnessing the Power of Round-Trip Time (Network RTT) Optimization for Business Success
In the fast-paced digital landscape, where every millisecond counts, optimizing Network Round-Trip Time (RTT) should be a top priority for network admins. Achieving low and consistent RTT not only enhances the user experience but also impacts business operations in numerous ways.
For businesses, RTT optimization means improved productivity, reduced downtime, and the ability to leverage real-time applications to their full potential. In e-commerce, it can translate to higher sales, as low latency ensures swift page loads and seamless transactions. For video conferencing and collaboration tools, it means clearer communication and increased efficiency. In the realm of online gaming, it can be the difference between a competitive edge and a frustrating experience for gamers.
By harnessing the power of RTT optimization, businesses ensure that their digital offerings meet the high expectations of today's users and remain competitive in an ever-evolving market.
Measuring and Optimizing Network RTT with Obkio’s NPM Tool
To start measuring and optimizing RTT, you need the right tools, and Obkio's Network Performance Monitoring (NPM) tool stands as a valuable ally.
With Obkio, you can measure, monitor, and optimize RTT with precision. Get real-time insights into network performance, offering visibility into RTT metrics at various network points. Obkio equips network admins and IT professionals with the means to detect and resolve RTT issues promptly, ensuring that network operations remain seamless and efficient. With Obkio, you can proactively manage RTT, detect anomalies, and maintain low-latency network performance.
As you harness the power of Obkio's NPM tool, you're well-equipped to elevate your network to new heights of efficiency, ultimately contributing to the success of your business in a digitally connected world!
- 14-day free trial of all premium features
- Deploy in just 10 minutes
- Monitor performance in all key network locations
- Measure real-time network metrics
- Identify and troubleshoot live network problems
You can rest assured that we're not like those pushy Sellsy people - there's no catch here. We firmly believe in the excellence of our product, but if it's not the right fit for you, we understand and want what's best for you.
These might interest you
19 network metrics: how to measure network performance, how to measure latency, say goodbye to network headaches..
Get a live demo of Obkio now!
Did you know?

- Statseeker Features
- Meraki Module for Statseeker
- Instant Network Visibility
- Network Latency Tool
- Infrastructure Utilization and Capacity Planning
- Network Forensics and Root Cause Analysis
- SLA Oversight
- Powerful Dashboards & Reports
- Asset Management
- Contractor Management
- Compliance Management
- Spend Optimization
- Techniche EV
- Professional Services
- Statseeker Blog
- Urgent Blog
- Techniche EV Blog
- Statseeker Technical Documentation
- How to Buy and Sell Shares
- Updates, Reports and Presentations
- Corporate Governance
Real-time Performance Monitoring Using Round-trip Time
Network performance monitoring is a fundamental function of a NetOps team. Poor network performance can impact critical business applications, user experience and revenue. Network performance can be measured using round-trip time.
Try Statseeker for 45 days at no cost.
What is Round-Trip Time?
Round-trip time (RTT) is an essential in networking that can indicate the quality of communications between two endpoints and is used for real-time performance monitoring.
RTT, also known as round-trip delay time (RTD), is a metric that measures in milliseconds the amount of time it takes for a data packet to be sent, plus the amount of time it takes for an acknowledgment of that signal to be received. This time delay includes propagation times for the paths between the two communication endpoints.
RTT can be directly impacted by a range of architecture design decisions, especially network topology.
Along with RTT, other metrics can be used to monitor real-time network performance, for example jitter on the connection. This can affect VoIP and video quality for your critical business services.
Why is RTT a key indicator of network performance and user experience?
As RTT only measures the data packet transport time, it is a reliable indicator – or KPI – of pure network performance, independent of the application, application server performance or the end-user hardware.

How can RTT be measured?
RTT is measured in different ways by different network equipment manufacturers. For example, a manufacturer may send ten data packets every minute to measure both packet loss and RTT.
A useful measurement is the variation in the RTT (this causes jitter) and the RTT duration (this causes additional latency). The results of these tests are made available in the device Management Information Base (MIB) which differs for every manufacturer and device.
How do NetOps teams use RTT data to ensure good user experience?
RTT data provides an indication of latency across the network. NetOps teams typically use maximum RTT (or one way) or average RTT metrics taken from a particular time period to monitor network latency.
A network monitoring tool can use the RTT value for alerting and reporting.
How does Statseeker help NetOps teams use RTT data?
Statseeker supports one-minute polling and stores the data in a proprietary time-series database. Unlike other NPMs, Statseeker does not average or roll up the data. It preserves the as-polled data to enable accurate long-term historical reporting and predictive analytics.
Once the polled data is in the system, NetOps teams can track real-time observability, KPIs and SLAs using Statseeker dashboards, reporting, and alerting. Network administrators can automate reports and alerts for real-time performance monitoring or configure threshold alerts to be notified when a network is operating with poor performance and affecting latency-sensitive applications and services.
In addition, Statseeker has a unique analytics engine that can enable predictive monitoring to allow the NetOps team to see network performance degrading over time or at peak load hours. This capability enables them to act before their customers notice a performance loss in their voice and video applications.
Managed Service Providers are required to produce regular reports to illustrate that the networks they manage on behalf of a customer have operated without latency issues, and also that SLAs were met. An MSP noted that it took on average ten working days for one person to prepare these reports for customer viewing. With Statseeker’s large-scale automation capabilities, reports are auto-generated and auto-distributed.

Your next step
Whether you are an MSP, government, or enterprise customer, Statseeker can help you meet your real-time performance requirements.
To trial Statseeker for 45 days at no cost, send your details. Setup takes less than an hour.
Categories:
Techniche APAC Pty. Ltd.
143 Coronation Drive,
Ground Floor,
Milton QLD 4064, Australia
+61 1300 556 673
Techniche EMEA Ltd.
Studio C2, Witan Studios,
324 Witan Gate,
Milton Keynes MK9 1EJ
+44 1908 038560
Techniche Americas LLC.
5857 Owens Avenue,
Carlsbad, CA 92008, USA
+1 844 782 8757
Help us improve your experience.
Let us know what you think.
Do you have time for a two-minute survey?
Understanding Using Probes for Real-Time Performance Monitoring on M, T, ACX, MX, and PTX Series Routers, EX and QFX Switches
Real-time performance monitoring (RPM) enables you to configure active probes to track and monitor traffic. Probes collect packets per destination and per application, including PING Internet Control Message Protocol (ICMP) packets, User Datagram Protocol and Transmission Control Protocol (UDP/TCP) packets with user-configured ports, user-configured Differentiated Services code point (DSCP) type-of-service (ToS) packets, and Hypertext Transfer Protocol (HTTP) packets. RPM provides Management Information Base (MIB) support with extensions for RFC 2925, Definitions of Managed Objects for Remote Ping, Traceroute, and Lookup Operations .
When RPM is configured on a Junos device, the device calculates network performance based on packet response time, jitter, and packet loss. The device gathers RPM statistics by sending out probes to a specified probe target, identified by an IP address. When the target receives a probe, it generates responses that are received by the device.
Starting in Junos OS Release 17.3R1, you can apply RPM to IPsec tunnels and GRE tunnels for PIC-based and Routing Engine-based RPM clients and servers if you are using MS-MPCs or MS-MICs. Packet Forwarding Engine-based RPM is not supported for IPsec tunnels. Support of RPM on IPSec tunnels enables service level agreement (SLA) monitoring for traffic transported in IPSec tunnels.
RPM is not supported on logical systems.
Starting in Junos OS Evolved Release 20.1R1, you can configure RPM probes. For Junos OS Evolved, RPM is configured at the [edit services monitoring rpm] hierarchy level. The scope of support is limited to:
Probe generation and reception (client) as well as reflection (server) for the following RPM probe types:
http-get (added in Junos OS Evolved 23.4R1)
You must set the offload-type statement to none to configure this probe type.
http-metadata-get (added in Junos OS Evolved 23.4R1)
icmp-timestamp
tcp-ping (added in Junos OS Evolved 23.4R1)
udp-timestamp
Probe history management
Reporting through syslog only
Starting in Junos OS Evolved Release 21.2R1, reporting through SNMP MIB objects is supported for RPM. For more information about SNMP MIBs that Juniper supports, see SNMP MIB Explorer .
In Junos OS, you can also configure RPM services to determine automatically whether a path exists between a host device and its configured BGP neighbors. You can view the results of the discovery using an SNMP client. Results are stored in pingResultsTable , jnxPingResultsTable , jnxPingProbeHistoryTable , and pingProbeHistoryTable .
Starting in Junos OS Release 18.4R1 for MX Series routers, you can use RPM probes to detect link status, and change the preferred-route state on the basis of the probe results. RPM-tracked routes can be IPv4 or IPv6, and support a single IPv4 or IPv6 next hop. You configure this feature with the rpm-tracking statement at the [edit routing-options] or [edit routing-instances routing-options] hierarchy level. For example, RPM probes can be sent to an IP address to determine if the link is up, and if so, the software installs a static route in the route table. RPM-tracked static routes are installed with preference 1 and thus are preferred over any existing static routes for the same prefix. Starting in Junos OS Release 19.1R1, you can track up to 16 next hops for each IPv4 or IPv6 RPM-tracked static route, for MX Series routers. Starting in Junos OS Release 20.4R1, we've extended support to the PTX Series routers. In addition, for this feature, you can configure route preference and tag values for each IPv4 or IPv6 destination prefix. Starting in Junos OS Release 22.3R1, you can configure RPM-tracked static routes for the ACX710 and ACX5448 routers.
In Junos OS, probe configuration and probe results are supported by both the command-line interface (CLI) and SNMP. You set the probe options in the test test-name statement at the [ edit services rpm probe owner ] hierarchy level. You use the show services rpm probe-results command to view the results of the most recent RPM probes.
The following probe types are supported with DSCP marking:
HTTP get (not available for BGP RPM services)
ICMP timestamp
TCP connection
UDP timestamp
For ACX routers:
The ACX710 and ACX5448 Series routers support the hardware-timestamp statement configuration, starting in Junos OS Release 22.3R1.
The ACX500 Series, ACX1000 Series, ACX2000 Series, ACX4000 Series, ACX5048 router, and the ACX5096 router do not support the hardware-timestamp statement configuration.
With probes, you can monitor:
Average round-trip time
Jitter of the round-trip time—The difference between the minimum and maximum round-trip time
Maximum round-trip time
Minimum round-trip time
Standard deviation of the round-trip time (Junos OS only)
One-way measurements for ICMP timestamp probes include:
Minimum, maximum, standard deviation, and jitter measurements for egress and ingress times
Number of probe responses received
Number of probes sent
Percentage of lost probes
You can configure the following RPM thresholds:
Ingress/egress delay
Round-trip time
Standard deviation (Junos OS only)
Successive lost probes
Total lost probes (per test)
You can also configure CoS classifiers and prioritization of RPM packets over regular data packets received on an input interface with the dscp-code-points configuration statement.
Table 1 provides information about RPM and related timestamp support on MPC, MS-MIC/MPC, and Routing Engine:
Related Documentation
- Configuring BGP Neighbor Discovery Through RPM
- Examples: Configuring BGP Neighbor Discovery on SRX Series Firewalls and MX, M, T and PTX Series Routers With RPM
- Search Please fill out this field.
- Manage Your Subscription
- Give a Gift Subscription
- Sweepstakes
Score a Southwest Companion Pass With Just One Round-trip Flight — but You'll Have to Book Soon
The offer is running until tomorrow night and is valid for travel from Aug. 5 through Oct. 2
:max_bytes(150000):strip_icc():format(webp)/alison-fox-author-pic-15f25761041b477aaf424ceca6618580.jpg "jitter round trip time")
Ashlee Duncan/Courtesy of Southwest Airlines
Grab a friend and get ready to hit the skies by scoring one of Southwest Airlines’ limited-time Companion Passes, available by flying just one roundtrip flight.
The promotional passes, which allow travelers to designate one person to fly with them practically for free, are available to members of Southwest’s Rapid Rewards program who register for the promotion online and purchase one qualifying Southwest revenue flight by 11:59 p.m. CT on March 27, according to the airline . To qualify, travelers must book either a roundtrip flight or two one-way flights and must take off by May 22.
Customers who score a companion pass with the promotion can then designate a companion to travel with them from Aug. 5 through Oct. 2. Travelers can choose to change their designated companion up to three times with the promotional Companion Pass.
“We know the Companion Pass is a favorite perk of our Rapid Rewards program, and we're thrilled to bring back this promotion for a limited time so that Customers can experience why this popular benefit is so meaningful," Jonathan Clarkson, vice president of marketing at Southwest, said in a statement. "We invite our Customers to take advantage of this offer because traveling with your favorite Companion supports sharing of adventures and creating memories that can last a lifetime."
The Companion Pass allows holders to designate one companion to fly with them nearly for free , simply paying taxes and fees for each flight, which start at $5.60 each way. Typically, travelers can earn a Companion Pass by either flying 100 qualifying one-way flights or earning 135,000 qualifying points in a calendar year (which they can do by using a qualifying credit card, staying at partner hotels, and more).
The latest Companion Pass promotion comes on the heels of Southwest’s plans to start red-eye flights sometime in the next two years. It also follows the airline’s decision to redesign its cabins for 2025 featuring ( controversial ) slimmer new seats , adjustable headrests, and larger under-seat space.
Game time set for Texas vs. Gonzaga in 2024 NCAA Women’s Tournament Sweet 16

After beginning its NCAA Tournament run at home, the Texas Longhorns are heading out west to Oregon.
The NCAA has announced that Texas and Gonzaga will meet in the third round of the NCAA Tournament at 9 p.m. CT on Friday. This Sweet 16 matchup will be played at Portland's Moda Center and ESPN will televise the contest.
The winner of this battle between the Longhorns and Zags will advance to face either Stanford or North Carolina State in the Elite Eight on Sunday.
Texas and Gonzaga have never played before. Not all of the Longhorns are unfamiliar with the Zags, however. While she was a member of BYU's basketball team from 2018-22 , UT guard Shaylee Gonzales averaged 16.1 points over the nine games she played against Gonzaga.
The No. 1 seed in the Portland 4 region, Texas is 32-4 this season. The champion of the Big 12 Tournament, Texas has won 14 of its last 15 games. Texas did not trail once during its first- and second-round wins over Drexel and Alabama in the NCAA Tournament .
FOLLOW THE MADNESS: NCAA tournament brackets, scores, schedules, teams and more.
After earning its best-ever seed in the NCAA Tournament, Gonzaga (32-3) has lived up to its No. 4 seed. Gonzaga opened the NCAA Tournament with a 75-56 win over UC Irvine and then bested Utah on Monday night. The Zags are led by senior forward Yvonne Ejim, who was named the West Coast Conference's player of the year and defensive player of the year this season.
Port of Baltimore suspends ship traffic after bridge collapse: What it means for travel
Travel is being impacted by Tuesday’s Francis Scott Key Bridge collapse along Interstate 695 in Baltimore, Maryland.
Drivers were immediately directed to take alternate routes through the city, following the early morning incident. What’s less clear is what the bridge collapse may mean for upcoming cruises in and out of Baltimore.
“Vessel traffic into and out of the Port of Baltimore is suspended until further notice,” the Port of Baltimore posted on X, formerly Twitter.
Live Updates: Baltimore's Key Bridge collapses after ship hits it; construction crew missing
Rep. Kweisi Mfume, D-Md., whose district includes the bridge and the port, called the collapse an “unthinkable horror” and said he had spoken with Transportation Secretary Pete Buttigieg and the White House.
Learn more: Best travel insurance
“They are responding with all of the assets at their disposal,” he said in a statement. “Our prayers right now are for the missing individuals and victims of this tragedy. We thank God for the effective service of our first responders.”
Here’s what we know.
Which cruises go to Baltimore?
Several major cruise lines serve Baltimore. According to the Cruise Lines International Association, the industry’s leading trade group, published itineraries in the 2024 calendar year include a dozen ships making 115 stops in Baltimore.
“We are deeply saddened by the tragedy and collapse of the Key Bridge that occurred last night and extend our support and heartfelt prayers to all those impacted,” CLIA spokesperson Anne Madison said in an emailed statement. “We join everyone in extending our thanks and appreciation to the first responders and emergency workers in Baltimore, the U.S. Coast Guard, and other professionals who are working with one goal in mind—to save lives. We are closely following this situation.”
Royal Caribbean’s Vision of the Seas has a roundtrip itinerary scheduled to depart Baltimore on April 12, according to the cruise line’s website. “We are deeply saddened by the tragedy and collapse of the Francis Scott Key Bridge and extend our heartfelt prayers to all those impacted,” a spokesperson for the line said in an email. “We are closely monitoring the situation, and our port logistics team is currently working on alternatives for Vision of the Seas’ ongoing and upcoming sailings.”
Carnival’s website shows Carnival Pride and Carnival Legend also have sailings into or out of Baltimore set for April.
Carnival Legend will temporarily move operations to Norfolk, Virginia.
The ship's current cruise, which left for a planned round-trip sailing from Baltimore on March 24, will end in Norfolk on Sunday. Passengers will then receive free bus rides to Baltimore. The vessel's next cruise will sail round-trip from Norfolk later that day.
“Our thoughts remain with the impacted families and first responders in Baltimore,” Carnival president Christine Duffy said in a statement. “We appreciate the pledge made by President Biden today to dedicate all available resources to reopen Baltimore Harbor to marine traffic as soon as possible. As those plans are finalized, we will update our future cruise guests on when we will return home to Baltimore, but in the meantime, we appreciate the quick response and support from officials in Norfolk.”
The cruise line has not yet shared plans for Carnival Pride. Carnival's parent company, Carnival Corp., said the temporary change in homeport is estimated to have an impact of up to $10 million on adjusted EBITDA and adjusted net income this year, according to a news release .
Was your cruise itinerary changed?: What to do next
American Cruise Lines has roundtrip sailings from Baltimore scheduled in May, according to its website.
“We will monitor the situation and make adjustments to future cruises if needed, but at the present time our schedules remain unaffected, and our thoughts remain with those affected by the immediate situation and rescue efforts underway,” an American Cruise Lines spokesperson told USA TODAY.
Norwegian Cruise Line doesn’t appear to have any Baltimore sailings until September on Norwegian Sky . The line will stay in contact with the port and share any changes with passengers and travel partners, according to a spokesperson.
"In the meantime, we wish the city of Baltimore strength during this very unfortunate event," they said in an email.
Alternate routes for the Baltimore bridge
Most drivers can take Interstate 95 (Fort McHenry Tunnel) or Interstate 895 (Baltimore Harbor Tunnel) to avoid the collapsed bridge. However Maryland Transportation Authority notes there are some exceptions .
Vehicles carrying hazardous materials, including more than 10 pounds of propane, are not allowed in the tunnels. Additionally, vehicles more than 13-feet and 6-inches high or 8-feet wide may not use the 1-895 Baltimore Harbor Tunnel. Vehicles more than 14-feet and 6-inches high or 11-feet wide may not use the I-95 Fort McHenry Tunnel.
Those vehicles should use the western portion of I-695 instead.
IMAGES
VIDEO
COMMENTS
Consider implementing QoS across your organization to maximize the quality of the user experience where bandwidth is constrained. QoS will help solve issues typically associated with high levels of packet loss, and—to a lesser degree—jitter and round-trip times. Teams QoS guidance; Wi-Fi: Wi-Fi can have a significant impact on call quality.
3. Round Trip Time. The RTT is the time between sending a message from a source to a destination (start) and receiving the acknowledgment from the destination at the source point (end). We can also see RTT referred to as Round Trip Delay (RTD). Sometimes, the acknowledgment is sent from the destination to the source almost immediately after the ...
Jitter is a measure of the variation in packet delay for a data stream. When jitter is too high, audio can become choppy. Real-Time Analytics displays network inter-arrival jitter, not audio jitter. ... Round trip time is the time it takes for a single packet to travel from the client to the remote endpoint and back to the client. High round ...
Latency This is the time it takes to get an IP packet from point A to point B on the network. This network propagation delay is tied to physical distance between the two points and the speed of light, including extra overhead taken by the various routers in between. Latency is measured as one-way or Round-trip Time (RTT).
To do this, work out the mean round-trip time and the minimum-round trip time for multiple data packets. You can then use this information to check jitter with an instantaneous jitter measurement. This calculates the average between instant jitter measures and the average jitter measures across multiple data packets.
Roundtrip time. Response time between your system and the Teams server. Lower is better. < 200 ms. Sent codec. The codec used for encoding audio sent by your system. Informational only. Received jitter. The distortion in audio caused by inconsistent audio packet arrival times, Lower is better. < 30 ms. Received packets. The number of audio data ...
Round Trip Time. Jitter Delay. Call quality estimation . Call Quality Estimation: Overall estimated call quality score based on the packet loss rate, round trip time and jitter. 4.5: Excellent (Imperceptible) 4.0: Good (Perceptible but not annoying) 3.0: Fair (Slightly annoying) 2.0: Poor (Annoying) 1.0: Bad (Very Annoying) Packet Loss Rate(%):
Network Metrics (Jitter, Packet Loss, Round Trip Time) Audio, Video and Application Sharing (Bitrate, Frame Rate) *Available only for internal users . Several of customers in the financial services industry have been able to leverage the RTA dashboard to identify and assist with meetings that were experiencing "issues".
Network Metrics (Jitter, Packet Loss, Round Trip Time) Audio, Video and Application Sharing (Bitrate, Frame Rate) Image 1 of 3. The new tool is coming to government clouds in the first half of ...
Network jitter and round trip time - are these an infrastructure problem or an end user problem? Both. At times, network jitter and round trip time can occur due to infrastructure issues - anything from faulty cables, bad network configurations or just machines that are too busy to process data fast enough. Other times, your user is to blame.
The response time of the ping will be measured and displayed. If the response time is larger than expected, there is likely an issue with latency. To stop the test, type Ctrl+C. When you stop the test, you will be presented with minimum, maximum, and average round trip times in milliseconds and a summary of packet loss. Here is an example output:
4. Examine the ping and round-trip results. The round-trip results reliably measure your latency. This test also provides valuable information about packet loss. What is Jitter? Jitter is when a network connection has inconsistent latency that results in major variation and time delay between data packet transmissions.
However, measuring round-trip delay is easier and requires less expensive equipment. To get a general measurement of one-way delay, measure round-trip delay and divide the result by two. VoIP typically tolerates delays up to 150 ms before the quality of the call is unacceptable. Jitter is the variation in delay over time from point-to-point. If ...
How Packet Loss and Jitter are Related to the Network MOS Score. The packet loss plays a very important role in the Network MOS calculation. Over 20% of packet loss, your MOS cannot be higher than 2.5. The latency round trip won't affect the MOS if it stays under 100ms. If the Jitter stays under 50ms, the MOS will be as high as it can.
Network Score is a value computed from network round-trip time, packet loss, and jitter. It is a ranking of the network quality for a Teams call or stream in a single number, with higher values being better. Device: First Capture Dev: String: Name of the capture device used by the first endpoint.
Latency (RTT or round-trip time) below 100ms. ... Packet inter-arrival jitter lower than 30ms in each 15s interval. This value indicates the difference between the latencies of the packets. A high jitter means that the delivery time (latency) of the packets varies greatly. Microsoft Teams tries to compensate this with larger buffers and as a ...
At Modality Systems we have a Diagnostics product that reports on Skype for Business network performance and we primarily look at average packet loss, jitter and round-trip time. Packet Loss This is often defined as a percentage of packets that are lost in a given window of time. Packet loss directly affects audio quality—from small ...
The feature breakdown shows us that the round trip time, jitter, and packet loss values spiked during this time period. To see if this is an intermittent issue for this agent, we have two approaches. First, we can check the anomaly occurrences for the agent to see if there is a trend. In the following screenshot, John Doe had 12 anomalies over ...
First, let's make sure we're all on the same page. Network Round-Trip Time (RTT) in networking, also commonly referred to as Round-Trip Latency or simply Latency, is a crucial metric that measures the time it takes for a packet of data to travel from its source to its destination and back again to the source.RTT is typically expressed in milliseconds (ms) and is a fundamental aspect of ...
Round-trip time (RTT) is an essential in networking that can indicate the quality of communications between two endpoints and is used for real-time performance monitoring. ... Along with RTT, other metrics can be used to monitor real-time network performance, for example jitter on the connection. This can affect VoIP and video quality for your ...
Real-time performance monitoring (RPM) enables you to configure active probes to track and monitor traffic. Probes collect packets per destination and per application, including PING Internet Control Message Protocol (ICMP) packets, User Datagram Protocol and Transmission Control Protocol (UDP/TCP) packets with user-configured ports, user-configured Differentiated Services code point (DSCP ...
Round Trip Time Jitter Delay Call quality estimation Call Quality Estimation: Overall estimated call quality score based on the packet loss rate, round trip time and jitter. 4.5: Excellent (Imperceptible) 4.0: Good (Perceptible but not annoying) 3.0: Fair (Slightly annoying) 2.0: Poor (Annoying) 1.0: Bad (Very Annoying) Packet Loss Rate(%):
To enable round-trip time tests, configure the tests using the Data Aggregator REST API. capm supports the following test types: MENU. Products; Solutions ... Measures the round-trip delay, one-way delay, one-way jitter, and one-way packet loss. Codec simulation is provided for MOS and ICPIF voice quality scoring capability. In this article: ...
Score a Southwest Companion Pass With Just One Round-trip Flight — but You'll Have to Book Soon. The offer is running until tomorrow night and is valid for travel from Aug. 5 through Oct. 2
The No. 1 seed in the Portland 4 region, Texas is 32-4 this season. The champion of the Big 12 Tournament, Texas has won 14 of its last 15 games.
The ship's current cruise, which left for a planned round-trip sailing from Baltimore on March 24, will end in Norfolk on Sunday. Passengers will then receive free bus rides to Baltimore.