- You are here:
- Home »
- Blog »
- RV Interior
- » RV Spongy Floor Repair Kit: How To Fix Soft Spot in Camper


RV Spongy Floor Repair Kit: How To Fix Soft Spot in Camper
- July 14, 2021 /
- RV Interior /
- By James V.
One of the most vital parts of an RV i s the flooring. When you have a solid floor underneath you, it is possible to live normally and without worry. However, those floors can get damaged, making RV or camper life a little unsettling. That is until you save the money up to have the floor repaired.
This ‘simple’ and ‘easy’ repair can be quite a job. Most often, it requires the old soft flooring to be removed, then a piece of new flooring put in its place. But the job can have some hidden surprises, and covering the old floor with thicker plywood may be the easiest answer.
To learn more about repairing a soft floor in your camper or RV, just continue to read our article. It has the information you want to know about in order for you to do an excellent job replacing the old soft spot with solid new flooring material.
Why do Campers Get Soft Spots On a Floor?

There is only one answer to this question- moisture. That moisture can be in the form of drips from a faucet, dropped water glasses, or easy paths for water to follow when it rains. No matter the method, moisture is the enemy of all wood products.
When water or other liquids get absorbed into the wood, that spot will get damaged and eventually ruined. Moisture helps the wood to expand, bloat, twist, and lose its integrity. When that happens, the only option you have is to replace the damaged section or cover it up with a new floor.
The latter option may mean removing the toilet, the cabinets, and other pieces of furniture in order to do a thorough job of repairing the floor. The former repair option may be easier, but you still have to make sure the floor returns to level prior to the wood softening.
That makes this repair a little trickier than you may think. if you are going to do this repair yourself, make sure you have some good DIY skills as those will be needed. These seemingly simple repairs can turn into a monster of a job if you are not careful.
How Much Does it Cost to Repair a Soft Spot On The RV Floor?
We hate to use it, but it will depend on the size of the soft spot, location, and whether the problem can be resolved. By that, we mean if the source of the moisture can be tracked down and sealed. You do not want to have to fix the same problem over and over.
If you can do it yourself and the location of the soft spot is in an ideal location, you may be able to get away with spending a few hundred dollars, give or take a hundred. It is hard to estimate because there are too many mitigating factors involved.
Then if you decide to have professionals do it, the bill could run you into a thousand or more dollars. This cost will depend on several factors as well. The location, size, and materials that will be used to replace the soft spot will add significantly to your costs.
Then the labor charges will not be cheap. If the repairman has to remove furniture, cabinets, and other items, expect your costs to go up as you need to pay for the labor to re-install them.
The best thing to do to ballpark your costs is, one, get a price list of materials you will need and two, get an estimate from a professional. Keep in mind that costs change due to hidden issues that were discovered after the flooring was pulled up.
Does RV Insurance Cover Water Damage?

There is some good news here. Yes, you can get your RV insurance to cover the damage caused by water. But, you have to have the right kind of insurance. Accident insurance is for damage due to accidents and does not cover water damage.
The type of coverage you need comes from comprehensive insurance policies. There is some bad news, though. You have to make sure the policy will cover water damage and in what forms that damage is produced. Dropping or spilling water on your floor usually is not covered.
There are many different types of RV insurance, so you need to read through the details to buy the right one. The insurance agent may not tell you everything, or they may fudge a little bit, so do not rely on them to give you the straight insurance coverage story.
Make sure you find out the sources of the water damage that will NOT be covered before buying. This is very important as you may buy insurance thinking you are protected when you are not.
Also, the attitude of your insurance company will play a role in this scenario.
Types of RV Insurance Coverage
What follows are a few of the different types of RV insurance packages you can buy. There may be one or two more, but you would have to check with your insurance agent to find them.
Each insurance company is different when offering policies, so it pays to shop around first and get the best deal possible. here are your options:
- Liability - this protects you when you cause damage to other people’s property or their bodies.
- Collision - protects you when you have an accident or accidentally hit a tree, etc. Hitting animals is not covered.
- Uninsured motorist - just what it says, this policy protects you when the other person involved in the accident doesn’t have insurance.
- Comprehensiv e - covers replacement or repair costs that are not the result of an accident.
Some types of water damage that are not covered comes from the following sources:
- Freezing temperatures
- Age-related issues
- Manufacturing issues
- Water leaks
- Dry rot or rust
- Snow and ice
- Improper maintenance and storage
While this seems like just about everything that can happen, it is best to double-check with your insurance agent. There may be exceptions to these rules.
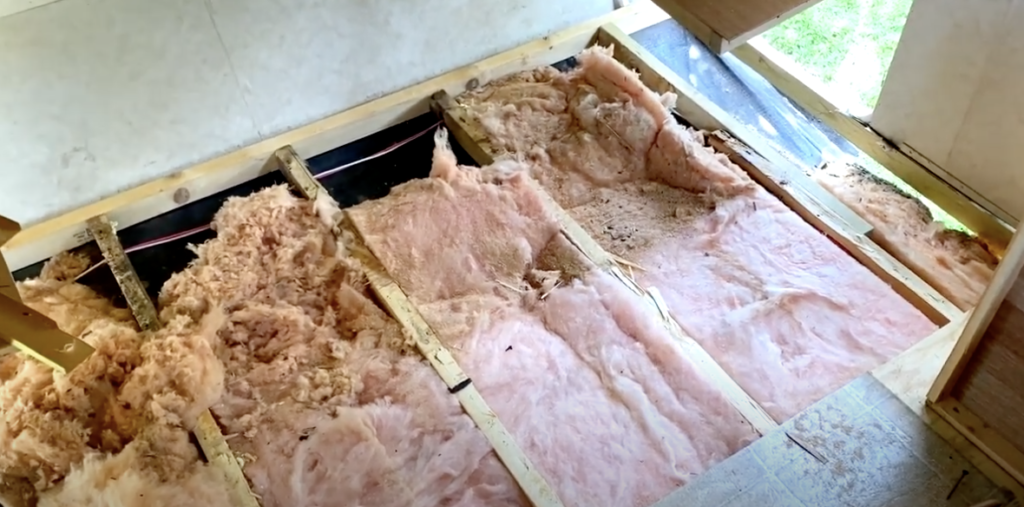
How to Fix a Soft Spot in Camper Floor

One reason it is vital you fix these soft spots as quickly as possible is for safety. You do not want yourself or your family to fall through the floor and hurt themselves. Then, you especially do not want a guest to do that either. They could sue or make an insurance claim that eventually raises your rates.
When it comes to repairing, the ideal flooring to have underneath your feet is plywood. If it is particle board, the repair task just got a little harder. This is one of the factors we mentioned earlier. Cutting particleboard is a lot different than cutting solid wood, which is why you want plywood instead of that material on your floors.
After determining what kind of flooring you have, you need to find the size of the problem. Once that is done, you will need to cut a few inches beyond that boundary in order to add the replacement piece.
When you are getting ready to cut your soft spot out, you really should cut the piece so that it exposes the stud. That way, you have something to nail or screw into when you replace the bad spot.
What you do not want is for the studs to be damaged by water as that is a very expensive repair and a lot more work. When you have marked the area, you need to cut out, set your skill saw blade to reach the depth of the plywood.
You do not want to go any deeper because you may cause more damage by cutting something you shouldn’t. Once you made your cut, you can use a nail puller to any nails holding the flooring to the studs, or your hammer and pry bar can do the same job.
After the nails are up, pry up the plywood and cleanly get it out of the spot. Now, take accurate measurements and cut the replacement plywood to fit the size of your hole. Lay it in the spot, and you can either nail it into place or use screws.
RV manufacturers may use staples to hold the old plywood in place so use a flat head screwdriver and a pair of pliers to remove those before you lay the new piece in place. Or you can just hammer them down into the joist.
You can use cleats to help support the new piece of plywood, but they are not usually necessary if you expose the joists and nail them into those. Cleats come in handy if you do not want to expose the joists.
The key is to use the same thickness of new wood as the old wood. This helps keep the floor level. If the floor is not level, then you might need a floor leveling compound, and that is a repair for another time.
RV Spongy Floor Repair Kit
We have seen one at Amazon , but we are not sure if this is a good idea. This is a two-part epoxy-like compound that you mix together before injecting it into your soft floor area. The purpose of this epoxy is to hold the soft flooring together and make sure no one falls through.
According to the labels, the time it takes to work is roughly 1 to 2 hours, with a 24 hour cure time frame. That means you cannot use that section of your RV for up to one day after repairs.
Since this epoxy sticks to wood, metal, and other surfaces, chances are that it will stick to your soft floor material. You have to give it time to work. You have to make sure that it seeps into all the crevices, cracks, and holes under your flooring. If not, you may not have solved your problem.
You can use other compounds, and these repair kits are a lot cheaper than the method we described in the previous section. We cannot guarantee that your problem will be fixed or if this or any other kit will work as advertised.
This is a trial and error type repair option that may or may not hold. You will have to make your own decision on this, and if you are on a tight budget, it may be the only choice you have but don’t hold your breath.
RV Sandwich Floor Repair

You can try different methods that will make your repair solid and nice to walk on. What follows is just one option that is available for you to consider. The first step is to remove the entire sandwich piece that lies between the two aluminum rails.
Next, you can tap and screw in a piece of angle made from aluminum and make it flush to the bottom of the flooring. Then to get the right floor thickness, you can glue and screw two pieces of 3/4” plywood together. Use drywall screws, and make sure to cut these pieces to size before gluing and screwing.
Then screw this piece into the aluminum using the appropriate screws. This should bring those pieces of plywood flush to the top of the aluminum frame, so you will need to add a 5 mm piece of luan plywood to the top of the plywood. That should level the floor for you.
This may be overkill to some people, but it is better to have a solid floor than a weak one. You may be able to find a method that is a little easier, cost-effective, and not as labor-intensive.
Can You Put Vinyl Plank Flooring in an RV?
Yes, it is possible to do this, and putting in this floor will be similar to putting in a wood floor or adding carpet to your RV. The key to adding this material to your RV is the subflooring.
If it is in good shape, you should buy some polyurethane and coat the sub-flooring to protect it against water leaks. This is not mandatory but a good damage precaution. Then if the flooring is not in good shape, you will need to make repairs as described above and still do the polyurethane step.
Once that is done and dry, your next step is to add a layer of the vinyl plank. If you do not know what this flooring material is, it is similar to linoleum or vinyl sheets, just thicker. That extra thickness makes the material more durable.
You can install an underlayer for insulation and added water protection, but it is not necessary. Also, you can install this material over existing flooring material, except carpets, IF the original flooring is in top shape.
The planks usually come with the tongue and groove construction system, making installing the vinyl straightforward. The tricky part of this installation will be cutting all the corners and curves found in RVs.
The Leading Cause of Water Damage

There are always several ways that water can get to your subflooring. Remember that water follows the easiest path possible. The cause that leads all the options is leaks. This is especially true if you own an older RV.
Unfortunately, leaks can occur in newer ones just as easily and more so if you do not do proper maintenance. The problem with fixing the leak is that the water can get in next to your air conditioner but does not appear until it reaches your sofa area. Water will travel far from the leak if it is the easiest path.
By the time you spot it, the damage may already be done. There are steps you can take to minimize these water issues. The first is to do very good maintenance. Take time to inspect the caulking around windows, vents, air conditioning units, and even the edge of your roof.
Filling those with the right caulk, and you may have to remove the old before refilling, is a big step in stopping water leaks. Next, check your seals no matter where they may be. Seals can get old, dry out, or damaged by freezing temperatures.
The quicker you can seal the leaks, the safer your flooring will be.
Some Final Words
For the most part, fixing spongy flooring issues takes a little time. The repairs are not complicated, just annoying as you may have to remove objects from the room to do a great job.
The key is to remove all the damaged wood and replace it with better materials, then go find and seal the leaks. Good floor maintenance will preserve the value of your RV.
Related Posts
Toy Hauler Add a Room Options (DIY Ramp Tent, Dometic Room)
DIY RV Engine Cover Console Replacement Ideas (Insulation)
RV Cable Pass Through Guide (Electrical, TV, Through Wall)
Leave a Comment:
3 Reasons Your RV Floor Is Soft – And How to Fix It
- One Comment
- Floors, Walls & Ceiling , Maintenance

One of RV owners’ biggest nemeses is soft flooring, a problem that can be hard to prevent and expensive to fix.
Soft flooring in RVs is usually caused by water damage, breakdown of the foam layer in sandwich flooring, or structural flaws. Unless the damage is extensive, you can likely pull out damaged sections yourself and replace them with brand new wood.
The rest of this article will discuss soft flooring issues in depth.
You’ll learn the causes of soft flooring, how to check for soft spots, and the basic steps for how to replace sections of your RV subfloor on your own.
Water Damage
Without a doubt, the number one cause of soft floors in an RV is water damage.
RVs are notorious for suffering from water damage at some point in their lives; your vehicle has likely spent a lot of time outdoors, exposed to all kinds of inclement wet weather and storms, so it’s not surprising that at some point, water will find its way inside.
Sometimes the presence of water damage will be obvious, either from damp carpets or because of the general smell of mold or mildew.
Other times, water damage may go unnoticed, quietly wreaking havoc until something alerts you to the problem.
In addition to outside sources, remember that your RV has the potential to be damaged from the water on the inside, too.
Kitchens and bathrooms both use water for everyday purposes, plus the air can build humidity from cooking, drying wet clothing indoors, or poor ventilation.
Water can sneak in around windows and doors, near slide rooms, delamination in the walls, or the roof.
Wherever the source of the leak, water causes damage to RVs, and the damage is worse if the leak goes undetected (or ignored).
If water is the cause of your soft floors, be sure that you find and fix any leaks along with fixing the floor.
Sandwich Flooring
Many RVs use a flooring style called “sandwich flooring,” which essentially layers lightweight foam or styrofoam between plywood.
Sandwich flooring is popular because it’s lightweight, reducing the overall weight of the RV.
Over time, though, this foam starts to break down, especially in high-impact areas (are your kids jumping out of the bunk bed in the morning?) or in high traffic areas (such as right in front of the stove).
Depending on how this sandwich flooring is built and supported inside with cross beams, this failing foam may make the upper layer of the floor buckle underneath your weight.
The floor itself might not actually be soft, but it will certainly feel that way, and it still needs to be fixed.
Manufacturing Issues or Faults
It’s possible that what feels like a soft spot is actually something either structural or related to how the floor was manufactured.
And unfortunately, you likely wouldn’t be able to determine this for certain until you pulled up any carpet or laminate and got a look at the subfloor underneath.
One potential issue concerns floors that are not constructed of a single piece.
If there are any seams in the subfloor, it’s always possible that, over time, any adhesive or bonding agent between the individual pieces has deteriorated, which now allows the flooring sections to shift slightly when walking in that particular area.
Another concern is that, for whatever reason, the subfloor may not be properly supported via joists and crossbeams.
This would cause it to feel soft when you step on it because the floor is actually bending underneath your weight.
Unfortunately, an issue like this can only be detected by completely removing parts of the subfloor to see what’s underneath.
How to Find Soft Spots
As a responsible RV owner, you’re already likely checking your vehicle several times a year for water damage and other general maintenance issues.
Feeling for soft spots in the floor should be part of such routine inspections.
First, give the floors a visual inspection.
You are looking for stains in carpets, cracks in linoleum or another hard flooring, and other signs of damage throughout the surface floor and around the edges, where the floor meets the wall.
In bathrooms and kitchens, you might want to peek into lower cabinets for signs of damage there; if the cabinets are water damaged, they may have soaked through to the flooring underneath.
Also, check thoroughly near toilets, showers, and any sinks and areas near any water connection or water tank.
Next, walk every single inch of exposed flooring, ideally with bare feet, so that you can better feel any sinking or softness underneath your feet.
If the floor dips or compresses beneath your weight, you’ll want to inspect the area more carefully in the next step.
Once you’ve located any areas that look or feel soft, you’ll need to pull back the upper flooring to inspect the subfloor beneath.
With the subfloor exposed, water damage will be immediately obvious: the floor will be soft, soggy, discolored, and rotten.
You may also be able to see cracks in the subfloor or noticeable indentations or dips where the insulation underneath is compressed or deteriorated.
Other causes of soft spots may require a closer eye or perhaps a tactile inspection.
Up close, you’ll be able to see if the glue is deteriorating between subfloor board seams or to feel if the area is soft or spongy even if it doesn’t look like it should be.
How to Fix Soft Spots
You’ve found a soft spot, and you have a general idea of what the problem is. What do you do now? In this section, we’ll look at the steps necessary actually to fix soft flooring in your RV.
Get your tools, set aside a few hours, and get a helping hand to finish the task in half of the time.
Subfloor Composition
The first thing to consider is how the actual floor of your RV is constructed because this determines what you’ll need to do to fix it.
Most RV subfloors are constructed from particleboard, plywood, or a flooring style called sandwich flooring.
Particleboards are made of wood chips that have been adhered together with glue, usually water-based.
This mixture is pressed into the shape of a board and quickly dried.
The particleboard is a favorite construction material in RVs because it’s lightweight and inexpensive.
But if this kind of subfloor becomes damaged, especially if it’s water damaged, the trouble spreads quickly.
Particleboard subfloors are laid on top of cross beams and support joists.
Sometimes large sections of the floor are all one piece of the board; other times, multiple planks may be used, joined at the seams with adhesive.
Plywood is another common material used for RV subfloors.
Plywood is constructed of multiple thin layers of wood that have been glued together.
As with particle boards, plywood subflooring involves a framework of cross beams and joists that the plywood is secured to.
Plywood flooring may be one or just a few larger pieces or multiple smaller boards.
Sandwich flooring is something you’ll frequently see in a lot of RVs.
With sandwich flooring, the subfloor is constructed of multiple layers: two thin plywood sheets make up the “bread” of the sandwich, with a meaty layer of foam nestled in between.
Also in between are numerous cross beams for support.
This style of flooring is extremely lightweight, and many RV manufacturers prefer it. Unfortunately, as mentioned earlier, sandwich flooring is especially prone to creating soft spots.
Over time, the foam layer starts to break down, which allows the top layer of plywood to sag under the everyday pressure of people walking on it.
Determine the Extent of the Damage
Whatever the flooring type and whatever the cause of the damage, your next step is to determine exactly how far the damage has spread and what magnitude of a repair job you’re looking at.
If you haven’t already, it’s time to pull up whatever flooring is on top of the subfloor.
If it’s carpet, you will hopefully be able to pry it away with little difficulty; the chances are that if the subfloor is damaged anyway, any adhesive that originally bonded the carpet to the floor has broken down already.
Some laminate floorings may also be able to be pried away. Other types of flooring may be harder to remove without damaging them.
Once you’ve exposed the subfloor, you can figure out exactly which areas are damaged.
Draw a rectangle around the damage, and then draw a second rectangle surrounding that rectangle, with a few inches between the lines.
Rectangles with straight lines and right angles at the corners are not only easier to cut out, but they’re also easier to cut replacement flooring to fit.
You must go past the damage this way to ensure that you’re getting all the rot out. You don’t want to leave damaged wood behind accidentally.
If you’re dealing with particle boards, you’ll need to cut even further back into “clean” wood.
Water damage to particle boards causes it to, in a sense, dissolve.
If you don’t cut far enough away from the damage, you’ll end up with lots of messy fluff.
You may also want to consider locating cross beams and joists below when determining where to make your cuts.
If you can make your cuts immediately alongside any cross beams or joists, do so; it’ll be much easier to attach to your new wood.
Otherwise, you may end up needing to create new floor joists or cleats as you reinstall the new subfloor section.
Remove Soft Floor
Next, determine how thick the flooring is so that you can cut it out; one method is to drill a hole in an area with no joists or cross beams and then measure the thickness that way.
Carefully remove any nails, screws, or staples that will be near the cutting line. If these get nicked by the saw, they could fly out unexpectedly and cause injury.
Set a circular saw to the flooring’s exact thickness; this will ensure that you don’t damage any of the support structures as you cut.
Cut carefully along the line you drew.
Then pull out the old flooring. If you’re dealing with sandwich flooring, you may need to pry the old floor away from the layer of foam in between.
Note: Wood rot can cause the floor to cave in when you’re cutting it with a saw. If it feels wet or bubbly, you should keep your body weight away from the intended portion of the floor. Excess moisture leads to mold and rot, which is a major cause of soft floors in an RV (as mentioned earlier in the post).
Prepare the Subfloor for Its Replacement
Now it’s time to clean up the area in preparation for installing a fresh subfloor.
Start by removing any remaining staples, nails, or screws that either got missed or didn’t need to be removed for cutting.
Use a shop vacuum to remove sawdust and smaller bits of wood.
Next, figure out support. If you could cut close to any cross beams or joists, you could probably extend these, securely attaching a new section of the joist to the existing.
However, there will almost certainly be areas where the fresh wood is left hanging, not secured to the existing subfloor or the RV’s frame in any way.
It’s also possible that some flooring sections simply don’t have enough cross beams or joists in place for support, to begin with.
In this case, when you’re in there making your fix, you can add to the structural framework to prevent future problems.
In cases like this, you’ll want to build in cleats to support the new subfloor. A cleat is basically a piece of wood that’s attached to the underside of the old subfloor on one side, kind of like a tongue sticking out.
Install these cleats strategically around the edges of the hole you’ve cut, and you create a shelf of sorts to rest the new flooring on.
Use drywall screws or decking screws to attach the cleat to the existing floor. Place screws close together for maximum support.
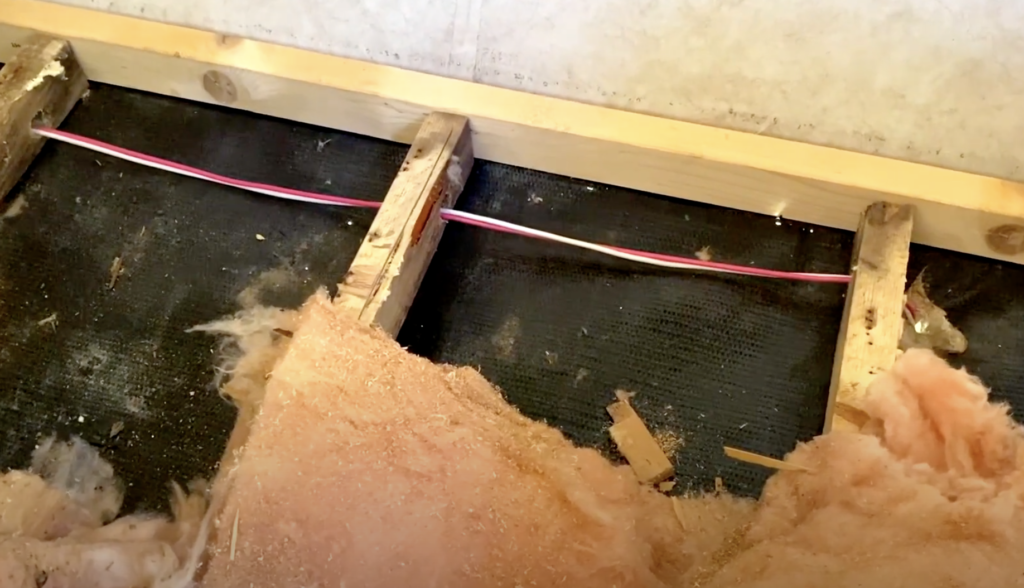
You may also need to install new insulation underneath the subfloor’s top layer, especially if your RV has sandwich-style flooring.
Measure the thickness of the preexisting, possibly deteriorating foam and buy something that will fit in place (you may need to go slightly thinner than the original).
After you remove any old foam, you’ll need to glue the new foam down.
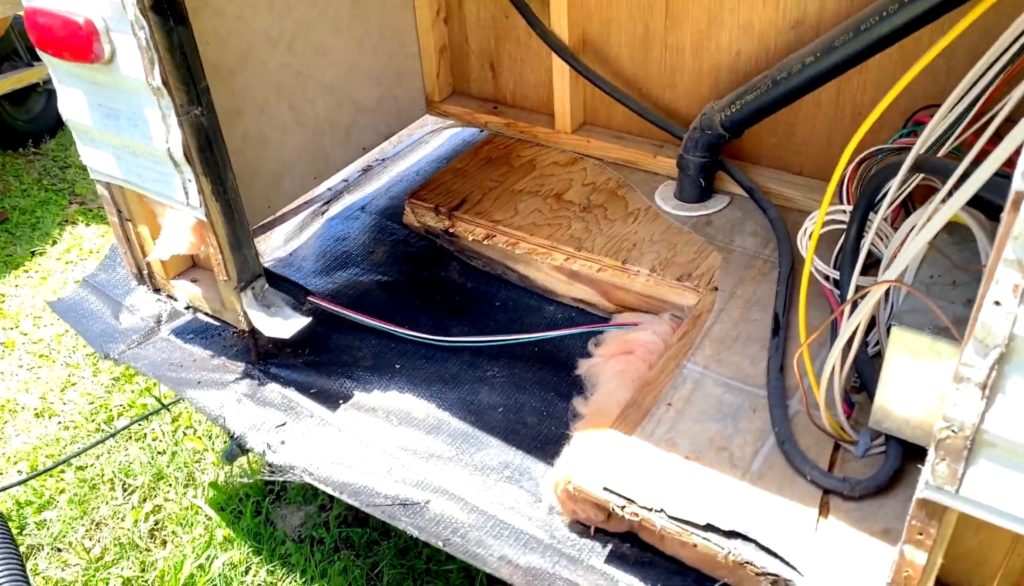
Replace the Subfloor

Carefully measure the flooring section you’ve removed and use those measurements to cut a replacement floor piece out of plywood.
You’ll want to use plywood of the same thickness as the original subfloor. Consider using either pressure-treated plywood or marine-grade plywood to reduce the risk of future water damage.
Lay the fresh floor into the hole from the old floor.
If you’ve measured everything correctly, the floor should fit in neatly and perfectly, with no gaps around the edges or any amount of wiggle room.
Use decking screws or drywall screws to attach the new subfloor section to the cross beams, joists, cleats, or whatever else will be supporting it.
Place them relatively close together, not more than six inches apart.
Finally, if there are any gaps or any other cracks or irregularities that spring up in this process, they’ll need to be filled with bonding agents to strengthen the floor.
There are many different opinions on what to use here, but keep in mind that whatever you go with needs to handle the roughness of life on the road. There will be bouncing and bumping.
You may be able to find a glue or adhesive of some sort that will work. You might also want to consider automotive-grade body filler.
Once the subfloor is fixed, you can replace the old carpet or flooring on top or install a new flooring if you prefer.
Soft flooring is one of the biggest things you should be checking in your frequent physical inspections of your RV.
Damaged flooring not only feels unpleasant to walk on, but it can actually be dangerous; if the problem gets too bad, you risk making a full-on hole in the floor.
Many soft flooring problems are caused by water damage, which can rot out the subfloor and damage your vehicle’s overall structural integrity.
Soft spots are also common in RVs with sandwich flooring. Sometimes, your particular RV may just have manufacturing issues that contribute to it.
Fortunately, many soft spots can be repaired at home with the right tools and knowledge.
With a little know-how, you can fix your flooring for a fraction of what a repair shop would charge.

Cody and Jackie
One response.
This is a great article. We have a 2007 Jayco Jay Flight 5th wheel, with soft floors in the kitchen area. We are trying to sell the unit, but of course, with soft floors in spots, prospective purchases are Leary. So, we removed the carpet and Lino to make sure that there is no water damage, and thankfully there isn’t. But what we can see, is that the flooring is the Luan sheeting, and the foam has clearly collapsed in the high traffic areas. So now, we are wondering what the best repair solution is. We are thinking about the Epoxy injections, but that looks awfully messy, and we aren’t sure how long that will last. On the other hand, we are wondering whether if we remove the sheeting (subfloor) in those weakened areas, and replace them with proper plywood the same thickness, and if necessary, add a few additional cross struts for support, would we have to do that from underneath the RV, or should it be done from above? Also,have you ever removed this Luan sheeting? And is it difficult? Obviously, we don’t want to have to remove cupboards etc. just those soft areas.
Leave a Reply Cancel reply
Your email address will not be published. Required fields are marked *
Save my name, email, and website in this browser for the next time I comment.
Table of Contents
Related posts.

Can You Put Real Furniture in an RV? Essential Tips and Considerations
When it comes to customizing your recreational vehicle (RV), you may wonder if it’s possible to incorporate regular furniture rather than traditional RV furniture. The

Are RVs Losing Value? Analyzing Trends and Factors
The market for recreational vehicles (RVs) has experienced significant growth in recent years. However, potential buyers often wonder whether RVs lose their value over time

What is the Average Lifespan of an RV? Top Considerations
Recreational vehicles, commonly known as RVs, have become a popular choice for those seeking endless adventure and comfort while on the road. However, a common

RV Remodel Supplies: Your Go-To Guide for a Stylish Makeover
Embarking on an RV remodeling journey can be both exciting and rewarding, allowing RV enthusiasts to truly personalize and optimize their living spaces on wheels.
- Recent Articles
- Share Your Remodel
Subscribe to our (not-very-often) newsletter
Follow us on youtube, all rights reserved © 2023, diy remodeling, renovating, and maintaining rvs, contact information.
Follow Us on YouTube:
Work with us.

- Skip to primary navigation
- Skip to main content
- Skip to primary sidebar
- Skip to footer
Journey With Confidence
Tech Tips: Repairing Floor Soft Spots

- Maintenance, Modifications and Repairs
Many folks who love—and preserve—an older RV have found a painful reality in their treasure: soft spots in their flooring. Usually the problem can be traced back to a water leak that’s compromised the integrity of the floor. You can sometimes ignore it for a while, but it can get downright dangerous. Having a guest fall through your bathroom floor is not a pleasant thought.
Replacing a bad spot in the floor is challenging, but not impossible for the do-it-yourselfer. It takes time and patience, and at times a bit of imagination. We’ll walk you through the process.

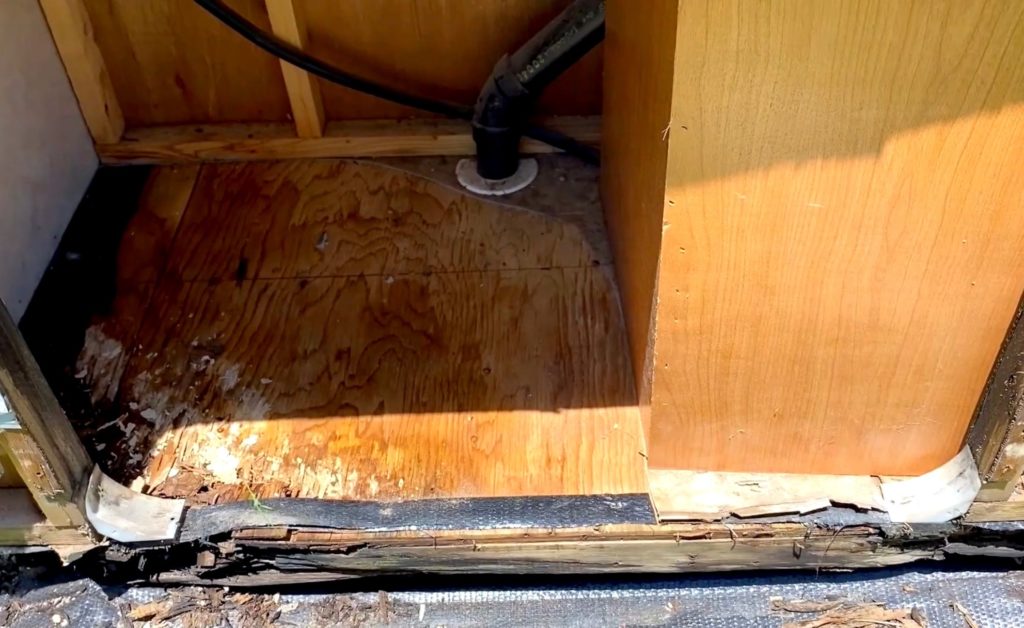
The first step in dealing with nasty floor rot is to pray intensely that the underlying floor material is plywood. Particle board flooring is a curse, and will quickly turn to powdery fluff. Much can be learned by dismounting a floor heat register near the crime scene and taking a squint at the floor material underneath. We found 3/4-inch plywood under our vinyl floor, which meant we’d only need to cut into “solid wood” a few inches beyond the damage. If you’ve got particle board rot, you’ll be cutting a long way back.
By judicious tapping and pressing, we managed to figure out how large an area of soft wood we were dealing with, and then went a few inches farther away from the soft spot and determined that this would be the floor area that we would cut out. Using a square and a felt-tip marker, we carefully drew out a rectangle on the floor as the target lines for our cut. Setting a circular saw the thickness of the floor (and no more), we then cut along the lines. From there it was a matter of using a pry bar and hammer to wrench the old plywood out of the hole, as the manufacturer had used plenty of long staples to install the original plywood decking.
If at all possible, it’s best to leave the old plywood intact, as opposed to beating it into little pieces. This can give you a template to use in cutting the replacement wood. However, in our case, the vinyl flooring was only fastened to the plywood around the borders, so we were able to use the cutout flooring as our template piece.
With the plywood out of the hole, you’ll probably have plenty of work to do to get the remaining staples out of the floor joists. We found that grabbing the staple close to the joist with diagonal pliers, and then twisting the pliers on the joist gave enough leverage to yank the long-legged staples out of the wood. A shop vac will quickly suck up the dust and plywood fragments, keeping your work area clean and making it much easier to work.

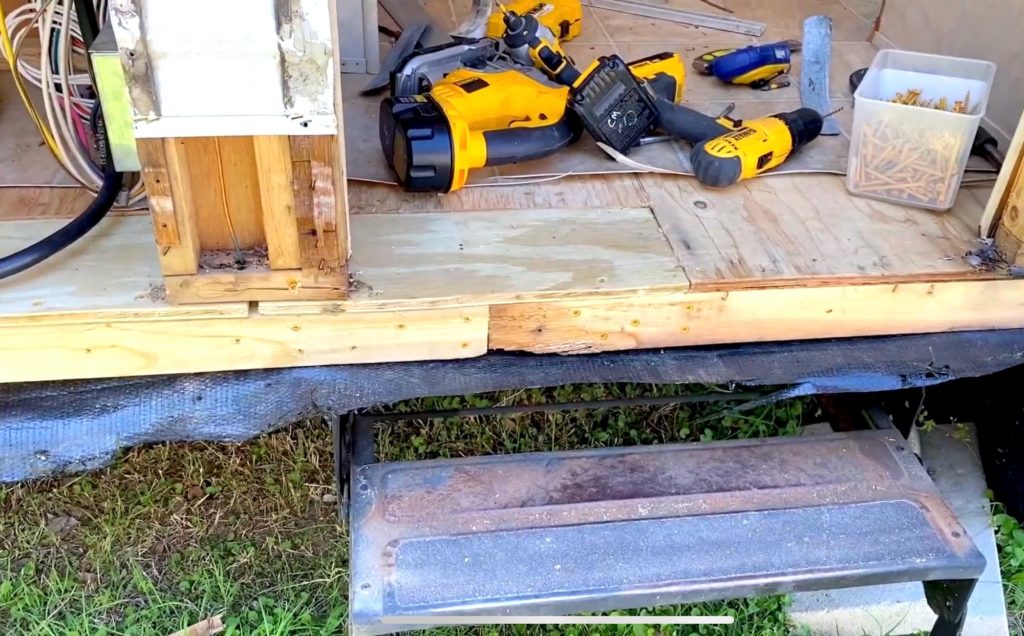
Basically a cleat is a chunk of dimensional lumber (2 x 4s are good for this) laid on its side, and tucked underneath the edge of the good remaining plywood. Stick the cleat up under the existing plywood so that half of the cleat is sticking out from under the plywood, like a tongue. Using 2 1/2-inch drywall screws, we drove screws down through the existing flooring into the cleat, spacing the screws close to 3 inches on center. When you lay the new plywood replacement piece in the hole, it will be supported by the cleat and you simply run screws through the new plywood into the cleat. Voila! The new “plug” is firmed into the spot.
In some areas you may be very close to an existing floor joist—say the cut is right along the edge of a joist. In this case you can make a “sister” by screwing another joist piece onto the existing joist. Here the plywood screws into the sister.

Then a contractor friend said, “Bondo it!” Sure enough, automotive body filler was our answer. This had to be the longest part of the job. Mixing the fiberglass-like compound up, smoothing it into irregularities and cracks, drying it, then sanding it with a belt sander seemed to take forever. Don’t try to fill deep voids or irregularities in one shot; you’ll need to come after them in a multi-layered approach. If you’re recovering with vinyl, be sure your screws are driven down deep and covered with body filler. And be sure to follow the precautions with regard to safety. Boxed up in an enclosed RV with fumes from this stuff filling your lungs is a surefire way to damage your organism.
If you’re doing a replacement vinyl floor, you’ll really need to pay close attention to getting this floor prepping done smoothly, as imperfections will show. Laminates or carpeting cover a multitude of sins.
Russ and Tiña De Maris are authors of RV Boondocking Basics—A Guide to Living Without Hookups, which covers a full range of dry camping topics. Visit icanrv.com for more information.
Your privacy is important to us. This website uses cookies to enhance user experience and to analyze performance and traffic on our website. By using this website, you acknowledge the real-time collection, storage, use, and disclosure of information on your device or provided by you (such as mouse movements and clicks). We may disclose such information about your use of our website with our social media, advertising and analytics partners. Visit our Privacy Policy and California Privacy Disclosure for more information on such sharing.
- Owner Login
- Dealer Login
- Toy Haulers
- Fifth Wheels
- Travel Trailers
- Destination Trailers
- Tent Campers
Helpful Tools
- Find A Dealer
- RV Definitions
- Our Company
- Owners Page
- Forest River Corporate Home
- Privacy Policy
- Terms of Use
- Accessibility
- Forest River Apparel
Explore Apex Ultra-Lite
Home > Apex > Apex Ultra-Lite
- Find Your Local Dealer
- Contact Coachmen
- Search Our Videos
- Local Dealers

Apex Travel Trailers
An Apex Travel Trailer does not just start off as a frame, walls and roofs… it begins with an idea! Our belief is that getting the little things right is a BIG THING! The Apex is not like other lightweight trailers… it is much smarter because we set new, higher standards for this innovative, truly lightweight trailer.
What makes an Apex smarter? Quality – Lightweight – Innovation – Eco-friendly – Design.
Each and every Apex model must achieve high scores in each of these standards in order to earn the Apex seal of approval. Our rating system is gathered and driven by the end user… you the customer… in order to produce a quality and most customer friendly lightweight trailer on the market!

- We love our Apex. It has been a great year of awesome camping adventures. - Justin B.

2024 Apex Ultra-Lite Floorplans
7.5 ft. wide travel trailers.

You must be logged in, or create an account to use the Forest River wish list.

8 ft. Wide Travel Trailers

Specifications Definitions
GAWR (Gross Axle Weight Rating) – is the maximum permissible weight, including cargo, fluids, optional equipment and accessories that can be safely supported by a combination of all axles.
UVW (Unloaded Vehicle Weight)* - is the typical weight of the unit as manufactured at the factory. It includes all weight at the unit’s axle(s) and tongue or pin and LP Gas. The UVW does not include cargo, fresh potable water, additional optional equipment or dealer installed accessories. *Estimated Average based on standard build optional equipment.
CCC (Cargo Carrying Capacity)** - is the amount of weight available for fresh potable water, cargo, additional optional equipment and accessories. CCC is equal to GVWR minus UVW. Available CCC should accommodate fresh potable water (8.3 lbs per gallon). Before filling the fresh water tank, empty the black and gray tanks to provide for more cargo capacity. **Estimated Average based on standard build optional equipment.
Each Forest River RV is weighed at the manufacturing facility prior to shipping. A label identifying the unloaded vehicle weight of the actual unit and the cargo carrying capacity is applied to every Forest River RV prior to leaving our facilities.
The load capacity of your unit is designated by weight, not by volume, so you cannot necessarily use all available space when loading your unit.
May Show Optional Features. Features and Options Subject to Change Without Notice.

2024 Apex Ultra-Lite Features & Options
Value package (mandatory).
- Vacuum-bonded Laminated Dual Azdel/ Fiberglass Walls
- Vacuum-bonded Laminated Crowned Roof
- Laminated Aluminum Framed Floor
- Fiberglass Front Cap w/LED Lighting and Window
- Aluma-cage Construction
- Two-Tone White and Grey Fiberglass Exterior Sidewalls
- Dark Grey Exterior Rear Wall
- Front Stone Guard
- Enclosed Underbelly w/Forced Air Heat
- Aluminum Wheels
- Slide Topper Prep
- Back-up Camera Mount
- Power Tongue Jack
- Mounted Bluetooth Wireless Speaker
- Stabilizer Jacks (4)
- Regulated LP Port
- 200 Watt Solar Panel w/30 AMP Control Charger
- 13.5K BTU A/C
- Ducted/Direct Vent Furnace (Floor Plan Specific)
- DSI Gas/Electric Water Heater
- Hot/Cold Outside Shower
- Black Tank Flush Kit
- Power Awning w/Lighting
- Swing Away Assist Handle
- Friction Hinge Entrance Door
- Slam Latch Baggage Door Catches
- LED Motion Sensor Light in Exterior Storage Area
- Hard Valances w/Night Shades Throughout
- LED Interior Lighting Throughout
- Lighted, Flush-mount, 3-Burner High Output Range w/Oven
- 8 Cu. Ft. 12V Refrigerator
- Stainless Steel Single Bowl Sink w/Flush-mount Cover
- Access Doors Under Dinette (Select models)
- Interior Convenience Center
- Digital TV Antenna w/Cable Hook-ups and WiFi Capability
- USB Charging Station
- Hide-A-Bed Sofa (Deep slides only)
- Tub Surround
- Skylight in Bath
INTERIOR AND DÉCOR
- Casino Bisque Cabinetry
- Super Bed Storage (Select Models)
- Shaker Cabinet Door Frames
- One-Piece Seamless Edge Countertops
- Shaw Residential Flooring
- Overhead Bedroom Cabinets w/Side Wardrobes
- Hard Valances w/Night Shades
- Pedestal Dinette Table
- Large Oversized Booth or U-shaped Dinette w/Sliding Door Storage Access (Select Models only
- 68" Residential Sofa (Most models)
- LED TV in 8' Wide Models
- LP Leak Alarm
- Fire Extinguisher
- Smoke Alarm
- Carbon Monoxide Detector
ELECTRICAL/HEATING/AC
- Furnace – Forced Air/Ducts (N/A 7.5' Wides)
- 13.5K BTU Ducted A/C (8' Wides)
- 55 Amp Power Center
- Outside Receptacle GFI
- Detachable Marine Style Power Cord
- USB Chargers
- Flush-mount 3-Burner Stovetop w/Oven
- Power LED Lighted Range Hood
- Matte Black Hardware
BATH AND WATER
- 6 Gal. Gas/Electric DSI Hot Water Heater
- Power Bath Vent
- Water Heater Bypass Valve
- On-Demand Water Pump
- Below Floor Low Point Drains
- Foot Flush Toilet
- Glass Shower Door (Select Models)
- Hand-crafted Wood Medicine Cabinet
EXTERIOR/CONSTRUCTION
- Aluma-Cage Construction
- Vacuum-bonded, Aluminum Trussed Roof w/Dicor Crossflex Roof Membrane
- Vacuum-bonded Dual Azdel Fiberglass Sidewalls
- Vacuum-bonded Dual Azdel Fiberglass Rear Wall
- Corrosion Resistant Powder Coated Frame
- I-beam Chassis Construction
- Heated and Enclosed Underbelly w/Forced Air
- Gutter Rail
- Dual 20 Lb. LP Tanks w/Cover
- Dual Battery Tray
- Tinted Safety Glass Radius Windows
- Radius Entrance Door w/Window
- Dead Bolt Lock
- Radius Slam Latch Baggage Doors
- Break Away Switch
- Easy Lube Axles
- Schwintek/Rack and Pinon Slide Room System (per floor plan)
- Frame Receiver Prep
- Battery Disconnect
- Cast Iron Griddles and Prep Bar
- On-The-Go Ladder Prep
- Frameless Dark Tint Windows
- 15K BTU A/C Upgrade
- 50 Amp Service w/Second (Forced) 13.5K BTU A/C
- Theater Seating (not available ON 251RBK & 300BHS)
Apex Ultra-Lite Update Alerts
Please sign up below if you would like to receive notifications when we make updates to this brand. Or, if you only want updates on a particular floorplan, you can select to be updated on each one individually.
Get Update Alerts
Get update alerts for apex ultra-lite, alert sections.
- Specifications
Apex Brochure

Apex Floorplans

Apex Features
Your privacy is important to us. This website uses cookies to enhance user experience and to analyze performance and traffic on our website. By using this website, you acknowledge the real-time collection, storage, use, and disclosure of information on your device or provided by you (such as mouse movements and clicks). We may disclose such information about your use of our website with our social media, advertising and analytics partners. Visit our Privacy Policy and California Privacy Disclosure for more information on such sharing.
- Owner Login
- Dealer Login
- Toy Haulers
- Fifth Wheels
- Travel Trailers
- Destination Trailers
- Tent Campers
Helpful Tools
- Find A Dealer
- RV Definitions
- Our Company
- Owners Page
- Forest River Corporate Home
- Privacy Policy
- Terms of Use
- Accessibility
- Forest River Apparel
Explore Rockwood Ultra Lite Travel Trailers
Home > Rockwood > Rockwood Ultra Lite Travel Trailers
- Find Your Local Dealer
- Contact Rockwood
- Search Our Videos
- Local Dealers

Rockwood Ultra Lite Travel Trailers
PREPARE TO BE ENCHANTED BY OUR VERSATILE FLOOR PLANS. Our trailers are packed full of quality features in order to bring to you one of the best values in the light weight market. There are spacious flush floor slides, comfortable stylish sofas and wide dinettes for you and guests to gather around. The Ultra Lite series extends an invitation to indulge in generous space and deluxe amenities, most while remaining towable by a half-ton vehicle.

2024 Rockwood Ultra Lite Travel Trailers Floorplans
Ultra lite travel trailers.

You must be logged in, or create an account to use the Forest River wish list.

Specifications Definitions
GAWR (Gross Axle Weight Rating) – is the maximum permissible weight, including cargo, fluids, optional equipment and accessories that can be safely supported by a combination of all axles.
UVW (Unloaded Vehicle Weight)* - is the typical weight of the unit as manufactured at the factory. It includes all weight at the unit’s axle(s) and tongue or pin and LP Gas. The UVW does not include cargo, fresh potable water, additional optional equipment or dealer installed accessories. *Estimated Average based on standard build optional equipment.
CCC (Cargo Carrying Capacity)** - is the amount of weight available for fresh potable water, cargo, additional optional equipment and accessories. CCC is equal to GVWR minus UVW. Available CCC should accommodate fresh potable water (8.3 lbs per gallon). Before filling the fresh water tank, empty the black and gray tanks to provide for more cargo capacity. **Estimated Average based on standard build optional equipment.
Each Forest River RV is weighed at the manufacturing facility prior to shipping. A label identifying the unloaded vehicle weight of the actual unit and the cargo carrying capacity is applied to every Forest River RV prior to leaving our facilities.
The load capacity of your unit is designated by weight, not by volume, so you cannot necessarily use all available space when loading your unit.
May Show Optional Features. Features and Options Subject to Change Without Notice.

2024 Rockwood Ultra Lite Travel Trailers Features & Options
Exterior features.
- High Gloss Front Cap
- Power Awning w/ Adjustable Rain Dump & LED Lighting
- Tinted Frameless Windows
- Slam Latches & Magnetic Compartment Door Catches
- Cable & Satellite Hookup
- Exterior Battery Disconnect Switch
- Side Solar Prep
- Outside Griddle w/ LP Hook Up
- Friction Hinge Entrance Door with Window Shade & ScreenShot Screen Door
- Large, Foldable Grab Handles (All Entrance Doors)
- Outside Antifreeze Station
- Black Tank Flush
- 360 Siphon Vent Cap On All Black Tanks
- Solid Entry, Strut Assist Fold Out Entry Steps
- Outside Speakers
- Keyed Alike Locks
- Power Stabilizer Jacks
- Automotive Windshield
- Rear Ladder
- 2" Accessory Hitch
- Laminated White Fiberglass Sidewalls
- 200W Roof Solar Panel with 1800W Inverter
- Outside Spray Port
- AIR 360+ OMNIDIRECTIONAL ANTENNA / WITH WIFI PREP
Interior Features
- Autumn Wood Cabinetry
- Screwed & Glued, Solid Wood Cabinet Doors & Drawers With Hidden Hinges, Metal Drawer Glides & Residential Hardware
- 35K BTU Furnace
- Carbon Monoxide Detector
- Interior 12V USB Outlet
- OneControl Panel with WeRV App Control
- 55 AMP Converter with Charger
- Ceiling LED 12V Interior Lighting
- Quick Recovery Water Heater w/ Interior Gas/Electric Switches
- 50 Amp Service and Digital Dual Thermostat Control
- 15,000 BTU Ducted Air Conditioner
- Sedona Wood Cabinetry
- Night Roller Shade
Living Area Features
- Deluxe Theater Seating
- Multi Zone Sound Bar/Stereo Combo w/AM/FM & Bluetooth Control
- Marine Grade Carpet in slides
- Fireplace (N/A 2616BH, 2911BS)
Bedroom Features
- Large Wardrobe or Wardrobe Slide
- Designer Bedding
- Optional Smart Bedroom TV
- King Bed Optional (2720IK, 2906BS)
Construction Features
- 6 Sided Aluminum Framed (Side Walls, End Wall, Front, Floor & Roof)
- 5/8" Plywood Tongue & Groove Subfloor
- Insulation Factors R-7 Side Wall, R-12 Floor & R-14 Ceiling
- Radiant Foil Insulated Underbelly & Slide Out Floors
- Enclosed Underbelly
- Electronically Controlled Heated Holding Tanks
- Radius Roof w/ Interior Vaulted Ceilings
- Vinyl/Rubber Composite Roofing Membrane
- Vacuum Laminated One Piece Roof & Walls
- Aluminum Cage Dinette & Bed Base
Towing Features
- Rear Observation Camera Prep w/ Molded Mounting Plate
- Easy Lube Axles & Nev-R Adjust Brakes
- Torsion Axle, Rubber-Ryde Suspension
- Spare Tire w/ Carrier & Cover
- Power Tongue Jack
- Nitrogen Filled, Goodyear Endurance Tires w/ Polished Alloy Wheels
- TST Tire Pressure Monitor System w/ Monitor
- 2 5/16" Ball
Kitchen Features
- Three Burner High Output Gas Range with Flush Mount Glass Top Cover
- 21" Gas Oven
- Microwave Oven
- Solid Surface Kitchen Countertops
- Designer Kitchen Backsplash
- 12V Refrigerator
- Under mount Single Basin Kitchen Sink w/ Residential Style Faucet
- Water Filter Supplied
Bathroom Features
- Showermiser Water Saving System
- Bathroom Skylight
- Foot Flush Toilets
- Maxxair Ventilation Fan & Cover
- Water Heater By-Pass Kit
- 2nd Roof 15,000 BTU A/C with Chill Chaser Heat Strip & Digital Dual Control Thermostat
- Tongue Mount Bike Rack
- Slide Toppers
- Thermopane Windows
- Gas/Electric Refrigerator
- 2nd roof mount solar panel
- Day/Night Roller Shade
- Second MaxXair Fan and Cover
- King Bed (Only on 2720IK, 2906BS)
- Free Standing Table and Chairs IPO Dinette
- Bunkroom TV (2616BH, 2911BS)
- Deluxe Tri-Fold Sleeper Sofa (IPO Theater Seating N/A 2906BS)
Rockwood Ultra Lite Travel Trailers Update Alerts
Please sign up below if you would like to receive notifications when we make updates to this brand. Or, if you only want updates on a particular floorplan, you can select to be updated on each one individually.
Get Update Alerts
Get update alerts for rockwood ultra lite travel trailers, alert sections.
- Specifications
Rockwood Mini Lite & Ultra Lite Brochure
English | French
PLEASE SELECT YOUR REGION
Rockwood Ultra Lite Travel Trailers has floorplans and standard features designed for the area where they are sold. Please select your region from the map below.
Your privacy is important to us. This website uses cookies to enhance user experience and to analyze performance and traffic on our website. By using this website, you acknowledge the real-time collection, storage, use, and disclosure of information on your device or provided by you (such as mouse movements and clicks). We may disclose such information about your use of our website with our social media, advertising and analytics partners. Visit our Privacy Policy and California Privacy Disclosure for more information on such sharing.
- Owner Login
- Dealer Login
- Fifth Wheels
- Travel Trailers
Helpful Tools
- Find A Dealer
- RV Definitions
- Component Manuals
- Our Company
- Owners Page
- Forest River Corporate Home
- Privacy Policy
- Terms of Use
- Accessibility
- Forest River Apparel
Explore Tracer
Home > Tracer > Tracer
- Find Your Local Dealer
- Contact Prime Time
- Search Our Videos
- Local Dealers

NO SACRIFICES
For the consumer who is looking for ultra-light weights, but doesn’t want to sacrifice style, amenities, and comfort... we’ve designed the Tracer series travel trailers. The Tracer Ultra-Lite offers spacious layouts, plush residential furniture, and other high end features not typically seen in an ultra-lite trailer that is often thousands of pounds lighter than traditional travel trailers! The Tracer has raised the bar for comfort and luxury in an ultra-lite brand. In your next travel trailer, make NO SACRIFICES!
Light weight. Easy to tow. Loaded with features. No sacrifices!

2024 Tracer Floorplans
Tracer le travel trailers.

You must be logged in, or create an account to use the Forest River wish list.

Tracer Travel Trailers

Dealer Stock Only

Specifications Definitions
GAWR (Gross Axle Weight Rating) – is the maximum permissible weight, including cargo, fluids, optional equipment and accessories that can be safely supported by a combination of all axles.
UVW (Unloaded Vehicle Weight)* - is the typical weight of the unit as manufactured at the factory. It includes all weight at the unit’s axle(s) and tongue or pin and LP Gas. The UVW does not include cargo, fresh potable water, additional optional equipment or dealer installed accessories. *Estimated Average based on standard build optional equipment.
CCC (Cargo Carrying Capacity)** - is the amount of weight available for fresh potable water, cargo, additional optional equipment and accessories. CCC is equal to GVWR minus UVW. Available CCC should accommodate fresh potable water (8.3 lbs per gallon). Before filling the fresh water tank, empty the black and gray tanks to provide for more cargo capacity. **Estimated Average based on standard build optional equipment.
Each Forest River RV is weighed at the manufacturing facility prior to shipping. A label identifying the unloaded vehicle weight of the actual unit and the cargo carrying capacity is applied to every Forest River RV prior to leaving our facilities.
The load capacity of your unit is designated by weight, not by volume, so you cannot necessarily use all available space when loading your unit.
May Show Optional Features. Features and Options Subject to Change Without Notice.

2024 Tracer Features & Options
Tracer le advantage package.
- Eternabond Construction
- Gas/Electric DSI Water Heater
- Spare Tire w/Carrier
- Steel Wheels
- XL Grab Handle
- Steel Entry Steps
- Manual Stabilizer Jacks
- Manual Tongue Jack
- Power Awning w/LED lights
- Back Up Camera Prep
- 2 in 1 Gas Oven and Range
- LED Interior Lighting
- Stainless Steel Galley Sink
- 15k BTU Air Conditioner
Tracer Advantage Package
- ETERNABOND® CONSTRUCTION
- Fiberglass Front Cap
- Fully Enclosed Underbelly
- Spare Tire with Carrier
- Solid Stance Entry Steps
- Universal Docking Station
- Outside Shower
- Battery Disconnect
- Power Awning with LED Lighting
- Slam Latch Baggage Doors
- 60”x80” Queen Bed
- Undermount SS Kitchen Sink
- Low Profile Range Hood
- High Def Soundbar
- Large 2-Door 12V Refrigerator
- 15,000 BTU Ducted A/C
- 6 Gallon Gas/Electric Water Heater
- 18 Gallon /Hour Quick Recovery Mode for Water Heater
- 30,000 BTU Furnace
- 3-Burner Gas Cooktop with Oven
- Range Hood w/Light
- Water Heater Bypass
- High-Capacity Water Pump
Interior Features and Equipment
- LED Lighting Throughout w/Motion Sensor Lights In Key Locations
- Pre-drilled And Screwed Cabinetry
- Solid Wood Core Cabinetry
- Brushed Nickel “J” Spout Kitchen Faucet
- Solid Surface Galley Countertops (Not on LE models)
- EZ Glide Sleeper Sofa (Most Models)
- Extended Height Toilet w/Foot Flush
- Large Medicine Cabinet
- Shower Surround
- Skylight Above Shower (Most Models)
- 12V Exhaust Fan in Bath
- 60"x80" Queen Size Mattress (Not on LE models)
- Ultra Soft Bunk Mats (Where Applicable)
- LED TVs (Not on LE models)
Exterior Features and Equipment
- LED Lit Electric Awning
- Electric Stabilizer Jacks
- Power Tongue Jack
- Huge Pass Thru Storage
- 1” Thick Oversized Baggage Doors with Magnetic Catches and Slam Latches (Thumb latches on LE models)
- Universal Docking Center (Not on LE models)
- Battery Disconnect Switch (Not on LE models)
- Black Tank Flush (Not on LE models)
- Outside Shower with Recoil Hose
- Observation System / Sideview and Rearview
- Cable and Satellite Ready
- Large Fold-Away Grab Handle
- “Solid Step” Fold Down Entry Steps (Not on LE models)
- Spare Tire w/ Carrier
- Omni Directional TV Antenna
- Exterior GFI Outlet
- LP Quick Connect
- LED Lit Marine Grade Exterior Speakers
- Aerodynamic Fiberglass Front Cap (Not on LE models)
- Front Diamond Plate Rock Guard
- “E-Z Lube” Axle Hubs
- “D” Rated Radial Tires
- Extended Drip Spouts
- Exterior Bottle Opener
- Doggy D-Ring-Pet Securement
- Outside Refrigerator (Select Floorplans)
- 30 AMP Detachable Power Cord
- 50 AMP Detachable Power Cord (Select Models)
Tracer Update Alerts
Please sign up below if you would like to receive notifications when we make updates to this brand. Or, if you only want updates on a particular floorplan, you can select to be updated on each one individually.
Get Update Alerts
Get update alerts for tracer, alert sections.
- Specifications
Tracer Brochure

10th Anniversary Package
COMMENTS
In a previous video, I showed a common issue with floor construction on ultra lite RV trailers. That is, the floor gets soft and is dangerous to walk on. Whi...
Posts: 95. I have a 2011 250BH Passport and the floor has continued to expand the soft feel. Started out at the floor vent between the kitchen and the dinette. Was just a little on each side of the vent. Now it extends about 24" to the rear and 36" to the front. Feels mostly like the floor is delaminating.
Soft floor repair on Ultralite camper using Great Stuff foam. Easy low cost repair will fix those soft spots where there is no water damage. I mention not gl...
Sometimes projects just keep getting bigger and bigger! We were not sure the extent of the damage until we decided to remove the furniture and boy are we gla...
Cut out the soft spot by drilling some guide holes and using your jigsaw or flexible saw. Then remove the flooring material. This may be difficult as the flooring material is glued down very heavily by the RV maker. Once the material is done, replace the old flooring with a new panel of the same type of material. 3.
The first step is to remove the entire sandwich piece that lies between the two aluminum rails. Next, you can tap and screw in a piece of angle made from aluminum and make it flush to the bottom of the flooring. Then to get the right floor thickness, you can glue and screw two pieces of 3/4" plywood together.
_____Retired Navy Jake my sidekick (yellow Lab) 10/04 - 05/20 2017 RAM 2500 CC 4X4 Cummins Diesel 2016 Flagstaff 26 FKWS AF&AM & El Korah Shrine of Idaho
Posts: 1. We own a 2017 Keystone Passport Elite 31Re and had floor problems in the bathroom. Apparently a toilet flange was defective and the water damaged the subfloor under the vinyl flooring. Long process but we eventually had it repaired by our dealer, under warranty from Keystone.
Simply combine the two parts of the epoxy wood rot repair system, making sure to follow the included instructions carefully. Once it is combined, simply spray or brush the solution over the wood around the damaged area. It is also possible to inject the epoxy into the wood for even more strengthening power.
A how-to guide chronicling the DIY floor removal and replacement and roof repair for a 2002 Palomino Stampede Ultralight travel trailer RV. Dicor roof products are used for EPDM membrane restoration. ... This was my first camper/RV/travel trailer floor and roof repair project. It began with a 2002 Palomino Stampede S-17, a 17' hybrid travel ...
Soft flooring in RVs is usually caused by water damage, breakdown of the foam layer in sandwich flooring, or structural flaws. Unless the damage is extensive, you can likely pull out damaged sections yourself and replace them with brand new wood. The rest of this article will discuss soft flooring issues in depth.
Many folks who love—and preserve—an older RV have found a painful reality in their treasure: soft spots in their flooring. Usually the problem can be traced back to a water leak that's compromised the integrity of the floor. You can sometimes ignore it for a while, but it can get downright dangerous. Having a guest fall through your bathroom floor is not a pleasant thought. Replacing a ...
All you need to do for this RV floor repair step is to measure a piece of wood that fits the opening, cut the wood to size, and screw it into the framing using flooring screws and a power drill. RV Floor Repair Tips. Double-check all areas of the RV for damage: A thorough check of the RV ensures there is no hiding damage lurking to cause more ...
The Ultra-Lite features the same aluminum frame construction as the Kodiak Ultimate and many of the same amenities yet remains lightweight for easy towing ... Aspen Trail LOFT Travel Trailer FROM $50,177.00; Aspen Trail FROM $41,000.00; Aspen Trail LE FROM $35,128.00; Aspen Trail Mini ... our Kodiak travel trailers offer convenient features and ...
In this step-by-step how-to video, Equip RV Repair will guide you through the process of fixing a soft floor in your RV using epoxy injection. A soft or spon...
Making Simple Repairs Faster & Easier. Keystone's do-it-yourself repair program and video library allow an owner, whose Keystone unit is within the terms of limited warranty, the opportunity to obtain materials in order to repair simple warranty items yourself and perhaps reduce the time and inconvenience associated with taking your unit to a ...
GAWR (Gross Axle Weight Rating) - is the maximum permissible weight, including cargo, fluids, optional equipment and accessories that can be safely supported by a combination of all axles. UVW (Unloaded Vehicle Weight)*- is the typical weight of the unit as manufactured at the factory.It includes all weight at the unit's axle(s) and tongue or pin and LP Gas.
Our trailers are packed full of quality features in order to bring to you one of the best values in the light weight market. There are spacious flush floor slides, comfortable stylish sofas and wide dinettes for you and guests to gather around. The Ultra Lite series extends an invitation to indulge in generous space and deluxe amenities, most ...
About Press Copyright Contact us Creators Advertise Developers Terms Privacy Policy & Safety How YouTube works Test new features NFL Sunday Ticket Press Copyright ...
I replaced the rotten floor in my 2006 Trail Lite Camper for under $500. See my step by step DIY instructions for floor demolition and restoration. I removed...
The Tracer Ultra-Lite offers spacious layouts, plush residential furniture, and other high end features not typically seen in an ultra-lite trailer that is often thousands of pounds lighter than traditional travel trailers! The Tracer has raised the bar for comfort and luxury in an ultra-lite brand. In your next travel trailer, make NO ...
We fix the bathroom floor in our 2013 Rockwood Mini Lite travel and had to get a little creative on how to do it.