
Calibration & Thermographic Inspections Service
What is circuit breaker testing and how is it done.

Circuit Breaker Testing is utilised to test the operation of each switching systems and the programming of the entire tripping structure. Circuit Breaker Testing is essential to ensure the safe and reliable performance of this key link in the power asset chain. Circuit breakers perform three main tasks :
- They should conduct the current as efficiently as achievable, when closed.
- When open, they must insulate the contacts from one another as effectively as possible.
- In the event of a malfunction, they must disconnect the fault current as quickly and reliably as possible, thereby protecting all subsequent equipment.
Performing circuit breaker testing is more challenging with comparison to other electrical components like transformer as the short circuit current is greater. In the US market and regions of frequent earthquakes, the most popular high-voltage circuit breakers are “dead tank” units, whereas in central Europe “live tank” breakers are standard. Elsewhere both circuit breaker types are obtainable.
Why is Testing Circuit Breaker Important ?
A circuit breaker might stay idle years, but if a malfunction occurs it has to detach fault currents of huge kiloamps gradually within a few milliseconds. Major errors that happen on circuit breakers are incorrect behavior, short circuits in the coils, damage/wear to the mechanical connections or the insulation material. Therefore, circuit breakers need to be regularly and carefully tested. Circuit breakers perform a vital role in protecting expensive equipment from damage through faults i.e. connecting and disconnecting the electrical power in a reliable way; this requires proving their reliability with on field tests during installation and with regular maintenance tests during its lifetime to prevent costly failures and problems that could even compromising the safety of the substation. Testing the performance of your circuit breakers regularly is therefore an essential and cost-effective part of any maintenance strategy. Circuit breaker testing particularly concentrates on obtaining motion and time values on the units. However, our testing solutions have revolutionized circuit breaker testing. Performing the tests without use of the station battery greatly increases safety throughout the testing process.
What are the Steps in Circuit Breaker Testing?
Type tests of circuit breaker.
Type tests are organised with the aim of proving the abilities and making sure the rated characteristic of the circuit breaker are exact. Such tests are conducted in the specially built testing laboratory.
- Mechanical Test – It is mechanical ability type test involving the repeated opening and closing of the breaker. A circuit breaker must close and open at proper speed and do its allocated job and function without any failure.
- Thermal Test – Thermal tests are carried out to check the thermal behavior of the circuit breakers. Due to the streaming of rated current through its pole in a rated condition, the breaker under test undergoes steady-state temperature rises. The temperature rise for rated current should not exceed 40° for current less than 800A normal current and 50° for normal value of current 800A and above.
- Dielectric Test – These tests are performed to check power frequency and impulse voltage withstand capacity. Power frequency tests are kept on a new circuit breaker; the test voltage changes with a circuit breaker rated voltage. In impulse tests, impulse voltage of particular value is employed to the breaker. For outdoor circuit dry and wet tests are conducted.
- Short -Circuit Test – Circuit breakers are subjected to sudden short-circuits in short-circuit test laboratories, and oscillograms are taken to know the behaviour of the circuit breakers at the time of switching in, during contact breaking and after the arc extinction. The oscillograms are studied with particular reference to the making and breaking currents, both symmetrical and asymmetrical restriking voltages, and switchgear is sometimes tested at rated conditions.
Routine Tests of a Circuit Breaker
Routine tests are done as per references of standards of Indian Engineering Service and Indian Standards. These tests are performed on the manufacturers’ premises. Routine tests confirm the proper functioning of the circuit breaker. The routine tests confirm the proper functioning of the circuit breaker. Routine testing doesn’t necessarily include complex gear in order to ensure that a circuit breaker is functional. Some guidelines and recommendations for these tests include routine maintenance and verifying that that circuit breaker performance is in line with manufacture’s calibration curves. It is crucial that these tests are performed under stable conditions at suitable temperature so that there are no variations in the data. Some of the tests are listed below.
Preventative Maintenance of Circuit Breaker, Inspection, and Testing
Preventative maintenance depend operating conditions for circuit breakers. Primary inspections of CB (circuit breakers) will look at particulate matter that’s contaminating the inner workings of the CB. Accumulation of particulates can generally be disposed of by flipping the lathe on the breaker “Off” and “On” switch to clear away the accumulated dust
Circuit Breaker Trip Test
By analysing the current consumed by the trip coil during the circuit breaker’s operation, it is possible to determine whether there are mechanical or electrical issues present. In many cases, such issues can be localised to aid in finding the root cause. Optionally, monitoring the tripping supply’s voltage during the operation can detect issues arising with tripping batteries.
Insulation Resistance Test
For individual breaker resistance testing, load and line conductors should be preferably disconnected. If not detached the test values will also involve the characteristics of the connected circuit. Resistance testing is crucial for verifying that the insulating material which makes up the molded cases breakers are performing correctly. In order to test for insulation resistance, an instrument known as a megger is used. A megger instrument applies a known DC voltage to a given wire for a given period of time in order to test the resistance within the insulation on that particular wire or winding. It is vital that voltage is employed as the resistance checked with an ohmmeter may differ when there are no report of potential differences. It should also be noted that if you apply a voltage that is too high for that insulation to withstand, then you could potentially damage the insulation.
Connection Tests
Connection testing is important to make sure that an appropriate electrical connection is available and to recognise traces of overheating denoted by colour difference. It is important that electrical connections are properly installed to the CB to prevent and reduce overheating.
Contact Resistance Test
Normal wear and tear of contacts within the CB emerges after extended usage. An easy method to identify traces of weakening within the circuit breaker is to quantify the resistance across every pole of the breaker. Indications of abnormal conditions within the CB such as erosion and contamination of contacts are evident if there are excessive millivolt drops across the breaker. The contact resistance test is important in finding out if or not a circuit breaker is still apt for functioning.
Overload Tripping Test
Overload tripping components of CBs can be tested by inputting 300% of the breaker rating into each pole of the circuit breaker to determine that it will open automatically. The motive of this is to make sure that the circuit breaker will operate or not. Refer to NETA standards for trip times that are acceptable for the overload tripping test. When trying to find out tripping characteristics, it is advisable to consult with manufacturer’s manuals.
Instantaneous Magnetic Tripping
In routine tests, it is relevant to find out that the magnetic feature is functional and will trip the circuit breaker instead of finding the precise value at which the instantaneous magnetic feature functions.
How Testing of Circuit Breaker is Performed?
Different circuit breaker test equipment are used to check the operation and condition of circuit breakers on the power systems. How to test a circuit breaker involves many different test techniques and type of testers. This will define how to test a circuit breaker through different testing tools to be applied to check the equipment under a range of conditions or operation types. Discover how to test a circuit breaker with the different test sets that you can need.
Testing with Different Equipment:
To consider how to test a circuit breaker, it is required a deep knowledge of the breaker itself:
- How it works
- Its tolerances,
- Reference values of previous tests,
- Initial values with which to compare the actual results, sometimes defined by a rated timing graph,
- Established settings or initial features given by manufacturer
In this sense, how to test a circuit breaker becomes a trending analysis since test results are not always definitive but have meaning just when compared to previous data or results.
Testing with Circuit Breaker Analyzer
The timing tests of the different open and close operations of the breaker is an efficient way of how to test a circuit breaker, analyzing not only the trip times but also the essential synchronism of the poles in the different operations. This define how to test a circuit breaker through different simulations of its operation, which can be directly commanded from the circuit breaker analyzer, or initiated by an external signal, checking the opening or closing time of each pole, in single or combined operations, and checking the possible difference between poles or mismatch time which may lead to a dangerous lack of synchronism. How to test a circuit breaker with a circuit breaker analyzer depends also on the type of possible problems to be confirmed, which leads to check other features such as the possible bouncing, the proper performance of the pre-insertion resistances, the coils condition, and the mechanical analysis through contact travel speed and acceleration data with the use of the appropriate transducers.
Testing with a Micro-ohmmeter
Circuit breakers generally bear a huge value of current. Greater contact resistance cause greater losses, low current carrying capability and threatening hot spots in the breaker, so that the resistance testing with micro-ohmmeters are other way of how to test a circuit breaker for identifying and avoiding upcoming issues. How to test a circuit breaker with a micro-ohmmeter requires also reliable measurements and a wide injection range with high power that enables for longer test leads, less connections problems, and more accurate measurements.
Testing with a High Current Primary Injection Tester
The analysis of the tripping time characteristics of LV circuit breakers and molded-case circuit breakers is performed using high current injection, as the way to check the entire functionality. How to test a circuit breaker of this type depends on its maximum rated current, the trip protection settings and the inverse curve types which will define the overload and short-circuit trip pickup levels and time delays; all these features must be checked with the appropriate primary injection test set with the capacity to simulate the corresponding high current faults required and capture the answer of the breaker. A system which be easily upgraded in power capacity enables how to test a circuit breaker in the different possible situations and range of breakers; how to test a circuit breaker of this kind also needs a bendable design of the test set to fruitfully attain the certain large current job, and a design that create possible to position it nearer to the breaker, and so decreasing the power needed with smaller test leads; this is the case of the Raptor System, a modular and flexible primary injection system which easily and quickly adapts its power capacity to the several high currents ratings of the different circuit breakers.
Benefits of Circuit Breaker Testing
- Quick and easy to perform on site
- Circuits can be tested on or off load
- Tests performance of whole tripping cycle
- Tests overall timing of tripping system
- Identifies need for maintenance
- Part of a comprehensive diagnostic maintenance program
- Find early indications of possible problems
- Avoid issues other than pick up pieces
- Build up a test record database for trending
- Pick out the bad actors
- DUTY OF CARE
- Electrical Low Voltage Testing
- Temperature & Humidity Calibration
- Electrical Inspection
- Electrical Study & Analysis
THE BEGINNER’S GUIDE TO FIRE SPRINKLER TESTING & PREVENTION

If you have a fire sprinkler system, you don’t actually need to test it , right? Wrong. Sure, testing is performed to comply with NFPA regulations , insurance requirements, and to keep you out of trouble with the fire department (ahem, violations ). But it also lets you know if your system is working properly.
The types of tests that can be performed depend on the type of system you have. Different tests are performed to check your system’s functionality, as well as all the specific components of your system. In this post, we’re going to review:
- 2” Main Drain Test
- Water Flow Alarm Device Test
- Fire Pump Test
- Dry Pipe Valve Trip Test
- Hydrostatic 5 Year Functionality Test
Do you need help testing your fire sprinkler system? Get a free estimate today!
2” MAIN DRAIN TEST

The main drain test is required by NFPA25 to be performed annually to ensure the proper water supply is available at the system riser, detect changes in the water supply that may affect the sprinkler system’s performance, and confirm the drain valves are operational.
If the measurement between the inspections varies more than 10%, that could be a sign of a problem like a large obstruction, a dropped gate, a valve that is almost fully closed, or a check valve clapper stuck to the valve seat.
How to perform the main drain test:
- Record the pressure shown on the gauge. This is known as static pressure.
- Locate the main drain valve and turn slowly to turn the water on. Allow the water to run until pressure stabilizes.
- Record the pressure shown on the gauge. This is known as residual pressure.
- Close the main drain by turning it slowly.
*Tip: During the test, water is piped outside or into a drain. It is best to avoid performing the test during the winter when the water outside can turn to ice, leading to an injury.
WATER FLOW TEST

The water flow test is required by NFPA25 to be performed quarterly to ensure water flow detecting devices are operational, alarms are operational, and a signal is sent to and received by the central station (if connected).
It is important to inform the fire department and/or central station before you perform the test. Depending on what type of alarm device your system has, either a water motor gong sounds the alarm or an electrical water flow switch is tripped when water is flowing through the pipe.
How to perform the water flow test:
- If connected to a central alarm, notify the fire department and/or central station about the test.
- Locate the inspector’s test valve and slowly open so that the valve is in line with the pipe.
- Allow the water to flow for about 60 seconds or until the alarm sounds. If connected to central station, call to confirm the signal was received.
- Slowly close the inspector’s test valve. Notify the fire department and/or central station that test is complete.
FIRE PUMP TEST

The fire pump flow test is required by NFPA25 to be performed annually and measures the performance of the fire pump’s flow and pressure. The test is conducted by flowing water through hose streams connected to the test header. The test results are compared to the factory specifications and the test results from previous years. If there is a significant reduction in the pump’s performance, further examination is needed to make the necessary repairs.
The 2011 Edition of NFPA 25 requires electric motor driven fire pumps to be operated monthly. This is known as a churn test.
For more information, check out our blog post on the requirements for fire pump testing .
DRY PIPE VALVE TRIP TEST

Partial Trip Test
The partial dry pipe valve trip test (say that 3 times fast) is required by NFPA25 to be performed annually. During the test, the control valve is only partially opened so that no water is released. The system must trip in under 60 seconds. After the test is completed, the low points are drained and the valve is reset.
Full Trip Test
A full flow trip test is required by NFPA25 to be performed every 3 years. During the test, the control valve is opened completely to allow the flow of water. The system must trip in under 60 seconds. After the test is completed, the low points are drained and the valve is reset. After the test is completed, the low points are drained and the valve is reset.
*Tip: Dry pipe valves should be trip-tested during warmer weather to avoid freezing.
HYDROSTATIC 5 YEAR TEST

The hydrostatic test is a Fire Department requirement, it is not required as part of your annual NFPA25 inspection contract. The 5 year hydrostatic test, also known as a functionality test, confirms the fire sprinkler/standpipe components are in working condition and are acceptable for fire department use.
The test is completed by applying hydrostatic pressure to the fire department connection and maintaining the pressure for up to 2 hours. It must be conducted by a licensed fire sprinkler contractor, such as Capitol Fire Sprinkler in the presence of the Fire Department.
To learn more about the hydrostatic test, check out our post: Everything You Need To Know About the Hydrostatic Test and 4 Reasons to Schedule a Pre-Test for Your 5 Year Hydrostatic Test .
- Inspections
- Installation
- Maintenance
Recent Posts

CALL (718) 533-6800 FOR A FREE ESTIMATE!
- Basic Electrical
- Electrical Laws
- Electrical Tools
- Electrical Formulas & Equations
- Electrical Calculators
- Preventive Maintenance
- Electrical Procedures
- Electrical Projects
- Electrical Notes & Articles
- Electrical How to
- Troubleshooting
- Electrical Symbols
- Excel Tools
- Transformers
- Electric Motors
- Generations
- Transmission
- Distribution
- Measurement
- Control Systems
- Electrical Safety
- Electrical Interview
- Electrical MCQ
- Instrumentation & Control
- Renewable Energy
- Electrical Vehicles
- Submit Articles
- Freelance Job
- Privacy Policy
- Power Systems
12 Fundamental Testing of High Voltage Circuit Breaker

Introduction
Types of circuit breakers, conventional testing procedures, 1). first trip test, 2). primary injection test, 3). contact resistance measurement, 4). dynamic resistance measurement (drm), 5). main circuit dielectric test, 6). main circuit resistance test, 7). auxiliary & control circuit tests, 8). tightness test, 9). o-c timing test, 10). coil resistance test, 11). travel test, 12). aesthetic test.
Circuit breakers may not be the most noticeable types of equipment in a substation.
They spend a significant amount of time doing nothing except waiting in expectation.
However, there will come a time when the circuit breaker must operate properly and promptly.
Unfortunately, all electrically controlled devices will eventually malfunction, and if a circuit breaker fails to function properly, problems can cascade with potentially disastrous consequences.
However, testing allows technicians & substation managers to alleviate their concerns regarding circuit breaker functionality.
Circuit breakers protect equipment that is an essential component of the infrastructure and expensive to replace; keeping the breakers in good working order minimizes outages, which saves utilities & their customer’s time and money.
Furthermore, there is a genuine public service component to providing a consistent supply of power, avoiding corporate downtime and customer “dark” time. Substation breaker testing is a significant responsibility for all electricity companies.
The proper operation of a breaker is dependent on several distinct components that need to be calibrated & tested on a regular basis.
The parameters used to establish maintenance intervals vary widely amongst power utilities, although they frequently include time since the last test, number of operations, and the extent of fault current activities.
Environmental factors like as humidity and temperature – either the breaker is situated in a desert (or) coastal region – also influence the repair timetable.
International standards define the design and functioning of high voltage circuit breakers, as well as their type and routine tests.
IEC 62271-SER ed1.0 – High-voltage switchgear & control gear.
ANSI/IEEE C37 – Guides & Standards for Circuit Breakers, Relays, Switchgear, Substations, and Fuses.
IEC/TR 62063 ed1.0 (1999–2008) TC/SC 17A – High-voltage switchgear & control gear – Application of electronic and related technologies to switchgear and control gear auxiliary equipment.
Circuit breakers can be classed in a wide range of ways, including voltage, application, insulating medium, etc.
Depending on where a circuit breaker is located in the power network, it will require varying levels of reliability.
These standards usually determine the breaker’s testing schedule and the quantity of maintenance it will obtain.
The various types of high voltage circuit breakers comprise the following:
- Oil Circuit Breaker
- Air Circuit Breaker
- Vacuum Circuit Breaker
- SF6 Circuit Breaker
A circuit breaker’s primary functions include opening the circuit in reaction to faults and connecting/disconnecting objects & parts of the electrical network.
Normal-load operations account for the vast majority of circuit breaker switching operations.
Initially, a circuit breaker may appear to have nothing to test, but a closer look shows an advanced system that must function flawlessly in milliseconds.
One of the most important purposes of circuit breaker testing is to measure those milliseconds, also known as main contact timing.
Furthermore, contact movement is nearly always measured as part of the circuit breaker maintenance and service schedule.
In this post, we will look at the most prevalent test methods for breakers as well as some new techniques that are quickly acquiring widespread acceptance.
A circuit breaker’s initial open operation after a long idle period is a good indicator of its condition.
This test involves connecting and measuring the circuit breaker while it is in service.
No test connections are established outside the control cabinet.
The main benefit of a first trip test is to test circuit breaker functioning in “real world” circumstances.

First trip testing will show if the circuit breaker has slowed due to rust or dried grease in mechanism linkages (or) coil armatures.
Traditional alternative test techniques require the circuit breaker to be removed from operation and operated at least one time.
A first trip test on a gang-operated circuit breaker measures one-coil current.
However, an independent pole-operated breaker measures three coil currents. Analysis of coil current signatures reveals circuit breaker state. We can also measure auxiliary contact timing.
The secondary current in the protective CTs can be monitored to determine the circuit breaker’s opening time, but the arcing time is included.
Since parallel primary current paths limit arcing, opening time can be more accurately estimated.
First trip analysis can indicate the following problems:
Main Contact Timing
Main contact timing follows IEC definitions:
- The opening time is the time between activating the trip coil and the arcing contacts separating at all poles.
- The closing time is the period from activation of the closing device (such as the coil) until the moment the arcing contacts touch in all poles.
The primary contact timing test ensures circuit breaker manufacturer-specified opening and closing times.
Timing outside manufacturer guidelines, especially when switching short-circuit currents, increases arcing time. This causes severe contact wear and equipment emergencies such contact melting.
If contacts melt, the breaker must be repaired or replaced.
Correct synchronization between phases and, if there are many breaks / phases, across contacts in the same phase is essential, as are circuit breaker opening and closing times.
Multiple contacts in sequence require phase synchronization. When a breaker opens a circuit, it divides voltage. Too great a time gap between contact operations will cause high voltage across one, causing flashover and perhaps damaging the breaking chamber.
A 3-phase system power transmission system at 50 Hz has a higher tolerance for phase simultaneity as there is typically 3.33 ms across zero crossovers.
However, in such systems, time tolerance is frequently less than 2 ms. In both cases, synchronized switching breakers must meet stricter requirements.
IEC 62271-100 specifies circuit breaker synchronization to be better than 1/4 cycle for shutting and 1/6 cycle for opening. Better than 1/8 cycle synchronization across interrupters in the same phase.
Resistor Contact Timing
Resistor contacts may be pre- or post-insertion. Timing of resistor contacts is done simultaneously with main contacts, but only when main contacts are open can they be detected. Resistance is a good evaluating measure.
Auxiliary Contact Timing
The time connections between primary and auxiliary contacts are not limited, but understanding and checking auxiliary contact operation is essential. Auxiliary contacts close and open circuits.
To prevent coil burnout, such a contact could enable a closing coil whenever a breaker is ready to close and open the circuit shortly after. Relay protection and signalling use auxiliary contacts.
For primary injection testing, a large current is injected into the primary side of the transformer.
The test covers the full chain, which includes the
- Current transformer,
- Wires,
- Connection points,
- Relay protection, and
- Circuit breakers (in some cases).
During primary injection testing, the system undergoing test must be shut down.
This type of test is normally carried out as part of commissioning process.
The only method to ensure that a direct low voltage circuit breaker works properly is to run a strong current through it and observe/record the results.

Main Contact Motion
A high-voltage breaker is intended to stop short-circuit currents in regulated manner.
This places considerable pressure on the mechanical functionality of the operating mechanism & all of the components in the interrupter chamber.
The breaker must operate at a specific speed in order to provide enough pressure for the cooling stream of air, oil, or gas (depending on the kind of breaker) to extinguish the arc formed after contact separation till the next zero crossing.
It is essential to cut off the current to avoid a restrike. This is accomplished by making sure the contacts are adequately separated prior to the moving contact reaching the so-called damping zone.
The arcing zone is the distance required to extinguish the breaker’s electric arc. From the motion curve, velocity & acceleration curves may be derived, revealing even minor changes in the breaker mechanics.
The contact motion is collected by connecting a travel transducer to the moving element of the working mechanism. The transducer generates an analogue voltage in response to the movement of the contact.
Motion is typically represented as a time vs distance curve.
When the circuit breaker is closed, a known DC current is injected via the main contact system to determine contact resistance.
By monitoring the voltage drop, the resistance may be estimated. The value of main contact resistance represents the state of the conducting components. This test is often referred to as static resistance measurement (SRM).
The static resistance value serves as a reference value for all electrical connections and joints. According to IEC56 , this resistance should be measured with a current ranging from 50 A to the breaker’s nominal current.
ANSI C37.09 requires a minimal test current of 100 A.
Many international & national standards establish comparable guidelines to prevent the danger of receiving incorrectly high values if the test current is excessively low.
Heat created by a high test current can disperse contact grease residues or other contaminants found on contact surfaces.
When the circuit breaker contacts are in bad condition, the results can differ significantly from those recorded at the factory while the breaker was new.
ANSI specifies a 200% increase in resistance over the highest value specified by the factory.

This test is performed by injecting DC current via the breaker’s main contacts and monitoring both the voltage drop & current when the breaker is operational.
These values are subsequently utilized to depict resistance versus time. If contact movement is captured at the same time, the resistance of each contact position can be calculated.
This method is mostly used for contact diagnostics, while it can also be utilized for main contact timing. The only way to determine the total length of arcing contact is to disassemble the circuit breaker.
In SF6 breakers, the arcing contact is often constructed of tungsten. This contact gets burned off & gets shorter with each interruption of the load current. The arcing contact’s shortening is plainly seen from dynamic resistance tests.

To obtain valid DRM data, large test current and test equipment with adequate voltage measurement resolution are necessary.
Electrical Tester, will cover further widely used circuit breaker tests such as coil and voltage tests; vacuum bottle, SF6 leakage, & air pressure tests; & new test methods, like as resonant frequency techniques, which are rapidly gaining popularity.
This test, also known as the ‘Dielectric Withstand Test’, is designed to assess the CB’s withstand capacity against a variety of power frequencies & impulse voltages.
As standard procedure, a dry, high-power frequency voltage test must be performed for 60 seconds. According to the IEC 60061-2 standard, the voltage delivered should be 1.5 – 1.8 times higher than the CB’s rated voltage in a frequency range of 45 to 65 Hz.
Alternatively, unless otherwise indicated by the relevant technical committee, the ideal test voltage levels should be sustained within ±1% of the required level during the test.
For tests lasting more than 60 seconds, maintain voltage readings within ±3% of the required level.
The IEC 62271-100 standard requires a minimum current of 50 amps across the CB. The DC millivolt drop across it should be measured to determine the main contact resistance value using the Kelvins 4-Wire concept.
The main contact resistance value cannot go above 150 micro ohms.
Auxiliary & control circuits are usually tested using three distinct tests:
- Inspection & verification to establish whether the auxiliary & control circuits comply with the specified Circuit and Wiring Diagrams.
- Functional testing of all (LV) low-voltage circuits to check if auxiliary & control Circuits are functioning seamlessly with the other elements of the switchgear and control gear,
- Visual inspection to see if the auxiliary & control circuits may be securely accessed without also risking an electric shock from direct contact with the main circuit.
Manual testing should be performed to determine the tightness of CB’s connections.
Depending on the kind of switchgear, the following three tightness checks should be performed:
- Controlled & closed-pressure tests for the gas-insulated switchgear.
- Sealed-pressure tests for gas-insulated & vacuum-insulated switchgear.
- Perform a liquid tightness test to find any leaks.
When it comes to avoiding an electrical accident, the opening & closing time of CB are important.
In case of an electrical fault, the CB must quickly open and trip the current, then close when the issue is resolved.
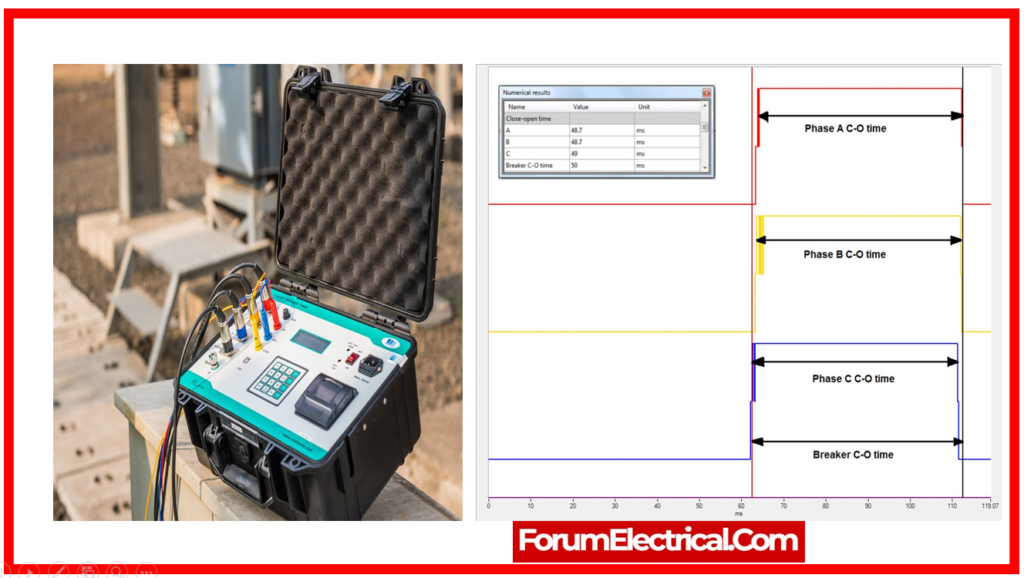
Industry best practices indicate that HV CBs open (& trip) between 30 to 50 ms of fault happening and shut between 60 to 80 milliseconds of the fault being fixed.
However, if the fault persists even after CB has closed, it should reopen, re-trip the current, and then close again. Unpredictable conditions like these make testing the CB’s Opening-Closing (O-C) timings essential.
CBs have dedicated coils for the opening and shutting. Depending on the condition, the relay delivers a ‘coil current’ that activates and operates the relevant coil.
To make sure whether a CB continues to function properly, measuring the resistance levels of each coil is essential.
Every CB’s interrupter has two mechanisms:
- Fixed and
- Movable.
As a CB closes, the moving part moves towards the fixed component, completing the loop.
To make sure that both of these components function properly, travel tests are conducted to assess their effectiveness. There are four basic characteristics to consider while performing trip tests:
Stroke Length: The contacts’ total travel distance from where they are at rest in a given state. For example, in a closed state, the distance travelled from resting posture to open state, & vice versa.
Damping: This is determined directly on the trip curve by computing the velocity in the damping zone or the time between two predetermined places on the travel curve in the damping zone.
Contact Wipe: The total length measured from initial contact touch to final resting posture following the relevant procedure.
Over-Travel: Over-travel, as measured directly from the travel curve, is the maximum displacement which the contacts may achieve beyond their resting position.
Rebound: The lowest displacement (after over-travel) to the contacts’ final resting position.
Aesthetic tests, which are as significant and involve a thorough inspection of the switchgear & control gear to ensure compliance with their individual procurement requirements.
These tests include a thorough examination of the language and information used on the respective nameplates, the identification of any auxiliary equipment, the color and quality of the paint and corrosion-protection materials used on metallic surfaces, & the values of the resistors & capacitors connected to main circuit.
RELATED ARTICLES MORE FROM AUTHOR
Disconnector switch testing procedure, how medium voltage switchgear (mvsg) works, explain air circuit breaker (acb) and their working principle.
What happens when you press the TEST button on a circuit breaker in an electric panel?
Thursday, July 12, 2018
All circuit breakers provide “overcurrent protection.” This means that, if current in excess of the breaker’s rating in amps is flowing through the circuit, the breaker will trip and disconnect the circuit to avoid overheating the wiring or equipment it serves, which could potentially start a fire.
Breakers with a small colored button marked “TEST”—it could be white, yellow, green, or red—have a dual protective function. And older GFCI breaker from the 1980s with a red test button is shown below.

There are two primary types: GFCI (Ground Fault Circuit Interrupter) and AFCI (Arc Fault Circuit Interrupter). When the test button is pushed the device simulates the defect that it s designed to protect against, and trips the breaker to the middle position if functioning properly. To reset, you push the breaker switch all the way to “OFF” and and then back to “ON.” If nothing happens when the test button is pushed, that means the device is not functional and therefore not protecting the circuit in the way it was designed.
The GFCI-breakers protect against ground faults, which is essentially current that is traveling off the intended circuit and may be shocking you. These breakers protect circuits for pools and spa tubs, along with receptacles in wet areas like bathrooms, kitchens, garages, and exterior. Because GFCI-protection can also be provided by GFCI-receptacles with “TEST” and “RESET” buttons in the center, GFCI-breakers are used less often in panels today, with GFCI-receptacles placed around the home in the wet areas instead.

Also, see our blog post Where are GFCI receptacle outlets required? and What electrical hazards does a Ground Fault Circuit Interrupter (GFCI) NOT protect against? and When did arc fault circuit interrupter (AFCI) breakers first become required? and Are Ground Fault Circuit Interrupters (GFCIs) really necessary and worth the trouble
• • • • • • • • • • • • • • • • • • • • • • • • • • • • • • • • • • • •
Here’s links to a collection of our other blog posts about AFCI and GFCI RECEPTACLES AND CIRCUIT BREAKERS:
• Does a septic pump or sump pump require a GFCI-receptacle?
• What is the difference between what trips a GFCI (ground fault) receptacle and a circuit breaker?
• What is the code requirement for GFCI protection for receptacles near a wet bar sink?
• When was GFCI-protection for kitchen dishwasher receptacle outlet first required?
• Does a washing machine receptacle outlet require GFCI protection?
• My spa tub stopped working. What's wrong?
• How do I identify a combination AFCI (CAFCI) circuit breaker?
• What does "listed and labeled" mean for an electrical component?
• What is the difference between GFCI and AFCI circuit breakers?
• When were GFCI receptacle outlets first required?
• What is the difference between the electric service to a mobile home and a site built home?
• Why is there a wall switch next to the furnace or indoor unit of the air conditioner in the garage?
• What is a Dual Function Circuit Interrupter (DFCI)?
• How I can tell if a receptacle outlet is tamper resistant?
• What is the difference between a Combination Arc Fault Circuit Interrupter (CAFCI) and an Arc Fault Circuit Interrupter (AFCI) circuit breaker?
• What is the difference between "grounded" and "grounding" electrical conductors?
• How far above a kitchen countertop do electrical outlets have to be?
• How is it possible to provide both GFCI (Ground Fault Circuit Interrupter) and CAFCI (Combination Arc Fault Circuit Interrupter) protection for kitchen and laundry circuits?
• My bathroom electric receptacle/outlet is dead and there are no tripped breakers in the electric panel. What's wrong?
• My GFCI reset button is hard to push and won't reset. What's wrong?
• Why do some breakers in my electric panel have a "TEST" button on them?
Visit our ELECTRICAL page for other related blog posts on this subject, or go to the INDEX for a complete listing of all our articles.
Water Heaters
Water Heater Age
"What Are The
Signs Of..."
Septic Tank Systems
Structure and Rooms
Plumbing Pipes
Termites, Wood Rot
When It First
Became Code
"Should I Buy A..."
Park Model Homes
Shingle Roofs
Wind Mitigation
Roof and Attic
"Does A Home
Inspector...?"
Pool and Spa
"What Is The Difference Between..."
Concrete and
Concrete Block
Metal Roofs
Foundations
Modular Homes
Rain Gutters
Mold, Lead & Other Contaminants
Condominiums
Historic Houses
Crawl Spaces
Mobile-Manufactured Homes
Building Permits
Life Expectancy
Exterior Walls
& Structures
Common Problems
HUD-Code for
Mobile Homes
Garages and Carports
Flat (Low Slope) Roofs
Electrical Panels
Sprinkler Systems
Electrical Receptacle Outlets
4-Point Inspections
Hurricane Resistance
Frequently Asked Questions (FAQ)
Home Inspection
Heating and Air Conditioning
Building Codes
Fireplaces and Chimneys
Inspector Licensing
& Standards
Energy Efficiency
Washers and Dryers
Doors and Windows
Electrical Wiring
Click Below
to Collections
of Blog Posts
Plumbing Drains
Smoke & CO Alarms
Aging in Place
Top 5 results given instantly.
Click on magnifying glass
for all search results.
AFCI, CAFCI,
DFCI, & GFCI
Air Conditioner & Furnace Age/Size
Electrical Switches
Water Intrusion
Electrical - Old
and Obsolete
Foundation Certifications
Tiny Houses
About McGarry and Madsen
Buying a home in North/Central Florida? Check our price for a team inspection by two FL-licensed contractors and inspectors. Over 8,500 inspections completed in 20+ years. In a hurry? We will get it done for you.

Moisture Problems
Schneider Electric Blog
Home > Infrastructure and Grid > Power Distribution and Management > LV Circuit Breaker Testing – Learn when, why, and how to perform it and the role new software plays
Power Distribution and Management
LV Circuit Breaker Testing – Learn when, why, and how to perform it and the role new software plays
February 24, 2022
6 min read | Mathieu Guillot
JavaScript is required to use the TTS Player.
This audio was created using Microsoft Azure Speech Services
Circuit breakers help ensure the safety and reliability of electrical distribution systems in all facility types. Low-voltage (LV) circuit breakers need checking to ensure proper configuration to operate as expected during their entire lifecycle.
This validation is the combined responsibility of specifiers, panel builders, installers, and service technicians. This post explains why, when, how, and by whom should perform testing and how the newest software makes it faster and easier to perform and share test reports.

The importance of properly configuring LV circuit breakers
Most of today’s circuit breakers designed for simple protection functions in final distribution applications are non-adjustable, so they do not require any unique configuration.
However, circuit breakers designed for LV applications above 100A in main switchboards – i.e., molded case circuit breakers (MCCB) and air circuit breakers (ACB) – typically integrate protection for many fault conditions, like overload, short circuit, and earth fault. Many of these breakers configure to coordinate protection between each other – using selectivity and cascading – to help minimize impacts of electrical faults while preserving supply continuity for the rest of a facility. Circuit breakers offering this level of protection and reliability have adjustable settings that need configuration.
During the design phase of a new facility, upgrade, or expansion, the latest advanced software design tools, such as ETAP or Caneco ONE , can specify settings for each circuit breaker in an electrical system based on various parameters, e.g., cable cross-section. To optimize safety and reliability, it is essential that the specified breaker settings during the design stage are applied to each circuit breaker and maintained to ensure optimized performance during electrical instillation’s operational lifecycle.

Circuit breaker checking validates the configuration
There are three important reasons to check circuit breakers to certify proper configuration and operation:
- Safety – The ability of a circuit breaker to reliably disconnect in the case of overcurrent or earth fault is a matter of property and people protection. Proper functioning relies on consistency between circuit-breaker setting, tripping curves, and power system characteristics (e.g., rated power of sources, impedances, length, and cross-section of cables).
- Continuity of supply – One way to solve the previous requirement is to have a very sensitive circuit breaker with a low threshold and time delay, but this will create issues due to unwanted tripping or selectivity issues. That will result in forcing settings to maximum values, potentially impairing safety. So the perfect compromise between safety and supply continuity is entirely dependent on the correct application of the settings calculated during design.
- Standards compliance – Part 6 of the IEC 60364-6 standard for LV installations – and multiple local regulations such as BS7671 and NFC15100 – require overcurrent protective devices tripping values to be checked during installation and periodically during operation.
Though circuit breakers must be properly configured, it is unfortunately prevalent that large numbers of breakers do not have their optimized settings configured when buildings are designed, constructed, and operated. We estimate that at least one-third of adjustable circuit-breaker remain with factory settings. There can be many reasons for this:
- According to the actual installation, the initial design calculation is done without the necessary information and is not current. For example, it is typical that the load list may evolve, cable types and lengths may change, or the setting capability is more than initially calculated for a circuit breaker.
- No one thinks it’s their responsibility to configure the circuit breakers.
- Settings are manual, and checking is visual, increasing the chance of human error.
- Settings are modified during operation to solve an issue quickly.
If not configured, circuit breaker settings remain in their factory defaults. A circuit breaker with factory settings might still pass a building inspection, but there is the risk of:
- Non-conformity to the installation standard
- Non-selectivity or unexpected circuit breaker tripping for the installation
Checking circuit breaker settings during the construction phase and periodically during the facility’s operation will avoid these risks by ensuring conformity of the built installation with the calculations done during design. However, mandatory checking is usually performed visually. This poses a risk of human error with poor traceability.
Additionally, periodically testing circuit breaker s is an essential preventative maintenance step to help find early indications of a potential operational issue. Circuit breakers may be inactive for months or years before a fault. This will give you time to fix the issue before it can cause a problem.
Recommended steps for circuit breaker testing
As per the standards noted above, checking LV circuit breaker settings should be executed multiple times over the circuit breaker’s lifecycle. Here are some additional considerations:
Testing at the initial installation stage:
- Checking adjustable circuit breaker settings should be prescribed for all new electrical installations.
- The panel builder or electrical contractor should be responsible for this early verification phase.
- Before putting electrical equipment into operation, check the protection settings on circuit breakers and perform testing to verify the functioning of the breakers in accordance with these settings.
- Details of configuration should be entered into a digital logbook – such as EcoStruxure Facility Expert – to set a ‘baseline’ for the configuration and ensure traceability. This record should also include all details for the associated switchboard.
- The panel builder or contractor performing the settings check should deliver a test report to the specifier and building owner to ensure correct settings and operational tests. This should be delivered before starting the installation.

Periodic testing during facility operation:
- For example, the contracted electrical service, a Schneider Electric EcoXpert ™ partner, should be responsible for this stage of checking settings and testing performance.
- Though the IEC 60364-6 standard specifies that the testing period is dependent on the installation, equipment, and type of operation. For example, for the ComPacT NSX from Schneider Electric, we recommend testing the trip curve every two years under normal environmental conditions.
- The test procedure should include testing the ability of the circuit breaker to detect an overcurrent and trip (including the mechanical part). It should also include checking that all settings are consistent with the original design specification, including protected circuit characteristics and selectivity objectives.
New technology makes circuit breaker testing simpler, faster, and more reliable
EcoStruxure™ Power Commission (formerly known as Ecoreach) is an intelligent digital testing tool compatible with all Schneider Electric circuit breakers with electronic trip units, power and energy meters, and communication gateways. EcoStruxure Power Commission is a software app that runs on a laptop computer. This mobility makes it ideal for circuit breaker initial validation testing before installation and periodic testing during facility operations.
EcoStruxure Power Commission automates setting, commissioning, and testing, making these steps safer, faster, and more reliable, with less human error. The newest version of this software is simplified to allow direct connection of the laptop to any Schneider Electric MasterPacT MCB or ComPacT MCCB circuit breaker with as little as a USB cable or Field Services Interface. It supports routine checkups, secondary injection testing, preparation for primary injection testing (if required in special cases), and zone selective interlocking testing.
Settings are automatically documented in a digital logbook to save time while enabling consistency and traceability. EcoStruxure Power Commission can also quickly and automatically generate a project report to share with all stakeholders to give them peace of mind that circuit breakers are correctly configured and performing safely and reliably.

In the future, we envision digital design tools like ETAP or Caneco BT software to offer seamless connectivity between the ‘digital twin’ and EcoStruxure Power Commission. This will enable direct upload of specified settings for each breaker in the electrical system for even greater time savings.
To learn more, discover EcoStruxure Power Commission , watch our demonstration video, or download our eGuide .
Tags: Caneco ONE , EcoStruxure Facility Expert , EcoStruxure Power , EcoStruxure Power Commission , ETAP , Low Voltage Circuit Breaker , LV Circuit Breaker Testing , LV electrical installations , selectivity

Optimizing installation costs with circuit breaker cascading

Circuit breaker selectivity for power availability

Circuit breaker innovation drives today’s quality and reliability standards

3 Extreme Conditions that Put Low Voltage Circuit Breaker Reliability at Risk
Sprinkler Age A Publication of the American Fire Sprinkler Association
Dry System Valve Trip Testing
April 17, 2019 Featured Articles , Technical Articles Leave a comment
All That It Entails
With all that NFPA 25, Standard for the Inspection, Testing, and Maintenance of Water-Based Fire Protection Systems , includes, few things are as straight forward as the trip testing of a dry system valve. Straight forward, however, does not mean uncomplicated. So, don’t lose focus during this test procedure or you’ll find yourself having to perform it all over again to get the information needed for a proper functional test. Of course, that goes for any test where one may think the results are not accurate, but it is one thing to re-perform the testing of a wet system or even a fire pump three-point flow test. It is an entirely different burden to have to drain, reset, and pump up a dry valve in order to retest it a second time. What’s the famous saying? You know it… if you don’t have time to do it right the first go around, where is the time going to come from to do it correctly the second go around?
This article will cover the most important areas on which to focus in the hopes of helping to avoid the costly and time-consuming dry trip retest. Let me start by saying that if you’re reading this article then dry system valve trip testing is probably something with which you are familiar and already understand. With so many variations of dry system valves and set ups, this article is meant to be a refresher or a checklist for you to confirm what you already know; it is not meant to be the “end all be all” to dry system valve trip testing. So, with the disclaimer out of the way, let’s get to it.
The most important thing to do with a dry system valve is slow down… slow way down. This equipment is touchy and once tripped, leaves no chance to go back and get your previous static pressures (air, water, quick-opening device, etc.). So upon walking up on one, look it over and take some notes. Firstly, notice if there is a quick-opening device (QOD) and what pressure is on it. Also, pay attention to whether there is a low-pressure actuator or a standard actuator and then validate by verifying that the pressure concurs with the system gauge. Keep in mind that the QOD also has to match the actuator as either standard or low-pressure; they don’t mix and match. It is not uncommon to walk up on a dry valve and have the QOD out of service or have a low-pressure actuator with 38 pounds of air or nitrogen on the system. Those low-pressure actuators should have between 13 and 18 pounds of air or nitrogen in them according to the manufacturer, not 38. Additionally, find the air compressor or nitrogen generator and confirm that it is operational before attempting the trip test. If it’s not working, you won’t be able to pressurize the system without repairing the unit or bringing in temporary air or nitrogen to use. Notice the water pressure on the system; is it fed from city pressure or is there a pump supplementing the pressure? All of these things affect the performance and accuracy of the test results. Remember the reason for performing the test – to ensure the functionality of the valve to operate if it is needed. Therefore, the starting parameters need to be accurate in order to ensure the final results are accurate. Finally, pay attention to the temperature. Dry system valves shall be trip tested during the warm seasons when there is time to drain down the piping prior to freezing weather.
After assessing the equipment on the system to be operated and documenting all of the pressures, the technician will need to understand what kind of test is going to be performed. Dry system valve trip testing can be performed as a partial trip test or as a full flow trip test. The full-flow trip test is conducted every third year with the control valve fully open. The water delivery time to the most remote outlet is compared to the system acceptance results. Longer water delivery times could mean the degradation of the system or water supply, resulting in significant delays in system operation. By contrast, a partial trip test is performed the other years with the control valve partially open to prevent the system from filling with water. It does not require water delivery to the most remote outlet. The full-flow test procedure requires two people to perform where the partial trip test procedure can be performed with one technician as long as the control valve is not a wall post indicating valve (WPIV) or a post indicating valve (PIV).
So far there has been a whole lot of looking, assessing, and organizing but we haven’t touched a thing. We’ll perform the procedures for the partial dry trip test first. Let’s assume the customer is expecting you and they have already notified the local fire department, if required, and the monitoring company has the system on test. Before the test is conducted, make sure that the area where water will be discharged can handle the volume and pressure and that it is safe to discharge. Then,
• Record the air or nitrogen pressure on the QOD (if it exists and confirm it matches with the actuator, if one exists) and on the system side of the valve, taking note if a low-pressure or standard actuator is installed.
• Record the water pressure on the supply side of the valve.
Note: At this point, the technician should follow the pre-planned impairment procedures in Chapter 15 to secure the fire pump (if it exists). Technicians should follow their company procedures as they align with NFPA 25.
• Fully open the main drain and flush the water supply. While the main drain is flowing, slowly close down the system control valve until the main drain can no longer provide flow through the entire outlet. Some water needs to be exhausting from the drain; do not close the system control valve tightly.
• Fully close the main drain.
Note: The technician can choose to close the QOD (if it exists) or leave it in service. The QOD has to be tripped quarterly so this may be a good time to perform that test. The technician should follow their company’s procedure whether to perform the QOD trip as part of the dry trip or as a separate test after the dry trip.
• Open a valve on the system to release the air or nitrogen.
• Watch the system air or nitrogen gauge and document the pressure at which the dry valve trips.
• Immediately close tightly the system control valve and fully open the main drain valve.
• Fully close the air or nitrogen supply valve and the QOD supply valve (if it exists).
• Fully open the inspector’s test valve and the auxiliary drain valves on the system to allow them to drain any accumulated condensation.
Note: The location of auxiliary drain valves shall be listed at the riser.
• While resetting the interior seat of the dry valve, clean it and make sure the seat will open fully and latch.
• Confirm that the pressure switch flow alarm and the control valve and low air or nitrogen supervisory signals were received at the fire alarm control panel (FACP).
Note: Make sure the dry valve system is not equipped with a paddle style flow switch and be mindful of the order the switches were received at the FACP. Occasionally, switches have been wired or identified incorrectly.
• Reset the seat of the dry valve system and the QOD (if it exists) and apply priming water to the actuator of a newer valve or to the top of a differential dry valve system.
• Fully close all auxiliary drain valves and the inspector’s test valve.
• Fully open the air or nitrogen supply valve.
Note: The air or nitrogen supply shall be able to restore system air or nitrogen pressure to normal within 30 minutes through the bypass connection. If multiple systems exist, the 30-minute fill requirement is only applicable to one system at a time. Technicians may use a supplemental supply to bring multiple systems to normal pressure but the 30-minute requirement must be confirmed using the installed compressor.
• When system air or nitrogen pressure is restored, open the QOD supply valve (if it exists). Document the air or nitrogen pressure on the system side of the dry valve and on the QOD (if it exists).
Note: Compare the two. They should be very similar.
• With the main drain still open, slowly open the system control valve until water starts to release from the main drain. Continue slowly opening the system control valve until it is fully opened and the main drain is fully flowing. Document your residual pressure.
• Slowly close the main drain fully so as to not cause water hammering. Document your return to static pressure.
Note: The technician may choose to close the main drain after partially opening the system control valve to allow water pressure to build up under the seat. However, the technician will be required to perform a valve status test if it is not performed at the time of setting up the valve as described above.
• Hang the system tag with pertinent information at the dry valve system.
• Return the fire pump (if it exists) to normal operation.
• Reset the fire alarm control panel and confirm its status is normal.
Now, let’s take a look at how the full flow dry trip test compares to the partial trip procedures from above. Keep in mind, for this test there will need to be two people present and the use of radios or communication of some kind will be imperative. Certainly one, but I prefer both technicians to have a stopwatch. If a pump exists and it is remote from the location of the valve or the inspector’s test, then a third person will need to be present in the pump room while the pump is running. We’ll make the usual assumptions that we made above and we’ll start the test procedure at:
• Record the air or nitrogen pressure on the QOD (if it exists and confirm it matches with the actuator, if one exists) and on the system side of the valve, taking note if a low pressure or standard actuator is installed.
• Record the water pressure on the supply side of the valve.
Note: At this point, the technician should follow the pre-planned impairment procedures in Chapter 15 to secure the fire pump (if it exists). Technicians should follow their company procedures as they align with NFPA 25.
• Fully open the main drain and flush the water supply.
• Fully close the main drain slowly.
Note: Restore the pump that was impaired per Chapter 15 to normal operating service at this time. It will be needed for the full-flow dry system valve trip test.
Note: At this point, one technician should be stationed at the most remote inspector’s test valve and the other technician at the riser. When the next step is initiated, both technicians will start their stopwatches in order to time the tripping of the dry system valve and the delivery of a full stream of water at the inspector’s test valve.
• Open the inspector’s test valve on the system to release the air or nitrogen. (Timing begins.)
• Watch the QOD gauge (if it exists) and document the pressure when the QOD (if it exists) trips.
Note: This should happen quickly and will most likely result in the dry system valve tripping instantaneously, so be watching both gauges simultaneously as best you can.
• Watch the system air or nitrogen gauge and document the pressure at which the dry system valve trips.
• Document the time at which the dry system valve trips. Call out to your coworker that the system tripped.
• Document the water pressure at the time the dry system valve tripped.
• Confirm operation of the fire pump (if it exists).
• Close the air or nitrogen supply valve and the QOD supply valve (if it exists).
• When a steady flow of water is reached at the inspector’s test valve, the coworker should stop the timing and call in the time to the technician stationed at the riser.
• Document the time it took for water to reach the inspector’s test valve.
• When a steady stream of clear water is present at the inspector’s test valve, close tightly the system control valve.
• The technician should follow the pre-planned impairment procedures in Chapter 15 to secure the fire pump (if it exists).
• While resetting the interior seat of the dry system valve, clean it and confirm it latched in the open position.
Note: The full-flow test shall latch the clapper in the open position.
• Confirm that the pressure switch flow alarm and the control valve, low temperature, and low air or nitrogen supervisory signals were received at the FACP.
Note: Make sure the dry valve system is not equipped with a paddle-style flow switch and be mindful of the order the switches were received at the FACP. Occasionally, switches have been wired or identified incorrectly.
• Reset the seat of the dry system valve and the QOD (if it exists) and apply priming water to the dry system valve.
• Fully close all auxiliary drains and the inspector’s test valve.
Note: The air or nitrogen supply shall be able to restore system air or nitrogen pressure to normal within 30 minutes through the bypass connection. If multiple systems exist, the 30-minute fill requirement is only applicable to one system at a time. Technicians may use a supplemental supply to bring multiple systems to normal pressure but the 30-minute requirement must be confirmed using the installed compressor.
• Slowly close the main drain fully so as to not cause water hammering. Document your return to static.
So, in a nutshell, there you have the basic differences between the partial trip test and the full flow dry system valve trip test. I would be remiss if I didn’t reiterate that there are a multitude of system configurations for which a technician needs to be looking, which was the purpose of my first two paragraphs. Additionally, the air compressor or nitrogen generator maintenance, the heating of the riser room, and the draining of auxiliary drum drips are a continual task of which the owner needs to be aware, especially at the onset of cold weather and during freezing weather. These three topics have enough information to fill their own article which is coming shortly. For now, take your time, be aware of the purpose of the equipment you see, and have good documentation so that you can successfully communicate the accurate results of the testing you just performed. Unlike golf, taking a mulligan on a dry system will cost you, and perhaps your boss, a stroke.
ABOUT THE AUTHOR: Howard Clay is employed by VSC Fire & Security, Inc. in its Inspection Division. He received his B.A. in managerial economics from Hampden-Sydney College. Clay is NICET certified in water-based fire protection systems, fire alarm systems, and fire alarm inspections and testing. He holds state backflow prevention testing licenses in both Virginia and North Carolina and carries the FS-IT-C inspection and testing certification in North Carolina. Clay represents AFSA on the NFPA 25 Committee. He has authored articles for magazines of local organizations and has been asked to speak to local businesses, fire departments, and community associations to help them better understand fire protection. Clay is an instructor for AFSA’s ITM Inspector Development program and is a member of the National Association of Fire Investigators (NAFI) and the International Association of Arson Investigators (IAAI). He can be reached at [email protected].
IMPORTANT NOTICE: The article and its content is not a Formal Interpretation issued pursuant to NFPA Regulations. Any opinion expressed is the personal opinion of the author and presenter and does not necessarily present the official position of the NFPA and its Technical Committee.
Did you enjoy this article? Subscribe for FREE!
Tags dry system valve trip test dry systems ITM

AFSA: Your Education Destination
ITM, Hydraulic Calculations, Design, and Apprenticeship Programs Offered In-Person and Virtually The American Fire Sprinkler …
Leave a Reply Cancel reply
Your email address will not be published. Required fields are marked *
CDL Pre-Trip Inspection Test and How To Memorize It
The pre-trip is one of the things that students fear the most and fail the most. Let’s face it, the pre-trip is intimidating because there is so much stuff to memorize. The key to learning the pre-trip inspection is preparation, memorization, and repetition. Don’t go away, in this article I have exactly what you need to make sure you pass it the first time.
It is going to take time for you to memorize everything and the only way to do this is by repeating it over and over.
Hopefully, the school where you are being trained is giving you enough time to practice it everyday you are there.
I can’t stress that enough, regardless of which method you use below you need to repeat it daily and practice on your own.
Don’t expect that your run through once a day with your instructor is enough, it isn’t.
In this article I’m going to give you 8 tips that will help you memorize the pre-trip so you are able to pass it your first time and move on with your driving career.
1. REPETITION!
The only way to memorize the pre-trip is to repeat it over and over. Start with the engine area and work your way around the truck and finally inside the cab.
There is no way around consistent repetition. The more you do it the more you will memorize it. It’s just that simple.
Now that we have established how important repetition is I want you go through the rest of this list and figure out which method (or methods) works best for you and then repeat it over and over.
2. Record Someone Else
You can use YouTube to find a video of someone doing a pretrip and for the most part they work pretty well (more about YouTube later).
Take it a step further though. Ask someone (like and instructor or friend) to do a pre-trip and video record them.
While they are doing it try to use the zoom function on your camera so that you know what the parts look like and what is being checked.
Students that I come across have said that this method works really well because you have quality video and audio. Just watch your recording over and over and this stuff will be engraved in your brain.
Just make sure you are absolutely sure that the person you record knows what they are doing and are showing you everything. You don’t want to watch a video that skips anything that will be on the test.
3. Smaller Chunks
Break down the pre-trip into smaller chunks so that it is not overwhelming. If you think about memorizing everything at once it will be a daunting task.
My suggestion is you learn your air brakes first, then the inside of the cab, the engine compartment, and then the rest of the truck. You can chose any order that you want to as long as it helps you out.
Memorize each part and then tie it all together. You will find that learning the pre-trip is much easier if you do it this way.
4. Use Your Imagination
Do this while in bed before you fall asleep. Warning: the pre-trip is going to consume a lot of your attention during training, even while you sleep!
When you wake up go through a video you found on YouTube or the one you recorded (see #2) and correct any errors you made.
5. Find A Truck
It really helps if you have access to a truck. Pictures alone are not enough. Most of you are probably getting your training through a private school, company sponsored training , or community college.
All of these will give you access to an actual truck and should be taking time each day to practice the pre-trip.
Take advantage of this time with the truck to practice your pre-trip as much as possible. When class ends try to stick around to get in some extra practice, this could be the difference between passing and failing.
6. Watch A Pre-Trip Video On YouTube (not straight through)
There are a lot of videos on YouTube that you can choose from. Let me save you some time, these two (below) is the best because it has good audio and video quality, is accurate, and is easy to follow.
Don’t watch the video straight through over and over. Like I mentioned earlier you should chunk it into smaller sections.
Watch a section, pause it, and list off the names of the parts and things to look for. Play it again to see if you are getting them correct. When you finish one section go on to another section until you finish it.
Don’t move on to a new section until you have memorized the section you started. When you complete all the sections you should be able to watch the whole pre-trip and repeat everything on it from start to finish.
If you want to challenge yourself a little try mixing up the sections so that the sections that was last is now first. This will let you know if you are really memorizing everything.
7. Use A Checklist
Probably the most popular ways to memorize the pre-trip is to use a checklist. No doubt that wherever you are getting your training at is already giving you a checklist to use.
Use it. A lot.
Not all checklists are done in the same order but they should all cover the same stuff. I like this one here (printable PDF document) by the people at Trucking Truth , it’s easy to follow and is accurate.
Every possible thing that you will need to identify during the pre-trip is on this checklist.
8. Use Pictures/Diagrams
There are a ton of picture resources out there that will help you memorize the test. Just do a search for “cdl pre-trip inspection pictures” and you will find a ton of stuff.
The picture I like most are these (link to PDF) by Driver Solutions. The pictures are easy to see and distinct arrows are used to point to each part. Along with pictures is an explanation of what to look for and what to say for each individual part.
What Is The Pre-Trip Inspection?
The pre-trip inspection is an inspection of the commercial vehicle including the cab, engine compartment, and exterior.
A driver of a commercial vehicle is required, by federal law, to complete one every day before driving the vehicle and at least once in a 24 hour period. Every single time you begin driving your truck you will have to complete a pre-trip.
The purpose of it is to make sure that the vehicle is safe to drive.
This gives you a chance to get whatever is wrong fixed. If you miss something and are inspected it could result in citations by the DOT.
A lot of drivers find it to be a pain in the rear but you really need to do it every single time you drive your truck. Don’t listen to the irresponsible driver at the truck stop that tells you it’s okay to skip it. It’s not okay.
How Long Does An Inspection Take?
A pre-trip usually takes about 15-45 minutes to complete. It really depends on the type of truck you are inspecting and your experience.
After several years of driving it’s inevitable that your pre-trip is going to be quicker because you are better at doing it and you know what to look for.
As a new driver you should take your time and make sure you do it right. Make it a habit to always conduct a thorough inspection so that you run into less problems while on the road.
What To Say During The Pre-Trip Test
Knowing what to say is important during the test. There are some specific language the person testing you is going to be listening for. More than likely you already heard these phrases but here is an easy way to remember what to say:
PMS— Properly Mounted, Secure ABC— Abrasions, Bulges, Cuts CBB— Cracked, Bent, Broken
There are some tricks that you can use to make sure you say the right thing, here they are: 1 . If its mounted (almost everything is) use the words, “Properly Mounted, Secure” (PMS) 2. If its rubber use the words, “Abrasions, Bulges, Cuts” (ABC) 3. If it’s metal or another hard surface use the words, “Cracked, Bent, Broken” (CBB) 4. If it has fluid or air going through it or in it remember to say, “Not Leaking”
This language shouldn’t be new to you, hopefully the school that is training you has already taught you this stuff.
What Should You Cover During The Pre-Trip?
The areas that you should cover include the coupling system, light check, in-cab inspection, engine compartment, trailer, and drivers door fuel area. Make sure that you are prepared for all of these.
Also, keep in mind that CDL schools/classes may cover the pre-trip in different orders. It’s okay though, they all cover the same stuff. The order that you practice is probably going to be different from someones in a different school/class.
There is no correct order as long as you memorize everything.
What Will Be Tested On The Actual State Pre-trip Inspection Test?
You will be required to perform a pre-trip for the light check, the in-cab inspection, and the coupling system. These 3 areas you have to complete.
After completing those 3 areas your examiner will have you perform one of the following: the engine compartment, trailer, drivers door fuel door, or the entire vehicle.
You will not know ahead of time which one the examiner will choose. This is why it is crucial that you know all the areas.
What Else You Can Do To Prepare?
Aside from the ways listed above to help you memorize the pre-trip there are some other things you can do.
One thing you can do is try answering some practice tests like these here from Trucking Truth. There are 5 free practice tests you can take.
I really find that these practice tests reinforce what you need to know for the real test. It’s worth your time try them out just to see how you do.
What If You Fail The Pre-Trip?
If you do fail the pre-trip you are able to retake it. Make sure you know why you failed the test, ask the inspector if he/she can specifically tell you what you did wrong.
This is usually never a problem because the inspectors want you to know what you missed so that you can pass the test the next time.
One more thing, don’t be embarrassed because you didn’t pass it on your first try! This happens to a lot of people! You are not the only person that will fail the pre-trip and you won’t be the last.
Study what it is that you missed/did wrong and pass it on your second attempt.
Extra Tips For Passing The Pre-Trip Test
Probably the most common reason people fail the pre-trip is because they are nervous.
The two things that will help you out the most is to always remember that the pre-trip is a verbal contact test.
As you start walking towards the vehicle you should already be looking for any leaks under it, broken marker lights, loose mirror brakes and anything else that seems out of place.
BE VERBAL! Your number one priority is to make sure the examiner knows that you know what you are talking about. The more you talk the greater your chances are to pass the test.
Even if it might seem you are going overboard just keep going. Examiners tend to like when testers are verbal.
http://www.truthabouttrucking.com/fls/Pre_Trip_Inspection.pd
CONTACT! The second most important thing you can do is make contact with the item you are describing. For example, as you are explaining the radiator brace you need to make sure you point to or put your hand on the brace as well.
Your examiner wants to make sure that you actually know what the item is that you are explaining.
Make sure you are pointing the the correct item though! Don’t describe the radiator brace while pointing to the turbo!
Again, make sure you are VERBAL and CONTACT every single item (correctly) that you are describing.
Now go pass that test! Good luck driver!
Privacy Policy
COPYRIGHT © 2019 CDL TRAINING SPOT
Our Websites
Our regional sites, ensuring reliable switchgear performance with circuit breaker testing, circuit breaker testing.
Circuit Breaker Testing (also known as ‘Trip Profiling’) is essential for ensuring the safety and reliability of the circuit breaker, a key link in the power asset chain. This testing is crucial for maintaining electrical safety and preventing electrical shock.
- Quick and easy to perform on-site
- Circuits can be tested on or offload
- Tests performance of whole tripping cycle
- Tests overall timing of the tripping system
- Identifies need for maintenance
Circuit breakers perform a vital role in protecting expensive equipment from damage through faults. They are designed to protect electrical circuits from damage caused by short circuits and fault conditions. Testing the performance of your circuit breakers regularly is, therefore, an essential and cost-effective part of any maintenance strategy, ensuring both circuit protection and electrical safety.

EA Technology’s circuit breaker testing service consists of two tests to assess the condition and performance of the tripping system:
Circuit Breaker Trip Test
By analysing the current consumed by the trip coil during the circuit breaker’s operation, it is possible to determine whether there are mechanical or electrical issues present. In many cases, such issues can be localised to aid in finding the root cause. Monitoring the tripping supply’s voltage during the operation can detect issues arising with tripping batteries.
Secondary Injection of Overcurrent and Earth Fault Relays
Proper coordination of the protection schemes on a network is essential to minimise the disruption caused by a fault. Secondary injection testing ensures that protection relays operate as intended, safeguarding the electrical circuit.
In addition to these primary tests, dynamic contact resistance tests and primary injection tests can provide further insights into the condition and reliability of circuit breakers. These tests are particularly important in industrial applications where the reliability of the electric power system is paramount. EA Technology also offers testing services for miniature circuit breakers and single pole breakers, ensuring comprehensive coverage of all types of protection devices.
Test your circuit breakers with us today to ensure your protection devices are functioning correctly and maintaining electrical safety. Get in touch!

Head of Technical Services
Brad is the Head of Services at EA Technology Australia.
With over 20 years in the energy sector, 5 of which at EA Technology, Brad has a versatile, technical skillset established through his experience with electrical distribution companies, industrial and renewables across a range of trades and field teams.
Through his early career at a DNO, Brad has a core knowledge and capability in technical, operational and test procedures within the electrical industry. He works predominantly with high voltage (HV) assets and plays a key role in condition monitoring, diagnosing and managing partial discharge defects, conducting PD surveys, training, technical support and data interpretation.

Enquire Now
Thank you for your interest in EA Technology. You can request information or a free callback. One of our experts will be in touch with you shortly.
By submitting this form, you agree to the Cookies and Privacy Policy .
Related Services

Partial Discharge Surveys
Have one of our electrical engineers perform a partial discharge (PD) survey to determine the condition of your electrical assets....

Hipot Testing
Need Offline High Voltage testing for withstand or partial discharge? EA Technology has the electrical experts you need to make su...

Infrared Thermographic Surveys
Have one of our electrical engineers perform an infrared thermographic survey to determine problem areas in your electrical system...
Safer, stronger, smarter networks
Need HELP ?
Tehnical support, send us an email, get your local contact, how to perform the minimum trip voltage (mtv) test, introduction.
To ensure that circuit breaker operation is within specification under the most rigorous conditions placed on its tripping ability, circuit breaker trip coils are specified to work with a minimum tripping voltage much below the nominal battery voltage. According to the standard IEC 60694 closing coils shall operate correctly between 85% and 110% of the rated supply voltage (AC or DC). Also, opening coils shall operate between 70% DC (85% AC) and 110% (AC or DC) of the rated supply voltage.
The minimum trip voltage test is described in a number of international and national standards such as IEC 56, ANSI C37.09, etc. Traditionally, this test was performed by tapping into the main tripping battery. However, this method should not be utilized as it presents a considerable risk to testing personnel, battery, and the breaker being tested.
Performing the Test
A better way to carry out the MTV test is by using SAT or POB devices. These devices are developed to supply voltage to breaker coils and spring-charging motor during commissioning testing and field service. SAT and POB generate filtered DC or AC voltage (50 Hz or 60 Hz; true RMS). It eliminates the need for station batteries or converters during a test. The output voltage is selectable from 10 V to 300 V DC or 10 V to 250 V AC (50/60 Hz; true RMS).
Minimum trip voltage test of the circuit breaker’s coils can be performed in two ways:
- MANUAL: A pre-selected DC voltage in the DC MAN (SAT) or Volt DC (POB) menu is brought to the selected coil by pressing START (on the SAT) or TRIG (on the POB) button. The voltage level is increased manually until the coil is actuated.
- AUTOMATIC: Select minimum voltage U start , maximum voltage U stop and step voltage ΔU on the instrument in the DC AUT (SAT) or MTV DC (POB) menu (i.e. as shown in Figure 1). Press the START (TRIG) button. A pre-selected minimum DC voltage is applied across the desired coil, lasting 100 ms. If the coil is not actuated, after 900 ms of waiting time, the voltage is automatically increased for a pre-selected step (value 1 V to 19 V). The instrument repeats these steps until the coil is activated or maximum voltage U stop reached (Figure 2).

NOTE: Please make sure SAT (POB) is connected to the control circuit to include auxiliary contacts “a” and “b” within connection, exactly as shown in Figure 3. If SAT cables are directly connected to the coil terminals a result will not be obtained. SAT (POB) registers the minimum trip voltage at the moment when auxiliary contact opens and the coil current drops to zero. The auxiliary contact in the tested coil circuit has to be in a closed position. Therefore, the MTV test is performed on the opening coil when the circuit breaker is in a closed position, while for performing the MTV test on the closing coil the circuit breaker has to be in an open position. Also, performing the MTV test on the closing coil requires an operating mechanism to be charged.

Test Results
The test can have three possible outcomes:
- The coil is actuated and the minimum trip voltage and maximum coil current are registered;
- The maximum pre-selected test voltage is reached without coil actuation, which is indicated by “No activation” message on the display, and announced by a sound and light alarms. The reason can be the disconnected coil circuit (e.g. auxiliary contact is open), insufficient high maximum pre-selected test voltage or a damaged coil;
- The coil is actuated with no registration of the minimum trip voltage and maximum coil current. After the circuit breaker operation is executed, SAT (POB) will continue to “pump” the coil. This outcome indicates SAT (POB) is not connected in a proper way as shown in Figure 3, but directly to coils. If voltage supply is not stopped manually by the user (by pressing the STOP button), the message “No activation” will appear after reaching the maximum pre-selected test voltage. In this case, to prevent possible coil damage, it is needed to stop voltage supply from SAT (POB) after coil actuation.
To download .pdf format of this article, please log in and visit the following link.
May 27, 2020
More Readings
Discover the fastest sweep frequency response analyzer, the impact of controlled deep discharge start voltage, end voltage and current on voltage recovery and cell temperature for lithium ion battery recycling, circuit breaker test system designed for fully automatic routine, free webinar “testing current transformers using ieee standards”.
- PRO Courses Guides New Tech Help Pro Expert Videos About wikiHow Pro Upgrade Sign In
- EDIT Edit this Article
- EXPLORE Tech Help Pro About Us Random Article Quizzes Request a New Article Community Dashboard This Or That Game Happiness Hub Popular Categories Arts and Entertainment Artwork Books Movies Computers and Electronics Computers Phone Skills Technology Hacks Health Men's Health Mental Health Women's Health Relationships Dating Love Relationship Issues Hobbies and Crafts Crafts Drawing Games Education & Communication Communication Skills Personal Development Studying Personal Care and Style Fashion Hair Care Personal Hygiene Youth Personal Care School Stuff Dating All Categories Arts and Entertainment Finance and Business Home and Garden Relationship Quizzes Cars & Other Vehicles Food and Entertaining Personal Care and Style Sports and Fitness Computers and Electronics Health Pets and Animals Travel Education & Communication Hobbies and Crafts Philosophy and Religion Work World Family Life Holidays and Traditions Relationships Youth
- Browse Articles
- Learn Something New
- Quizzes Hot
- Happiness Hub
- This Or That Game
- Train Your Brain
- Explore More
- Support wikiHow
- About wikiHow
- Log in / Sign up
- Home and Garden
- Home Maintenance
- Electrical Maintenance
- Electrical and Electronic Circuits
Does Your Circuit Breaker Keep Tripping? Here’s How to Find the Cause
Last Updated: May 6, 2023 Fact Checked
Common Causes of Tripped Circuits
Finding overloaded circuits, finding short circuits, finding ground faults.
This article was co-authored by Jesse Kuhlman and by wikiHow staff writer, Johnathan Fuentes . Jesse Kuhlman is a Master Electrician and the Owner of Kuhlman Electric based in Massachusetts. Jesse specializes in all aspects of home and residential wiring, troubleshooting, generator installation, and WiFi thermostats. Jesse is also the author of four eBooks on home wiring including "Residential Electrical Troubleshooting" which covers basic electrical troubleshooting in residential homes. There are 8 references cited in this article, which can be found at the bottom of the page. This article has been fact-checked, ensuring the accuracy of any cited facts and confirming the authority of its sources. This article has been viewed 24,470 times.
Picture this: you’re watching TV or browsing on your phone when, suddenly, half the lights in your home turn off. You check your circuit breaker and flip one of the switches back to “ON,” but an hour later it trips again…and again. Sound familiar? Having your circuit breaker trip over and over can be frustrating, but don’t sweat. In this article, we’ll explain the most common causes of a tripped circuit breaker. Keep reading to learn which causes might apply to your situation, when to try do-it-yourself fixes, and when it’s best to call an electrician.
Things You Should Know
- The most common causes of tripped circuit breakers are overloaded circuits, short circuits, and ground faults.
- Test for overloaded circuits by resetting your breaker and plugging in devices until it trips again. The device that caused the trip is overloading the circuit.
- Test for short circuits by resetting your breaker and plugging in items into different sockets. The device or socket that always trips the breaker likely has a short circuit.
- Have an electrician test for ground faults if you’ve already ruled out overloaded and short circuits. Ground faults are too dangerous to test for on your own.

- For example, if your bathroom and kitchen are part of the same circuit—that is, the plugs in your kitchen and bathroom are all connected to the same switch on your circuit breaker—then the breaker might trip if you run your microwave and hair dryer at the same time.

- Short circuits often happen when wires come loose or get damaged by corrosion or wear and tear, or even from an animal chewing through them. [3] X Research source
- Short circuits can occur in the wiring in your home or in individual devices. For instance, a refrigerator can have a short circuit due to a loose wire.

- Ground faults often happen due to water leaking into outlets or devices. They also occur when loose or corroded wires come into contact with ground wires, or when defective devices cause electricity to flow to a ground wire.

- If you have multiple devices sharing a single outlet in the area affected by the tripped breaker, it’s likely that that group of devices is causing the overload. [6] X Research source

- Wear safety goggles or stand to the side of a breaker when flipping a switch to “ON” in case of sparks.
- If the switches aren’t labeled, narrow down the affected area by flipping the switch to “ON” and checking which devices and lights turn on again.
- If multiple switches tripped at the same time, there might be an overloaded circuit in more than one area of your home, or you may have another issue such as a short circuit or ground fault.

- If none of the devices immediately trip the circuit breaker, it’s possible that your circuit isn’t getting overloaded right away. Leave the devices plugged in and turned on for a few minutes to see if the breaker trips again.
- If the breaker trips after several minutes, try the process again, but leave 1-2 less important devices unplugged. Eventually, you’ll find a combination of devices that doesn’t trip the circuit breaker.

- Leave your devices plugged in and on for a few hours. If the circuits are not overloaded, the circuit breaker shouldn’t trip.
- If the circuit breaker trips for the same part of your home again, plug additional devices into other outlets. You may need to try different combinations of plugs and outlets to see which combination doesn’t overload your circuits.
- If you try several combinations and the breaker continues to trip, it’s possible that you have a short circuit or ground fault somewhere in your home.

- If devices are plugged into surge protectors, unplug each device from the surge protector before unplugging the surge protector itself.

- If the circuit breaker trips whenever you plug something into a particular outlet, you probably have a short circuit in that outlet.
- If one particular device always trips the breaker, but other devices don’t, you probably have a short circuit in that particular device.

- If the device you want to test is too large to move—such as a kitchen refrigerator or washing machine—use a long extension cord to reach other outlets.

- If you find a short circuit in an individual device, check if your product is covered by a warranty. If it is covered, you might be able to get it fixed or replaced for free. [14] X Trustworthy Source Federal Trade Commission Website with up-to-date information for consumers from the Federal Trade Commisson Go to source

- Tell your electrician which outlet or area of your home is affected by the tripped circuit breaker. This will help them narrow down the exact problem.
- Avoid using sockets that appear water-logged or that show signs of water damage.
Expert Q&A
You Might Also Like

- ↑ https://nps.edu/documents/111291366/111353794/SafetyGram_Circuit_Breaker_Panels.pdf/eab72177-f7b7-4f6f-b7bc-f7efde96df4f?t=1423776819000
- ↑ https://engineering.mit.edu/engage/ask-an-engineer/what-is-a-short-circuit/
- ↑ https://www.coynecollege.edu/how-to-deal-unsafe-electrical-wiring/
- ↑ https://www.osha.gov/sites/default/files/2018-12/fy07_sh-16586-07_4_electrical_safety_participant_guide.pdf
- ↑ https://ask-the-electrician.com/how-to-fix-a-overloaded-circuit-breaker-problem/electrical-wiring-2/
- ↑ http://thecircuitdetective.com/treeshort.php
- ↑ https://consumer.ftc.gov/articles/warranties
- ↑ https://tools.niehs.nih.gov/wetp/public/Course_download2.cfm?tranid=2495
About This Article

- Send fan mail to authors
Did this article help you?

Featured Articles

Trending Articles

Watch Articles

- Terms of Use
- Privacy Policy
- Do Not Sell or Share My Info
- Not Selling Info
wikiHow Tech Help Pro:
Level up your tech skills and stay ahead of the curve
First trip testing method for circuit breakers

“First trip” test is important to determine a condition of the coil operating mechanism and give us information how would the circuit breaker perform in a real-life fault situation. Therefore capturing the first trip operation is essential to effective circuit breaker condition monitoring. A circuit breaker spends most of its lifetime conducting a current without any operation. Once the protective relay detects a problem, the circuit breaker, that was idle for maybe a year or longer, has to operate as fast as possible. However, if the circuit breaker has not been operated for a long time, the latch friction may increase. Information about the latch friction can be obtained from the coil current waveform recorded during the first trip operation.
The biggest benefit of using first trip testing is to test “real world” operating conditions. If the circuit breaker has not operated for year, first trip testing will show if the circuit breaker is slower due to problems like corrosion in the mechanism linkages. With traditional methods, the testing is carried out after the circuit breaker has been taken out of service and has been operated once or even twice.
When a fault occurs, it is expected to CB operate correctly. Unfortunately, environmental contaminants, hardened grease, vibration and other factors can adversely affect the operating time of the circuit breaker. Frequently, this problem is cleared after the first operation of the breaker, and thus the original cause can’t be detected in subsequent testing. Modern CB analyzers offer an online testing mode that can record the first on-line trip time without insulation from grid.
Online first trip testing provides 3 key benefits:
- Saves time and resources
- Determines whether a CB needs offline diagnostic testing
- Captures CB slow operation on first trip test
The first on line testing measurements have this sections:
- Trip and Close Coil Current
- Main Contact Timing
- Battery Voltage graph
- Auxiliary Contact Inputs
In fig shown typical Connection Diagram for an Online Test from Vanguard Instruments Company with 3 non-contact AC current probes, connected to the CB bushing CT secondary winding, are used CB to detect the main contact current. Since the timer can detect when the Trip or Close operation is initiated, the contact time can be determined based on the presence or absence of the bushing current.

Capacitive current switching test for high voltage AIS disconnector switch according to IEC
Energisation of back to back(b to b) cables by circuit breaker according to iec, leave a reply cancel reply.
Your email address will not be published. Required fields are marked *
Save my name, email, and website in this browser for the next time I comment.
Don't have an account?
QRFS - Thoughts on Fire Blog

- Common Problems
- Cover Plate Finder
- Viking Cover Plates
- Tyco Cover Plates
- Reliable Cover Plates
- Victaulic Cover Plates
- Senju Cover Plates
- Escutcheon Finder
- Adjustable (401)
- Split Ring (Retrofit)
- Institutional
- Viking Escutcheons
- Tyco Escutcheons
- Reliable Escutcheons
- Victaulic Escutcheons
- Senju Escutcheons
- Vaulted Ceiling
- Extension Tubes
- Sprinkler Finder
- Concealed Pendents
- Horizontal Sidewalls
- Concealed Sidewalls
- Residential
- Standard Response (SR)
- Quick Response (QR)
- ESFR, EC, & Other
- Viking Fire Sprinklers
- Tyco Fire Sprinklers
- Victaulic Fire Sprinklers
- Reliable Fire Sprinklers
- Senju Fire Sprinklers
- Cabinet/Plastic
- Hybrid and Other
- Sprinkler Extensions
- Installation Tools
- Spare Head Cabinets
- Paint Covers
- Standard Head Guards
- Heavy Duty Head Guards
- Water Shields and Baffles
- Sprinkler Gauges
- Flexible Drops
- Drywall Access Doors
- Pre-Assembled Risers
- Cleaning Tools
- Breakable Locks
- Adapters and Reducers
- Mechanical Tees
- Coupling Grease
- Square Head Plugs
- Rod Buttons
- Pilot Clamps
- Hole Saw Blades
- Sealants and Greases
- Boltbreakers
- Paint Markers
- Riser Clamps
- CPVC Hangers
- Fasteners and Drivers
- Beam Clamps
- Swivel Rings
- Aluminum Signs
- Decals and Stickers
- Fire Extinguisher Signs
- Hydrostatic Test Pumps
- Smoke Detector Test Kits
- Smoke Aerosols and Cartridges
- Smoke Dispensers
- Sensitivity Testers
- Scorpion (Mounted)
- CO Detector Test Kits
- CO Aerosols and Cartridges
- CO Dispensers
- Battery Testing
- Duct Detector Testing
- Sound & Voice Testing
- Heat Detector Test Kits
- Heat Detector Testers
- Universal Detector Test Kits
- Detector Testing Equipment & Accessories
- Removal and Cleaning
- Batteries and Chargers
- Access Poles
- Flow Test Kits
- Pitot Gauge Kits
- Flow Testing Parts
- Alarm Bell Accessories
- Flow Switches
- Pressure Switches
- Supervisory Switches
- Breakable Caps
- Plug and Chains
- Snoots and Swivels
- Round ID Plates
- Square ID Plates
- Auto Spkr ID Plates
- Standpipe ID Plates
- Combination ID Plates
- Grooved Butterfly Valves
- Threaded Butterfly Valves
- Wafer Butterfly Valves
- OS&Y Valves
- Powerball Valves
- Gate Valves
- Shotgun Riser Check Valves
- Brass Check Valves
- In-Line Check Valves
- Swing Check Valves
- Angle Valves
- Pressure Relief Valves
- Bleeder Valves
- Three Way Valves
- Ball Valves
- Globe Valves
- Ball Drip Valves
- Auxiliary Drain Valves
- Test and Drain Valves
- Hose Valves
- Post Indicator Valve Wrench
- Valve Wheel Wrenches
- Valve Trim Kits
- Plastic Cap and Chain
- Brass Cap and Chain
- Hose Nozzles
- Double Jacket Hose
- Rack and Reel Hose
- Single Jacket Hose
- Hose Adapters and Reducers
- Vehicle Brackets
- Wall Brackets

#216 – Guide to Dry Sprinkler Systems, Part 9: Quarterly and Semiannual Testing
Regularly testing dry sprinklers uncovers issues that cause systems to fail.
Dry sprinkler systems are specially designed to protect people and property from fires when temperatures drop below freezing. But regular testing is required to deliver true peace of mind that these complex systems won’t fail when they’re needed most. In this installment of our series on dry sprinkler systems, we examine the National Fire Protection Association (NFPA) standards for quarterly and semiannually testing dry sprinklers.
Stay tuned for future blogs covering requirements for tests that must be performed at least once a year, as well as guidelines for maintaining dry systems.
Are you looking to buy components for your building’s sprinkler system? QRFS offers a range of dry sprinkler heads available on special order. Simply give us a call at 888.361.6662 or email [email protected] .
You can also view our in-stock selection of sprinkler gauges , valves , supervisory switches , and other accessories .
Dry sprinklers require extra care to remain in working order
Even the simplest commercial sprinkler system requires a series of tests to keep it in tip-top shape. And with additional, complex parts, a greater potential for corrosion, and regular exposure to freezing temperatures, dry sprinklers need extra TLC to make sure they remain in working order.
Dry sprinkler systems offer reliable automatic fire protection in bitterly cold temperatures by relying on pressurized air or nitrogen to hold back the water supply at a dry pipe valve situated in a heated space. When heat from a fire activates one or more sprinkler heads, the pressure is reduced as the compressed air escapes, opening the valve and enabling the water supply to rush through the pipes and onto the fire. This animation shows how a Viking dry sprinkler system activates:
The 2017 edition of NFPA 25 : Standard for the Inspection, Testing, and Maintenance of Water-Based Fire Protection Systems establishes a schedule for testing dry sprinkler systems. These tests require qualified personnel to perform physical checks on all parts of your sprinkler system, generating carefully prepared records for the property owner to store.
Before we begin, this is worth stating again: It’s important to keep in mind that the tests mandated by NFPA 25 and addressed in this blog are routine, and unusual conditions should prompt additional testing. When that occurs, the type of test conducted and the number and location of samples taken should be appropriate to the problem being investigated. Consultations with the manufacturer, listing agency, and authority having jurisdiction (AHJ) can help determine the right course of action.
Quarterly tests of dry sprinkler systems
Priming water level tests.
In some dry pipe valve models, a small amount of priming water is used to create a better seal. The priming water level should be tested quarterly to make sure it’s appropriate. The importance of maintaining the proper level can’t be overstated; allowing too much water to build inside the valve can create a water column that stops the dry sprinkler system from operating.
From the 2017 edition of NFPA 25 13.4.5.2.1* The priming water level shall be tested quarterly.
To test priming water levels, open the small priming water level test valve:
- If water flows in a steady stream, it should be drained until air starts to discharge.
- If there is a mix or sputtering of air and water, close the valve because the water level is good.
- If only air escapes, the water level is probably too low, and the valve should be closed immediately. The priming cup can be used to add water according to the manufacturer’s instructions.
Low air pressure alarm tests
Low air pressure alarms prevent accidental trips of dry sprinkler systems by sending an alert before air pressure drops low enough to open the dry pipe valve and flood the system with water. If provided, they are tested as instructed by the manufacturer.
13.4.4.2.13 Low air pressure supervisory devices, if provided on the detection system, shall be tested quarterly in accordance with the manufacturer’s instructions.
Quick-opening device tests
The design of dry sprinkler systems causes a small delay between the time a sprinkler head activates and when water flows onto the fire. Quick-opening devices speed water delivery in dry sprinkler systems to meet NFPA time limits by accelerating the tripping of dry pipe valves. But when they aren’t adequately maintained, false trips can occur—causing too many building owners to solve the problem by turning them off.
This is a dangerous choice because it can cause the system’s water delivery time to extend beyond what’s deemed acceptable by NFPA 13: Standard for the Installation of Sprinkler Systems, enabling fire to grow until it’s beyond the sprinkler system’s ability to control. If the gauge pressure on top of the quick-opening device is zero—or is significantly lower than the air pressure in the system—the quick-opening device may be disabled.

When quick-opening devices are present, they should be tested quarterly. They can almost always be isolated and tested without tripping the dry pipe valve.
13.4.5.2.4* Quick-opening devices, if provided, shall be tested quarterly. A.13.4.5.2.4 Except when a full flow trip test is conducted in accordance with A.13.4.5.2.2.2, a quick-opening device should be tested in the following manner: (1) Close the system control valve (2) Open the main drain valve, and keep it in the open position (3) Verify that the quick-opening device control valve is open (4) Open the inspector’s test valve. (Note that a burst of air from the device indicates that it has tripped) (5) Close the device’s control valve (6) Return the device to service in accordance with the manufacturer’s instructions and return the system to service. See the NFPA 25 handbook, Water-Based Fire Protection Systems Handbook, for additional guidance relative to potential procedures for the conduct of such testing.
Waterflow device tests
Depending upon what type of alarm equipment is attached to your dry sprinkler system, a mechanical device sounds an alarm or an electrical waterflow switch is tripped when water flows through the dry pipe valve into the sprinkler pipes. NFPA 25 requires quarterly testing of mechanical waterflow devices like water motor gongs, but that timeline stretches to every six months for pressure switch-type waterflow devices.
It’s important to note that the NFPA bans vane-type waterflow devices in dry pipe valves because the force of the water when the valve trips could rip off a vane and force it into the piping.

Waterflow tests are designed to ensure waterflow detecting devices and alarms are operational and signals are sent to and received by the central station, if connected. For that reason, you must always notify the fire department and/or central station before you start a test.
Testing waterflow alarms on dry sprinklers is different than doing it for wet sprinklers because opening the inspector’s test connection will cause the dry pipe valve to trip. Instead, the alarm test line valve is opened to initiate waterflow alarm testing on a dry pipe valve.
The waterflow test line is normally linked to the same line, which drains from the valve’s intermediate chamber to the velocity drip drain. A check valve stops the test water from entering the intermediate chamber, which can trip the dry pipe valve if the velocity drip drain is also clogged. Corrosion tends to accumulate inside the velocity drip drain, preventing it from properly draining.
Before starting a waterflow test, it’s a good idea to exercise the velocity drip valve by pushing the plunger several times to make sure it operates smoothly, nothing is obstructing its path, and the ball isn’t wedged in front of the drain hole.
When testers are ready to begin, they slowly open the alarm test valve while continuously depressing the plunger on the velocity drip. If no water flows from the velocity drip, they continue opening the valve and performing the waterflow test for about 60 seconds or until the alarm sounds. Once the alarm activates, the valve is closed and a call is placed to any central station to confirm the signal was received. Testers should be sure to let them and the fire department know that the test is complete.
If water discharges from the velocity drip when the alarm test valve is opened, close the alarm test valve immediately. This most likely means that the check valve is not doing its job and it’s stopping water from entering the intermediate chamber.
5.3.2 Waterflow Alarm Devices. 5.3.2.1 Mechanical waterflow alarm devices including, but not limited to, water motor gongs, shall be tested quarterly. 5.3.2.2* Vane-type and pressure switch–type waterflow alarm devices shall be tested semiannually. 5.3.2.3.1 Where freezing weather conditions or other circumstances prohibit use of the inspector’s test connection, the bypass connection shall be permitted to be used. 5.3.2.5 Fire pumps shall not be taken out of service during testing unless constantly attended by qualified personnel or all impairment procedures contained in Chapter 15 are followed. 13.2.6.6* Testing waterflow alarm devices on dry pipe, preaction, or deluge systems shall be accomplished by using the bypass connection.
Semiannual tests of dry sprinkler systems
Pressure switch-type waterflow device tests.
See the waterflow devices section above; pressure-type switches have testing timelines that expand to twice per year.

Valve supervisory switch tests
Control valves, often generically referred to as butterfly valves (a specific type of valve), control the flow of water in an automatic sprinkler system—and it’s vital that they remain open to allow water to get to sprinkler heads during a fire. Closed control valves are a main reason that sprinkler systems fail. To combat this, NFPA 25 requires valve supervisory switches that indicate unauthorized operation of a control valve to be tested every six months.
Testing should ensure that the supervisory switches send an electronic signal through an alarm system that reports movement from the valve’s normal position, and that the signal is received by the appropriate monitoring station.
From the 2017 edition of NFPA 25 13.3.3.5* Valve Supervisory Switches. 13.3.3.5.1 Valve supervisory switches shall be tested semiannually. 13.3.3.5.2 A distinctive signal shall indicate movement from the valve’s normal position during either the first two revolutions of a hand wheel or when the stem of the valve has moved one-fifth of the distance from its normal position. 13.3.3.5.3 The signal shall not be restored at any valve position except the normal position.
Qualified personnel need to performing dry sprinkler tests
Proper testing of a dry sprinkler system is key to protecting the building and its occupants from fires. When building owners or their representatives choose a company or hire an individual to test the sprinklers, it’s wise to ask for evidence of the qualifications necessary to perform the complex tests required by NFPA 25.
Stay tuned for future blogs covering the requirements for testing that must be performed at least once a year, as well as guidelines for maintaining dry sprinklers.
We also carry sprinkler gauges , valves , supervisory switches , and other accessories and equipment that are online and in-stock .
Check out previous installments in this dry sprinkler system series:
A Guide to Dry Sprinkler Systems, Part 1: System Overview
A Guide to Dry Sprinkler Systems, Part 2: Components and Installation Requirements
A Guide to Dry Sprinkler Systems, Part 3: Installation of Dry Pipe Valves, Check Valves, and Quick-Opening and Antiflooding Devices
A Guide to Dry Sprinkler Systems, Part 4: Installation of Air Compressors and Air Maintenance Devices
A Guide to Dry Sprinkler Systems, Part 5: Daily, Weekly and Monthly Inspections
A Guide to Dry Sprinkler Systems, Part 6: Quarterly, Annual, and Longer Inspections
A Guide to Dry Sprinkler Systems, Part 7: Fighting Corrosion
A Guide to Dry Sprinkler Systems, Part 8: Daily, Weekly, and Monthly Testing
Leave a Comment Cancel reply
Select your region & language
Southeast Asia, Oceania
Trip testing of high-voltage circuit breakers in power transformer installations.
Home Knowledge Center Applications Trip Testing of High-voltage Circuit Breakers in Power Transformer Installations
Introduction Circuit breakers play an extremely important role in modern society. They protect everything from homes to hospitals from dangerous electric phenomena like lightning and harmful high-frequency noise. These breakers go through stringent tests right after being manufactured as well as during scheduled maintenance. However, each circuit breaker varies based on use, and each person overseeing these tests require slightly different things. These variations require test technicians to be flexible in order to test and produce satisfactory test reports.
This article will first give an overview of circuit-breaker trip-tests (for those who need it) and will then present arguments as to why Hioki’s Memory HiCorder MR8847A is a great—if not the best—tool for the job because of flexibility in data processing and probing.

1. Overview of trip tests
So, what is the trip test? For readers less familiar with the “trip test,” this section will explain it. The “trip test” is in essence making sure that the spring mechanism of the breaker switch performs fast enough after receiving the signal to cut off or let in power from the grid. The pass/fail judgement is based on the recorded timing of the control signal that triggers the breaker switch and the recorded timing of the mechanical open/close operation. A minute time-delay inevitably occurs due to the mechanical nature of the spring mechanism. This time-delay is compared against a minimum tripping time for a pass/fail judgement. In the case of 3-phase power systems, there is an additional comparison done between the timing of each spring-loaded switch. The timing variation of the three switches are compared against a minimum variation time. Through regular maintenance in these ways, technicians can ensure that circuit breakers switch properly.
Types of measurement required in trip testing
The following are steps of the trip test. 1. The circuit-breaker’s connection to the primary side (power mains) and secondary side (power line that goes to the facility and/or devices) are disconnected for safety. Also, the breaker should be grounded. 2. The test instrument is set up and test measurement started At this stage, all of the necessary probes need to be connected. After confirming that all connections have been made, the start button of the instrument can be pushed. 3. The test trip-button on the breaker is pushed The breaker has a separate power source that sends out a control signal for tripping the breaker. By pushing a button on the breaker, the breaker is tripped. Since the measuring instrument was turned on in step 2, its sensors will acquire both the control signal and the logic signal showing that the physical switching operation occurred. 4. Disconnect the test instrument 5. Reconnect the breaker to the primary and secondary side The test is over so you can now reconnect and return power to the facility. 6. Evaluate and process the data for the test report

So, what is the trip test? For readers less familiar with the “trip test,” this section will explain it. The “trip test” is in essence making sure that the spring mechanism of the breaker switch performs fast enough after receiving the signal to cut off or let in power from the grid. The pass/fail judgement is based on the recorded timing of the control signal that triggers the breaker switch and the recorded timing of the mechanical open/close operation. A minute time-delay inevitably occurs due to the mechanical nature of the spring mechanism. This time-delay is compared against a minimum tripping time for a pass/fail judgement. In the case of 3-phase power systems, there is an additional comparison done between the timing of each spring-loaded switch. The timing variation of the three switches are compared against a minimum variation time. Through regular maintenance in these ways, technicians can ensure that circuit breakers switch properly.
Flexibility in data processing The Memory HiCorder (short for Hioki-recorder) MR8847A’s flexibility in data processing makes it especially useful for trip-testing. Usually, field instruments are designed for just a few purposes and lack much flexibility in their ability to process data. However, in the case of the MR8847A, even though it is made for field work, it also contains the high specs usually associated with advanced R&D use. This makes it flexible to respond to a wide array of report demands.
As a field measuring instrument, this HiCorder is field-ready with features like general durability and rubber padded handle and edges. Its larger buttons are perfect for operators wearing protective gloves (unlike touch-screens common in R&D instruments). The large screen is popular among technicians who want to check details in the field.
In terms of data processing, the MR8847A provides great flexibility to meet the various demands for trip-test reporting. As the reader is most likely aware, the test criteria used in trip tests depend on the circuit breaker. Some breakers fall under IEC standards, while others do not. This means that the test instrument must be flexible in its ability to adapt to various test criteria of that specific trip-test. In addition, each person to whom the technician reports (e.g., facility manager) may demand their own specific report format, requiring flexibility in data processing abilities.

The MR8847A excels in data processing for report creation This HiCorder makes the standard trip testing easy with its Time Difference Calculation function, but it also has many functions and features that enable flexibility in data analysis and data reporting. Having similar functions to its sister model the MR6000 (Hioki’s flagship R&D HiCorder), the MR8847A has many preinstalled numerical calculation and waveform calculation functions as well as various analysis and display modes. If the facility manager asks for analysis from different perspectives or presentation of the data in different ways, the technician can rely on the HiCorder for support. The calculated/analyzed data can then be uploaded as a CSV for easy report creation. As a side note, the MR8847A comes equipped with a printer that enables technicians to print in the field so that they can explain to the manager on pen and paper. In these ways, even though the Memory HiCorder MR8847A is well-suited for field work, its flexible data processing and multimedia features make it perfect for the ever-changing test criteria and reporting demands of trip testing.

2. Hioki instruments recommended for use in circuit breaker trip testing
Flexibility in probing
Another point in which this Memory HiCorder provides much-needed flexibility is in probing and wiring. The trip test involves sensing control signals and the mechanical open/close motion of the breaker switch. However, it is not uncommon to be asked to test breakers only to find that the usual tester’s probes are physically unable to access the measurement point (too large to clamp, too cramped to probe, etc.) or that the current/voltage rating does not match the signal being measured.
Hioki’s wide line-up of sensors and probes can provide the flexibility needed for varying probing demands. Hioki is widely accredited for its high-precision current sensors. But in reality, it provides the market with a wide range of current and voltage probes, from affordable to state-of-the-art. Whether it be small spaces, large wires/busbars, or minute control signal currents, the technician can rest assured in knowing that Hioki’s lineup can provide the probe right for the job.
In addition, Hioki also provides flexible solutions to in-field problems. One such solution is eliminating the need for cluttering power cables of current sensors (for control signal sensing). Current sensors which require a power source, usually have a separate wire for power. Hioki’s sensors use the same cable for power and current sensing, eliminating this source of clutter. Another practical solution is eliminating the need for an external power source for logic signals (for the switch-motion sensing). Typically, an external voltage power source is used to apply a logic voltage, which is then sensed by the test instrument’s voltage probe. Hioki’s logic probes both apply and sense the voltage, thereby eliminating the need for a separate voltage source. The current ensors’ and logic probes’ power sources are just a few examples of probing solutions to in-field problems from which the technician can choose.
In these ways, Hioki’s large lineup of current sensors and probes provides flexibility to adapt to the special demands of the site, making the Memory HiCorder MR8847A an even more attractive unit for trip testing.

Principal equipment used
Waveform recorder MEMORY HiCORDER MR8847A Input unit 3CH CURRENT UNIT U8977 × 1 slot Current Sensor AC/DC CURRENT PROBE CT6830 ×1 Logic sensor LOGIC PROBE 9320-01 × 1
*This Application Note describes an example setup recommended for use in trip-testing circuit breakers. The specific equipment recommended for any given application varies with the purpose of measurement. Current sensors have different rated currents and should be chosen based on the purpose of measurement and the location being measured.

Conclusion The Memory HiCorder MR8847A’s data calculation, analysis, and media capabilities give it the flexibility needed to meet the pass/fail criteria and reporting demands original to each trip test. Furthermore, there are many probes and sensors that can be paired with it, providing flexibility in both plain specs as well as in-field convenience. In these ways, Hioki’s Memory HiCorder MR8847A provides the technician with the versatility and capabilities demanded by the various requirements of trip tests for circuit breakers.
As of late, there have been global trends toward increased electrification of drive-systems for transportation and data-centers used for digitization and artificial intelligence. These and other trends increase the global demand for electricity—and consequently the need for breakers that protect electrical systems. This means that more and more breakers will need to be trip-tested.
We at Hioki are determined to provide society with the tools and solutions required to make changes for a better, safer, and more sustainable society. This application of trip testing using the Memory HiCorder MR8847A is just one example of this determination. We look forward to working with on-site technicians for the realization of such a society.
For comprehensive details on the Memory HiCorder MR8847A, please visit the product page. For inquiries such as quotes, demonstrations, and trial usage, please use Hioki’s contact form for a personalized reply from your closest or most appropriate Hioki representative. We are here to help tailor solutions to your needs.
Current probe and current unit The trip signal that operates a circuit breaker in the event of an abnormal grid condition takes the form of a DC current. Consequently, a current probe capable of detecting current in the DC band is required in order to measure the trip current. Please choose a probe model with a rated current that’s suitable for the magnitude of the current being measured. Recommended probe: AC/DC Current Probe CT6830 (2A) or CT6831 (20 A)
In general, DC current probes require wiring both to supply power to drive the probe and to output data. The 3ch Current Unit U8977 uses dedicated connectors to simplify wiring, allowing it to supply power, output a data signal, and acquire information such as the current probe’s rating.
Logic probe
Although it’s typical to apply a DC voltage from an external source in order to acquire the contact signal, an optional logic probe can be used to acquire the contact signal directly. In addition, logic probe output can be connected directly to the Memory HiCorder MR8847A since the instrument ships standard with 16 channels of logic input. No optional logic unit is needed in order to measure up to 16 logic channels.

3. Related products
PS: other options… (‘cause we just can’t help ourselves) Here are a few other options that you may be interested in if you’re involved in trip testing.
Don’t need the flexibility? If you always test the same breaker or need a less high-end instrument, you may want to try the Memory HiCorders MR8870, MR8875, or MR8880. The flexibility in data analysis and high-end probes may not be as advanced as the MR8875A, but they may be a better fit for a more limited application.
Need to measure contact resistance of the breaker? Hioki’s portable Resistance Meter RM3548 is recommended for use in applications that involve measuring primary-circuit contact resistance as part of the maintenance of circuit breakers at substations.
Requests for demonstration units and questions about applications should be directed to Hioki’s customer service hotline.
Related Products List

Premier Manufacturer
[email protected]
- Fast Delivery
- Diverse Selection
- One-on-One Assistance
Injection Test: What are Primary and Secondary Injection Tests?
Every circuit breaker has a trip unit to protect the device upon detecting overcurrent. Trip units allow accommodation of load circuit and use field interchangeable rating plugs. However, these units may become faulty, and overcurrent protective devices may fail. To maintain the reliability and safety of such systems, you must execute well-planned injection tests in these air circuit breakers .
Get Your Free Sample!
Injection testing for circuit breakers.
Many electricians use injection testing to check the characteristics of protective devices, including protective relays, power transformers, etc. For the circuit breakers, you can make use of the same injection test sets. You will conduct this test regarding tripping time , insulation capacity, resistance , operational behavior, etc.
There are two types of commonly done Injection Test sets.

Primary Injection Testing
Primary current injection testing is a detailed system analysis that takes time. You can test solid-state and electromagnetic trip units through a primary injection test. In addition to trip units, you can test a low-voltage circuit breaker through this method. It can verify that you have connected the sensors and wiring properly.
Though it is a beneficial method, it has one major drawback. You can test only one phase at a time and detect no polarity problems. You have to test all the wirings separately with the Polarity Test .
However, primary injection testing also requires more money and is an expensive maintenance program. The price is because it used large testing equipment, time-consuming single-phase tests, and proper circuit breaker removal. Therefore, the maintenance prices go up when all these steps are incorporated.
In most cases, you must occasionally follow the primary injection test sets with a secondary one.
Secondary Injection Testing
On the other hand, you can only conduct the secondary current injection test on the solid-state trip units. Hence, you cannot perform this test on molded case circuit breakers or older ones. In secondary current injection testing, you inject a three-phase current into the trip unit. This allows you to verify the trip unit polarities at the same time.
However, one major drawback of this testing is that you can inspect only the trip unit logic and the system’s wiring. Unlike primary tests, you cannot check all the current-carrying components simultaneously. This fact gives an edge to the primary injection test sets over the secondary one.
Suppose either test fails and you detect anomalies in the functionality. In that case, you have to change the trip unit as soon as possible and mark it as defective.
Why Do We Primary & Secondary Injection Tests?
Due to the following reasons, you may want to use Injection Test Sets over a specific period.
- For personal protection, It is vital to maintain the trip unit logic. If the device cannot trip within the given time, it may cause arc flashes and electrical fires. As a result, it may damage your assets, and your life will be in danger.
- For device protection: Again, if the device cannot trip within a given time, it will damage the equipment downstream more than you expect.
To avoid these events from happening, you have to conduct the current injection method. That way, your electrical devices will give you a good performance in the long run.

How Do Primary Injection Tests Work?
For a successful test, you must appropriately determine a number of factors.
Input Specifications
The output of a primary injection test depends on the input voltage. The input voltage must be within +_5 % of the test specifications. You must appropriately size the input breaker because there are higher losses since the test is done at higher currents.
Therefore, the relationship between the output and input current for primary injection tests is exponential. When performing a high current test, installing an input breaker capable of handling the input power needed for max test currents that you plan on applying as you test the breakers is essential.
The connection between the input voltage terminals and the input voltage supply on the test must also be short in length and appropriately sized. Excessively long connections could result in voltage drops at the input voltage terminals, affecting the test’s effectiveness.
Test Connections
Since high-current tests have extremely low open circuit voltage (5V – 10V), the max output from a high current is limited by the circuit’s impedance, which mainly depends on the test connections. The connection is normally done using cables for breakers with a lower amperage. The cables should have sufficient ampacity. You can achieve this by connecting some cables in a parallel manner. It’s best to use as short cables as possible. To further minimize the impedance of the circuit, you can twist the cables together.
Higher current tests for draw-out circuit breakers typically use stab sets for connections to ensure the circuit impedance is negligible. You can create various designs of stab sets to use with different circuit breakers.
To deal with high circuit impedance when testing at lower currents, you can utilize a modular design that connects many high current sources in series to get a higher open circuit voltage to push your desired current through your breaker.
During an immediate trip test, an error can occur in the results due to a DC offset in the current pulse.
The unbalanced nature of the first few current cycles occurs due to a high X/R ratio in inductive circuits. You can minimize the DC offset by automatically or manually adjusting the point on the voltage wave where the output is energized (firing angle). The DC offset is measured by the difference between the RMS and peak/√2.
For a perfectly sinusoidal wave, the two values should be equal.
Ground Fault Protection On Trip Unit
When testing circuit breakers with trip units featuring ground fault protection, it’s important to turn off the ground fault protection to be able to run other tests. The current involved in other tests is often higher than the ground fault pick-up. While some trip units offer the option of turning off the ground fault protection, not all do.
However, you can still test by injecting current through 2 poles connected in a series.

Caption: Circuit Breaker
Primary Injection Test Modes
You can choose different injection test sets according to the functions you are testing. For instance, you will use long-time and short-time delays to test the circuit breaker’s overcurrent protection features.
Long-time delay and pickup
The feature of long-time delay provides overload protection. For this, you will set the pickup time according to the continuous current rating.
Then, you will inject the test current that is three times the long-time pickup. Moreover, apply the current from each pole and record the trip time.
Record the results and create a time-current curve out of the found data. Compare the readings with the data manufacturers have provided.
If the values you found are near the standard ratings, you are good to go. Otherwise, you have to replace the equipment.
Remember, you will record the trip time in seconds.
Short-time delay and pickup
The short-term delay feature protects the equipment from short-circuiting or any other faults provided by an intentional delay.
Here, you will inject a test current 1.5 or 2.5 times of short-time pickup, multiple long-time pickups. Moreover, apply the current from each pole and record the trip time.
Next, compare the readings with the data manufacturers have given in the manual. Record the results and create a time-current curve out of the found data. In this case, you will record the trip time in milliseconds or cycles.
Instantaneous pickup
The instantaneous trip feature also protects the equipment from short-circuit or fault conditions. Still, you do not need to provide any time delay. In this test, you will inject instant current pulses with increasing magnitude. Apply the current from each pole until the circuit breaker trips.
You will keep the starting pulse on about 70% of the expected pick-up and record the value when the circuit breaker trips. In this case, manufacturers typically provide tolerance of about 10% to 25% on the pickup.
Ground-fault delay and pickup
The ground fault pickup protects against ground faults. Here, you will inject a test current 1.5 or 2.5 times the pickup. Additionally, the test current is a 20-60% fraction of the continuous current rating value.
In a real environment, you will perform this test for service entrances by the National Electrical Code (NEC ).
How Do Secondary Injection Tests Work?
Primary injection test and secondary injection test sets work identically to each other. For both electrical tests, you will inject the calculated amount of current through the breaker. Next, measure the time it will take to trip the breaker.
Secondary Injection Test Modes
You can perform secondary injection tests on electronic trip devices and solid-state trip units using different test modes depending on your desired accuracy and outcome of the test.
No Trip Mode
You can test the protective features of an electronic trip device; however, it won’t send a trip signal to the breaker’s trip actuator.
You can perform this test while the breaker is energized and conveying load current since a no-strip test will not cause the breaker to open.
The protective functions of an electronic circuit are tested similarly to the no-trip test. However, the trip unit will signal the breaker’s trip actuator.
Therefore, the circuit breaker will open, so trip mode tests are normally done only when the circuit breaker is removed from its compartment, meaning it’s disconnected from the switchgear bus.
Self-Test Mode
Some modern protective relays and solid-state trip units feature integrated self-test functions that don’t need a separate test kit.
Tri-unit self-tests are undoubtedly easier to perform than other tests and can be done more frequently.
A trip test is ideally suited for troubleshooting a suspected breaker malfunction.
Similar to secondary current injection tests, the self-test functions don’t verify the performance of the circuit breaker sensors and associated current wiring.
Additionally, some components of the trip unit that convey secondary current can’t be functionally tested with self-test.
Hence why occasionally self tests are accompanied by secondary injection tests or primary injection tests.
Most modern solid-state trip units constantly execute self-diagnostics checks. Then, any potential issues with the trip unit are normally signaled by a displayed fault message or status lamp.
Also, the trip device might be able to communicate its fault condition or alarm through a digital communication system or built-in relay contact.
Primary vs Secondary Injection tests: Differences and Similarities
conclusion.
As the breakers may be magnetic or thermal, you will perform some electrical tests. However, the method will differ slightly. You can choose primary injection test sets or secondary inject test sets. Both to test the trip functions of the breakers. Here at Cloom, we offer custom wiring assembly with attention to each detail so that your wiring is easy to check and maintain. Please fill out the form and contact our team now.

Hey, I am John, General manager of Cloom and OurPCB.
I am a responsible, intelligent and experienced business professional with an extensive background in the electronics industry.
Reach me at [email protected] to get a quote for your projects.

Enjoy a free sample worth up to $100! Explore our custom services now. Leave your email, and we’ll get in touch!
Get A QUICK QUOTE
Fill in your details and we’ll get back to you in 24 Hours.

CS Electrical & Electronics
Circuit Breaker Testing, Top 10 Types Of Testing On Circuit Breakers

Hello guys, welcome back to my blog. In this article, I will discuss the top types of testing on circuit breakers or circuit breaker testing, why it is conducted, the benefits of circuit breaker testing.
If you have any doubts related to electrical, electronics, and computer science, then ask questions . You can also catch me @ Instagram – Chetan Shidling.
Also, read:
- Difference Between Hydrogen And Lithium, Future Of Electric Vehicle
- What Is Reactor, Types Of Reactors Used In Power Systems, Applications
Top 10 Amazing Autonomous Vehicles Makers That Will Attract You
Circuit Breaker Testing
It is conducted to ensure that the circuit breaker works efficiently under all conditions. Before using a circuit breaker at different places there are many tests conducted on it, such as:
01. Mechanical Test
It’s a mechanical ability test in which the breaker is repeatedly opened and closed. A circuit breaker must close and open at the correct rate and perform its assigned duty and function without fail.
02. Thermal Test
Circuit breakers are subjected to thermal tests to determine their thermal behavior. Due to the streaming of rated current through its pole in a rated condition, the breaker under test exhibits steady-state temperature rises. The temperature rise for rated current should not exceed 40° for normal currents less than 800A and 50° for normal currents 800A and above.
03. Dielectric Test
The purpose of this test is to determine the power frequency and impulsive voltage withstand capabilities. On a new circuit breaker, power frequency tests are retained, the test voltage varies with the circuit breaker’s rated voltage. In impulse testing, a certain value of impulse voltage is applied to the breaker. Outdoor circuits are subjected to both dry and wet testing.
04. Short-Circuit Test
In short-circuit test laboratories, circuit breakers are subjected to abrupt shortcircuits, and oscillograms are obtained to determine the behavior of the circuit breakers at the moment of switching in, during contact breaking, and after the arc extinction. The producing and breaking currents, as well as symmetrical and asymmetrical restriking voltages, are analyzed in the oscillograms, and switchgear is occasionally tested in underrated settings.
05. Circuit Breaker Trip Test
It is feasible to identify whether there are mechanical or electrical concerns present by analyzing the current utilized by the trip coil during the circuit breaker’s operation. In many circumstances, such problems may be pinpointed to help in the discovery of the main cause. Detecting issues with tripping batteries can be done by monitoring the voltage of the tripping supply during the operation.
06. Insulation Resistance Test
Load and line conductors should be separated for individual breaker resistance testing. If the test readings aren’t separated, they’ll additionally include the features of the linked circuit. To guarantee that the insulating material that makes up the molded case breakers is operating correctly, resistance testing is required. Equipment called a megger is used to test for insulating resistance.
A megger instrument tests the resistance within the insulation on a specific wire or winding by applying a specified DC voltage to it for a set amount of time. When there are no reports of potential changes, it is critical to use voltage since the resistance measured with an ohmmeter may differ. It should also be noted that if you apply a voltage that is more than the insulation’s ability to bear, the insulation may be damaged.
07. Connection Tests
Connection testing is necessary to ensure that a suitable electrical connection is present and to identify overheated traces indicated by a color difference. To avoid and decrease overheating, electrical connections to the CB must be correctly fitted.
08. Contact Resistance Test
After prolonged use, normal wear and tear of contacts within the CB occur. Quantifying the resistance across each pole of the circuit breaker is a simple way to find evidence of weakening inside the breaker. If there are significant millivolt dips across the breaker, this indicates abnormal conditions within the CB, such as contact erosion and contamination. The contact resistance test is crucial for determining whether or not a circuit breaker is still functional.
09. Overload Tripping Test
Check for overload tripping components of CBS by putting 300 percent of the breaker rating into each pole of the circuit breaker and seeing if it opens right away. The goal is to determine whether or not the circuit breaker will activate. For permissible trip times for the overload tripping test, consult the NETA guidelines. It is best to reference the manufacturer’s instructions while trying to figure out tripping characteristics.
10. Instantaneous Magnetic Tripping
Instead of determining the precise value at which the instantaneous magnetic feature performs, it is more important to determine if the magnetic feature is functional and will trip the circuit breaker during normal tests.
Benefits of Circuit Breaker Testing
- On-site performance is quick and simple.
- Circuits can be checked both with and without a load.
- The performance of the entire tripping cycle is evaluated.
- The total timing of the tripping system is tested.
- Determines the necessity for maintenance.
- It’s all part of a larger diagnostic maintenance routine.
- Find early warning signs of potential issues.
- Other than picking up pieces, stay away from them.
- Create a database of test records for trending.
- Identify the negative performers
To summarise, Circuit Breaker Testing is used to evaluate the performance of each switching system as well as the programming of the overall tripping system. Circuit breaker testing is necessary to guarantee that this critical link in the power asset chain operates safely and reliably
I hope this article may help you all a lot. Thank you for reading.
- 10 Tips To Maintain Battery For Long Life, Battery Maintainance
- 10 Tips To Save Electricity Bills, Save Money By Saving Electricity
- 100 (AI) Artificial Intelligence Applications In The Automotive Industry
- 100 + Electrical Engineering Projects For Students, Engineers
- 1000+ Control System Quiz, Top MCQ On Control System
- 1000+ Electrical Machines Quiz, Top MCQs On Electrical Machines
- 1000+ MATLAB Simulink Projects For MTech, Engineering Students
- 50 Tips To Save Electricity At Home, Shop, Industry, Office
Related Posts

Siemens Hiring Software Engineers For Experienced Professional
Hello guys, welcome back to my blog. Here I will share the link of Siemens hiring software engineers for experienced…

Hello guys, welcome back to my blog. In this article, I will discuss the top 10 amazing autonomous vehicles makers…

What Is Round Robin In OS, Explanation, Source Code, Steps
Hello guys, welcome back to our blog. Here in this article, we will discuss what is round robin in an…
WhatsApp us
What is a Shunt Trip Test?
We commonly receive this question and it is almost always generated after the building receives an Inspection Report from the City or State of Washington. For example, a correction on the Inspection Report may read like this: WAC 296-96-00675(8): Perform annual test of elevator shunt-trip device. Test is to include heat detectors or flow switches.
So what is it? When it comes to elevators, a shunt-trip device is required when water from sprinklers could cause unsafe elevator operation. To simplify, if there are sprinklers in your machine room or elevator hoistway, you have a shunt-trip device. Heat detectors are located in the hoistway and/or machine room. If those detectors are initiated, the fire panel will send a signal to the shunt-trip device. This will remove power from the elevator, stopping it wherever it is, so that it will not malfunction when the sprinkler discharges.

1. The initiating devices (heat detectors) and shunt-trip will need to be tested. Generally, this is done during your annual building confidence testing.
A fire/life safety contractor will test the heat and smoke detectors.
A Class 1 electrician is needed to test the shunt-trip.
2. An elevator mechanic is only needed to provide access if the heat detectors are located in the hoistway. If devices are only in the machine room, an elevator mechanic is not required. Often, building owners prefer to have an elevator mechanic onsite in case the elevator does not reset after the test.
3. Once complete, the test should be signed off by the person who performed the test. The form should be conspicuously posted in the elevator machine room. SEE THE EXAMPLE FORM ABOVE. If not, it can be found here: Hydraulic or Traction . And finally, be sure to notify the City or State when all discrepancies have been completed.
If you really want to get into the weeds, the WAC references the elevator code (Specifically, ASME A17.1, 8.6.4.19.6). It states: At least once each year, the fire alarm initiating devices associated with elevator recall and shunt trip initiating devices shall be tested to ensure they are still properly interfaced with the elevator control. Deficiencies shall be corrected. A record of findings shall be available to elevator personnel and the authority having jurisdiction. This test applies to electric and hydraulic elevators.
In short, if you are written up for testing of initiating and/or shunt-trip devices, you need to call a fire/life safety contractor and/or electrician and possibly your elevator service provider.
Still have questions, we’re happy to help! Call or email our Chief Problem Solver, Sean (206) 482-5119.
There is nothing that Sean enjoys more than helping a customer solve an elevator issue. Since 2008, he has witnessed a deterioration in the services provided throughout the industry. Sean prides himself on being responsive and honest. He takes the time to educate elevator owners and help them understand their options. After spending time at various elevator companies, Sean joined Washington Elevator because he believes building owners and managers crave a company focused on people, not profits.
With more than 15 years of elevator experience, Sean’s goal is to proactively address all elevator issues so that you can focus on your business.
When Sean isn’t helping customers, you can find him playing on the soccer field, cheering on the Sounders and enjoying activities with his wife and their two young kids.
On behalf of our Washington Elevator team, Happy Thanksgiving.
Seattle ronald mcdonald house partnership - serving more than just french fries..
- Auto Insurance Best Car Insurance Cheapest Car Insurance Compare Car Insurance Quotes Best Car Insurance For Young Drivers Best Auto & Home Bundles Cheapest Cars To Insure
- Home Insurance Best Home Insurance Best Renters Insurance Cheapest Homeowners Insurance Types Of Homeowners Insurance
- Life Insurance Best Life Insurance Best Term Life Insurance Best Senior Life Insurance Best Whole Life Insurance Best No Exam Life Insurance
- Pet Insurance Best Pet Insurance Cheap Pet Insurance Pet Insurance Costs Compare Pet Insurance Quotes
- Travel Insurance Best Travel Insurance Cancel For Any Reason Travel Insurance Best Cruise Travel Insurance Best Senior Travel Insurance
- Health Insurance Best Health Insurance Plans Best Affordable Health Insurance Best Dental Insurance Best Vision Insurance Best Disability Insurance
- Credit Cards Best Credit Cards 2024 Best Balance Transfer Credit Cards Best Rewards Credit Cards Best Cash Back Credit Cards Best Travel Rewards Credit Cards Best 0% APR Credit Cards Best Business Credit Cards Best Credit Cards for Startups Best Credit Cards For Bad Credit Best Cards for Students without Credit
- Credit Card Reviews Chase Sapphire Preferred Wells Fargo Active Cash® Chase Sapphire Reserve Discover It® Cash Back Discover It® Student Chrome Discover It® Student Cash Back Chase Ink Business Unlimited American Express Blue Business Plus
- Credit Card by Issuer Best Chase Cards Best Discover Cards Best American Express Cards Best Visa Credit Cards Best Bank of America Credit Cards
- Credit Score Best Credit Monitoring Services Best Identity Theft Protection
- CDs Best CD Rates Best No Penalty CDs Best Jumbo CD Rates Best 3 Month CD Rates Best 6 Month CD Rates Best 9 Month CD Rates Best 1 Year CD Rates Best 2 Year CD Rates Best 5 Year CD Rates
- Checking Best High-Yield Checking Accounts Best Checking Accounts Best No Fee Checking Accounts Best Teen Checking Accounts Best Student Checking Accounts Best Joint Checking Accounts Best Business Checking Accounts Best Free Checking Accounts
- Savings Best High-Yield Savings Accounts Best Free No-Fee Savings Accounts Simple Savings Calculator Monthly Budget Calculator: 50/30/20
- Mortgages Best Mortgage Lenders Best Online Mortgage Lenders Current Mortgage Rates Best HELOC Rates Best Mortgage Refinance Lenders Best Home Equity Loan Lenders Best VA Mortgage Lenders Mortgage Refinance Rates Mortgage Interest Rate Forecast
- Personal Loans Best Personal Loans Best Debt Consolidation Loans Best Emergency Loans Best Home Improvement Loans Best Bad Credit Loans Best Installment Loans For Bad Credit Best Personal Loans For Fair Credit Best Low Interest Personal Loans
- Student Loans Best Student Loans Best Student Loan Refinance Best Student Loans for Bad or No Credit Best Low-Interest Student Loans
- Business Loans Best Business Loans Best Business Lines of Credit Apply For A Business Loan Business Loan vs. Business Line Of Credit What Is An SBA Loan?
- Investing Best Online Brokers Top 10 Cryptocurrencies Best Low-Risk Investments Best Cheap Stocks To Buy Now Best S&P 500 Index Funds Best Stocks For Beginners How To Make Money From Investing In Stocks
- Retirement Best Roth IRAs Best Gold IRAs Best Investments for a Roth IRA Best Bitcoin IRAs Protecting Your 401(k) In a Recession Types of IRAs Roth vs Traditional IRA How To Open A Roth IRA
- Business Formation Best LLC Services Best Registered Agent Services How To Start An LLC How To Start A Business
- Web Design & Hosting Best Website Builders Best E-commerce Platforms Best Domain Registrar
- HR & Payroll Best Payroll Software Best HR Software Best HRIS Systems Best Recruiting Software Best Applicant Tracking Systems
- Payment Processing Best Credit Card Processing Companies Best POS Systems Best Merchant Services Best Credit Card Readers How To Accept Credit Cards
- More Business Solutions Best VPNs Best VoIP Services Best Project Management Software Best CRM Software Best Accounting Software
- Debt relief Best debt management Best debt settlement Do you need a debt management plan? What is debt settlement? Debt consolidation vs. debt settlement Should you settle your debt or pay in full? How to negotiate a debt settlement on your own
- Debt collection Can a debt collector garnish my bank account or my wages? Can credit card companies garnish your wages? What is the Fair Debt Collection Practices Act?
- Bankruptcy How much does it cost to file for bankruptcy? What is Chapter 7 bankruptcy? What is Chapter 13 bankruptcy? Can medical bankruptcy help with medical bills?
- More payoff strategies Tips to get rid of your debt in a year Don't make these mistakes when climbing out of debt How credit counseling can help you get out of debt What is the debt avalanche method? What is the debt snowball method?
- Manage Topics
- Investigations
- Visual Explainers
- Newsletters
- Abortion news
- Climate Change
- Corrections Policy
- Sports Betting
- Coach Salaries
- College Basketball (M)
- College Basketball (W)
- College Football
- Concacaf Champions Cup
- For The Win
- High School Sports
- H.S. Sports Awards
- Scores + Odds
- Sports Pulse
- Sports Seriously
- Women's Sports
- Youth Sports
- Celebrities
- Entertainment This!
- Celebrity Deaths
- Policing the USA
- Women of the Century
- Problem Solved
- Personal Finance
- Consumer Recalls
- Video Games
- Product Reviews
- Home Internet
- Destinations
- Airline News
- Experience America
- Great American Vacation
- Ingrid Jacques
- Nicole Russell
- Meet the Opinion team
- How to Submit
- Obituaries Obituaries
- Contributor Content Contributor Content
Personal Loans
Best personal loans
Auto Insurance
Best car insurance
Best high-yield savings
CREDIT CARDS
Best credit cards
Advertiser Disclosure
Blueprint is an independent, advertising-supported comparison service focused on helping readers make smarter decisions. We receive compensation from the companies that advertise on Blueprint which may impact how and where products appear on this site. The compensation we receive from advertisers does not influence the recommendations or advice our editorial team provides in our articles or otherwise impact any of the editorial content on Blueprint. Blueprint does not include all companies, products or offers that may be available to you within the market. A list of selected affiliate partners is available here .
Travel insurance
What is trip interruption insurance?
Mandy Sleight

Heidi Gollub
“Verified by an expert” means that this article has been thoroughly reviewed and evaluated for accuracy.

Alyce Meserve
Published 5:00 a.m. UTC Aug. 13, 2024
- path]:fill-[#49619B]" alt="Facebook" width="18" height="18" viewBox="0 0 18 18" fill="none" xmlns="http://www.w3.org/2000/svg">
- path]:fill-[#202020]" alt="Email" width="19" height="14" viewBox="0 0 19 14" fill="none" xmlns="http://www.w3.org/2000/svg">
Editorial Note: Blueprint may earn a commission from affiliate partner links featured here on our site. This commission does not influence our editors' opinions or evaluations. Please view our full advertiser disclosure policy .

Nicoletaionescu, Getty Images
- Trip interruption insurance is typically included in a comprehensive travel insurance policy.
- If you have to cut your trip short for a reason listed in your policy, trip interruption coverage can reimburse you for unused, nonrefundable, prepaid travel expenses.
- Trip interruption coverage can also reimburse additional expenses you pay to go home early, such as a new one-way economy plane ticket.
A comprehensive travel insurance policy typically includes the trip interruption insurance benefit. If your trip has to be cut short for a covered reason, trip interruption coverage can help you recoup nonrefundable travel expenses and additional transportation expenses to get you home early.
How trip interruption insurance works
Trip interruption coverage is a post-departure benefit that will reimburse you for unused, prepaid, nonrefundable expenses if you have to shorten your trip for a covered reason. When a covered event occurs, you can file a claim under your trip interruption benefit for the unused expenses, plus eligible extra costs like a new flight home and local transportation to the airport.
For example, let’s say you and your friend are soaking up the rays with a drink in hand, staring out at the beautiful blue Caribbean Sea. Two days into your five-day beach vacation, an unforeseen hurricane slams into the island, causing your accommodations to lose power.
Since your destination is now uninhabitable because of a natural disaster and this is a covered reason to end your trip early, you can get reimbursed for the rest of your unused, prepaid and nonrefundable trip costs. You can also claim costs incurred from changing your original return flight home.
Do I need trip interruption insurance?
Travel is expensive, costing an average of $6,878 for a 16-day trip, according to Squaremouth data. If you have to interrupt your trip to return home early and don’t have a travel protection plan, you could lose a lot of money.
If you have to return from a trip early, trip interruption coverage is often the only way to recoup financial losses.
“Trip interruption is often used because a traveler’s family member gets sick or passes away and the traveler decides to come home early,” said Angela Borden, Product Specialist at Seven Corners. “Having this benefit removes a lot of the stress around what to do when the unexpected happens.”
Other common reasons you might use trip interruption coverage are if you or your traveling companion become seriously injured or sick during your journey or if inclement weather occurs en route to or while you’re at your destination.
What does trip interruption insurance cover?
If you must end your trip early for a covered reason, trip interruption coverage can provide reimbursement for:
- Unused, prepaid trip costs or deposits that aren’t refundable, including excursions, tours and entry tickets.
- Additional, required accommodation fees, such as a single supplement that a cruise line may charge if you prepaid for double occupancy and your traveling companion must interrupt their trip because of an unforeseen event.
- Reasonable transportation costs you have to pay to return home, or to catch up to your trip.
Covered reasons can vary by insurer and travel insurance policy, but typically include:
- You or your traveling companion developing a medical condition or becoming injured or ill after starting your trip.
- A non-traveling family member getting an injury, illness or medical condition that is life-threatening or requires hospitalization.
- You, your traveling companion or an immediate family member dying during your trip.
- You or your traveling companion needing to medically quarantine during your travels.
- You being required to attend jury duty or other legal proceedings during your travel dates.
- Your primary residence or destination becoming uninhabitable following a natural disaster, fire, flood or burglary.
- A terrorist incident within 100 miles of where you’re traveling.
- Government authorities ordering a mandatory evacuation of your destination.
- A mechanical failure, unplanned strike, severe weather or natural disaster that prevents the common carrier you’re traveling on from getting you to your original destination within a specific time frame.
To qualify for reimbursement through trip interruption insurance, you should notify travel suppliers, such as the hotel, airline or cruise ship, as quickly as possible that your travel plans will be interrupted. If a severe injury or illness prevents you from notifying travel suppliers, notify them as soon as you are able.
What is not covered by trip interruption insurance?
It’s a good idea to review your plan document for the full list of what’s covered and not covered before your trip departure. “If a reason isn’t specifically named in the plan, then it won’t be covered,” said Stan Sandberg, co-founder of TravelInsurance.com.
“The trip interruption benefit does not cover losses resulting from the insured’s choices, such as deciding to cut a trip short due to dissatisfaction with the destination, accommodations or elective medical treatment,” said Chris Carnicelli, CEO of Generali Global Assistance .
There are a number of things that trip interruption insurance coverage might also exclude, like:
- Normal pregnancy complications or childbirth.
- Pre-existing medical conditions.
- Committing a criminal or illegal act.
- Getting injured or sick while under the influence of alcohol or drugs.
- Attempted suicide, intentional injury and suicide.
- Injuries sustained during an adventure activity, such as skydiving, bungee jumping, canoeing, kayaking, mountaineering or playing sports.
Exclusions and limitations can differ by insurance company and plan type. The policy will only cover up to the maximum benefit amount for each insurance coverage in the plan documents.
There are sometimes exceptions to the exclusions, such as time-sensitive benefits like a pre-existing condition waiver. For instance, some travel insurance policies will cover claims related to pre-existing conditions if you purchase them within a specific time frame, usually 14 to 21 days of making your initial trip deposit, insure the total trip cost and are medically able to travel on the day you buy the policy.
You can also purchase an adventure activity-specific travel insurance policy if you plan to participate in activities a standard policy won’t cover. Many policies, such as those sold by World Trips , AIG Travel , Travelex , Tin Leg, and World Nomads , offer adventure activity add-ons.
How much does trip interruption insurance cost?
Trip interruption insurance is a part of a complete travel insurance plan, so it does not have a separate cost. “Generally, a comprehensive travel insurance policy will cost anywhere from 4% to 10% of your total prepaid, nonrefundable trip cost,” said Suzanne Morrow, chief executive officer of InsureMyTrip.
The cost of a travel insurance policy will vary and is based on the:
- Ages and number of travelers.
- Total trip cost.
- Travel insurance company and plan you choose.
- Any optional coverages you add to the plan.
For example, some plans offer an optional upgrade called “interruption for any reason” (IFAR) coverage. IFAR allows you to interrupt your trip for any reason without exclusions. Depending on the travel insurance plan you buy, IFAR coverage may reimburse you up to 50% or 75% of your unused prepaid, nonrefundable trip arrangements. If you’re interested in IFAR coverage, look at the top-rated WorldTrips Atlas Journey Elevate or Travel Insured International Worldwide Trip Protector plans.
How do I get trip interruption insurance?
Trip interruption insurance is included in comprehensive travel insurance plans. You can purchase a policy directly from the travel insurance company or through a travel insurance comparison website. Some credit card issuers also provide coverage for trip interruption.
For instance, the Chase Sapphire Reserve credit card will reimburse up to $10,000 per person and $20,000 per trip of eligible prepaid, nonrefundable trip expenses. American Express offers similar trip interruption and trip cancellation coverage for its members.
Coverages, limitations and exclusions will vary by insurance company and credit card issuer. Be sure to compare policy details to ensure you understand what’s covered to find the right policy to protect yourself financially.
Trip delay vs. trip cancellation vs. trip interruption insurance
The main difference between trip delay, interruption and trip cancellation insurance is when coverage kicks in.
“Trip cancellation covers you up to your departure date. Once you’ve left on your trip, trip interruption coverage will cover your insured trip cost for the duration of your trip. Trip delay coverage handles the travel to and from your destination,” said Sandberg.
A comprehensive travel insurance plan will bundle these three coverage types, along with others such as travel medical insurance , in a single plan. Travel insurance plans will have varying compensation amounts, eligibility requirements and coverage limits for each coverage type.
See how travel insurance protects your trip investment: What does travel insurance cover?
What are the benefits of trip interruption insurance?
Trip interruption insurance can provide peace of mind and financial protection if you have to shorten your trip because of an unforeseen event such as a severe injury or the death of a loved one back home. Some travel insurance plans will cover up to 200% of your total trip cost if you need to interrupt your trip for a covered reason, which can reimburse you for the extra cost of changing your flight itinerary if you have to fly home early.
If you purchase an IFAR upgrade, you have even more financial security. Since there are no covered reasons you have to meet to use your trip interruption benefits, you could cut your trip short and potentially claim up to 75% of your unused, prepaid, nonrefundable travel arrangements.
Things to consider when choosing trip interruption insurance
Different travel insurance policies have different coverages and benefit limits. Comparing travel insurance plans and insurers can help you find the best policy for your travel needs. You can also narrow your choices by comparing exclusions, eligibility requirements and other travel insurance benefits.
“On some economy plans, trip interruption may be included at 100% of the trip cost with fewer covered reasons,” Morrow said, “while higher-end plans can cover up to 200% of the trip cost and have more covered reasons.”
If you want maximum flexibility, the additional cost of IFAR coverage may be worth the extra expense, though few travel insurance plans offer this upgrade.
Expert tip: It’s wise to buy travel insurance when you make your first trip deposit. Buying early may make you eligible for benefits like CFAR, IFAR and a pre-existing medical condition waiver. You can always increase your policy limit at a later date if your final trip costs exceed your initial policy coverage.
Frequently asked questions (FAQs)
Trip interruption benefits will reimburse you for lost prepaid, nonrefundable trip costs if you have to cut your trip short or are delayed starting it for a covered reason. These benefits are part of a travel insurance policy, usually including coverage for medical evacuation and emergencies, trip delay insurance, and lost, stolen, or delayed luggage.
Valid reasons for trip interruption vary by travel insurance policy . Common covered reasons include a traveler’s injury, illness or death during the trip, severe weather, natural disasters, unplanned strikes and terrorism.
Trip interruption insurance can reimburse nonrefundable, prepaid expenses, like cruise excursions, guided tours, plane tickets or lodging, if you need to cut your trip short for reason listed in your policy. It can also cover a new one-way economy ticket home.
Blueprint is an independent publisher and comparison service, not an investment advisor. The information provided is for educational purposes only and we encourage you to seek personalized advice from qualified professionals regarding specific financial decisions. Past performance is not indicative of future results.
Blueprint has an advertiser disclosure policy . The opinions, analyses, reviews or recommendations expressed in this article are those of the Blueprint editorial staff alone. Blueprint adheres to strict editorial integrity standards. The information is accurate as of the publish date, but always check the provider’s website for the most current information.

Mandy is an insurance writer who has been creating online content since 2018. Before becoming a full-time freelance writer, Mandy spent 15 years working as an insurance agent. Her work has been published in Bankrate, MoneyGeek, The Insurance Bulletin, U.S. News and more.
Heidi Gollub is the USA TODAY Blueprint managing editor of insurance. She was previously lead editor of insurance at Forbes Advisor and led the insurance team at U.S. News & World Report as assistant managing editor of 360 Reviews. Heidi has an MBA from Emporia State University and is a licensed property and casualty insurance expert.
Alyce Meserve is an experienced insurance, personal finance and travel writer. Alyce is a licensed insurance professional in life, health and property and casualty, and holds an Executive Certificate in Financial Planning from Duke University.

10 worst US airports for flight cancellations this week
Travel insurance Heidi Gollub

How travel insurance works for baggage
Travel insurance Erica Lamberg

What does travel delay insurance cover?
Travel insurance Mandy Sleight

Travel insurance for UK trips
Travel insurance Amy Fontinelle

10 worst US airports for flight cancellations last week

What are your rights during an airline meltdown?

Hurricanes and travel insurance

Generali Global Assistance travel insurance review 2024
Travel insurance Jennifer Simonson

Travel insurance for vacations to Italy
Travel insurance Timothy Moore

Tricky travel insurance questions answered by experts

Survey: 20% of Americans have had a life-changing experience while traveling

Our travel insurance ratings methodology

AXA Assistance USA travel insurance review 2024

Cheapest travel insurance of August 2024

Average flight costs: Travel, airfare and flight statistics 2024
COMMENTS
Trip test the quick-opening device, if installed, according to the manufacturer's instructions. These steps can usually be followed once step 7 is performed (13.4.5.2.4): Open the valve for the quick-opening device feed line. Open the inspector's test valve and record the time it takes to trip. A rush of air from the device indicates that ...
Circuit Breaker Trip Test. By analysing the current consumed by the trip coil during the circuit breaker's operation, it is possible to determine whether there are mechanical or electrical issues present. In many cases, such issues can be localised to aid in finding the root cause. Optionally, monitoring the tripping supply's voltage during ...
The system must trip in under 60 seconds. After the test is completed, the low points are drained and the valve is reset. Full Trip Test. A full flow trip test is required by NFPA25 to be performed every 3 years. During the test, the control valve is opened completely to allow the flow of water. The system must trip in under 60 seconds.
1). First Trip Test. A circuit breaker's initial open operation after a long idle period is a good indicator of its condition. This test involves connecting and measuring the circuit breaker while it is in service. No test connections are established outside the control cabinet.
When the test button is pushed the device simulates the defect that it s designed to protect against, and trips the breaker to the middle position if functioning properly. To reset, you push the breaker switch all the way to "OFF" and and then back to "ON.". If nothing happens when the test button is pushed, that means the device is not ...
The test procedure should include testing the ability of the circuit breaker to detect an overcurrent and trip (including the mechanical part). It should also include checking that all settings are consistent with the original design specification, including protected circuit characteristics and selectivity objectives.
Typical On-line Timing Test Report. Figures 2 and 3 show a typical test record of a first trip test. Contact time phase A, B, and C is shown under CT Channels Analysis (30.50, 30.55, and 30.60 ms, respectively). DC nominal control voltage is shown as 124Vdc. The voltage dips to 116 Vdc during breaker trip operation. Open coil current is ...
Dry system valve trip testing can be performed as a partial trip test or as a full flow trip test. The full-flow trip test is conducted every third year with the control valve fully open. The water delivery time to the most remote outlet is compared to the system acceptance results. Longer water delivery times could mean the degradation of the ...
1. REPETITION! The only way to memorize the pre-trip is to repeat it over and over. Start with the engine area and work your way around the truck and finally inside the cab. There is no way around consistent repetition. The more you do it the more you will memorize it. It's just that simple.
The thermomagnetic trip unit consists of two parts: The thermal trip unit - Made up by a bimetal thermal device which actuates the opening of a circuit breaker with a delay depending on the overcurrent value. This trip unit is intended for the protection against overloads. The magnetic trip unit - Made up by an electromagnetic device, with ...
Circuit Breaker Trip Test. By analysing the current consumed by the trip coil during the circuit breaker's operation, it is possible to determine whether there are mechanical or electrical issues present. In many cases, such issues can be localised to aid in finding the root cause. Monitoring the tripping supply's voltage during the ...
The trip unit is the part of the circuit breaker that determines when the contacts will open automatically. In a thermal-magnetic circuit breaker, the trip unit includes elements designed to sense the heat resulting from an overload condition and the high current resulting from a short circuit. In addition, some thermal magnetic circuit ...
The output voltage is selectable from 10 V to 300 V DC or 10 V to 250 V AC (50/60 Hz; true RMS). Minimum trip voltage test of the circuit breaker's coils can be performed in two ways: (POB) menu is brought to the selected coil by pressing (on the POB) button. The voltage level is increased manually until the coil is actuated.
Test for overloaded circuits by resetting your breaker and plugging in devices until it trips again. The device that caused the trip is overloading the circuit. Test for short circuits by resetting your breaker and plugging in items into different sockets. The device or socket that always trips the breaker likely has a short circuit.
First trip testing method for circuit breakers. "First trip" test is important to determine a condition of the coil operating mechanism and give us information how would the circuit breaker perform in a real-life fault situation. monitoring. A circuit breaker spends most of its lifetime conducting a current without any operation.
The waterflow test line is normally linked to the same line, which drains from the valve's intermediate chamber to the velocity drip drain. A check valve stops the test water from entering the intermediate chamber, which can trip the dry pipe valve if the velocity drip drain is also clogged.
The need for inspection of molded case breakers (MCCB) will vary depending on operating conditions. Suggested inspection and testing is defined in ANSI/NEMA AB 4, Guidelines for Inspection and Preventive Maintenance of Molded Case Circuit Breakers Used in Commercial and Industrial Applications. As part of these guidelines, AB 4 also provides ...
In this video, Sam will take you through the steps of performing a trip test 🔄Got a question about living in your Magna home? We've got the answers on our F...
The "trip test" is in essence making sure that the spring mechanism of the breaker switch performs fast enough after receiving the signal to cut off or let in power from the grid. The pass/fail judgement is based on the recorded timing of the control signal that triggers the breaker switch and the recorded timing of the mechanical open ...
A trip test is ideally suited for troubleshooting a suspected breaker malfunction. Similar to secondary current injection tests, the self-test functions don't verify the performance of the circuit breaker sensors and associated current wiring. Additionally, some components of the trip unit that convey secondary current can't be functionally ...
Circuit Breaker Trip Test. It is feasible to identify whether there are mechanical or electrical concerns present by analyzing the current utilized by the trip coil during the circuit breaker's operation. In many circumstances, such problems may be pinpointed to help in the discovery of the main cause. Detecting issues with tripping batteries ...
Secondary Injection Test on Electronic Trip Units. The purpose of this test is to check the healthiness of the electronic trip unit of a breaker. The instrument will automatically generate the required currents for below types of trip (LSIG). Some or all, of the following tests will be conducted depending on what is supported by the trip unit ...
First trip testing methods can provide a real-life operating time which can be compared to the assumed opening times used in an arc flash analysis. It's not unusual for the first trip time of a breaker with 5-10 years of inactivity to be 200-300 milliseconds. After the first trip, it will typically be only 30-50 milliseconds.
In short, if you are written up for testing of initiating and/or shunt-trip devices, you need to call a fire/life safety contractor and/or electrician and possibly your elevator service provider. Still have questions, we're happy to help! Call or email our Chief Problem Solver, Sean (206) 482-5119.
How trip interruption insurance works. Trip interruption coverage is a post-departure benefit that will reimburse you for unused, prepaid, nonrefundable expenses if you have to shorten your trip ...
Definitions. In the most general definition of "Trip-Free," the contacts of the circuit breaker must return to the open position and remain there when an opening operation follows a closing operation, regardless of whether the closing signal, force, or action is maintained. A common variant is called "Electrically Trip-Free.".